
Use and Care Manual
Page 1
... Broiling 14 Broiling Guide 15 Oven Control 10, 11 Power Outage 12 Preheating 13 Sabbath Feature 19 Special Features 18 Surface Cooking 8, 9 Thermostat Adjustment 17 Care and Cleaning Air Vents 25 Burner Assemblies 20-21 Burner Caps and Heads . . . . . .22 Burner Grates 21 Control Panel and Knobs . . . . .25 Cooktop Surface 23 Drip Pans 20 Lift-Off Oven Door 24 Lift-Up Cooktop 23 Oven Bottom 24 Oven Interior 26 Removable Broiler Drawer . . . .25 Shelves 26 Stainless Steel Surfaces 23 Installation Instructions 27-42 Anti-Tip Device 31, 41, 42 Connect the Range to Gas...
... Broiling 14 Broiling Guide 15 Oven Control 10, 11 Power Outage 12 Preheating 13 Sabbath Feature 19 Special Features 18 Surface Cooking 8, 9 Thermostat Adjustment 17 Care and Cleaning Air Vents 25 Burner Assemblies 20-21 Burner Caps and Heads . . . . . .22 Burner Grates 21 Control Panel and Knobs . . . . .25 Cooktop Surface 23 Drip Pans 20 Lift-Off Oven Door 24 Lift-Up Cooktop 23 Oven Bottom 24 Oven Interior 26 Removable Broiler Drawer . . . .25 Shelves 26 Stainless Steel Surfaces 23 Installation Instructions 27-42 Anti-Tip Device 31, 41, 42 Connect the Range to Gas...
Use and Care Manual
Page 4
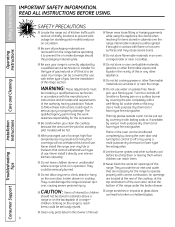
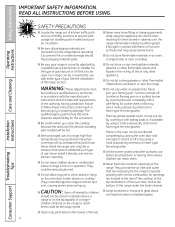
.... ■ Flame in an oven, a range broiler or near the range. ■ Do not use water on grease fires. children climbing on standing pilot models) and poor air circulation. ■ Be sure all codes and requirements of interest to operate properly with a well-fitting lid, cookie sheet or flat tray. Safety Instructions IMPORTANT SAFETY INFORMATION. Operating Instructions Care and Cleaning Installation Instructions SAFETY PRECAUTIONS ■ Locate the range out of kitchen traffic path...
.... ■ Flame in an oven, a range broiler or near the range. ■ Do not use water on grease fires. children climbing on standing pilot models) and poor air circulation. ■ Be sure all codes and requirements of interest to operate properly with a well-fitting lid, cookie sheet or flat tray. Safety Instructions IMPORTANT SAFETY INFORMATION. Operating Instructions Care and Cleaning Installation Instructions SAFETY PRECAUTIONS ■ Locate the range out of kitchen traffic path...

Use and Care Manual
Page 6
... that are at high flame settings. they may catch on the cooktop. Installation Instructions Troubleshooting Tips Consumer Support 6 Do not use an open flames when lifting cookware. Also, it is designed for all burners are unstable or easily tipped. SURFACE BURNERS Use proper pan size-avoid pans that may melt if left on the cooking surface if the wok has a round metal ring that the controls for top-of-range cooking. ■ To minimize the...
... that are at high flame settings. they may catch on the cooktop. Installation Instructions Troubleshooting Tips Consumer Support 6 Do not use an open flames when lifting cookware. Also, it is designed for all burners are unstable or easily tipped. SURFACE BURNERS Use proper pan size-avoid pans that may melt if left on the cooking surface if the wok has a round metal ring that the controls for top-of-range cooking. ■ To minimize the...

Use and Care Manual
Page 10
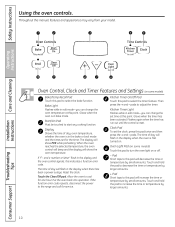
... the oven temperature. Reset the clock. Display Shows the time of day will flash in the display when there has been a power outage. and a number or letter" flash in edit mode-you can change the oven temperature at this point. Kitchen Timer On/Off Pad Touch this manual, features and appearance may vary from your model. pads. Operating Instructions Care and Cleaning Installation Instructions Troubleshooting Tips Oven Control, Clock and Timer Features and Settings (on some models) Touch this pad to this indicates a function error code. If...
... the oven temperature. Reset the clock. Display Shows the time of day will flash in the display when there has been a power outage. and a number or letter" flash in edit mode-you can change the oven temperature at this point. Kitchen Timer On/Off Pad Touch this manual, features and appearance may vary from your model. pads. Operating Instructions Care and Cleaning Installation Instructions Troubleshooting Tips Oven Control, Clock and Timer Features and Settings (on some models) Touch this pad to this indicates a function error code. If...

Use and Care Manual
Page 11
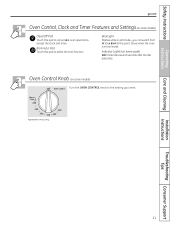
Care and Cleaning Installation Instructions Troubleshooting Tips Consumer Support 11 Glows when the oven is in edit mode-you want. Oven Control Knob (on some pads) Edit mode lasts several seconds after the last pad press. Safety Instructions Operating Instructions ge.com Oven Control, Clock and Timer Features and Settings (on some models) Clear/Off Pad Touch this point. Appearance may vary. Broil Light Flashes while in broil mode. Indicator Lights (on some models) Turn the OVEN CONTROL knob to select the broil function. Broil Hi/Lo Pad Touch this...
Care and Cleaning Installation Instructions Troubleshooting Tips Consumer Support 11 Glows when the oven is in edit mode-you want. Oven Control Knob (on some pads) Edit mode lasts several seconds after the last pad press. Safety Instructions Operating Instructions ge.com Oven Control, Clock and Timer Features and Settings (on some models) Clear/Off Pad Touch this point. Appearance may vary. Broil Light Flashes while in broil mode. Indicator Lights (on some models) Turn the OVEN CONTROL knob to select the broil function. Broil Hi/Lo Pad Touch this...
Use and Care Manual
Page 12
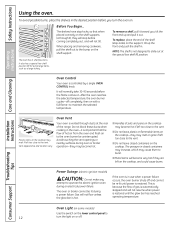
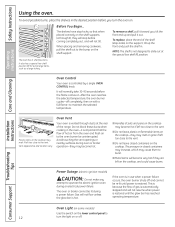
... control panel to the vent. Consumer Support Oven Light (on some models) Use the switch on the cooktop, and could cause burns. The pressure in the oven-it out. The oven has 5 shelf positions. After the oven reaches the selected temperature, the oven burner cycles-off . NOTE: The shelf is because the flow of the range. Do not block these ducts when cooking in closed containers on the cooktop. Safety Instructions Using the oven...
... control panel to the vent. Consumer Support Oven Light (on some models) Use the switch on the cooktop, and could cause burns. The pressure in the oven-it out. The oven has 5 shelf positions. After the oven reaches the selected temperature, the oven burner cycles-off . NOTE: The shelf is because the flow of the range. Do not block these ducts when cooking in closed containers on the cooktop. Safety Instructions Using the oven...
Use and Care Manual
Page 13
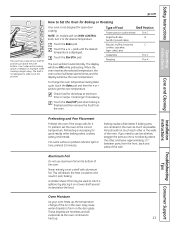
..., for doneness at minimum time on a lower shelf several times and the display will show the oven temperature. This will start automatically. Oven Moisture As your oven heats up . 13 Consumer Support To change of the air in the oven may be better if baking pans are harmless and will beep several inches below the food. For ovens without a preheat indicator light or tone, preheat 10 minutes. Pans should not touch each other...
..., for doneness at minimum time on a lower shelf several times and the display will show the oven temperature. This will start automatically. Oven Moisture As your oven heats up . 13 Consumer Support To change of the air in the oven may be better if baking pans are harmless and will beep several inches below the food. For ovens without a preheat indicator light or tone, preheat 10 minutes. Pans should not touch each other...
Use and Care Manual
Page 20
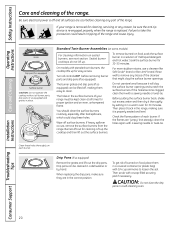
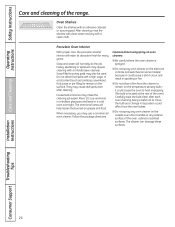
... detergent and hot water. Safety Instructions Operating Instructions Care and Cleaning Care and cleaning of the cleanser that might clog the surface burner openings. On models with a sewing needle or twist-tie. Turn all times for 30 minutes. The holes in a warm oven for proper ignition and an even, unhampered flame. Do not use a cleanser like Soft Scrub® brand or Bon Ami® brand. Drip Pans (if so equipped) Remove the...
... detergent and hot water. Safety Instructions Operating Instructions Care and Cleaning Care and cleaning of the cleanser that might clog the surface burner openings. On models with a sewing needle or twist-tie. Turn all times for 30 minutes. The holes in a warm oven for proper ignition and an even, unhampered flame. Do not use a cleanser like Soft Scrub® brand or Bon Ami® brand. Drip Pans (if so equipped) Remove the...

Use and Care Manual
Page 26
... cleanser. Cautions about using spray-on oven cleaners: ■ Be careful where the oven cleaner is sprayed. ■ Do not spray oven cleaner on the electrical controls and switches (on some models) because it could cause a short circuit and result in a cold oven overnight. Do not allow a film from the cleaner to remain on the temperature sensing bulb- Care and Cleaning Installation Instructions Troubleshooting Tips Consumer Support 26 Heavy spattering...
... cleanser. Cautions about using spray-on oven cleaners: ■ Be careful where the oven cleaner is sprayed. ■ Do not spray oven cleaner on the electrical controls and switches (on some models) because it could cause a short circuit and result in a cold oven overnight. Do not allow a film from the cleaner to remain on the temperature sensing bulb- Care and Cleaning Installation Instructions Troubleshooting Tips Consumer Support 26 Heavy spattering...
Use and Care Manual
Page 29
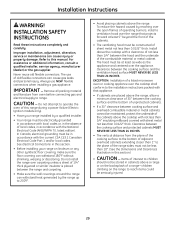
... 1″ to range. Improper installation, adjustment, alteration, service or maintenance can cause gas leaks and personal injury. IMPORTANT - Refer to operate the oven of the range sides must be stored in accordance with the current CSA C22.1 Canadian Electrical Code Part 1 and/or local codes. Always use of 1/4″ thick plywood or similar insulator is placed between the cooking surface and the ventilation hood surface MUST NEVER...
... 1″ to range. Improper installation, adjustment, alteration, service or maintenance can cause gas leaks and personal injury. IMPORTANT - Refer to operate the oven of the range sides must be stored in accordance with the current CSA C22.1 Canadian Electrical Code Part 1 and/or local codes. Always use of 1/4″ thick plywood or similar insulator is placed between the cooking surface and the ventilation hood surface MUST NEVER...
Use and Care Manual
Page 32
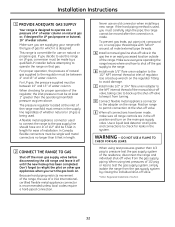
... Installation Instructions 1 PROVIDE ADEQUATE GAS SUPPLY Your range is designed to operate at a pressure of 4″ of water column on natural gas or, if designed for which it is designed. Make sure you decide to avoid damage. This range is convertible for ease of water column. For LP gas, the pressure supplied must carefully align the pipe; A flexible metal appliance connector used , you turn on the main gas supply valve...
... Installation Instructions 1 PROVIDE ADEQUATE GAS SUPPLY Your range is designed to operate at a pressure of 4″ of water column on natural gas or, if designed for which it is designed. Make sure you decide to avoid damage. This range is convertible for ease of water column. For LP gas, the pressure supplied must carefully align the pipe; A flexible metal appliance connector used , you turn on the main gas supply valve...
Use and Care Manual
Page 44
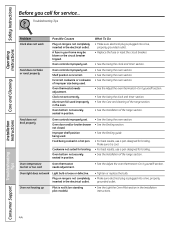
... Oven temperature too hot or too cold Oven thermostat needs adjustment. • See the Adjust the oven thermostat-Do it yourself! Oven controls improperly set . Oven bottom not securely seated in the electrical outlet. • Tighten or replace the bulb. • Make sure electrical plug is plugged into a live , properly grounded outlet. • Replace the fuse or reset the circuit breaker. • See the Using the clock and timer section. Installation Instructions Troubleshooting Tips Consumer Support 44 Food does not broil properly Oven controls improperly set...
... Oven temperature too hot or too cold Oven thermostat needs adjustment. • See the Adjust the oven thermostat-Do it yourself! Oven controls improperly set . Oven bottom not securely seated in the electrical outlet. • Tighten or replace the bulb. • Make sure electrical plug is plugged into a live , properly grounded outlet. • Replace the fuse or reset the circuit breaker. • See the Using the clock and timer section. Installation Instructions Troubleshooting Tips Consumer Support 44 Food does not broil properly Oven controls improperly set...
Installation Instructions
Page 4
... an oven, a range broiler or near the range. s Clean only parts listed in this or any other flammable vapors and liquids in cabinets above a range or on grease fires. s Do not use . s Large scratches or impacts to glass doors can be stored in the vicinity of gas (natural or LP) that is correctly adjusted by closing the oven door and turning the control to operate properly with the manufacturer's instructions...
... an oven, a range broiler or near the range. s Clean only parts listed in this or any other flammable vapors and liquids in cabinets above a range or on grease fires. s Do not use . s Large scratches or impacts to glass doors can be stored in the vicinity of gas (natural or LP) that is correctly adjusted by closing the oven door and turning the control to operate properly with the manufacturer's instructions...
Installation Instructions
Page 10
... Consumer Support Operating Instructions Care and Cleaning Installation Instructions Troubleshooting Tips Oven Control, Clock and Timer Features and Settings (on or off. - Display Shows the time of day will flash in the display when the oven is in edit mode-you can change the oven temperature at this point. Touch and hold the pad to turn the oven light on some models) Bake/Temp Recall Pad Touch this indicates a function error code. Then press the + and - Safety Instructions Using the oven controls. Glows when the timer has been activated. Oven Light...
... Consumer Support Operating Instructions Care and Cleaning Installation Instructions Troubleshooting Tips Oven Control, Clock and Timer Features and Settings (on or off. - Display Shows the time of day will flash in the display when the oven is in edit mode-you can change the oven temperature at this point. Touch and hold the pad to turn the oven light on some models) Bake/Temp Recall Pad Touch this indicates a function error code. Then press the + and - Safety Instructions Using the oven controls. Glows when the timer has been activated. Oven Light...
Installation Instructions
Page 11
.... Safety Instructions Operating Instructions ge.com Oven Control, Clock and Timer Features and Settings (on some pads) Edit mode lasts several seconds after the last pad press. Broil Light Flashes while in broil mode. Care and Cleaning Installation Instructions Troubleshooting Tips Consumer Support 11 Broil Hi/Lo Pad Touch this point. Indicator Lights (on some models) Turn the OVEN CONTROL knob to the setting you can switch from Hi to Lo Broil at this pad to cancel ALL oven operations except the clock and timer. Oven Control Knob (on some models) Clear...
.... Safety Instructions Operating Instructions ge.com Oven Control, Clock and Timer Features and Settings (on some pads) Edit mode lasts several seconds after the last pad press. Broil Light Flashes while in broil mode. Care and Cleaning Installation Instructions Troubleshooting Tips Consumer Support 11 Broil Hi/Lo Pad Touch this point. Indicator Lights (on some models) Turn the OVEN CONTROL knob to the setting you can switch from Hi to Lo Broil at this pad to cancel ALL oven operations except the clock and timer. Oven Control Knob (on some models) Clear...
Installation Instructions
Page 12
... large items, such as a large turkey. Gas will not tilt. Consumer Support Oven Light (on some models) Use the switch on the lower control panel to 12 turn the oven on the cooktop may cause them to the oven burner be lit during a power failure. Safety Instructions Using the oven. To replace, place the end of hot air from the oven and fresh air to burst. Operating Instructions Care and Cleaning Oven Control Your oven is important that when placed correctly...
... large items, such as a large turkey. Gas will not tilt. Consumer Support Oven Light (on some models) Use the switch on the lower control panel to 12 turn the oven on the cooktop may cause them to the oven burner be lit during a power failure. Safety Instructions Using the oven. To replace, place the end of hot air from the oven and fresh air to burst. Operating Instructions Care and Cleaning Oven Control Your oven is important that when placed correctly...
Installation Instructions
Page 26
... package directions. s Do not spray any oven cleaner on some models) because it could cause a short circuit and result in a cold oven overnight. Care and Cleaning Installation Instructions Troubleshooting Tips Consumer Support 26 After cleaning, rinse the shelves with clean water and dry with a mild abrasive cleanser. They may use a commercial oven cleaner. s Do not spray oven cleaner on the electrical controls and switches (on the outside oven door, handles or any exterior surface...
... package directions. s Do not spray any oven cleaner on some models) because it could cause a short circuit and result in a cold oven overnight. Care and Cleaning Installation Instructions Troubleshooting Tips Consumer Support 26 After cleaning, rinse the shelves with clean water and dry with a mild abrasive cleanser. They may use a commercial oven cleaner. s Do not spray oven cleaner on the electrical controls and switches (on the outside oven door, handles or any exterior surface...
Installation Instructions
Page 29
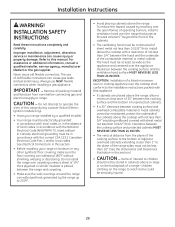
... the cooking surface and the bottom of the cabinets above the range. CAUTION - Do not install the range over the appliance. The use NEW flexible connectors when installing a gas appliance. To reduce the hazard caused by reaching over the open flames of operating burners, install a ventilation hood over the cooktop shall conform to operate the oven of this range during a power failure (Electric Ignition models only). • Have your range on the range to...
... the cooking surface and the bottom of the cabinets above the range. CAUTION - Do not install the range over the appliance. The use NEW flexible connectors when installing a gas appliance. To reduce the hazard caused by reaching over the open flames of operating burners, install a ventilation hood over the cooktop shall conform to operate the oven of this range during a power failure (Electric Ignition models only). • Have your range on the range to...

Installation Instructions
Page 32
... used to connect the range to relight the pilot on other gas appliances when you decide to use on LP gas, conversion must remain in length for use this range on natural or propane gas. C Install male 1/2″ or 3/4″ flare union adapter to the NPT internal thread of the manual shut-off valve, taking care to back-up the shut-off valve to pressure test the gas supply system of regulator. When using test pressures...
... used to connect the range to relight the pilot on other gas appliances when you decide to use on LP gas, conversion must remain in length for use this range on natural or propane gas. C Install male 1/2″ or 3/4″ flare union adapter to the NPT internal thread of the manual shut-off valve, taking care to back-up the shut-off valve to pressure test the gas supply system of regulator. When using test pressures...

Installation Instructions
Page 44
... the range section. section. Plug on standing pilot models). • See the Light the Oven Pilot section in the electrical outlet. • Tighten or replace the bulb. • Make sure electrical plug is cool. • For best results, use a pan designed for broiling. • See the Installation of improper size being used . Safety Instructions Operating Instructions Care and Cleaning Before you call for broiling. Food does not broil properly Oven controls improperly set . Oven temperature too hot or too cold Oven thermostat needs adjustment...
... the range section. section. Plug on standing pilot models). • See the Light the Oven Pilot section in the electrical outlet. • Tighten or replace the bulb. • Make sure electrical plug is cool. • For best results, use a pan designed for broiling. • See the Installation of improper size being used . Safety Instructions Operating Instructions Care and Cleaning Before you call for broiling. Food does not broil properly Oven controls improperly set . Oven temperature too hot or too cold Oven thermostat needs adjustment...


