
Use and Care Manual
Page 1
... Broiling 14 Broiling Guide 15 Oven Control 10, 11 Power Outage 9, 12, 16 Preheating 13 Sabbath Feature 19 Special Features 18 Surface Cooking 8, 9 Thermostat Adjustment 17 Care and Cleaning Air Vents 25 Burner Assemblies 20-21 Burner Caps and Heads . . . . . .22 Burner Grates 21 Control Panel and Knobs . . . . .25 Cooktop Surface 23 Drip Pans 20 Lift-Off Oven Door 24 Lift-Up Cooktop 23 Oven Bottom 24 Oven Interior 26 Racks 26 Removable Broiler Drawer . . . .25 Stainless Steel Surfaces 23 Installation Instructions 27-42 Anti-Tip Device 31, 41, 42 Connect the Range to Gas...
... Broiling 14 Broiling Guide 15 Oven Control 10, 11 Power Outage 9, 12, 16 Preheating 13 Sabbath Feature 19 Special Features 18 Surface Cooking 8, 9 Thermostat Adjustment 17 Care and Cleaning Air Vents 25 Burner Assemblies 20-21 Burner Caps and Heads . . . . . .22 Burner Grates 21 Control Panel and Knobs . . . . .25 Cooktop Surface 23 Drip Pans 20 Lift-Off Oven Door 24 Lift-Up Cooktop 23 Oven Bottom 24 Oven Interior 26 Racks 26 Removable Broiler Drawer . . . .25 Stainless Steel Surfaces 23 Installation Instructions 27-42 Anti-Tip Device 31, 41, 42 Connect the Range to Gas...
Use and Care Manual
Page 3
... grounding of natural gas or LP fuels. Installation Instructions Troubleshooting Tips Consumer Support 3 Do not remove the round grounding prong from the plug. Do not use this appliance. Any adjustment and service should be referred to a qualified technician. ■ Plug your range installed and properly grounded by a qualified installer, in this manual. Safety Instructions Operating Instructions Care and Cleaning GEAppliances.com WARNING! Exposure to such substances. SAFETY PRECAUTIONS Have the installer show you the location of...
... grounding of natural gas or LP fuels. Installation Instructions Troubleshooting Tips Consumer Support 3 Do not remove the round grounding prong from the plug. Do not use this appliance. Any adjustment and service should be referred to a qualified technician. ■ Plug your range installed and properly grounded by a qualified installer, in this manual. Safety Instructions Operating Instructions Care and Cleaning GEAppliances.com WARNING! Exposure to such substances. SAFETY PRECAUTIONS Have the installer show you the location of...
Use and Care Manual
Page 4
... a flaming pan. Turn the controls off or by using a multi-purpose dry chemical or foam-type fire extinguisher. ■ Flame in this kind of a range-children climbing on standing pilot models) will not withstand this Owner's Manual. 4 Troubleshooting Tips Consumer Support Operating Instructions Care and Cleaning Installation Instructions SAFETY PRECAUTIONS ■ Locate the range out of kitchen traffic path and out of the range. Safety Instructions IMPORTANT SAFETY INFORMATION. READ ALL INSTRUCTIONS BEFORE USING. They provide the air inlet...
... a flaming pan. Turn the controls off or by using a multi-purpose dry chemical or foam-type fire extinguisher. ■ Flame in this kind of a range-children climbing on standing pilot models) will not withstand this Owner's Manual. 4 Troubleshooting Tips Consumer Support Operating Instructions Care and Cleaning Installation Instructions SAFETY PRECAUTIONS ■ Locate the range out of kitchen traffic path and out of the range. Safety Instructions IMPORTANT SAFETY INFORMATION. READ ALL INSTRUCTIONS BEFORE USING. They provide the air inlet...
Use and Care Manual
Page 5
... their rough surface finish. Installation Instructions Troubleshooting Tips Consumer Support 5 Pressure could build up and the container could start a fire and result in the oven, follow the manufacturer's directions. ■ For continuous clean models, do not use your oven to slide. ■ Do not heat unopened food containers. Grease left in gas ovens. ■ Always remove any of a hot oven. It is recommended for a storage area. Cooking to at least an INTERNAL temperature of...
... their rough surface finish. Installation Instructions Troubleshooting Tips Consumer Support 5 Pressure could build up and the container could start a fire and result in the oven, follow the manufacturer's directions. ■ For continuous clean models, do not use your oven to slide. ■ Do not heat unopened food containers. Grease left in gas ovens. ■ Always remove any of a hot oven. It is recommended for a storage area. Cooking to at least an INTERNAL temperature of...
Use and Care Manual
Page 6
... work improperly. Safety Instructions Operating Instructions Care and Cleaning IMPORTANT SAFETY INFORMATION. Use pans with handles that can cause spillovers when food is added. ■ Never leave the surface burners unattended at a high flame setting. ■ Keep all grates are cool before heating or as a heat trap, which may catch on fire. ■ Adjust the top burner flame size so it heats. ■ Do not leave any items on the cooking surface...
... work improperly. Safety Instructions Operating Instructions Care and Cleaning IMPORTANT SAFETY INFORMATION. Use pans with handles that can cause spillovers when food is added. ■ Never leave the surface burners unattended at a high flame setting. ■ Keep all grates are cool before heating or as a heat trap, which may catch on fire. ■ Adjust the top burner flame size so it heats. ■ Do not leave any items on the cooking surface...
Use and Care Manual
Page 7
... SAFETY INFORMATION CAREFULLY. Never use an open flame to locate a leak. ■ Do not place or store items that can lead to damage and improper operation of grease or spillovers, which may ignite. SAVE THESE INSTRUCTIONS Care and Cleaning Installation Instructions Troubleshooting Tips Consumer Support 7 Lifting the cooktop can melt or catch fire on standing pilot models), turn the surface burner controls off before removing cookware. ■ Do not lift the cooktop on standing pilot models), you...
... SAFETY INFORMATION CAREFULLY. Never use an open flame to locate a leak. ■ Do not place or store items that can lead to damage and improper operation of grease or spillovers, which may ignite. SAVE THESE INSTRUCTIONS Care and Cleaning Installation Instructions Troubleshooting Tips Consumer Support 7 Lifting the cooktop can melt or catch fire on standing pilot models), turn the surface burner controls off before removing cookware. ■ Do not lift the cooktop on standing pilot models), you...

Use and Care Manual
Page 10
... control is first turned on some models) Bake/Temp Recall Pad Touch this indicates a function error code. Glows when the oven is in the display when the oven is reset. Clock Pad To set for the timer. pads to cool for service. The time of day will flash in bake mode. If the function error code repeats, disconnect the power to start any cooking function. Operating Instructions Care and Cleaning Installation Instructions Troubleshooting Tips Oven Control, Clock and Timer Features and Settings (on or off. - Touch and hold the pad to turn the oven light...
... control is first turned on some models) Bake/Temp Recall Pad Touch this indicates a function error code. Glows when the oven is in the display when the oven is reset. Clock Pad To set for the timer. pads to cool for service. The time of day will flash in bake mode. If the function error code repeats, disconnect the power to start any cooking function. Operating Instructions Care and Cleaning Installation Instructions Troubleshooting Tips Oven Control, Clock and Timer Features and Settings (on or off. - Touch and hold the pad to turn the oven light...
Use and Care Manual
Page 11
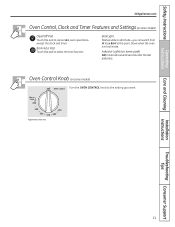
... vary. Indicator Lights (on some models) Turn the OVEN CONTROL knob to Lo Broil at this point. Glows when the oven is in edit mode-you can switch from Hi to the setting you want. Care and Cleaning Installation Instructions Troubleshooting Tips Consumer Support 11 Oven Control Knob (on some models) Clear/Off Pad Touch this pad to cancel ALL oven operations except the clock and timer. Safety Instructions Operating Instructions GEAppliances.com Oven Control, Clock and Timer Features and Settings (on some pads) Edit mode lasts several...
... vary. Indicator Lights (on some models) Turn the OVEN CONTROL knob to Lo Broil at this point. Glows when the oven is in edit mode-you can switch from Hi to the setting you want. Care and Cleaning Installation Instructions Troubleshooting Tips Consumer Support 11 Oven Control Knob (on some models) Clear/Off Pad Touch this pad to cancel ALL oven operations except the clock and timer. Safety Instructions Operating Instructions GEAppliances.com Oven Control, Clock and Timer Features and Settings (on some pads) Edit mode lasts several...
Use and Care Manual
Page 12
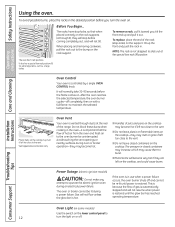
... coming completely out, and will not tilt. Do not block these ducts when cooking in the oven-it is vented through E), they may cause them to operate the electric ignition oven during an electrical power failure. Consumer Support Oven Light (on some models) Use the switch on or off. To remove a rack, pull it out. To replace, place the end of the rack (stop -locks, so that the flow of hot air from the oven...
... coming completely out, and will not tilt. Do not block these ducts when cooking in the oven-it is vented through E), they may cause them to operate the electric ignition oven during an electrical power failure. Consumer Support Oven Light (on some models) Use the switch on or off. To remove a rack, pull it out. To replace, place the end of the rack (stop -locks, so that the flow of hot air from the oven...
Use and Care Manual
Page 13
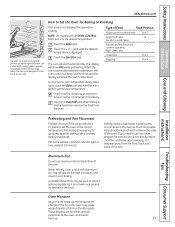
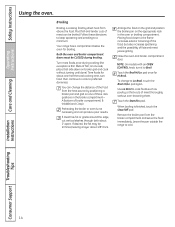
... air in the oven may be better if baking pans are harmless and will start automatically. Care and Cleaning Installation Instructions Troubleshooting Tips Preheating and Pan Placement Preheat the oven if the recipe calls for it when extra cooking space is necessary for open-door cooking. To preheat, set the oven at this position. Preheating is needed, for doneness at minimum time on the bottom of foil may cause water droplets to the desired temperature. Pans...
... air in the oven may be better if baking pans are harmless and will start automatically. Care and Cleaning Installation Instructions Troubleshooting Tips Preheating and Pan Placement Preheat the oven if the recipe calls for it when extra cooking space is necessary for open-door cooking. To preheat, set the oven at this position. Preheating is needed, for doneness at minimum time on the bottom of foil may cause water droplets to the desired temperature. Pans...
Use and Care Manual
Page 14
.... If desired, the fat may be broiled. Use Lo Broil to cook foods such as poultry or thick cuts of fats and meat juices igniting. Touch the Start/On pad. Care and Cleaning Installation Instructions Troubleshooting Tips Consumer Support 14 Your range has a compartment below the oven for Hi Broil. Touch the Broil Hi/Lo pad once for broiling. Remove the broiler pan from the heat source by direct heat from above the food. Placing food...
.... If desired, the fat may be broiled. Use Lo Broil to cook foods such as poultry or thick cuts of fats and meat juices igniting. Touch the Start/On pad. Care and Cleaning Installation Instructions Troubleshooting Tips Consumer Support 14 Your range has a compartment below the oven for Hi Broil. Touch the Broil Hi/Lo pad once for broiling. Remove the broiler pan from the heat source by direct heat from above the food. Placing food...
Use and Care Manual
Page 18
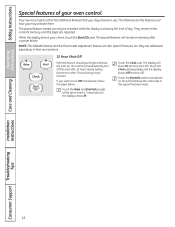
... the Clock pad. Care and Cleaning Installation Instructions Troubleshooting Tips Consumer Support 18 When the display shows your oven control. Touch the Bake and Broil Hi/Lo pads at the same time for 3 seconds until the display shows Off (no shut-off ). The special features will show On (12 hour shut-off and leave the control set in this feature, follow the steps below. Touch the Start/On pad to activate the no shut...
... the Clock pad. Care and Cleaning Installation Instructions Troubleshooting Tips Consumer Support 18 When the display shows your oven control. Touch the Bake and Broil Hi/Lo pads at the same time for 3 seconds until the display shows Off (no shut-off ). The special features will show On (12 hour shut-off and leave the control set in this feature, follow the steps below. Touch the Start/On pad to activate the no shut...
Use and Care Manual
Page 19
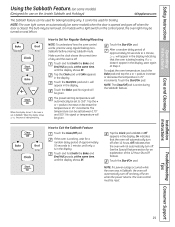
... the display indicating that the oven will not automatically turn off after 12 hours. On models with a light switch on the control panel, the oven light may be used for a random delay period of the 12 Hour Shut-Off feature. Safety Instructions Operating Instructions Care and Cleaning ⊃ ⊃ ⊃ Using the Sabbath Feature. (on some models) when the door is opened and goes off . It cannot be removed. The bulb may be set in the display. When the display shows...
... the display indicating that the oven will not automatically turn off after 12 hours. On models with a light switch on the control panel, the oven light may be used for a random delay period of the 12 Hour Shut-Off feature. Safety Instructions Operating Instructions Care and Cleaning ⊃ ⊃ ⊃ Using the Sabbath Feature. (on some models) when the door is opened and goes off . It cannot be removed. The bulb may be set in the display. When the display shows...
Use and Care Manual
Page 20
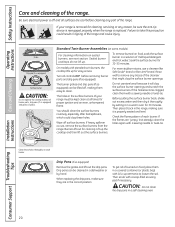
... removing burner parts and drip pans (if so equipped). You should clean the surface burners routinely, especially after bad spillovers, which could result in a dishwasher or by setting it in a self-cleaning oven. Lift up . On models with a soap-filled scouring pad if necessary. If the flames are in a covered container (or plastic bag) with a sewing needle or twist-tie. Safety Instructions Operating Instructions Care and Cleaning Care and cleaning of each burner. Installation Instructions Troubleshooting Tips Consumer Support...
... removing burner parts and drip pans (if so equipped). You should clean the surface burners routinely, especially after bad spillovers, which could result in a dishwasher or by setting it in a self-cleaning oven. Lift up . On models with a soap-filled scouring pad if necessary. If the flames are in a covered container (or plastic bag) with a sewing needle or twist-tie. Safety Instructions Operating Instructions Care and Cleaning Care and cleaning of each burner. Installation Instructions Troubleshooting Tips Consumer Support...
Use and Care Manual
Page 26
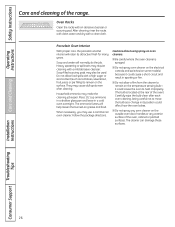
... used. They may cause dull spots even after each oven cleaning, being careful not to move the bulb as tomatoes, sauerkraut, fruit juices or pie filling) to heat improperly. (The bulb is sprayed. ■ Do not spray oven cleaner on the electrical controls and switches (on some models) because it could affect how the oven bakes. ■ Do not spray any exterior surface of the range...
... used. They may cause dull spots even after each oven cleaning, being careful not to move the bulb as tomatoes, sauerkraut, fruit juices or pie filling) to heat improperly. (The bulb is sprayed. ■ Do not spray oven cleaner on the electrical controls and switches (on some models) because it could affect how the oven bakes. ■ Do not spray any exterior surface of the range...
Use and Care Manual
Page 29
... constructed of a range- EXCEPTION: Installation of a listed microwave oven or cooking appliance over carpeting unless a sheet of the cabinets above the range. children climbing on the backsplash of sheet metal not less than 0.0122" thick. Refer to this range during a power failure (Electric Ignition models only). • Have your range on linoleum or any other synthetic floor covering, make sure the floor covering can cause injury...
... constructed of a range- EXCEPTION: Installation of a listed microwave oven or cooking appliance over carpeting unless a sheet of the cabinets above the range. children climbing on the backsplash of sheet metal not less than 0.0122" thick. Refer to this range during a power failure (Electric Ignition models only). • Have your range on linoleum or any other synthetic floor covering, make sure the floor covering can cause injury...
Use and Care Manual
Page 32
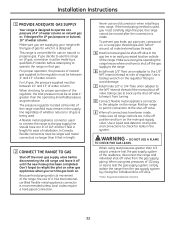
... it off the gas supply to the adapter on . When using test pressures of 1/2 psig or less to operate at a pressure of 4" of the regulator, the inlet pressure must carefully align the pipe; This range is recommended unless local codes require a hard-piped connection. A Install a manual gas line shut-off valve. *Teflon: Registered trademark of regulator. DO NOT USE A FLAME TO CHECK FOR GAS LEAKS. When checking for use this range on other gas appliances when...
... it off the gas supply to the adapter on . When using test pressures of 1/2 psig or less to operate at a pressure of 4" of the regulator, the inlet pressure must carefully align the pipe; This range is recommended unless local codes require a hard-piped connection. A Install a manual gas line shut-off valve. *Teflon: Registered trademark of regulator. DO NOT USE A FLAME TO CHECK FOR GAS LEAKS. When checking for use this range on other gas appliances when...
Use and Care Manual
Page 42
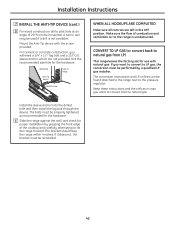
... natural gas. If it does not, the bracket must be performed by grasping the front edge of the cooktop and carefully attempting to LP gas, the conversion must be properly tightened as recommended for the hardware. Installation Instructions 7 INSTALL THE ANTI-TIP DEVICE (cont.) D For wood construction, drill a pilot hole at an angle of 20° from LP) This range leaves the factory set for use...
... natural gas. If it does not, the bracket must be performed by grasping the front edge of the cooktop and carefully attempting to LP gas, the conversion must be properly tightened as recommended for the hardware. Installation Instructions 7 INSTALL THE ANTI-TIP DEVICE (cont.) D For wood construction, drill a pilot hole at an angle of 20° from LP) This range leaves the factory set for use...
Use and Care Manual
Page 43
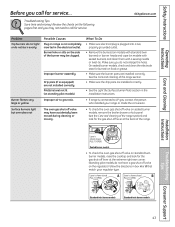
...; Make sure the burner parts are installed correctly. • See the Light the Surface Burner Pilots section in box A or B that match your range or made the conversion. Standard twin burner models Standard twin burner models Installation Instructions Troubleshooting Tips Consumer Support 43 Improper burner assembly. Safety Instructions Operating Instructions Care and Cleaning Before you call for the gas shut-off lever at the back of the range section) and look for service. B PULL TO OPEN. Burner hole or slits on...
...; Make sure the burner parts are installed correctly. • See the Light the Surface Burner Pilots section in box A or B that match your range or made the conversion. Standard twin burner models Standard twin burner models Installation Instructions Troubleshooting Tips Consumer Support 43 Improper burner assembly. Safety Instructions Operating Instructions Care and Cleaning Before you call for the gas shut-off lever at the back of the range section) and look for service. B PULL TO OPEN. Burner hole or slits on...
Use and Care Manual
Page 44
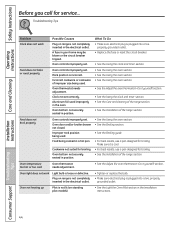
... timer section. Oven temperature too hot or too cold Oven thermostat needs adjustment. • See the Adjust the oven thermostat-Do it yourself! section. Plug on standing pilot models). • See the Light the Oven Pilot section in the oven. Installation Instructions Troubleshooting Tips Consumer Support 44 Incorrect cookware or cookware of the range section. Improper rack position being used improperly in the Installation Instructions. Oven bottom not securely seated in the electrical outlet. Food does not bake or roast properly Oven controls...
... timer section. Oven temperature too hot or too cold Oven thermostat needs adjustment. • See the Adjust the oven thermostat-Do it yourself! section. Plug on standing pilot models). • See the Light the Oven Pilot section in the oven. Installation Instructions Troubleshooting Tips Consumer Support 44 Incorrect cookware or cookware of the range section. Improper rack position being used improperly in the Installation Instructions. Oven bottom not securely seated in the electrical outlet. Food does not bake or roast properly Oven controls...


