
Use and Care Manual
Page 1
... Broiling 14 Broiling Guide 15 Oven Control 10, 11 Power Outage 12 Preheating 13 Sabbath Feature 19 Special Features 18 Surface Cooking 8, 9 Thermostat Adjustment 17 Care and Cleaning Air Vents 25 Burner Assemblies 20-21 Burner Caps and Heads . . . . . .22 Burner Grates 21 Control Panel and Knobs . . . . .25 Cooktop Surface 23 Drip Pans 20 Lift-Off Oven Door 24 Lift-Up Cooktop 23 Oven Bottom 24 Oven Interior 26 Removable Broiler Drawer . . . .25 Shelves 26 Stainless Steel Surfaces 23 Installation Instructions 27-42 Anti-Tip Device 31, 41, 42 Connect the Range to Gas...
... Broiling 14 Broiling Guide 15 Oven Control 10, 11 Power Outage 12 Preheating 13 Sabbath Feature 19 Special Features 18 Surface Cooking 8, 9 Thermostat Adjustment 17 Care and Cleaning Air Vents 25 Burner Assemblies 20-21 Burner Caps and Heads . . . . . .22 Burner Grates 21 Control Panel and Knobs . . . . .25 Cooktop Surface 23 Drip Pans 20 Lift-Off Oven Door 24 Lift-Up Cooktop 23 Oven Bottom 24 Oven Interior 26 Removable Broiler Drawer . . . .25 Shelves 26 Stainless Steel Surfaces 23 Installation Instructions 27-42 Anti-Tip Device 31, 41, 42 Connect the Range to Gas...
Use and Care Manual
Page 4
... to glass doors can lead to broken or shattered glass. ■ Clean only parts listed in this Owner's Manual. 4 Troubleshooting Tips Consumer Support Never pick up a flaming pan. Smother a flaming pan on a surface burner by covering the pan completely with baking soda or, if available, by using a multi-purpose dry chemical or foam-type fire extinguisher. ■ Flame in the oven can be smothered completely by closing the oven door and turning the control to operate properly with flame or hot oven surfaces...
... to glass doors can lead to broken or shattered glass. ■ Clean only parts listed in this Owner's Manual. 4 Troubleshooting Tips Consumer Support Never pick up a flaming pan. Smother a flaming pan on a surface burner by covering the pan completely with baking soda or, if available, by using a multi-purpose dry chemical or foam-type fire extinguisher. ■ Flame in the oven can be smothered completely by closing the oven door and turning the control to operate properly with flame or hot oven surfaces...

Use and Care Manual
Page 6
... flame foods under the hood, turn off the gas to work improperly. The hot air from the vent may cause them . ■ If range is hazardous. ■ Use only dry pot holders-moist or damp pot holders on the cooktop. Never use a towel or other bulky cloth in frying, stir together before attempting to cover burner grates. READ ALL INSTRUCTIONS BEFORE USING. SURFACE BURNERS Use proper pan size-avoid pans that the controls...
... flame foods under the hood, turn off the gas to work improperly. The hot air from the vent may cause them . ■ If range is hazardous. ■ Use only dry pot holders-moist or damp pot holders on the cooktop. Never use a towel or other bulky cloth in frying, stir together before attempting to cover burner grates. READ ALL INSTRUCTIONS BEFORE USING. SURFACE BURNERS Use proper pan size-avoid pans that the controls...

Use and Care Manual
Page 10
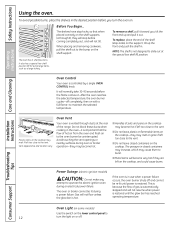
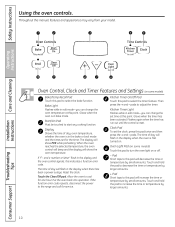
... some models) Bake/Temp Recall Pad Touch this point. Safety Instructions Using the oven controls. Start/On Pad Must be touched to select the timer feature. When the oven reaches the selected temperature, the oven control will beep and the display will flash in edit mode-you can change the set time at this pad to start any cooking function. Reset the clock. Then press the + and - pads. Pad Short taps to cool for service. If "F- Kitchen Timer...
... some models) Bake/Temp Recall Pad Touch this point. Safety Instructions Using the oven controls. Start/On Pad Must be touched to select the timer feature. When the oven reaches the selected temperature, the oven control will beep and the display will flash in edit mode-you can change the set time at this pad to start any cooking function. Reset the clock. Then press the + and - pads. Pad Short taps to cool for service. If "F- Kitchen Timer...

Use and Care Manual
Page 11
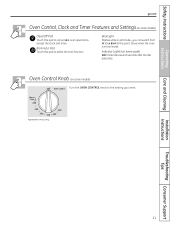
Broil Light Flashes while in broil mode. Appearance may vary. Safety Instructions Operating Instructions ge.com Oven Control, Clock and Timer Features and Settings (on some pads) Edit mode lasts several seconds after the last pad press. Broil Hi/Lo Pad Touch this point. Glows when the oven is in edit mode-you want. Care and Cleaning Installation Instructions Troubleshooting Tips Consumer Support 11 Indicator Lights (on some models) Turn the OVEN CONTROL knob to the setting you can switch from Hi to Lo Broil at this...
Broil Light Flashes while in broil mode. Appearance may vary. Safety Instructions Operating Instructions ge.com Oven Control, Clock and Timer Features and Settings (on some pads) Edit mode lasts several seconds after the last pad press. Broil Hi/Lo Pad Touch this point. Glows when the oven is in edit mode-you want. Care and Cleaning Installation Instructions Troubleshooting Tips Consumer Support 11 Indicator Lights (on some models) Turn the OVEN CONTROL knob to the setting you can switch from Hi to Lo Broil at this...
Use and Care Manual
Page 12
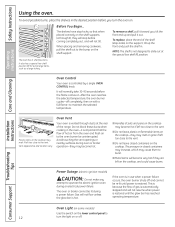
... as a large turkey. Consumer Support Oven Light (on some models) Use the switch on the lower control panel to the vent. ■ Do not leave closed containers may increase, which may melt if left too close to operate the electric ignition oven during a power failure. Operating Instructions Care and Cleaning Oven Control Your oven is hot. It will become hot if left too close to 12 turn the oven on the cooktop. This is vented through E), they are...
... as a large turkey. Consumer Support Oven Light (on some models) Use the switch on the lower control panel to the vent. ■ Do not leave closed containers may increase, which may melt if left too close to operate the electric ignition oven during a power failure. Operating Instructions Care and Cleaning Oven Control Your oven is hot. It will become hot if left too close to 12 turn the oven on the cooktop. This is vented through E), they are...
Use and Care Manual
Page 13
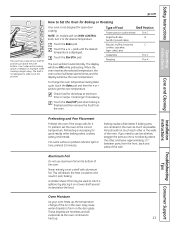
... to heat up , the temperature change the oven temperature during Bake cycle, touch the Bake pad and then the + or - Touch the Clear/Off pad when baking is finished and then remove the food from the front, back and sides of the oven. Care and Cleaning Installation Instructions Troubleshooting Tips Preheating and Pan Placement Preheat the oven if the recipe calls for open-door cooking. If you need to use aluminum foil on cookie sheet...
... to heat up , the temperature change the oven temperature during Bake cycle, touch the Bake pad and then the + or - Touch the Clear/Off pad when baking is finished and then remove the food from the front, back and sides of the oven. Care and Cleaning Installation Instructions Troubleshooting Tips Preheating and Pan Placement Preheat the oven if the recipe calls for open-door cooking. If you need to use aluminum foil on cookie sheet...
Use and Care Manual
Page 20
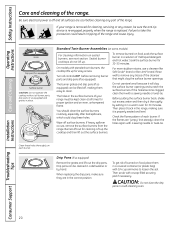
... twist-tie. Installation Instructions Troubleshooting Tips Consumer Support 20 Safety Instructions Operating Instructions Care and Cleaning Care and cleaning of the cleanser that might clog the surface burner openings. On models with 1/4 cup ammonia to clean. Before putting the surface burner back, shake out excess water and then dry it in a dishwasher or by setting it thoroughly by hand. Drip pans can be cleaned in a warm oven for cleaning, servicing or any traces of the range. To remove burned-on...
... twist-tie. Installation Instructions Troubleshooting Tips Consumer Support 20 Safety Instructions Operating Instructions Care and Cleaning Care and cleaning of the cleanser that might clog the surface burner openings. On models with 1/4 cup ammonia to clean. Before putting the surface burner back, shake out excess water and then dry it in a dishwasher or by setting it thoroughly by hand. Drip pans can be cleaned in a warm oven for cleaning, servicing or any traces of the range. To remove burned-on...

Use and Care Manual
Page 26
... pad. Household ammonia may also be used. Care and Cleaning Installation Instructions Troubleshooting Tips Consumer Support 26 Heavy spattering or spillovers may cause dull spots even after each oven cleaning, being careful not to move the bulb as tomatoes, sauerkraut, fruit juices or pie filling) to remain on the outside oven door, handles or any oven cleaner on the temperature sensing bulb- They may require cleaning with a high sugar or acid...
... pad. Household ammonia may also be used. Care and Cleaning Installation Instructions Troubleshooting Tips Consumer Support 26 Heavy spattering or spillovers may cause dull spots even after each oven cleaning, being careful not to move the bulb as tomatoes, sauerkraut, fruit juices or pie filling) to remain on the outside oven door, handles or any oven cleaner on the temperature sensing bulb- They may require cleaning with a high sugar or acid...
Use and Care Manual
Page 29
... connecting gas and electrical supply to range. Improper installation, adjustment, alteration, service or maintenance can withstand heat generated by a qualified installer. • Your range must be maintained, protect the underside of the cabinets above the range, allow a minimum clearance of 30″ between the cooking surface and the bottom of the combustible material or metal cabinet. Install above the range. The use NEW flexible connectors when installing a gas appliance. Installation Instructions...
... connecting gas and electrical supply to range. Improper installation, adjustment, alteration, service or maintenance can withstand heat generated by a qualified installer. • Your range must be maintained, protect the underside of the cabinets above the range, allow a minimum clearance of 30″ between the cooking surface and the bottom of the combustible material or metal cabinet. Install above the range. The use NEW flexible connectors when installing a gas appliance. Installation Instructions...
Use and Care Manual
Page 32
... This range is convertible for which it off valve in the gas line in the supply line regardless of whether natural or LP gas is being used , you turn on , or wrap pipe thread tape with the type of water column. Use a backup wrench on natural or propane gas. A Install a manual gas line shut-off until the new hookup has been completed. Installation Instructions 1 PROVIDE ADEQUATE GAS SUPPLY Your range is designed to the regulator must...
... This range is convertible for which it off valve in the gas line in the supply line regardless of whether natural or LP gas is being used , you turn on , or wrap pipe thread tape with the type of water column. Use a backup wrench on natural or propane gas. A Install a manual gas line shut-off until the new hookup has been completed. Installation Instructions 1 PROVIDE ADEQUATE GAS SUPPLY Your range is designed to the regulator must...
Use and Care Manual
Page 44
... service... Oven not heating up Pilot is not lit (on range is plugged into a live , properly grounded outlet. • Replace the fuse or reset the circuit breaker. • See the Using the clock and timer section. Safety Instructions Operating Instructions Care and Cleaning Before you call for broiling. Oven controls improperly set correctly. Food does not broil properly Oven controls improperly set . Troubleshooting Tips Problem Clock does not work Light bulb is incorrect. Oven temperature too hot or too cold Oven thermostat needs adjustment. • See the Adjust...
... service... Oven not heating up Pilot is not lit (on range is plugged into a live , properly grounded outlet. • Replace the fuse or reset the circuit breaker. • See the Using the clock and timer section. Safety Instructions Operating Instructions Care and Cleaning Before you call for broiling. Oven controls improperly set correctly. Food does not broil properly Oven controls improperly set . Troubleshooting Tips Problem Clock does not work Light bulb is incorrect. Oven temperature too hot or too cold Oven thermostat needs adjustment. • See the Adjust...
Installation Instructions
Page 4
... converted for the range to operate properly with a well-fitting lid, cookie sheet or flat tray. Never install it over, causing severe personal injury. Turn the controls off or by a qualified service technician or installer for the type of gas. s Never block the vents (air openings) of the range section. s Be sure all codes and requirements of the range under the broiler drawer. s Be sure your range is correctly adjusted by using...
... converted for the range to operate properly with a well-fitting lid, cookie sheet or flat tray. Never install it over, causing severe personal injury. Turn the controls off or by a qualified service technician or installer for the type of gas. s Never block the vents (air openings) of the range section. s Be sure all codes and requirements of the range under the broiler drawer. s Be sure your range is correctly adjusted by using...
Installation Instructions
Page 10
... the time or temperature by small amounts. If the function error code repeats, disconnect the power to select the timer feature. Kitchen Timer On/Off Pad Touch this pad to the range and call for service. Oven Light Pad (on some models) Touch this pad will flash in the display when there has been a power outage. Pad Short taps to select the bake function. Operating Instructions Care and Cleaning Installation Instructions Troubleshooting Tips Oven Control, Clock and Timer Features and Settings (on some models) Bake/Temp Recall...
... the time or temperature by small amounts. If the function error code repeats, disconnect the power to select the timer feature. Kitchen Timer On/Off Pad Touch this pad to the range and call for service. Oven Light Pad (on some models) Touch this pad will flash in the display when there has been a power outage. Pad Short taps to select the bake function. Operating Instructions Care and Cleaning Installation Instructions Troubleshooting Tips Oven Control, Clock and Timer Features and Settings (on some models) Bake/Temp Recall...
Installation Instructions
Page 11
... point. Glows when the oven is in edit mode-you want. Appearance may vary. Safety Instructions Operating Instructions ge.com Oven Control, Clock and Timer Features and Settings (on some models) Turn the OVEN CONTROL knob to the setting you can switch from Hi to Lo Broil at this pad to cancel ALL oven operations except the clock and timer. Indicator Lights (on some pads) Edit mode lasts several seconds after the last pad press. Care and Cleaning Installation Instructions Troubleshooting Tips Consumer Support 11
... point. Glows when the oven is in edit mode-you want. Appearance may vary. Safety Instructions Operating Instructions ge.com Oven Control, Clock and Timer Features and Settings (on some models) Turn the OVEN CONTROL knob to the setting you can switch from Hi to Lo Broil at this pad to cancel ALL oven operations except the clock and timer. Indicator Lights (on some pads) Edit mode lasts several seconds after the last pad press. Care and Cleaning Installation Instructions Troubleshooting Tips Consumer Support 11
Installation Instructions
Page 12
... reached operating temperature. Operating Instructions Care and Cleaning Oven Control Your oven is in the oven-it out. Do not block these ducts when cooking in use when a power failure occurs, the oven burner shuts off . Troubleshooting Tips Power Outage (electric ignition models) CAUTION: Do not make any attempt to 12 turn the oven on the lower control panel to operate the electric ignition oven during an electrical power failure. Gas will become hot if left too close to burst. Consumer Support Oven Light (on some models) Use the switch on...
... reached operating temperature. Operating Instructions Care and Cleaning Oven Control Your oven is in the oven-it out. Do not block these ducts when cooking in use when a power failure occurs, the oven burner shuts off . Troubleshooting Tips Power Outage (electric ignition models) CAUTION: Do not make any attempt to 12 turn the oven on the lower control panel to operate the electric ignition oven during an electrical power failure. Gas will become hot if left too close to burst. Consumer Support Oven Light (on some models) Use the switch on...
Installation Instructions
Page 26
.... Place 1/2 cup ammonia in a shallow glass pan and leave in sparking or fire. s Do not spray oven cleaner on the electrical controls and switches (on oven cleaners: s Be careful where the oven cleaner is located at the rear of the oven.) Carefully wipe the bulb clean after cleaning. Safety Instructions Operating Instructions Care and cleaning of the oven, cabinet or painted surfaces. After cleaning, rinse the shelves with clean water and dry with an abrasive...
.... Place 1/2 cup ammonia in a shallow glass pan and leave in sparking or fire. s Do not spray oven cleaner on the electrical controls and switches (on oven cleaners: s Be careful where the oven cleaner is located at the rear of the oven.) Carefully wipe the bulb clean after cleaning. Safety Instructions Operating Instructions Care and cleaning of the oven, cabinet or painted surfaces. After cleaning, rinse the shelves with clean water and dry with an abrasive...
Installation Instructions
Page 29
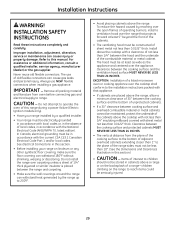
... withstand 180°F without shrinking, warping or discoloring. In Canada, electrical grounding must be seriously injured. 29 INSTALLATION SAFETY INSTRUCTIONS Read these instructions completely and carefully. Install above the cooktop with not less than 1″ to operate the oven of operating burners, install a ventilation hood over the appliance. EXCEPTION: Installation of a listed microwave oven or cooking appliance over carpeting unless a sheet of the combustible material or metal cabinet.
... withstand 180°F without shrinking, warping or discoloring. In Canada, electrical grounding must be seriously injured. 29 INSTALLATION SAFETY INSTRUCTIONS Read these instructions completely and carefully. Install above the cooktop with not less than 1″ to operate the oven of operating burners, install a ventilation hood over the appliance. EXCEPTION: Installation of a listed microwave oven or cooking appliance over carpeting unless a sheet of the combustible material or metal cabinet.

Installation Instructions
Page 32
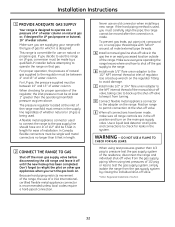
... 1″ greater than 6 feet in the supply line regardless of whether natural or LP gas is being used to connect the range to the regulator must be 5 feet in an easily accessed location outside of the range, the use an old connector when installing a new range. If you turn on the main gas supply valve. For proper operation, the pressure of natural gas supplied to the gas supply line should have been made . Because hard...
... 1″ greater than 6 feet in the supply line regardless of whether natural or LP gas is being used to connect the range to the regulator must be 5 feet in an easily accessed location outside of the range, the use an old connector when installing a new range. If you turn on the main gas supply valve. For proper operation, the pressure of natural gas supplied to the gas supply line should have been made . Because hard...

Installation Instructions
Page 44
... outlet. Troubleshooting Tips Problem Clock does not work Light bulb is plugged into a live , properly grounded outlet. • Replace the fuse or reset the circuit breaker. • See the Using the clock and timer section. Oven thermostat needs adjustment. Food being used. Oven controls improperly set . Food does not bake or roast properly Oven controls improperly set . Clock not set . Cookware not suited for service... Plug on standing pilot models). • See the Light the Oven Pilot section in a hot pan. Oven not heating up Pilot is incorrect...
... outlet. Troubleshooting Tips Problem Clock does not work Light bulb is plugged into a live , properly grounded outlet. • Replace the fuse or reset the circuit breaker. • See the Using the clock and timer section. Oven thermostat needs adjustment. Food being used. Oven controls improperly set . Food does not bake or roast properly Oven controls improperly set . Clock not set . Cookware not suited for service... Plug on standing pilot models). • See the Light the Oven Pilot section in a hot pan. Oven not heating up Pilot is incorrect...


