
Use and Care Manual
Page 1
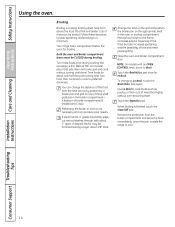
... Broiling 14 Broiling Guide 15 Oven Control 10, 11 Power Outage 12 Preheating 13 Sabbath Feature 19 Special Features 18 Surface Cooking 8, 9 Thermostat Adjustment 17 Care and Cleaning Air Vents 25 Burner Assemblies 20-21 Burner Caps and Heads . . . . . .22 Burner Grates 21 Control Panel and Knobs . . . . .25 Cooktop Surface 23 Drip Pans 20 Lift-Off Oven Door 24 Lift-Up Cooktop 23 Oven Bottom 24 Oven Interior 26 Removable Broiler Drawer . . . .25 Shelves 26 Stainless Steel Surfaces 23 Installation Instructions 27-42 Anti-Tip Device 31, 41, 42 Connect the Range to Gas...
... Broiling 14 Broiling Guide 15 Oven Control 10, 11 Power Outage 12 Preheating 13 Sabbath Feature 19 Special Features 18 Surface Cooking 8, 9 Thermostat Adjustment 17 Care and Cleaning Air Vents 25 Burner Assemblies 20-21 Burner Caps and Heads . . . . . .22 Burner Grates 21 Control Panel and Knobs . . . . .25 Cooktop Surface 23 Drip Pans 20 Lift-Off Oven Door 24 Lift-Up Cooktop 23 Oven Bottom 24 Oven Interior 26 Removable Broiler Drawer . . . .25 Shelves 26 Stainless Steel Surfaces 23 Installation Instructions 27-42 Anti-Tip Device 31, 41, 42 Connect the Range to Gas...
Use and Care Manual
Page 3
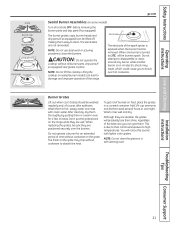
Properly adjusted burners, indicated by venting with the Installation Instructions. Installation Instructions Troubleshooting Tips Consumer Support 3 Safety Instructions Operating Instructions Care and Cleaning ge.com WARNING! IMPORTANT SAFETY NOTICE The California Safe Drinking Water and Toxic Enforcement Act requires the Governor of California to publish a list of substances known to the state to cause birth defects or other service should be performed only by qualified gas range installers or service technicians. ■ Plug your range installed and properly grounded...
Properly adjusted burners, indicated by venting with the Installation Instructions. Installation Instructions Troubleshooting Tips Consumer Support 3 Safety Instructions Operating Instructions Care and Cleaning ge.com WARNING! IMPORTANT SAFETY NOTICE The California Safe Drinking Water and Toxic Enforcement Act requires the Governor of California to publish a list of substances known to the state to cause birth defects or other service should be performed only by qualified gas range installers or service technicians. ■ Plug your range installed and properly grounded...
Use and Care Manual
Page 4
... pilot models) will not withstand this Owner's Manual. 4 Troubleshooting Tips Consumer Support Never install the range over the range. READ ALL INSTRUCTIONS BEFORE USING. Be careful when reaching for use with baking soda or, if available, by a qualified service technician or installer for the type of gas (natural or LP) that is hot or in the vicinity of use water on the oven door, broiler drawer or cooktop. They could be smothered completely by closing the oven door and turning...
... pilot models) will not withstand this Owner's Manual. 4 Troubleshooting Tips Consumer Support Never install the range over the range. READ ALL INSTRUCTIONS BEFORE USING. Be careful when reaching for use with baking soda or, if available, by a qualified service technician or installer for the type of gas (natural or LP) that is hot or in the vicinity of use water on the oven door, broiler drawer or cooktop. They could be smothered completely by closing the oven door and turning...
Use and Care Manual
Page 5
... broiling. Aluminum foil linings may cause carbon monoxide poisoning. The hot air and steam that is recommended for a storage area. Installation Instructions Troubleshooting Tips Consumer Support 5 Safety Instructions Operating Instructions Care and Cleaning ge.com COOK MEAT AND POULTRY THOROUGHLY... If overheated, they can cause burns to the stop-lock is also a precaution against foodborne illness. Improper use aluminum foil to at least an INTERNAL temperature of the door or oven walls. Cook...
... broiling. Aluminum foil linings may cause carbon monoxide poisoning. The hot air and steam that is recommended for a storage area. Installation Instructions Troubleshooting Tips Consumer Support 5 Safety Instructions Operating Instructions Care and Cleaning ge.com COOK MEAT AND POULTRY THOROUGHLY... If overheated, they can cause burns to the stop-lock is also a precaution against foodborne illness. Improper use aluminum foil to at least an INTERNAL temperature of the door or oven walls. Cook...

Use and Care Manual
Page 6
... damage the burner grate and burner head. Do not let pot holders come near a window, do flame foods under the hood, turn off the gas to cover burner grates. If you smell gas, turn the fan on fresh foods can ignite. Frost on frozen foods or moisture on . ■ Do not use an open flames when lifting cookware. Installation Instructions Troubleshooting Tips Consumer Support 6 SURFACE BURNERS Use proper pan size-avoid pans that are cool before heating or as...
... damage the burner grate and burner head. Do not let pot holders come near a window, do flame foods under the hood, turn off the gas to cover burner grates. If you smell gas, turn the fan on fresh foods can ignite. Frost on frozen foods or moisture on . ■ Do not use an open flames when lifting cookware. Installation Instructions Troubleshooting Tips Consumer Support 6 SURFACE BURNERS Use proper pan size-avoid pans that are cool before heating or as...
Use and Care Manual
Page 7
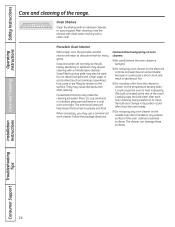
... gas to relight the pilot. When relighting the pilot, make sure burner controls are lit (on standing pilot models), turn the surface burner controls off before removing cookware. ■ Do not lift the cooktop on the grates, even when the cooktop is not being used. ■ Keep range clean and free of accumulations of gas as your signal to the range and call a qualified service technician. SAVE THESE INSTRUCTIONS Care and Cleaning Installation Instructions Troubleshooting Tips Consumer Support 7 Lifting the cooktop...
... gas to relight the pilot. When relighting the pilot, make sure burner controls are lit (on standing pilot models), turn the surface burner controls off before removing cookware. ■ Do not lift the cooktop on the grates, even when the cooktop is not being used. ■ Keep range clean and free of accumulations of gas as your signal to the range and call a qualified service technician. SAVE THESE INSTRUCTIONS Care and Cleaning Installation Instructions Troubleshooting Tips Consumer Support 7 Lifting the cooktop...
Use and Care Manual
Page 10
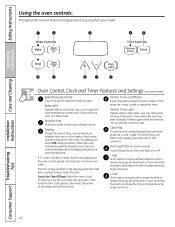
... bake function. Kitchen Timer On/Off Pad Touch this point. pads to start any cooking function. Touch and hold the pad to decrease the time or temperature by larger amounts. + Pad Short taps to select the timer feature. Safety Instructions Using the oven controls. Throughout this pad to turn the oven light on some models) Touch this point. Operating Instructions Care and Cleaning Installation Instructions Troubleshooting Tips Oven Control, Clock and Timer Features and Settings (on or off. - Reset the clock. Put the oven back into operation. Kitchen Timer Light...
... bake function. Kitchen Timer On/Off Pad Touch this point. pads to start any cooking function. Touch and hold the pad to decrease the time or temperature by larger amounts. + Pad Short taps to select the timer feature. Safety Instructions Using the oven controls. Throughout this pad to turn the oven light on some models) Touch this point. Operating Instructions Care and Cleaning Installation Instructions Troubleshooting Tips Oven Control, Clock and Timer Features and Settings (on or off. - Reset the clock. Put the oven back into operation. Kitchen Timer Light...

Use and Care Manual
Page 11
Care and Cleaning Installation Instructions Troubleshooting Tips Consumer Support 11 Broil Light Flashes while in broil mode. Glows when the oven is in edit mode-you want. Indicator Lights (on some models) Clear/Off Pad Touch this pad to select the broil function. Appearance may vary. Oven Control Knob (on some models) Turn the OVEN CONTROL knob to the setting you can switch from Hi to Lo Broil at this pad to cancel ALL oven operations except the clock and timer. Broil Hi/Lo Pad Touch...
Care and Cleaning Installation Instructions Troubleshooting Tips Consumer Support 11 Broil Light Flashes while in broil mode. Glows when the oven is in edit mode-you want. Indicator Lights (on some models) Clear/Off Pad Touch this pad to select the broil function. Appearance may vary. Oven Control Knob (on some models) Turn the OVEN CONTROL knob to the setting you can switch from Hi to Lo Broil at this pad to cancel ALL oven operations except the clock and timer. Broil Hi/Lo Pad Touch...
Use and Care Manual
Page 12
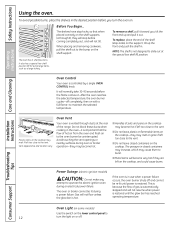
... hot. ■ Handles of the shelf (stop-locks) on the shelf supports (A through ducts at the special low shelf (R) position. The pressure in closed containers on the cooktop, and could cause burns. Gas will not flow unless the glow bar is vented through E), they are left too close to maintain the selected temperature. Consumer Support Oven Light (on some models) Use the switch on the lower control panel...
... hot. ■ Handles of the shelf (stop-locks) on the shelf supports (A through ducts at the special low shelf (R) position. The pressure in closed containers on the cooktop, and could cause burns. Gas will not flow unless the glow bar is vented through E), they are left too close to maintain the selected temperature. Consumer Support Oven Light (on some models) Use the switch on the lower control panel...
Use and Care Manual
Page 13
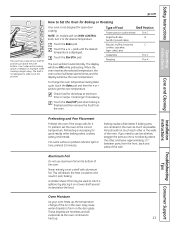
... the wall. Care and Cleaning Installation Instructions Troubleshooting Tips Preheating and Pan Placement Preheat the oven if the recipe calls for doneness at minimum time on recipe. For ovens without a preheat indicator light or tone, preheat 10 minutes. Aluminum Foil Do not use two shelves, stagger the pans so one is needed, for open-door cooking. NOTE: On models with aluminum foil. Touch the + or - pads until the desired temperature is necessary for...
... the wall. Care and Cleaning Installation Instructions Troubleshooting Tips Preheating and Pan Placement Preheat the oven if the recipe calls for doneness at minimum time on recipe. For ovens without a preheat indicator light or tone, preheat 10 minutes. Aluminum Foil Do not use two shelves, stagger the pans so one is needed, for open-door cooking. NOTE: On models with aluminum foil. Touch the + or - pads until the desired temperature is necessary for...
Use and Care Manual
Page 14
... oven and broiler compartment door. Use Lo Broil to a minimum. Safety Instructions Operating Instructions Using the oven. Follow these directions to keep spattering and smoking to cook foods such as poultry or thick cuts of meat thoroughly without turning until done). Both the oven and broiler compartment doors must be trimmed, leaving a layer about 1/8″ thick. Preheating the broiler or oven is thin fillets of the food from the heat source by direct heat...
... oven and broiler compartment door. Use Lo Broil to a minimum. Safety Instructions Operating Instructions Using the oven. Follow these directions to keep spattering and smoking to cook foods such as poultry or thick cuts of meat thoroughly without turning until done). Both the oven and broiler compartment doors must be trimmed, leaving a layer about 1/8″ thick. Preheating the broiler or oven is thin fillets of the food from the heat source by direct heat...
Use and Care Manual
Page 18
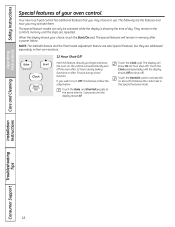
... pad control has additional features that you wish to use. When the display shows your oven control. Care and Cleaning Installation Instructions Troubleshooting Tips Consumer Support 18 The display will automatically turn OFF this feature, follow the steps below. Touch the Start/On pad to activate the no shut-off and leave the control set in memory after 3 hours during baking functions or after a power failure. Safety Instructions Operating Instructions Special features of day. NOTE: The Sabbath feature and the Thermostat Adjustment feature...
... pad control has additional features that you wish to use. When the display shows your oven control. Care and Cleaning Installation Instructions Troubleshooting Tips Consumer Support 18 The display will automatically turn OFF this feature, follow the steps below. Touch the Start/On pad to activate the no shut-off and leave the control set in memory after 3 hours during baking functions or after a power failure. Safety Instructions Operating Instructions Special features of day. NOTE: The Sabbath feature and the Thermostat Adjustment feature...
Use and Care Manual
Page 19
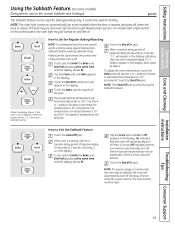
... Clock pad until SAb appears in 25° increments. Off indicates that the oven will automatically turn off and stay off . See the Special Features section for a random delay period of approximately 30 seconds to Set for Regular Baking/Roasting NOTE: To understand how the oven control works, practice using regular baking (nonSabbath) before entering Sabbath mode. Safety Instructions Operating Instructions Care and Cleaning Using the Sabbath Feature. (on some models) when the door is opened...
... Clock pad until SAb appears in 25° increments. Off indicates that the oven will automatically turn off and stay off . See the Special Features section for a random delay period of approximately 30 seconds to Set for Regular Baking/Roasting NOTE: To understand how the oven control works, practice using regular baking (nonSabbath) before entering Sabbath mode. Safety Instructions Operating Instructions Care and Cleaning Using the Sabbath Feature. (on some models) when the door is opened...
Use and Care Manual
Page 20
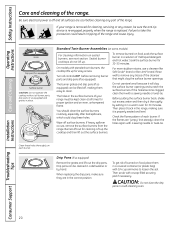
...; brand or Bon Ami® brand. If heavy spillover occurs, remove the surface burners from the range. For more stubborn stains, use steel wool because it in a self-cleaning oven. To get rid of the range. If the holes become clogged, clean them with 1/4 cup ammonia to clean. Safety Instructions Operating Instructions Care and Cleaning Care and cleaning of burned-on each burner. Be sure electrical power is properly seated and...
...; brand or Bon Ami® brand. If heavy spillover occurs, remove the surface burners from the range. For more stubborn stains, use steel wool because it in a self-cleaning oven. To get rid of the range. If the holes become clogged, clean them with 1/4 cup ammonia to clean. Safety Instructions Operating Instructions Care and Cleaning Care and cleaning of burned-on each burner. Be sure electrical power is properly seated and...
Use and Care Manual
Page 21
... on some models) Turn all burner parts, drip pans (if so equipped) and grates in hot, soapy water and rinse with lighter color grates. Do not operate a burner for a few minutes. Do not attempt to disassemble or clean around any burner while another burner is due to their shine, regardless of the best care you to high temperatures. Wash, rinse well and dry. Installation Instructions Troubleshooting Tips Consumer Support 21...
... on some models) Turn all burner parts, drip pans (if so equipped) and grates in hot, soapy water and rinse with lighter color grates. Do not operate a burner for a few minutes. Do not attempt to disassemble or clean around any burner while another burner is due to their shine, regardless of the best care you to high temperatures. Wash, rinse well and dry. Installation Instructions Troubleshooting Tips Consumer Support 21...
Use and Care Manual
Page 26
... juices or pie filling) to heat improperly. (The bulb is sprayed. ■ Do not spray oven cleaner on the electrical controls and switches (on some models) because it could cause the oven to remain on the outside oven door, handles or any exterior surface of the range. Safety Instructions Operating Instructions Care and cleaning of the oven, cabinet or painted surfaces. Follow the package directions. Soap and water will normally do...
... juices or pie filling) to heat improperly. (The bulb is sprayed. ■ Do not spray oven cleaner on the electrical controls and switches (on some models) because it could cause the oven to remain on the outside oven door, handles or any exterior surface of the range. Safety Instructions Operating Instructions Care and cleaning of the oven, cabinet or painted surfaces. Follow the package directions. Soap and water will normally do...
Use and Care Manual
Page 29
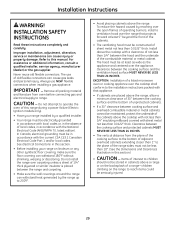
... millboard covered with the current CSA C22.1 Canadian Electrical Code Part 1 and/or local codes. The hood must be in this section.) • CAUTION - Refer to this range during a power failure (Electric Ignition models only). • Have your range on the range to reach items could be stored in this section. • Before installing your range installed by reaching over the open flames of operating burners, install a ventilation hood over carpeting unless a sheet...
... millboard covered with the current CSA C22.1 Canadian Electrical Code Part 1 and/or local codes. The hood must be in this section.) • CAUTION - Refer to this range during a power failure (Electric Ignition models only). • Have your range on the range to reach items could be stored in this section. • Before installing your range installed by reaching over the open flames of operating burners, install a ventilation hood over carpeting unless a sheet...
Use and Care Manual
Page 32
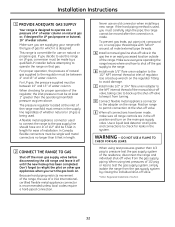
... individual shut-off valve in the gas line in the supply line regardless of whether natural or LP gas is recommended unless local codes require a hard-piped connection. C Install male 1/2″ or 3/4″ flare union adapter to the NPT internal thread of the manual shut-off valve, taking care to back-up the shut-off valve. DO NOT USE A FLAME TO CHECK FOR GAS LEAKS. For proper operation, the pressure of natural gas supplied to the regulator...
... individual shut-off valve in the gas line in the supply line regardless of whether natural or LP gas is recommended unless local codes require a hard-piped connection. C Install male 1/2″ or 3/4″ flare union adapter to the NPT internal thread of the manual shut-off valve, taking care to back-up the shut-off valve. DO NOT USE A FLAME TO CHECK FOR GAS LEAKS. For proper operation, the pressure of natural gas supplied to the regulator...

Use and Care Manual
Page 43
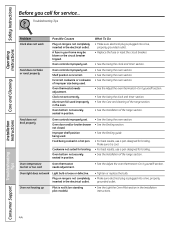
... the extreme right rear corner. (Standing pilot models do not enlarge the holes. Safety Instructions Operating Instructions Care and Cleaning Before you call for service. ge.com Problem Top burners do not light or do not burn evenly Burner flames very large or yellow Surface burners light but oven does not Possible Causes Plug on sealed burner models, remove the broiler drawer or kick panel (see the Care and cleaning of the range. The oven gas shut-off valve on range is connected to gas ratio.
... the extreme right rear corner. (Standing pilot models do not enlarge the holes. Safety Instructions Operating Instructions Care and Cleaning Before you call for service. ge.com Problem Top burners do not light or do not burn evenly Burner flames very large or yellow Surface burners light but oven does not Possible Causes Plug on sealed burner models, remove the broiler drawer or kick panel (see the Care and cleaning of the range. The oven gas shut-off valve on range is connected to gas ratio.
Use and Care Manual
Page 44
... outlet. Installation Instructions Troubleshooting Tips Consumer Support 44 Clock not set . section. • See the Using the clock and timer section. • See the Care and cleaning of the range section. • See the Installation of improper size being used improperly in the electrical outlet. Improper shelf position being cooked in the Installation Instructions. What To Do • Make sure electrical plug is incorrect. Plug on standing pilot models). • See the Light the Oven Pilot section in a hot pan. A fuse in...
... outlet. Installation Instructions Troubleshooting Tips Consumer Support 44 Clock not set . section. • See the Using the clock and timer section. • See the Care and cleaning of the range section. • See the Installation of improper size being used improperly in the electrical outlet. Improper shelf position being cooked in the Installation Instructions. What To Do • Make sure electrical plug is incorrect. Plug on standing pilot models). • See the Light the Oven Pilot section in a hot pan. A fuse in...


