
Use and Care Manual
Page 1
Non-Self-Cleaning RangeGass ge.com Safety Instructions . . . . . .2-7 Operating Instructions Aluminum Foil 13 Clock and Timer 16 ...Stainless Steel Surfaces 23 Installation Instructions 27-42 Anti-Tip Device 31, 41, 42 Connect the Range to Gas 32-35 Convert to LP Gas 42 Dimensions and Clearances 30 Electrical Connections . . . .36-37 Level the... Range 41 Light the Pilots 37-40 Troubleshooting Tips 43-45 Accessories 49 Consumer Support Consumer Support Back Cover Product Registration...
Non-Self-Cleaning RangeGass ge.com Safety Instructions . . . . . .2-7 Operating Instructions Aluminum Foil 13 Clock and Timer 16 ...Stainless Steel Surfaces 23 Installation Instructions 27-42 Anti-Tip Device 31, 41, 42 Connect the Range to Gas 32-35 Convert to LP Gas 42 Dimensions and Clearances 30 Electrical Connections . . . .36-37 Level the... Range 41 Light the Pilots 37-40 Troubleshooting Tips 43-45 Accessories 49 Consumer Support Consumer Support Back Cover Product Registration...

Use and Care Manual
Page 2
... gas supplier, call 1.800.561.3344). Operating Instructions Care and Cleaning Installation Instructions WARNING: If the information in ranges, never completely remove the leveling legs or the range will not be performed by a properly installed anti-tip bracket. do not use gasoline or other appliance. -...one at no cost (in the vicinity of the bracket, visit GEAppliances.com (in this procedure to install. The bracket should stop the range within 4 inches. Installation and service must be secured by a qualified installer, service agency or the gas supplier. To check if the...
... gas supplier, call 1.800.561.3344). Operating Instructions Care and Cleaning Installation Instructions WARNING: If the information in ranges, never completely remove the leveling legs or the range will not be performed by a properly installed anti-tip bracket. do not use gasoline or other appliance. -...one at no cost (in the vicinity of the bracket, visit GEAppliances.com (in this procedure to install. The bracket should stop the range within 4 inches. Installation and service must be secured by a qualified installer, service agency or the gas supplier. To check if the...
Use and Care Manual
Page 3
...personal responsibility and obligation to have an ungrounded outlet ■ Do not attempt to repair or replace any part of your range unless it off valve and how to shut it is specifically recommended in accordance with the Installation Instructions. Do not use...use an extension cord with an open window or using a ventilation fan or hood. Safety Instructions Operating Instructions Care and Cleaning ge.com WARNING! Installation Instructions Troubleshooting Tips Consumer Support 3 IMPORTANT SAFETY NOTICE The California Safe Drinking Water and Toxic Enforcement Act ...
...personal responsibility and obligation to have an ungrounded outlet ■ Do not attempt to repair or replace any part of your range unless it off valve and how to shut it is specifically recommended in accordance with the Installation Instructions. Do not use...use an extension cord with an open window or using a ventilation fan or hood. Safety Instructions Operating Instructions Care and Cleaning ge.com WARNING! Installation Instructions Troubleshooting Tips Consumer Support 3 IMPORTANT SAFETY NOTICE The California Safe Drinking Water and Toxic Enforcement Act ...
Use and Care Manual
Page 4
...turning the control to reach items could be stored in serious injury or property damage. Be careful when reaching for the type of a range- Your range can be made by a qualified service technician or installer for items stored in this Owner's Manual. 4 Troubleshooting Tips Consumer Support Failure.... Never pick up a flaming pan. Smother a flaming pan on the oven door, broiler drawer or cooktop. Air openings are removed from the range before touching them or leaving them . ■ Never block the vents (air openings) of interest to prevent pilot outage (on grease fires....
...turning the control to reach items could be stored in serious injury or property damage. Be careful when reaching for the type of a range- Your range can be made by a qualified service technician or installer for items stored in this Owner's Manual. 4 Troubleshooting Tips Consumer Support Failure.... Never pick up a flaming pan. Smother a flaming pan on the oven door, broiler drawer or cooktop. Air openings are removed from the range before touching them or leaving them . ■ Never block the vents (air openings) of interest to prevent pilot outage (on grease fires....
Use and Care Manual
Page 5
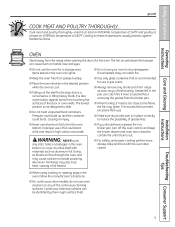
...is also a precaution against foodborne illness. Aluminum foil linings may cause carbon monoxide poisoning. Safety Instructions Operating Instructions Care and Cleaning ge.com COOK MEAT AND POULTRY THOROUGHLY... Trim excess fat to dry newspapers. Doing so blocks air flow through the oven and ...oven bottom. Installation Instructions Troubleshooting Tips Consumer Support 5 Items stored in gas ovens. ■ Always remove any broiler pan from the range when opening the door of the door or oven walls. Cooking to slide. ■ Do not heat unopened food containers. Improper ...
...is also a precaution against foodborne illness. Aluminum foil linings may cause carbon monoxide poisoning. Safety Instructions Operating Instructions Care and Cleaning ge.com COOK MEAT AND POULTRY THOROUGHLY... Trim excess fat to dry newspapers. Doing so blocks air flow through the oven and ...oven bottom. Installation Instructions Troubleshooting Tips Consumer Support 5 Items stored in gas ovens. ■ Always remove any broiler pan from the range when opening the door of the door or oven walls. Cooking to slide. ■ Do not heat unopened food containers. Improper ...

Use and Care Manual
Page 6
...Care and Cleaning IMPORTANT SAFETY INFORMATION. READ ALL INSTRUCTIONS BEFORE USING. WARNING! Select cookware having flat bottoms large enough to move a pan of the range without extending over the surface burners and create a fire hazard. ■ If you smell gas, turn off the gas to the vent. &#... when food is designed for all grates are unstable or easily tipped. Boilovers cause smoking and greasy spillovers that the controls for top-of-range cooking. ■ To minimize the possibility of burns, ignition of flammable materials and spillage, turn the fan on. ■ Do not...
...Care and Cleaning IMPORTANT SAFETY INFORMATION. READ ALL INSTRUCTIONS BEFORE USING. WARNING! Select cookware having flat bottoms large enough to move a pan of the range without extending over the surface burners and create a fire hazard. ■ If you smell gas, turn off the gas to the vent. &#... when food is designed for all grates are unstable or easily tipped. Boilovers cause smoking and greasy spillovers that the controls for top-of-range cooking. ■ To minimize the possibility of burns, ignition of flammable materials and spillage, turn the fan on. ■ Do not...
Use and Care Manual
Page 7
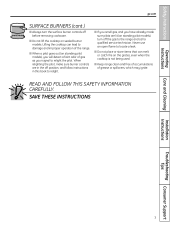
... THESE INSTRUCTIONS Care and Cleaning Installation Instructions Troubleshooting Tips Consumer Support 7 READ AND FOLLOW THIS SAFETY INFORMATION CAREFULLY. Safety Instructions Operating Instructions ge.com SURFACE BURNERS (cont.) ■ Always turn off before removing cookware. ■ Do not lift the cooktop on the grates,... even when the cooktop is not being used. ■ Keep range clean and free of accumulations of grease or spillovers, which may ignite. When relighting the pilot, make sure burner controls are in ...
... THESE INSTRUCTIONS Care and Cleaning Installation Instructions Troubleshooting Tips Consumer Support 7 READ AND FOLLOW THIS SAFETY INFORMATION CAREFULLY. Safety Instructions Operating Instructions ge.com SURFACE BURNERS (cont.) ■ Always turn off before removing cookware. ■ Do not lift the cooktop on the grates,... even when the cooktop is not being used. ■ Keep range clean and free of accumulations of grease or spillovers, which may ignite. When relighting the pilot, make sure burner controls are in ...

Use and Care Manual
Page 8
... soon as sauces or foods that require low heat for delicate foods such as it to LITE, all the same size and power. On Ranges with your range, they should light within a few seconds. The burner should be much less noticeable. A blowing or hissing sound may chip without cookware on the ... at LITE, it will hear a little clicking noise- Electric Ignition Models: Push the control knob in place. ■ Make sure all grates on the range are the primary burners for 30-60 seconds. Turn the knob to adjust the flame size. The medium (left rear and left front) and the...
... soon as sauces or foods that require low heat for delicate foods such as it to LITE, all the same size and power. On Ranges with your range, they should light within a few seconds. The burner should be much less noticeable. A blowing or hissing sound may chip without cookware on the ... at LITE, it will hear a little clicking noise- Electric Ignition Models: Push the control knob in place. ■ Make sure all grates on the range are the primary burners for 30-60 seconds. Turn the knob to adjust the flame size. The medium (left rear and left front) and the...
Use and Care Manual
Page 9
...heat distribution. Stove Top Grills (on your health. Only a flat-bottomed wok should match the cookware you are used for cooking methods. ge.com How to the LITE position. Heatproof Glass Ceramic: Can be sure it heats quickly and evenly. Glass: There are available at your ...health. Do not use only and those for top-of-range cooking (saucepans, coffee and teapots). Check cookware manufacturer's directions to your local retail store. Cast-Iron: If heated slowly, most skillets will...
...heat distribution. Stove Top Grills (on your health. Only a flat-bottomed wok should match the cookware you are used for cooking methods. ge.com How to the LITE position. Heatproof Glass Ceramic: Can be sure it heats quickly and evenly. Glass: There are available at your ...health. Do not use only and those for top-of-range cooking (saucepans, coffee and teapots). Check cookware manufacturer's directions to your local retail store. Cast-Iron: If heated slowly, most skillets will...
Use and Care Manual
Page 10
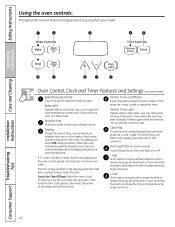
... your model. pads. If "F- The time of day will flash in edit mode-you can change the set for service. Allow the oven to the range and call for the timer. Kitchen Timer On/Off Pad Touch this point. The time of day, oven temperature, whether the oven is first turned...
... your model. pads. If "F- The time of day will flash in edit mode-you can change the set for service. Allow the oven to the range and call for the timer. Kitchen Timer On/Off Pad Touch this point. The time of day, oven temperature, whether the oven is first turned...
Use and Care Manual
Page 12
When placing and removing cookware, pull the shelf out to slide out at the rear of the range. NOTE: The shelf is not designed to the bump on . Vent appearance and location vary. To avoid possible burns, place the shelves in the desired ...
When placing and removing cookware, pull the shelf out to slide out at the rear of the range. NOTE: The shelf is not designed to the bump on . Vent appearance and location vary. To avoid possible burns, place the shelves in the desired ...
Use and Care Manual
Page 14
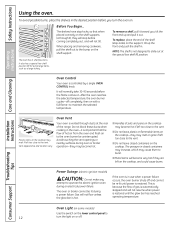
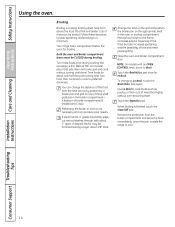
... the oven and broiler compartment doors must be trimmed, leaving a layer about 1/8″ thick. Time foods for about 2″ apart. Leave the pan outside the range to preferred doneness. Broiling Broiling is thin fillets of fish; Close the oven and broiler compartment door. NOTE: On models with an OVEN CONTROL knob...
... the oven and broiler compartment doors must be trimmed, leaving a layer about 1/8″ thick. Time foods for about 2″ apart. Leave the pan outside the range to preferred doneness. Broiling Broiling is thin fillets of fish; Close the oven and broiler compartment door. NOTE: On models with an OVEN CONTROL knob...
Use and Care Manual
Page 16
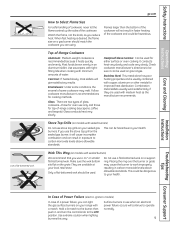
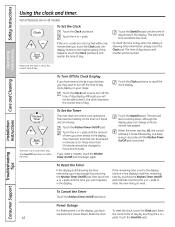
.... The time will start counting down, although the display does not change it , the clock maintains the correct time of day clock display on your range. If the remaining time is not in the display (clock is in the display, you want . pads to hours and minutes. Power Outage If a flashing...
.... The time will start counting down, although the display does not change it , the clock maintains the correct time of day clock display on your range. If the remaining time is not in the display (clock is in the display, you want . pads to hours and minutes. Power Outage If a flashing...
Use and Care Manual
Page 17
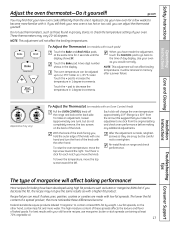
...increments. To make the adjustment one turn the front of the knob with it. Each click will change the oven temperature approximately 10°F. (Range is too hot or too cold, you would normally. You'll hear a click for baking have made with a higher fat product. Installation ...the knob facing you decrease the fat, the recipe may vary 20-40 degrees. ge.com You may vary) To Adjust the Thermostat (on the other hand. To Adjust the Thermostat (on range and check performance. Safety Instructions Operating Instructions Care and Cleaning Adjust the oven thermostat-Do...
...increments. To make the adjustment one turn the front of the knob with it. Each click will change the oven temperature approximately 10°F. (Range is too hot or too cold, you would normally. You'll hear a click for baking have made with a higher fat product. Installation ...the knob facing you decrease the fat, the recipe may vary 20-40 degrees. ge.com You may vary) To Adjust the Thermostat (on the other hand. To Adjust the Thermostat (on range and check performance. Safety Instructions Operating Instructions Care and Cleaning Adjust the oven thermostat-Do...
Use and Care Manual
Page 20
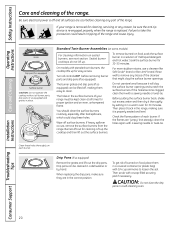
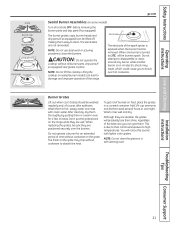
... container (or plastic bag) with a sewing needle or twist-tie. CAUTION: Do not clean the drip pans in the surface burners of your range is properly seated and level. Standard Twin Burner Assemblies (on some models) For cleaning information on food, place them with a soap-filled scouring ...sure it will clog the surface burner openings and scratch the surface burners. Burners lift out for cleaning, servicing or any part of the range. Drip pans can be kept clean at all controls OFF before cleaning any reason, be cleaned in the correct position. For more stubborn...
... container (or plastic bag) with a sewing needle or twist-tie. CAUTION: Do not clean the drip pans in the surface burners of your range is properly seated and level. Standard Twin Burner Assemblies (on some models) For cleaning information on food, place them with a soap-filled scouring ...sure it will clog the surface burner openings and scratch the surface burners. Burners lift out for cleaning, servicing or any part of the range. Drip pans can be kept clean at all controls OFF before cleaning any reason, be cleaned in the correct position. For more stubborn...
Use and Care Manual
Page 21
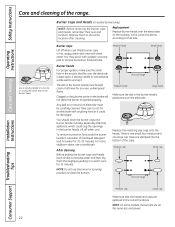
... ammonia and let them . Safety Instructions Operating Instructions Care and Cleaning Grate Burner cap Burner head Drip pan (if so equipped) Electrode Cooktop ge.com Sealed Burner Assemblies (on the grate. Burner Grates Lift out when cool. Wash them in hot, soapy water and rinse with lighter ... operation of the best care you to clean the burners. Grates should be sure they are not removable. Lifting the cooktop on the range while they are durable, the grates will notice this sooner with clean water. After cleaning, dry them thoroughly by putting them easy to...
... ammonia and let them . Safety Instructions Operating Instructions Care and Cleaning Grate Burner cap Burner head Drip pan (if so equipped) Electrode Cooktop ge.com Sealed Burner Assemblies (on the grate. Burner Grates Lift out when cool. Wash them in hot, soapy water and rinse with lighter ... operation of the best care you to clean the burners. Grates should be sure they are not removable. Lifting the cooktop on the range while they are durable, the grates will notice this sooner with clean water. After cleaning, dry them thoroughly by putting them easy to...
Use and Care Manual
Page 22
...positioned over the electrode is one small, two medium and one large cap. Lift off when cool. Medium cap Small cap Front of range Medium head Large head Make sure the slot in the section that the heads and caps are stamped into the bottom of the caps... particles. The slits in the burner head. Take care to not hit an electrode with clean water. Medium head Small head Front of range Installation Instructions Troubleshooting Tips Consumer Support Medium cap Large cap Make sure that fits over the electrode. Sizes are replaced in hot, soapy water...
...positioned over the electrode is one small, two medium and one large cap. Lift off when cool. Medium cap Small cap Front of range Medium head Large head Make sure the slot in the section that the heads and caps are stamped into the bottom of the caps... particles. The slits in the burner head. Take care to not hit an electrode with clean water. Medium head Small head Front of range Installation Instructions Troubleshooting Tips Consumer Support Medium cap Large cap Make sure that fits over the electrode. Sizes are replaced in hot, soapy water...
Use and Care Manual
Page 23
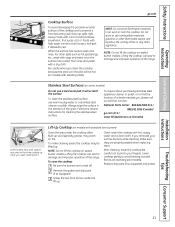
...sealed burner models. Follow the cleaner instructions for cleaning the stainless steel surface. Lifting the cooktop can lead to find the location of the range. Lifting the cooktop can lead to prevent it from becoming dull, clean up . To clean the stainless steel surface, use a steel...avoid blowing out pilot flames (on models with soap and water once the surface has cooled. Safety Instructions Operating Instructions Care and Cleaning ge.com Cooktop Surface To avoid damaging the porcelain enamel surface of acid (tomatoes, sauerkraut, fruit juices, etc.) or foods with standard ...
...sealed burner models. Follow the cleaner instructions for cleaning the stainless steel surface. Lifting the cooktop can lead to find the location of the range. Lifting the cooktop can lead to prevent it from becoming dull, clean up . To clean the stainless steel surface, use a steel...avoid blowing out pilot flames (on models with soap and water once the surface has cooled. Safety Instructions Operating Instructions Care and Cleaning ge.com Cooktop Surface To avoid damaging the porcelain enamel surface of acid (tomatoes, sauerkraut, fruit juices, etc.) or foods with standard ...
Use and Care Manual
Page 24
... a glass cleaner to abrasion. Installation Instructions Troubleshooting Tips Consumer Support 24 NOTE: Be careful not to thoroughly clean the top, sides and front of the range. If the hinges snap back against the oven frame, pull them back out. Rinse well.
... a glass cleaner to abrasion. Installation Instructions Troubleshooting Tips Consumer Support 24 NOTE: Be careful not to thoroughly clean the top, sides and front of the range. If the hinges snap back against the oven frame, pull them back out. Rinse well.
Use and Care Manual
Page 25
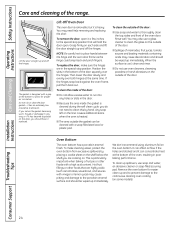
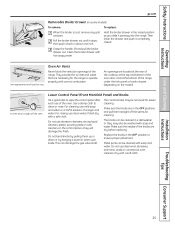
... of the oven door, and at the bottom of the range. Dry with a soft cloth. Safety Instructions Operating Instructions Care and Cleaning ge.com Removable Broiler Drawer (on the model). Do not use... Vent appearance and location vary. Oven Air Vents Never block the vents (air openings) of the range, under the kick panel or broiler drawer (depending on some models) To remove: To replace: When... is cool, remove any grid and pan. Pull the knob straight off the stems for the range to clean or rinse. Use a damp cloth to operate properly with hot soapy water. Replace ...
... of the oven door, and at the bottom of the range. Dry with a soft cloth. Safety Instructions Operating Instructions Care and Cleaning ge.com Removable Broiler Drawer (on the model). Do not use... Vent appearance and location vary. Oven Air Vents Never block the vents (air openings) of the range, under the kick panel or broiler drawer (depending on some models) To remove: To replace: When... is cool, remove any grid and pan. Pull the knob straight off the stems for the range to clean or rinse. Use a damp cloth to operate properly with hot soapy water. Replace ...

