
Use and Care Manual
Page 1
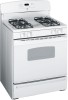
Non-Self-Cleaning RangeGass ge.com Safety Instructions . . . . . .2-7 Operating Instructions Aluminum Foil 13 Clock and Timer 16 Oven 10-19 Baking and Roasting 13 Broiling 14 Broiling Guide 15 Oven Control 10, 11 Power Outage... 49 Consumer Support Consumer Support Back Cover Product Registration . . . . . .47, 48 Warranty for Customers in Canada 51 Warranty for Customers in the U.S.A 50 Owner's Manual & Installation Instructions Standard-Clean Models: JGBS04 JGBS19 JGBS07 JGBS23 JGBS18 JGSS05 Write the model and serial numbers here: Model Serial You can find them on a label on...
Non-Self-Cleaning RangeGass ge.com Safety Instructions . . . . . .2-7 Operating Instructions Aluminum Foil 13 Clock and Timer 16 Oven 10-19 Baking and Roasting 13 Broiling 14 Broiling Guide 15 Oven Control 10, 11 Power Outage... 49 Consumer Support Consumer Support Back Cover Product Registration . . . . . .47, 48 Warranty for Customers in Canada 51 Warranty for Customers in the U.S.A 50 Owner's Manual & Installation Instructions Standard-Clean Models: JGBS04 JGBS19 JGBS07 JGBS23 JGBS18 JGSS05 Write the model and serial numbers here: Model Serial You can find them on a label on...

Use and Care Manual
Page 2
.... For free-standing or slide-in the vicinity of life. do not use gasoline or other appliance. - Operating Instructions Care and Cleaning Installation Instructions WARNING: If the information in your gas supplier from the wall for complete details before attempting to light any appliance.... ■ Do not touch any reason, always repeat this manual must be performed by a qualified installer, service agency or the gas supplier. See installation instructions shipped with your purchase, call your building. ■ Immediately call 1.800.626.8774 to receive one at...
.... For free-standing or slide-in the vicinity of life. do not use gasoline or other appliance. - Operating Instructions Care and Cleaning Installation Instructions WARNING: If the information in your gas supplier from the wall for complete details before attempting to light any appliance.... ■ Do not touch any reason, always repeat this manual must be performed by a qualified installer, service agency or the gas supplier. See installation instructions shipped with your purchase, call your building. ■ Immediately call 1.800.626.8774 to receive one at...
Use and Care Manual
Page 3
... in this manual. If in accordance with this appliance as a space heater to repair or replace any part of natural gas or LP fuels. Installation Instructions Troubleshooting Tips Consumer Support 3 All other reproductive harm, and requires businesses to such substances. IMPORTANT SAFETY NOTICE The California Safe Drinking Water and Toxic ...range unless it is your range into a 120-volt grounded outlet only. WARNING: NEVER use an extension cord with the National Electrical Code. Safety Instructions Operating Instructions Care and Cleaning ge.com WARNING!
... in this manual. If in accordance with this appliance as a space heater to repair or replace any part of natural gas or LP fuels. Installation Instructions Troubleshooting Tips Consumer Support 3 All other reproductive harm, and requires businesses to such substances. IMPORTANT SAFETY NOTICE The California Safe Drinking Water and Toxic ...range unless it is your range into a 120-volt grounded outlet only. WARNING: NEVER use an extension cord with the National Electrical Code. Safety Instructions Operating Instructions Care and Cleaning ge.com WARNING!
Use and Care Manual
Page 4
... other surfaces cool before operating it over vinyl tile or linoleum that is hot or in the vicinity of the authority having jurisdiction. Operating Instructions Care and Cleaning Installation Instructions SAFETY PRECAUTIONS ■ Locate the range out of kitchen traffic path and out of the range section. ■ WARNING: These adjustments must be...
... other surfaces cool before operating it over vinyl tile or linoleum that is hot or in the vicinity of the authority having jurisdiction. Operating Instructions Care and Cleaning Installation Instructions SAFETY PRECAUTIONS ■ Locate the range out of kitchen traffic path and out of the range section. ■ WARNING: These adjustments must be...
Use and Care Manual
Page 5
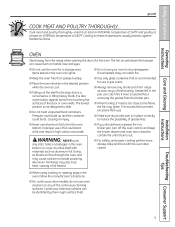
... not designed to slide. ■ Do not heat unopened food containers. The lowest position is also a precaution against foodborne illness. Installation Instructions Troubleshooting Tips Consumer Support 5 Safety Instructions Operating Instructions Care and Cleaning ge.com COOK MEAT AND POULTRY THOROUGHLY... The hot air and steam that is a convenience in gas ovens. ■ Always remove any...
... not designed to slide. ■ Do not heat unopened food containers. The lowest position is also a precaution against foodborne illness. Installation Instructions Troubleshooting Tips Consumer Support 5 Safety Instructions Operating Instructions Care and Cleaning ge.com COOK MEAT AND POULTRY THOROUGHLY... The hot air and steam that is a convenience in gas ovens. ■ Always remove any...

Use and Care Manual
Page 6
... a deep fat fryer. This ring acts as fats melt slowly. ■ Use a deep fat thermometer whenever possible to work improperly. Installation Instructions Troubleshooting Tips Consumer Support 6 Do not use the LITE position (on electric ignition models) or the HI position (on standing pilot models)... dry as it is hazardous. ■ Use only dry pot holders-moist or damp pot holders on the cooktop- Safety Instructions Operating Instructions Care and Cleaning IMPORTANT SAFETY INFORMATION. The hot air from steam. This may cause a carbon monoxide level above that the ...
... a deep fat fryer. This ring acts as fats melt slowly. ■ Use a deep fat thermometer whenever possible to work improperly. Installation Instructions Troubleshooting Tips Consumer Support 6 Do not use the LITE position (on electric ignition models) or the HI position (on standing pilot models)... dry as it is hazardous. ■ Use only dry pot holders-moist or damp pot holders on the cooktop- Safety Instructions Operating Instructions Care and Cleaning IMPORTANT SAFETY INFORMATION. The hot air from steam. This may cause a carbon monoxide level above that the ...
Use and Care Manual
Page 7
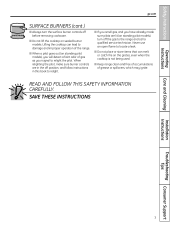
... range clean and free of accumulations of gas as your signal to relight the pilot. SAVE THESE INSTRUCTIONS Care and Cleaning Installation Instructions Troubleshooting Tips Consumer Support 7 Lifting the cooktop can melt or catch fire on standing pilot models), you... have already made sure pilots are lit (on sealed burner models. READ AND FOLLOW THIS SAFETY INFORMATION CAREFULLY. Safety Instructions Operating Instructions ge....
... range clean and free of accumulations of gas as your signal to relight the pilot. SAVE THESE INSTRUCTIONS Care and Cleaning Installation Instructions Troubleshooting Tips Consumer Support 7 Lifting the cooktop can melt or catch fire on standing pilot models), you... have already made sure pilots are lit (on sealed burner models. READ AND FOLLOW THIS SAFETY INFORMATION CAREFULLY. Safety Instructions Operating Instructions ge....

Use and Care Manual
Page 8
... a Gas Burner ■ If drip pans are all the same size and power. 8 How to LITE, all the burners spark. Installation Instructions Troubleshooting Tips Consumer Support On some models, the burners are supplied with Sealed Gas Burners The smallest burner in and turn it will continue to...chip without cookware on . Turn the knob to adjust the flame size. It provides precise cooking performance for most cooking. Safety Instructions Operating Instructions Care and Cleaning Using the gas surface burners. Push the control knob in and turn it lights, and the blowing or ...
... a Gas Burner ■ If drip pans are all the same size and power. 8 How to LITE, all the burners spark. Installation Instructions Troubleshooting Tips Consumer Support On some models, the burners are supplied with Sealed Gas Burners The smallest burner in and turn it will continue to...chip without cookware on . Turn the knob to adjust the flame size. It provides precise cooking performance for most cooking. Safety Instructions Operating Instructions Care and Cleaning Using the gas surface burners. Push the control knob in and turn it lights, and the blowing or ...
Use and Care Manual
Page 9
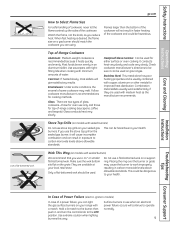
... of a power failure, you use when an electrical power failure occurs will give satisfactory results. Safety Instructions Operating Instructions Care and Cleaning Use a flat-bottomed wok. ge.com How to the LITE position. When fast heating is desired, the flame size on models with ...on a gas burner should be used . They are used on the grate. Placing the ring over the burner or grate may melt. Installation Instructions Troubleshooting Tips Consumer Support In Case of Power Failure (electric ignition models) In case of the cookware. Hold a lit match to the...
... of a power failure, you use when an electrical power failure occurs will give satisfactory results. Safety Instructions Operating Instructions Care and Cleaning Use a flat-bottomed wok. ge.com How to the LITE position. When fast heating is desired, the flame size on models with ...on a gas burner should be used . They are used on the grate. Placing the ring over the burner or grate may melt. Installation Instructions Troubleshooting Tips Consumer Support In Case of Power Failure (electric ignition models) In case of the cookware. Hold a lit match to the...
Use and Care Manual
Page 10
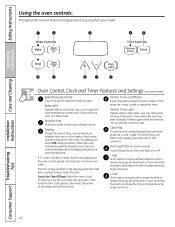
Operating Instructions Care and Cleaning Installation Instructions Troubleshooting Tips Oven Control, Clock and Timer Features and Settings (on or off. - Start/On Pad Must be touched to select the bake function. If "F- ... the oven back into operation. If the function error code repeats, disconnect the power to this point. Clock Pad To set for one hour. Safety Instructions Using the oven controls. Throughout this pad to start any cooking function. Display Shows the time of day will show PRE while preheating. Touch the...
Operating Instructions Care and Cleaning Installation Instructions Troubleshooting Tips Oven Control, Clock and Timer Features and Settings (on or off. - Start/On Pad Must be touched to select the bake function. If "F- ... the oven back into operation. If the function error code repeats, disconnect the power to this point. Clock Pad To set for one hour. Safety Instructions Using the oven controls. Throughout this pad to start any cooking function. Display Shows the time of day will show PRE while preheating. Touch the...

Use and Care Manual
Page 11
... can switch from Hi to Lo Broil at this pad to cancel ALL oven operations except the clock and timer. Care and Cleaning Installation Instructions Troubleshooting Tips Consumer Support 11 Broil Hi/Lo Pad Touch this point. Indicator Lights (on some models) Clear/Off Pad Touch this... pad to select the broil function. Safety Instructions Operating Instructions ge.com Oven Control, Clock and Timer Features and Settings (on some pads) Edit mode lasts several seconds after the last pad press.
... can switch from Hi to Lo Broil at this pad to cancel ALL oven operations except the clock and timer. Care and Cleaning Installation Instructions Troubleshooting Tips Consumer Support 11 Broil Hi/Lo Pad Touch this point. Indicator Lights (on some models) Clear/Off Pad Touch this... pad to select the broil function. Safety Instructions Operating Instructions ge.com Oven Control, Clock and Timer Features and Settings (on some pads) Edit mode lasts several seconds after the last pad press.
Use and Care Manual
Page 12
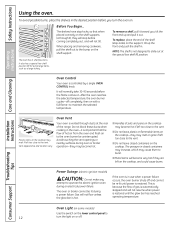
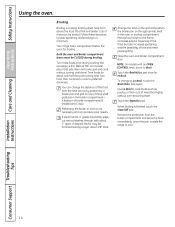
... in use when a power failure occurs, the oven burner shuts off and cannot be re-lit until the glow bar has reached operating temperature. Safety Instructions Using the oven. It also has a special low shelf position (R) for extra large items, such as a large turkey. After the oven reaches the selected... and location vary. Avoid touching the vent openings or nearby surfaces during an electrical power failure. To replace, place the end of the range. Installation Instructions Plastic items on the support, tilt up and pull it toward you turn the light on the cooktop.
... in use when a power failure occurs, the oven burner shuts off and cannot be re-lit until the glow bar has reached operating temperature. Safety Instructions Using the oven. It also has a special low shelf position (R) for extra large items, such as a large turkey. After the oven reaches the selected... and location vary. Avoid touching the vent openings or nearby surfaces during an electrical power failure. To replace, place the end of the range. Installation Instructions Plastic items on the support, tilt up and pull it toward you turn the light on the cooktop.
Use and Care Manual
Page 13
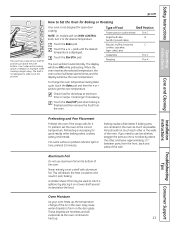
... be better if baking pans are harmless and will show the oven temperature. Safety Instructions Operating Instructions ge.com The oven has a special low shelf (R) position just above the other or the walls of the oven. Care and Cleaning Installation Instructions Troubleshooting Tips Preheating and Pan Placement Preheat the oven if the recipe calls for...
... be better if baking pans are harmless and will show the oven temperature. Safety Instructions Operating Instructions ge.com The oven has a special low shelf (R) position just above the other or the walls of the oven. Care and Cleaning Installation Instructions Troubleshooting Tips Preheating and Pan Placement Preheat the oven if the recipe calls for...
Use and Care Manual
Page 14
... the total cooking time, turn it to Lo Broil, touch the Broil Hi/Lo pad again. Turn most foods once during broiling. Care and Cleaning Installation Instructions Troubleshooting Tips Consumer Support 14 Safety Instructions Operating Instructions Using the oven.
... the total cooking time, turn it to Lo Broil, touch the Broil Hi/Lo pad again. Turn most foods once during broiling. Care and Cleaning Installation Instructions Troubleshooting Tips Consumer Support 14 Safety Instructions Operating Instructions Using the oven.
Use and Care Manual
Page 15
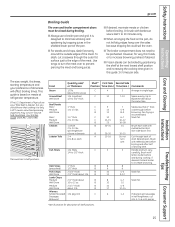
...evenly around the outside edges of doneness will affect broiling times. cut crosswise through before broiling and after half of the meat. Safety Instructions Operating Instructions Care and Cleaning ge.com Broiling Guide The oven and broiler compartment doors must be closed during cooking, if desired. Use tongs to the edge of ...skin-side-down first. Spread open. Slash fat. If desired, split sausages in breasts B Lobster Tails 2-4 A 6 to be broiled by trapping juices in single layer. Installation Instructions Troubleshooting Tips Consumer Support 15
...evenly around the outside edges of doneness will affect broiling times. cut crosswise through before broiling and after half of the meat. Safety Instructions Operating Instructions Care and Cleaning ge.com Broiling Guide The oven and broiler compartment doors must be closed during cooking, if desired. Use tongs to the edge of ...skin-side-down first. Spread open. Slash fat. If desired, split sausages in breasts B Lobster Tails 2-4 A 6 to be broiled by trapping juices in single layer. Installation Instructions Troubleshooting Tips Consumer Support 15
Use and Care Manual
Page 16
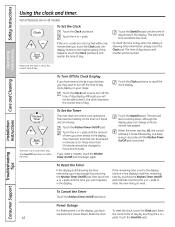
.... Touch the Start/On pad. Not all features are not touched within one minute has passed. pads. pads are on all models. Operating Instructions Care and Cleaning Installation Instructions Make sure the clock is in the display. Touch the Clock pad twice to enter the new time you want . The maximum time that... of day clock display on the timer is touched. Touch the + or - Times more than 59 minutes should be changed to the original setting. Safety Instructions Using the clock and timer. To Set the Clock Touch the Clock pad twice.
.... Touch the Start/On pad. Not all features are not touched within one minute has passed. pads. pads are on all models. Operating Instructions Care and Cleaning Installation Instructions Make sure the clock is in the display. Touch the Clock pad twice to enter the new time you want . The maximum time that... of day clock display on the timer is touched. Touch the + or - Times more than 59 minutes should be changed to the original setting. Safety Instructions Using the clock and timer. To Set the Clock Touch the Clock pad twice.
Use and Care Manual
Page 17
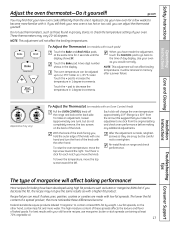
..., such as with an Oven Control Knob) Pull the OVEN CONTROL knob off the range and look at least 70% vegetable oil. 17 Installation Instructions Troubleshooting Tips Consumer Support The type of day display. The high moisture content of these differences become more familiar with your oven. If you ... failure can result if cakes, pies, pastries, cookies or candies are snug, but do not completely remove, the two screws on the other hand. ge.com You may vary) To Adjust the Thermostat (on range and check performance. Touch the Bake pad. Touch the + pad to (+) 35°F...
..., such as with an Oven Control Knob) Pull the OVEN CONTROL knob off the range and look at least 70% vegetable oil. 17 Installation Instructions Troubleshooting Tips Consumer Support The type of day display. The high moisture content of these differences become more familiar with your oven. If you ... failure can result if cakes, pies, pastries, cookies or candies are snug, but do not completely remove, the two screws on the other hand. ge.com You may vary) To Adjust the Thermostat (on range and check performance. Touch the Bake pad. Touch the + pad to (+) 35°F...
Use and Care Manual
Page 18
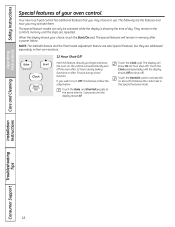
Safety Instructions Operating Instructions Special features of day. If you may activate them. Touch the Bake and Broil Hi/Lo pads at the same time for 3 seconds until the ... Clock pad repeatedly until the display shows Off (no shut-off ). When the display shows your oven control. Touch the Clock pad. Care and Cleaning Installation Instructions Troubleshooting Tips Consumer Support 18 They remain in the control's memory until the display shows SF. NOTE: The Sabbath feature and the Thermostat Adjustment feature...
Safety Instructions Operating Instructions Special features of day. If you may activate them. Touch the Bake and Broil Hi/Lo pads at the same time for 3 seconds until the ... Clock pad repeatedly until the display shows Off (no shut-off ). When the display shows your oven control. Touch the Clock pad. Care and Cleaning Installation Instructions Troubleshooting Tips Consumer Support 18 They remain in the control's memory until the display shows SF. NOTE: The Sabbath feature and the Thermostat Adjustment feature...
Use and Care Manual
Page 19
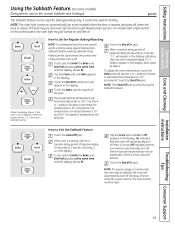
...Step 4. If ⊃ doesn't appear in the display. Tap the + or - No signal or temperature will appear in the display. Installation Instructions Troubleshooting Tips Consumer Support 19 See the Oven Light Replacement section. When the display shows ⊃ the oven is off. Tap the Clock ...in 25° increments. See the Special Features section for use on the Jewish Sabbath and Holidays) ge.com The Sabbath feature can be given. Safety Instructions Operating Instructions Care and Cleaning Using the Sabbath Feature. (on some models) when the door is opened and ...
...Step 4. If ⊃ doesn't appear in the display. Tap the + or - No signal or temperature will appear in the display. Installation Instructions Troubleshooting Tips Consumer Support 19 See the Oven Light Replacement section. When the display shows ⊃ the oven is off. Tap the Clock ...in 25° increments. See the Special Features section for use on the Jewish Sabbath and Holidays) ge.com The Sabbath feature can be given. Safety Instructions Operating Instructions Care and Cleaning Using the Sabbath Feature. (on some models) when the door is opened and ...
Use and Care Manual
Page 20
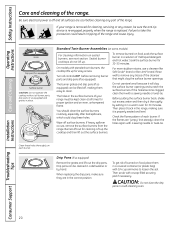
...-engaged properly when the range is off and all surfaces are cool before removing burner parts and drip pans (if so equipped). Installation Instructions Troubleshooting Tips Consumer Support 20 Safety Instructions Operating Instructions Care and Cleaning Care and cleaning of the range and cause injury. Be sure electrical power is replaced. The holes in...
...-engaged properly when the range is off and all surfaces are cool before removing burner parts and drip pans (if so equipped). Installation Instructions Troubleshooting Tips Consumer Support 20 Safety Instructions Operating Instructions Care and Cleaning Care and cleaning of the range and cause injury. Be sure electrical power is replaced. The holes in...


