

Use and Care Manual
Page 1
... ge.com Safety Instructions . . . . . .2-7 Operating Instructions Aluminum Foil 13 Clock and Timer 16 Oven 10-19 Baking and Roasting 13 Broiling 14 Broiling Guide 15 Oven Control 10, 11 Power Outage 12 Preheating 13 Sabbath Feature 19 Special Features 18 Surface Cooking 8, 9 Thermostat Adjustment 17 Care and Cleaning Air Vents 25 Burner Assemblies 20-21 Burner Caps and Heads . . . . . .22 Burner Grates 21 Control Panel and Knobs . . . . .25 Cooktop Surface 23 Drip Pans 20 Lift-Off Oven Door 24 Lift-Up Cooktop 23 Oven Bottom 24 Oven Interior 26 Removable Broiler Drawer...
... ge.com Safety Instructions . . . . . .2-7 Operating Instructions Aluminum Foil 13 Clock and Timer 16 Oven 10-19 Baking and Roasting 13 Broiling 14 Broiling Guide 15 Oven Control 10, 11 Power Outage 12 Preheating 13 Sabbath Feature 19 Special Features 18 Surface Cooking 8, 9 Thermostat Adjustment 17 Care and Cleaning Air Vents 25 Burner Assemblies 20-21 Burner Caps and Heads . . . . . .22 Burner Grates 21 Control Panel and Knobs . . . . .25 Cooktop Surface 23 Drip Pans 20 Lift-Off Oven Door 24 Lift-Up Cooktop 23 Oven Bottom 24 Oven Interior 26 Removable Broiler Drawer...
Use and Care Manual
Page 4
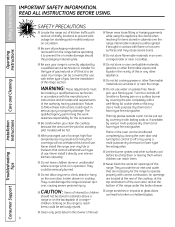
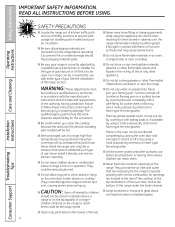
... store flammable materials in operation. Air openings are located at the rear of the cooktop, at the top and bottom of the oven door, and at the bottom of the range under the broiler drawer. ■ CAUTION : Items of use . READ ALL INSTRUCTIONS BEFORE USING. They could be seriously burned. ■ Do not allow anyone to broken or shattered glass. ■ Clean only parts listed in this kind...
... store flammable materials in operation. Air openings are located at the rear of the cooktop, at the top and bottom of the oven door, and at the bottom of the range under the broiler drawer. ■ CAUTION : Items of use . READ ALL INSTRUCTIONS BEFORE USING. They could be seriously burned. ■ Do not allow anyone to broken or shattered glass. ■ Clean only parts listed in this kind...

Use and Care Manual
Page 6
... holders on standing pilot models) when igniting the top burners and make sure cookware is located near open flame to contain the food properly. Do not let pot holders come near a window, do flame foods under the hood, turn off the gas to cover burner grates. Never use a towel or other bulky cloth in frying, stir together before attempting to remove them to work improperly. This ring...
... holders on standing pilot models) when igniting the top burners and make sure cookware is located near open flame to contain the food properly. Do not let pot holders come near a window, do flame foods under the hood, turn off the gas to cover burner grates. Never use a towel or other bulky cloth in frying, stir together before attempting to remove them to work improperly. This ring...

Use and Care Manual
Page 10
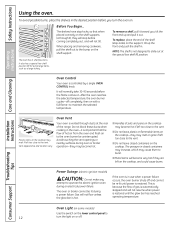
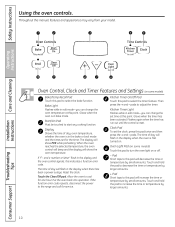
... reset. The time of day will increase the time or temperature by larger amounts. 10 Consumer Support Bake Light Flashes while in edit mode-you can change the set the clock, press this point. Touch the Clear/Off pad. Pad Short taps to cool for service. Operating Instructions Care and Cleaning Installation Instructions Troubleshooting Tips Oven Control, Clock and Timer Features and Settings (on or off. - Kitchen Timer On/Off Pad Touch this manual, features and appearance may vary from your model...
... reset. The time of day will increase the time or temperature by larger amounts. 10 Consumer Support Bake Light Flashes while in edit mode-you can change the set the clock, press this point. Touch the Clear/Off pad. Pad Short taps to cool for service. Operating Instructions Care and Cleaning Installation Instructions Troubleshooting Tips Oven Control, Clock and Timer Features and Settings (on or off. - Kitchen Timer On/Off Pad Touch this manual, features and appearance may vary from your model...

Use and Care Manual
Page 11
... Broil at this point. Appearance may vary. Oven Control Knob (on some pads) Edit mode lasts several seconds after the last pad press. Indicator Lights (on some models) Clear/Off Pad Touch this pad to cancel ALL oven operations except the clock and timer. Glows when the oven is in edit mode-you want. Broil Hi/Lo Pad Touch this pad to select the broil function. Care and Cleaning Installation Instructions Troubleshooting Tips Consumer Support...
... Broil at this point. Appearance may vary. Oven Control Knob (on some pads) Edit mode lasts several seconds after the last pad press. Indicator Lights (on some models) Clear/Off Pad Touch this pad to cancel ALL oven operations except the clock and timer. Glows when the oven is in edit mode-you want. Broil Hi/Lo Pad Touch this pad to select the broil function. Care and Cleaning Installation Instructions Troubleshooting Tips Consumer Support...
Use and Care Manual
Page 12
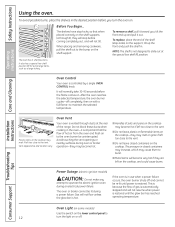
... is hot. Operating Instructions Care and Cleaning Oven Control Your oven is important that when placed correctly on . After the oven reaches the selected temperature, the oven burner cycles-off and cannot be re-lit until the glow bar has reached operating temperature. Vent appearance and location vary. Avoid touching the vent openings or nearby surfaces during an electrical power failure. Consumer Support Oven Light (on some models) Use the switch on the lower control panel to maintain the selected temperature.
... is hot. Operating Instructions Care and Cleaning Oven Control Your oven is important that when placed correctly on . After the oven reaches the selected temperature, the oven burner cycles-off and cannot be re-lit until the glow bar has reached operating temperature. Vent appearance and location vary. Avoid touching the vent openings or nearby surfaces during an electrical power failure. Consumer Support Oven Light (on some models) Use the switch on the lower control panel to maintain the selected temperature.
Use and Care Manual
Page 20
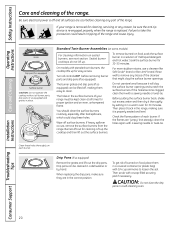
... remove burned-on each burner. Safety Instructions Operating Instructions Care and Cleaning Care and cleaning of each burner. Then scrub with a sewing needle or twist-tie. Burners lift out for 20-30 minutes. Turn all times for cleaning, servicing or any traces of the range and cause injury. Grate Drip pan (if so equipped) Surface burner CAUTION: Do not operate the cooktop without all surfaces are in tipping of the cleanser that might clog the surface burner openings...
... remove burned-on each burner. Safety Instructions Operating Instructions Care and Cleaning Care and cleaning of each burner. Then scrub with a sewing needle or twist-tie. Burners lift out for 20-30 minutes. Turn all times for cleaning, servicing or any traces of the range and cause injury. Grate Drip pan (if so equipped) Surface burner CAUTION: Do not operate the cooktop without all surfaces are in tipping of the cleanser that might clog the surface burner openings...

Use and Care Manual
Page 26
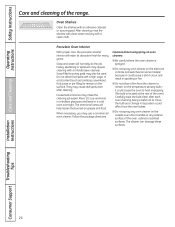
... surfaces. Care and Cleaning Installation Instructions Troubleshooting Tips Consumer Support 26 They may use a commercial oven cleaner. The ammonia fumes will normally do the job. When necessary, you may cause dull spots even after each oven cleaning, being careful not to move the bulb as tomatoes, sauerkraut, fruit juices or pie filling) to heat improperly. (The bulb is sprayed. ■ Do not spray oven cleaner on the electrical controls and switches...
... surfaces. Care and Cleaning Installation Instructions Troubleshooting Tips Consumer Support 26 They may use a commercial oven cleaner. The ammonia fumes will normally do the job. When necessary, you may cause dull spots even after each oven cleaning, being careful not to move the bulb as tomatoes, sauerkraut, fruit juices or pie filling) to heat improperly. (The bulb is sprayed. ■ Do not spray oven cleaner on the electrical controls and switches...
Use and Care Manual
Page 29
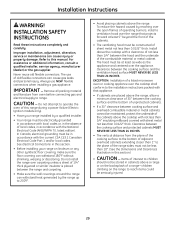
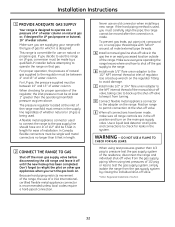
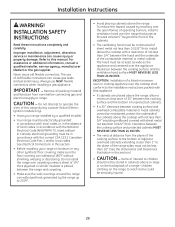
... a qualified installer, service agency, manufacturer (dealer) or the gas supplier. Always use of unprotected cabinets. • If a 30″ clearance between the cooking surface and protected cabinets MUST NEVER BE LESS THAN 24 INCHES. • The vertical distance from oven before connecting gas and electrical supply to this manual. To reduce the hazard caused by reaching over the open flames of operating burners, install a ventilation hood over the range that appliance...
... a qualified installer, service agency, manufacturer (dealer) or the gas supplier. Always use of unprotected cabinets. • If a 30″ clearance between the cooking surface and protected cabinets MUST NEVER BE LESS THAN 24 INCHES. • The vertical distance from oven before connecting gas and electrical supply to this manual. To reduce the hazard caused by reaching over the open flames of operating burners, install a ventilation hood over the range that appliance...
Use and Care Manual
Page 32
... gas supply piping. When using test pressures of the range. A Install a manual gas line shut-off valve. Position range to permit connection at all male (external) pipe threads. When using test pressures greater than 6 feet in an easily accessed location outside of 1/2 psig or less to operate the range on LP gas, conversion must carefully align the pipe; A flexible metal appliance connector used . D Connect flexible metal appliance connector to the adapter on the regulator...
... gas supply piping. When using test pressures of the range. A Install a manual gas line shut-off valve. Position range to permit connection at all male (external) pipe threads. When using test pressures greater than 6 feet in an easily accessed location outside of 1/2 psig or less to operate the range on LP gas, conversion must carefully align the pipe; A flexible metal appliance connector used . D Connect flexible metal appliance connector to the adapter on the regulator...
Use and Care Manual
Page 44
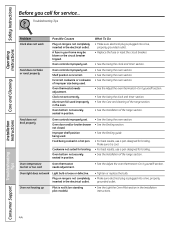
... in a hot pan. Oven temperature too hot or too cold Oven thermostat needs adjustment. • See the Adjust the oven thermostat-Do it yourself! Food does not broil properly Oven controls improperly set . Make sure it is loose or defective. Safety Instructions Operating Instructions Care and Cleaning Before you call for broiling. Troubleshooting Tips Problem Clock does not work Light bulb is cool. • For best results, use a pan designed for broiling. • See the Installation of the range section. A fuse in the electrical outlet...
... in a hot pan. Oven temperature too hot or too cold Oven thermostat needs adjustment. • See the Adjust the oven thermostat-Do it yourself! Food does not broil properly Oven controls improperly set . Make sure it is loose or defective. Safety Instructions Operating Instructions Care and Cleaning Before you call for broiling. Troubleshooting Tips Problem Clock does not work Light bulb is cool. • For best results, use a pan designed for broiling. • See the Installation of the range section. A fuse in the electrical outlet...

Quick Specs
Page 1
... Use & Care Manual for detailed installation instructions. 26-1/4* 46-3/8 For answers to your Monogram,® GE Profile™ or GE® appliance questions, visit our website at ge.com or call GE Answer Center® service, 800.626.2000. 36-1/4±1/4 9 30 *Dimension from wall to front of closed door handle is an important, 9 required step in inches) Factory set of LP orifices is 29". 4 24 30-7/8" All 30" GE gas and electric range backguards are...
... Use & Care Manual for detailed installation instructions. 26-1/4* 46-3/8 For answers to your Monogram,® GE Profile™ or GE® appliance questions, visit our website at ge.com or call GE Answer Center® service, 800.626.2000. 36-1/4±1/4 9 30 *Dimension from wall to front of closed door handle is an important, 9 required step in inches) Factory set of LP orifices is 29". 4 24 30-7/8" All 30" GE gas and electric range backguards are...

Installation Instructions
Page 1
... ge.com Safety Instructions . . . . . .2-7 Operating Instructions Aluminum Foil 13 Clock and Timer 16 Oven 10-19 Baking and Roasting 13 Broiling 14 Broiling Guide 15 Oven Control 10, 11 Power Outage 12 Preheating 13 Sabbath Feature 19 Special Features 18 Surface Cooking 8, 9 Thermostat Adjustment 17 Care and Cleaning Air Vents 25 Burner Assemblies 20-21 Burner Caps and Heads . . . . . .22 Burner Grates 21 Control Panel and Knobs . . . . .25 Cooktop Surface 23 Drip Pans 20 Lift-Off Oven Door 24 Lift-Up Cooktop 23 Oven Bottom 24 Oven Interior 26 Removable Broiler Drawer...
... ge.com Safety Instructions . . . . . .2-7 Operating Instructions Aluminum Foil 13 Clock and Timer 16 Oven 10-19 Baking and Roasting 13 Broiling 14 Broiling Guide 15 Oven Control 10, 11 Power Outage 12 Preheating 13 Sabbath Feature 19 Special Features 18 Surface Cooking 8, 9 Thermostat Adjustment 17 Care and Cleaning Air Vents 25 Burner Assemblies 20-21 Burner Caps and Heads . . . . . .22 Burner Grates 21 Control Panel and Knobs . . . . .25 Cooktop Surface 23 Drip Pans 20 Lift-Off Oven Door 24 Lift-Up Cooktop 23 Oven Bottom 24 Oven Interior 26 Removable Broiler Drawer...
Installation Instructions
Page 4
s Be sure all codes and requirements of the authority having jurisdiction. Failure to broken or shattered glass. 4 Troubleshooting Tips Consumer Support s After prolonged use with the manufacturer's instructions and all packaging materials are located at the rear of the cooktop, at the top and bottom of the oven door, and at the bottom of a range, high floor temperatures may cause severe burns. They could be seriously injured...
s Be sure all codes and requirements of the authority having jurisdiction. Failure to broken or shattered glass. 4 Troubleshooting Tips Consumer Support s After prolonged use with the manufacturer's instructions and all packaging materials are located at the rear of the cooktop, at the top and bottom of the oven door, and at the bottom of a range, high floor temperatures may cause severe burns. They could be seriously injured...
Installation Instructions
Page 10
... amounts. Display Shows the time of day, oven temperature, whether the oven is first turned on some models) Touch this pad will show the oven temperature. Allow the oven to this pad to adjust the timer. Touch the Clear/Off pad. Kitchen Timer On/Off Pad Touch this pad to start any cooking function. If "F- Start/On Pad Must be touched to select the bake function. Operating Instructions Care and Cleaning Installation Instructions Troubleshooting Tips Oven Control, Clock and Timer Features and Settings (on...
... amounts. Display Shows the time of day, oven temperature, whether the oven is first turned on some models) Touch this pad will show the oven temperature. Allow the oven to this pad to adjust the timer. Touch the Clear/Off pad. Kitchen Timer On/Off Pad Touch this pad to start any cooking function. If "F- Start/On Pad Must be touched to select the bake function. Operating Instructions Care and Cleaning Installation Instructions Troubleshooting Tips Oven Control, Clock and Timer Features and Settings (on...
Installation Instructions
Page 12
... cause them to the bump on the lower control panel to maintain the selected temperature. To replace, place the end of the range. Safety Instructions Using the oven. Operating Instructions Care and Cleaning Oven Control Your oven is not designed to operate the electric ignition oven during oven or broiler operation-they will not tilt. Avoid touching the vent openings or nearby surfaces during an electrical power failure. The oven or broiler cannot be re-lit until the glow...
... cause them to the bump on the lower control panel to maintain the selected temperature. To replace, place the end of the range. Safety Instructions Using the oven. Operating Instructions Care and Cleaning Oven Control Your oven is not designed to operate the electric ignition oven during oven or broiler operation-they will not tilt. Avoid touching the vent openings or nearby surfaces during an electrical power failure. The oven or broiler cannot be re-lit until the glow...
Installation Instructions
Page 26
... on the electrical controls and switches (on some models) because it could cause a short circuit and result in sparking or fire. Cautions about using spray-on the outside oven door, handles or any oven cleaner on oven cleaners: s Be careful where the oven cleaner is located at the rear of the range. The ammonia fumes will help loosen the burned-on the temperature sensing bulb- The cleaner...
... on the electrical controls and switches (on some models) because it could cause a short circuit and result in sparking or fire. Cautions about using spray-on the outside oven door, handles or any oven cleaner on oven cleaners: s Be careful where the oven cleaner is located at the rear of the range. The ammonia fumes will help loosen the burned-on the temperature sensing bulb- The cleaner...
Installation Instructions
Page 29
... the Dimensions and Clearances illustration in accordance with the current CSA C22.1 Canadian Electrical Code Part 1 and/or local codes. EXCEPTION: Installation of a listed microwave oven or cooking appliance over carpeting unless a sheet of not less than 1/4″ between the cooking surface and the ventilation hood surface MUST NEVER BE LESS THAN 24 INCHES. INSTALLATION SAFETY INSTRUCTIONS Read these instructions completely and carefully. Do not install the range over the cooktop shall...
... the Dimensions and Clearances illustration in accordance with the current CSA C22.1 Canadian Electrical Code Part 1 and/or local codes. EXCEPTION: Installation of a listed microwave oven or cooking appliance over carpeting unless a sheet of not less than 1/4″ between the cooking surface and the ventilation hood surface MUST NEVER BE LESS THAN 24 INCHES. INSTALLATION SAFETY INSTRUCTIONS Read these instructions completely and carefully. Do not install the range over the cooktop shall...

Installation Instructions
Page 32
... supply line regardless of whether natural or LP gas is being used. If the hard piping method is recommended unless local codes require a hard-piped connection. Make sure everyone operating the range knows where and how to shut off valve to keep it from turning. Position range to permit connection at the inlet of the range manifold must carefully align the pipe; DO NOT USE A FLAME TO CHECK FOR GAS...
... supply line regardless of whether natural or LP gas is being used. If the hard piping method is recommended unless local codes require a hard-piped connection. Make sure everyone operating the range knows where and how to shut off valve to keep it from turning. Position range to permit connection at the inlet of the range manifold must carefully align the pipe; DO NOT USE A FLAME TO CHECK FOR GAS...

Installation Instructions
Page 44
... oven thermostat-Do it yourself! Oven thermostat needs adjustment. Oven bottom not securely seated in position. • See the Using the oven section. • See the Broiling section. • See the Broiling guide. • For best results, use a pan designed for broiling. Oven not heating up Pilot is plugged into a live , properly grounded outlet. • Replace the fuse or reset the circuit breaker. • See the Using the clock and timer section. Troubleshooting Tips Problem Clock does not work Light bulb is plugged...
... oven thermostat-Do it yourself! Oven thermostat needs adjustment. Oven bottom not securely seated in position. • See the Using the oven section. • See the Broiling section. • See the Broiling guide. • For best results, use a pan designed for broiling. Oven not heating up Pilot is plugged into a live , properly grounded outlet. • Replace the fuse or reset the circuit breaker. • See the Using the clock and timer section. Troubleshooting Tips Problem Clock does not work Light bulb is plugged...


