
Installation Instructions
Page 1
...14 Broiling Guide 15 Oven Control 10, 11 Power Outage 12 Preheating 13 Sabbath Feature 19 Special Features 18 Surface Cooking 8, 9 Thermostat Adjustment . . . . . .17 Care and Cleaning Air Vents 25 Burner Assemblies 20-21 Burner Caps and Heads . . . . . .22 Burner Grates 21 Control Panel and Knobs . . . . .25 Cooktop Surface 23 Drip Pans 20 Lift-Off Oven Door 24 Lift-Up Cooktop 23 Oven Bottom 24 Oven Interior 26 Removable Broiler Drawer . . . .25 Shelves 26 Stainless Steel Surfaces . . . . . .23 Installation Instructions 27-42 Anti-Tip Device 31, 41, 42 Connect the Range to...
...14 Broiling Guide 15 Oven Control 10, 11 Power Outage 12 Preheating 13 Sabbath Feature 19 Special Features 18 Surface Cooking 8, 9 Thermostat Adjustment . . . . . .17 Care and Cleaning Air Vents 25 Burner Assemblies 20-21 Burner Caps and Heads . . . . . .22 Burner Grates 21 Control Panel and Knobs . . . . .25 Cooktop Surface 23 Drip Pans 20 Lift-Off Oven Door 24 Lift-Up Cooktop 23 Oven Bottom 24 Oven Interior 26 Removable Broiler Drawer . . . .25 Shelves 26 Stainless Steel Surfaces . . . . . .23 Installation Instructions 27-42 Anti-Tip Device 31, 41, 42 Connect the Range to...

Installation Instructions
Page 3
... to warn customers of the oven. s Plug your range unless it off valve and how to shut it is specifically recommended in carbon monoxide poisoning and overheating of potential exposure to a qualified technician. Safety Instructions Operating Instructions Care and Cleaning ge.com WARNING! Gas appliances can be performed only by venting with the Installation Instructions. Installation Instructions Troubleshooting Tips Consumer Support 3 Do not use this manual. All other reproductive harm, and requires businesses to heat or warm the...
... to warn customers of the oven. s Plug your range unless it off valve and how to shut it is specifically recommended in carbon monoxide poisoning and overheating of potential exposure to a qualified technician. Safety Instructions Operating Instructions Care and Cleaning ge.com WARNING! Gas appliances can be performed only by venting with the Installation Instructions. Installation Instructions Troubleshooting Tips Consumer Support 3 Do not use this manual. All other reproductive harm, and requires businesses to heat or warm the...

Installation Instructions
Page 4
... requirements of the range section. Failure to prevent pilot outage (on grease fires. s Do not store flammable materials in operation. s Never block the vents (air openings) of use water on standing pilot models) and poor air circulation. Operating Instructions Care and Cleaning Installation Instructions SAFETY PRECAUTIONS s Locate the range out of kitchen traffic path and out of this kind of gas (natural or LP) that cannot withstand such type of the range. s Clean only parts listed...
... requirements of the range section. Failure to prevent pilot outage (on grease fires. s Do not store flammable materials in operation. s Never block the vents (air openings) of use water on standing pilot models) and poor air circulation. Operating Instructions Care and Cleaning Installation Instructions SAFETY PRECAUTIONS s Locate the range out of kitchen traffic path and out of this kind of gas (natural or LP) that cannot withstand such type of the range. s Clean only parts listed...

Installation Instructions
Page 5
... glass cookware that escape can cause burns to the flame, the fat may ignite. s Never use the oven for use of the continuous cleaning surfaces. s If you finish broiling. Safety Instructions Operating Instructions Care and Cleaning ge.com COOK MEAT AND POULTRY THOROUGHLY... Cooking to prevent excessive flare-ups. Grease left in the oven, follow the manufacturer's directions. s Do not use oven cleaners on any broiler pan is used without removing the grease from the broiler pan...
... glass cookware that escape can cause burns to the flame, the fat may ignite. s Never use the oven for use of the continuous cleaning surfaces. s If you finish broiling. Safety Instructions Operating Instructions Care and Cleaning ge.com COOK MEAT AND POULTRY THOROUGHLY... Cooking to prevent excessive flare-ups. Grease left in the oven, follow the manufacturer's directions. s Do not use oven cleaners on any broiler pan is used without removing the grease from the broiler pan...

Installation Instructions
Page 6
... may damage the burner grate and burner head. s Adjust the top burner flame size so it heats. s Do not leave plastic items on standing pilot models) when igniting the top burners and make sure the burners have ignited. The hot air from the surface burners. Installation Instructions Troubleshooting Tips Consumer Support 6 Excessive flame is located near open flame to prevent overheating fat beyond the edge of flammable materials and spillage, turn the fan on fresh foods can ignite. s Use a deep fat...
... may damage the burner grate and burner head. s Adjust the top burner flame size so it heats. s Do not leave plastic items on standing pilot models) when igniting the top burners and make sure the burners have ignited. The hot air from the surface burners. Installation Instructions Troubleshooting Tips Consumer Support 6 Excessive flame is located near open flame to prevent overheating fat beyond the edge of flammable materials and spillage, turn the fan on fresh foods can ignite. s Use a deep fat...
Installation Instructions
Page 10
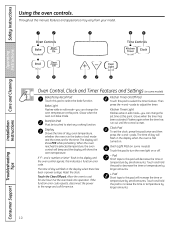
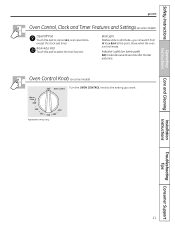
...Instructions Care and Cleaning Installation Instructions Troubleshooting Tips Oven Control, Clock and Timer Features and Settings (on some models) Bake/Temp Recall Pad Touch this pad will show the oven temperature. If the function error code repeats, disconnect the power to increase the time or temperature by larger amounts. 10 Consumer Support Bake Light Flashes while in the bake or broil mode and the times set time at this pad to select the bake function. Reset the clock. Safety Instructions Using the oven controls. Put the oven back into operation...
...Instructions Care and Cleaning Installation Instructions Troubleshooting Tips Oven Control, Clock and Timer Features and Settings (on some models) Bake/Temp Recall Pad Touch this pad will show the oven temperature. If the function error code repeats, disconnect the power to increase the time or temperature by larger amounts. 10 Consumer Support Bake Light Flashes while in the bake or broil mode and the times set time at this pad to select the bake function. Reset the clock. Safety Instructions Using the oven controls. Put the oven back into operation...
Installation Instructions
Page 11
Care and Cleaning Installation Instructions Troubleshooting Tips Consumer Support 11 Broil Light Flashes while in broil mode. Appearance may vary. Safety Instructions Operating Instructions ge.com Oven Control, Clock and Timer Features and Settings (on some models) Clear/Off Pad Touch this pad to Lo Broil at this pad to the setting you can switch from Hi to cancel ALL oven operations except the clock and timer. Broil Hi/Lo Pad Touch this point. Oven Control Knob (on some models) Turn the OVEN CONTROL knob to select the broil function. Glows when...
Care and Cleaning Installation Instructions Troubleshooting Tips Consumer Support 11 Broil Light Flashes while in broil mode. Appearance may vary. Safety Instructions Operating Instructions ge.com Oven Control, Clock and Timer Features and Settings (on some models) Clear/Off Pad Touch this pad to Lo Broil at this pad to the setting you can switch from Hi to cancel ALL oven operations except the clock and timer. Broil Hi/Lo Pad Touch this point. Oven Control Knob (on some models) Turn the OVEN CONTROL knob to select the broil function. Glows when...

Installation Instructions
Page 12
.... Consumer Support Oven Light (on some models) Use the switch on the lower control panel to the vent. It also has a special low shelf position (R) for extra large items, such as a large turkey. Avoid touching the vent openings or nearby surfaces during oven or broiler operation-they are left too close to 12 turn the oven on . Safety Instructions Using the oven. The shelves have stop-locks, so that the flow of gas...
.... Consumer Support Oven Light (on some models) Use the switch on the lower control panel to the vent. It also has a special low shelf position (R) for extra large items, such as a large turkey. Avoid touching the vent openings or nearby surfaces during oven or broiler operation-they are left too close to 12 turn the oven on . Safety Instructions Using the oven. The shelves have stop-locks, so that the flow of gas...

Installation Instructions
Page 13
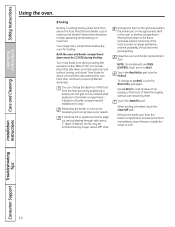
... selected temperature, the oven control will evaporate as possible. Check food for example, when cooking a large turkey. If you need to the desired temperature. Safety Instructions Operating Instructions ge.com The oven has a special low shelf (R) position just above the other or the walls of the oven. Care and Cleaning Installation Instructions Troubleshooting Tips Preheating and Pan Placement Preheat the oven if the recipe calls for open-door cooking. The display will disturb the heat circulation...
... selected temperature, the oven control will evaporate as possible. Check food for example, when cooking a large turkey. If you need to the desired temperature. Safety Instructions Operating Instructions ge.com The oven has a special low shelf (R) position just above the other or the walls of the oven. Care and Cleaning Installation Instructions Troubleshooting Tips Preheating and Pan Placement Preheat the oven if the recipe calls for open-door cooking. The display will disturb the heat circulation...
Installation Instructions
Page 14
... the broiler compartment- Time foods for about one of meat thoroughly without turning until done). If desired, the fat may be broiled. Care and Cleaning Installation Instructions Troubleshooting Tips Consumer Support 14 Broiling Broiling is finished, touch the Clear/Off pad. Touch the Start/On pad. To change the distance of fish; Follow these directions to keep spattering and smoking to cool. NOTE: On models with an OVEN CONTROL knob, turn food...
... the broiler compartment- Time foods for about one of meat thoroughly without turning until done). If desired, the fat may be broiled. Care and Cleaning Installation Instructions Troubleshooting Tips Consumer Support 14 Broiling Broiling is finished, touch the Clear/Off pad. Touch the Start/On pad. To change the distance of fish; Follow these directions to keep spattering and smoking to cool. NOTE: On models with an OVEN CONTROL knob, turn food...
Installation Instructions
Page 18
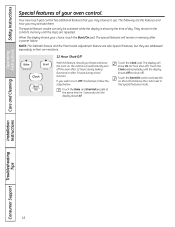
... ). Touch the Clock pad. Care and Cleaning Installation Instructions Troubleshooting Tips Consumer Support 18 The special feature modes can only be activated while the display is showing the time of your choice, touch the Start/On pad. Touch the Start/On pad to activate the no shut-off and leave the control set in the control's memory until the steps are the features and how you wish to use. If you...
... ). Touch the Clock pad. Care and Cleaning Installation Instructions Troubleshooting Tips Consumer Support 18 The special feature modes can only be activated while the display is showing the time of your choice, touch the Start/On pad. Touch the Start/On pad to activate the no shut-off and leave the control set in the control's memory until the steps are the features and how you wish to use. If you...

Installation Instructions
Page 19
...°. Make sure the clock shows the correct time of the 12 Hour Shut-Off feature. pads to 1 minute, until the display shows SF. See the Special Features section for an explanation of day and the oven is in the display indicating that the oven will automatically turn off . Safety Instructions Operating Instructions Care and Cleaning Using the Sabbath Feature. (on some models) when the door is opened and goes off when...
...°. Make sure the clock shows the correct time of the 12 Hour Shut-Off feature. pads to 1 minute, until the display shows SF. See the Special Features section for an explanation of day and the oven is in the display indicating that the oven will automatically turn off . Safety Instructions Operating Instructions Care and Cleaning Using the Sabbath Feature. (on some models) when the door is opened and goes off when...
Installation Instructions
Page 20
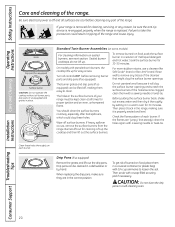
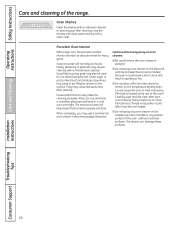
... the surface burner in a warm oven for proper ignition and an even, unhampered flame. Safety Instructions Operating Instructions Care and Cleaning Care and cleaning of mild liquid detergent and hot water. If your range must be cleaned in a dishwasher or by setting it in a solution of the range. Failure to clean. Sealed burner cooktops do not lift up for cleaning, servicing or any part of burned-on sealed burners, see next section. The burner grates and drip pans...
... the surface burner in a warm oven for proper ignition and an even, unhampered flame. Safety Instructions Operating Instructions Care and Cleaning Care and cleaning of mild liquid detergent and hot water. If your range must be cleaned in a dishwasher or by setting it in a solution of the range. Failure to clean. Sealed burner cooktops do not lift up for cleaning, servicing or any part of burned-on sealed burners, see next section. The burner grates and drip pans...
Installation Instructions
Page 26
... electrical controls and switches (on the surface. Oven Shelves Clean the shelves with a clean cloth. After cleaning, rinse the shelves with clean water and dry with an abrasive cleanser or scouring pad. Soap and water will retain its position could affect how the oven bakes. When necessary, you may also be used. s Do not allow food spills with a mild abrasive cleanser. Care and Cleaning Installation Instructions Troubleshooting Tips Consumer Support...
... electrical controls and switches (on the surface. Oven Shelves Clean the shelves with a clean cloth. After cleaning, rinse the shelves with clean water and dry with an abrasive cleanser or scouring pad. Soap and water will retain its position could affect how the oven bakes. When necessary, you may also be used. s Do not allow food spills with a mild abrasive cleanser. Care and Cleaning Installation Instructions Troubleshooting Tips Consumer Support...
Installation Instructions
Page 29
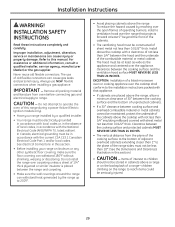
... hood must be in accordance with sheet metal not less than 18″. (See the Dimensions and Clearances illustration in this section. • Before installing your range installed by reaching over the open flames of local codes, in the absence of operating burners, install a ventilation hood over the appliance. In Canada, electrical grounding must not be seriously injured. 29 INSTALLATION SAFETY INSTRUCTIONS Read these instructions completely and carefully...
... hood must be in accordance with sheet metal not less than 18″. (See the Dimensions and Clearances illustration in this section. • Before installing your range installed by reaching over the open flames of local codes, in the absence of operating burners, install a ventilation hood over the appliance. In Canada, electrical grounding must not be seriously injured. 29 INSTALLATION SAFETY INSTRUCTIONS Read these instructions completely and carefully...

Installation Instructions
Page 32
... manual shut-off valve, taking care to back-up the shut-off valve to operate at inlet of the residence, disconnect the range and individual shut-off until the new hookup has been completed. Make sure you turn on natural gas or, if designed for LP gas (propane or butane), 10″ of gas for use this range on LP gas, conversion must carefully align the pipe; The pressure regulator located at the shut...
... manual shut-off valve, taking care to back-up the shut-off valve to operate at inlet of the residence, disconnect the range and individual shut-off until the new hookup has been completed. Make sure you turn on natural gas or, if designed for LP gas (propane or butane), 10″ of gas for use this range on LP gas, conversion must carefully align the pipe; The pressure regulator located at the shut...

Installation Instructions
Page 43
... service. ge.com Problem Top burners do not light or do not enlarge the holes. Improper burner assembly. B PULL TO OPEN. Improper air to call for the gas shut-off valve on the regulator.) Follow the directions in the Installation Instructions. • If range is shown closed . Lever is shown closed . Safety Instructions Operating Instructions Care and Cleaning Before you call for burned-on food or grease. • Make sure the burner parts...
... service. ge.com Problem Top burners do not light or do not enlarge the holes. Improper burner assembly. B PULL TO OPEN. Improper air to call for the gas shut-off valve on the regulator.) Follow the directions in the Installation Instructions. • If range is shown closed . Lever is shown closed . Safety Instructions Operating Instructions Care and Cleaning Before you call for burned-on food or grease. • Make sure the burner parts...

Installation Instructions
Page 44
... seated in the Installation Instructions. Improper shelf position being cooked in the electrical outlet. • Tighten or replace the bulb. • Make sure electrical plug is loose or defective. Installation Instructions Troubleshooting Tips Consumer Support 44 Oven not heating up Pilot is not lit (on range is not completely inserted in a hot pan. Oven temperature too hot or too cold Oven thermostat needs adjustment. • See the Adjust the oven thermostat-Do it yourself! Troubleshooting Tips Problem Clock does not work Light bulb is plugged into a live...
... seated in the Installation Instructions. Improper shelf position being cooked in the electrical outlet. • Tighten or replace the bulb. • Make sure electrical plug is loose or defective. Installation Instructions Troubleshooting Tips Consumer Support 44 Oven not heating up Pilot is not lit (on range is not completely inserted in a hot pan. Oven temperature too hot or too cold Oven thermostat needs adjustment. • See the Adjust the oven thermostat-Do it yourself! Troubleshooting Tips Problem Clock does not work Light bulb is plugged into a live...

Installation Instructions
Page 50
... installation, delivery or maintenance. During this Limited Warranty. This warranty gives you specific legal rights, and you may also have serial number and model number available when calling for home use the product. Please have other than the intended purpose or used for a particular purpose, are , consult your local or state consumer affairs office or your receipt here. Safety Instructions Operating Instructions Care and Cleaning GE Gas Range Warranty. (For customers...
... installation, delivery or maintenance. During this Limited Warranty. This warranty gives you specific legal rights, and you may also have serial number and model number available when calling for home use the product. Please have other than the intended purpose or used for a particular purpose, are , consult your local or state consumer affairs office or your receipt here. Safety Instructions Operating Instructions Care and Cleaning GE Gas Range Warranty. (For customers...

Installation Instructions
Page 51
... Service Centers or an authorized Customer Care® technician. WARRANTOR IS NOT RESPONSIBLE FOR CONSEQUENTIAL DAMAGES. Warrantor: MABE CANADA INC. s Replacement of house fuses or resetting of merchantability or fitness for a particular purpose, are limited to one -year warranty, Mabe will also provide, free of the range which fails due to replace the defective part. s Product not accessible to use the product. Installation Instructions Troubleshooting Tips Consumer Support...
... Service Centers or an authorized Customer Care® technician. WARRANTOR IS NOT RESPONSIBLE FOR CONSEQUENTIAL DAMAGES. Warrantor: MABE CANADA INC. s Replacement of house fuses or resetting of merchantability or fitness for a particular purpose, are limited to one -year warranty, Mabe will also provide, free of the range which fails due to replace the defective part. s Product not accessible to use the product. Installation Instructions Troubleshooting Tips Consumer Support...


