
Owners Manual
Page 1
...-Self-Cleaning RangeGass ge.com Safety Instructions . . . . . .2-7 Operating Instructions Aluminum Foil 15 Burners 8, 9 Clock 19 Griddle 10, 11 Oven 12-17 Baking and Roasting 15 Broiling 16, 17 Broiling Guide 17 Clock and Timer 19 Light 14 Oven Control 12 Power Outage 14 Preheating 15 Thermostat Adjustment . . . . . .18 Vent 14 Care and Cleaning Broiler Compartment 27 Broiler Drawer 27 Burner Assemblies 23, 24 Burner Grates 25 Control Panel and Knobs . . . . . .28 Cooktop Surface 25 Griddle 22 Lift-off Oven Door 26 Oven Bottom 26 Oven Interior 28 Oven Light Replacement...
...-Self-Cleaning RangeGass ge.com Safety Instructions . . . . . .2-7 Operating Instructions Aluminum Foil 15 Burners 8, 9 Clock 19 Griddle 10, 11 Oven 12-17 Baking and Roasting 15 Broiling 16, 17 Broiling Guide 17 Clock and Timer 19 Light 14 Oven Control 12 Power Outage 14 Preheating 15 Thermostat Adjustment . . . . . .18 Vent 14 Care and Cleaning Broiler Compartment 27 Broiler Drawer 27 Burner Assemblies 23, 24 Burner Grates 25 Control Panel and Knobs . . . . . .28 Cooktop Surface 25 Griddle 22 Lift-off Oven Door 26 Oven Bottom 26 Oven Interior 28 Oven Light Replacement...
Owners Manual
Page 4
... floor coverings will not withstand this kind of the authority having jurisdiction. s Be sure all codes and requirements of use with flame or hot oven surfaces and may cause severe burns. s Do not store or use . temperatures may result compartment or kick panel. kitchen carpeting. s Never block the vents (air openings) of the CAUTION : s Items of drafty locations to children range. Installation Instructions SAFETY PRECAUTIONS s Locate the range out of kitchen traffic...
... floor coverings will not withstand this kind of the authority having jurisdiction. s Be sure all codes and requirements of use with flame or hot oven surfaces and may cause severe burns. s Do not store or use . temperatures may result compartment or kick panel. kitchen carpeting. s Never block the vents (air openings) of the CAUTION : s Items of drafty locations to children range. Installation Instructions SAFETY PRECAUTIONS s Locate the range out of kitchen traffic...
Owners Manual
Page 5
... the oven is recommended for a storage area. Trim excess fat to at least an INTERNAL temperature of a hot oven. Installation Instructions Troubleshooting Tips Consumer Support 5 s When broiling, if meat is used without removing the grease from the range when opening the door of 180°F. Aluminum foil linings may cause carbon monoxide poisoning. Grease left in the oven, follow the manufacturer's directions. Safety Instructions Operating Instructions ge.com COOK MEAT AND POULTRY THOROUGHLY... s Always remove any...
... the oven is recommended for a storage area. Trim excess fat to at least an INTERNAL temperature of a hot oven. Installation Instructions Troubleshooting Tips Consumer Support 5 s When broiling, if meat is used without removing the grease from the range when opening the door of 180°F. Aluminum foil linings may cause carbon monoxide poisoning. Grease left in the oven, follow the manufacturer's directions. Safety Instructions Operating Instructions ge.com COOK MEAT AND POULTRY THOROUGHLY... s Always remove any...
Owners Manual
Page 7
... ignite. s If you smell gas, turn the surface burner controls off the gas to remove them. Never use aluminum foil to locate a leak. Safety Instructions Operating Instructions ge.com s Do not use an open flame to line the griddle. s Do not place or store items that can lead to the vent. s Do not leave plastic items on the grates, even when the cooktop is cool. s Do not lift the cooktop. s Keep range clean and free...
... ignite. s If you smell gas, turn the surface burner controls off the gas to remove them. Never use aluminum foil to locate a leak. Safety Instructions Operating Instructions ge.com s Do not use an open flame to line the griddle. s Do not place or store items that can lead to the vent. s Do not leave plastic items on the grates, even when the cooktop is cool. s Do not lift the cooktop. s Keep range clean and free...
Owners Manual
Page 8
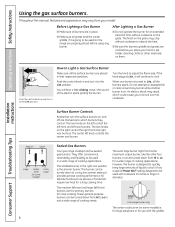
... for an extended period of the electric spark igniting the burner. Before Lighting a Gas Burner s Make sure all burners are placed in and turn it to a boil. After Lighting a Gas Burner s Do not operate the burner for use with cookware 10 inches or larger in the right rear position is the maximum output burner. Installation Instructions Consumer Support Troubleshooting Tips Push the control knob in their respective positions. These general-purpose burners can be turned down to adjust the flame size.
... for an extended period of the electric spark igniting the burner. Before Lighting a Gas Burner s Make sure all burners are placed in and turn it to a boil. After Lighting a Gas Burner s Do not operate the burner for use with cookware 10 inches or larger in the right rear position is the maximum output burner. Installation Instructions Consumer Support Troubleshooting Tips Push the control knob in their respective positions. These general-purpose burners can be turned down to adjust the flame size.
Owners Manual
Page 12
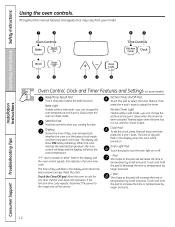
... the time or temperature by larger amounts. 12 Installation Instructions Consumer Support Troubleshooting Tips Oven Control, Clock and Timer Features and Settings (on or off. - Allow the oven to this pad to turn the oven light on some models) Bake/Temp Recall Pad Touch this pad will flash in the bake or broil mode and the times set time at this pad to adjust the timer. Pad Short taps to cool for the timer. Display Shows the time of day, oven temperature, whether the oven is reset.
... the time or temperature by larger amounts. 12 Installation Instructions Consumer Support Troubleshooting Tips Oven Control, Clock and Timer Features and Settings (on or off. - Allow the oven to this pad to turn the oven light on some models) Bake/Temp Recall Pad Touch this pad will flash in the bake or broil mode and the times set time at this pad to adjust the timer. Pad Short taps to cool for the timer. Display Shows the time of day, oven temperature, whether the oven is reset.
Owners Manual
Page 13
Glows when the oven is in edit mode-you can switch from Hi to Lo Broil at this point. Broil Hi/Lo Pad Touch this pad to cancel ALL oven operations except the clock and timer. Indicator Lights (on some pads) Edit mode lasts several seconds after the last pad press. Broil Light Flashes while in broil mode. Installation Instructions Troubleshooting Tips Consumer Support 13 Safety Instructions Operating Instructions ge.com Oven Control, Clock and Timer Features and Settings (on some models) Clear/Off Pad Touch this pad to select the broil function.
Glows when the oven is in edit mode-you can switch from Hi to Lo Broil at this point. Broil Hi/Lo Pad Touch this pad to cancel ALL oven operations except the clock and timer. Indicator Lights (on some pads) Edit mode lasts several seconds after the last pad press. Broil Light Flashes while in broil mode. Installation Instructions Troubleshooting Tips Consumer Support 13 Safety Instructions Operating Instructions ge.com Oven Control, Clock and Timer Features and Settings (on some models) Clear/Off Pad Touch this pad to select the broil function.
Owners Manual
Page 14
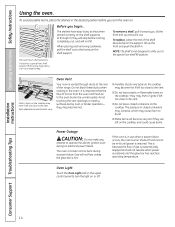
... power is restored until power is because the flow of the range. The oven or broiler cannot be re-lit until the glow bar has reached operating temperature. Installation Instructions Consumer Support Troubleshooting Tips 14 Operating Instructions Safety Instructions Using the oven. NOTE: The shelf is automatically stopped and will not tilt. Vent appearance and location vary. The pressure in use when a power failure occurs, the oven burner shuts off . Oven Vent Your oven is vented through E), they may become hot...
... power is restored until power is because the flow of the range. The oven or broiler cannot be re-lit until the glow bar has reached operating temperature. Installation Instructions Consumer Support Troubleshooting Tips 14 Operating Instructions Safety Instructions Using the oven. NOTE: The shelf is automatically stopped and will not tilt. Vent appearance and location vary. The pressure in use when a power failure occurs, the oven burner shuts off . Oven Vent Your oven is vented through E), they may become hot...
Owners Manual
Page 21
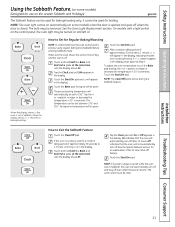
... in the display. Installation Instructions Troubleshooting Tips Consumer Support 21 NOTE: The oven light comes on automatically (on some models) (Designed for use on the Jewish Sabbath and Holidays) ge.com The Sabbath feature can be removed. Tap the Clock pad until only ⊃ is in 25° increments. Touch the Bake pad. Touch the Start/On pad. After a random delay period of day and the oven is off when the door is...
... in the display. Installation Instructions Troubleshooting Tips Consumer Support 21 NOTE: The oven light comes on automatically (on some models) (Designed for use on the Jewish Sabbath and Holidays) ge.com The Sabbath feature can be removed. Tap the Clock pad until only ⊃ is in 25° increments. Touch the Bake pad. Touch the Start/On pad. After a random delay period of day and the oven is off when the door is...
Owners Manual
Page 24
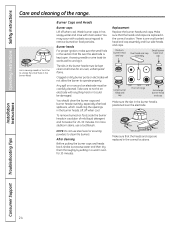
... by setting in hot, soapy water and rinse with anything hard or it . Make sure that the heads and caps are replaced in the burner heads must be carefully cleaned. There is kept open. Installation Instructions Consumer Support Troubleshooting Tips 24 Wash burner caps in a warm oven for an even, unhampered flame. A sewing needle or wire twist-tie works well to operate properly. Lift off when cool. NOTE: Do not use...
... by setting in hot, soapy water and rinse with anything hard or it . Make sure that the heads and caps are replaced in the burner heads must be carefully cleaned. There is kept open. Installation Instructions Consumer Support Troubleshooting Tips 24 Wash burner caps in a warm oven for an even, unhampered flame. A sewing needle or wire twist-tie works well to operate properly. Lift off when cool. NOTE: Do not use...
Owners Manual
Page 25
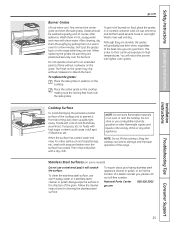
... on food, place the grates in a warm oven for cleaning the stainless steel surface. it from becoming dull, clean up spills right away. When replacing the grates, be washed regularly and, of the best care you , please call our toll-free number: National Parts Center 800.626.2002 ge.com Troubleshooting Tips Consumer Support 25 Do not store or use combustible materials, gasoline or other flammable...
... on food, place the grates in a warm oven for cleaning the stainless steel surface. it from becoming dull, clean up spills right away. When replacing the grates, be washed regularly and, of the best care you , please call our toll-free number: National Parts Center 800.626.2002 ge.com Troubleshooting Tips Consumer Support 25 Do not store or use combustible materials, gasoline or other flammable...
Owners Manual
Page 28
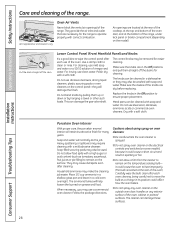
... 1/2 cup ammonia in a shallow glass pan and leave in the Off position to operate properly with soap and water. Operating Instructions Safety Instructions Installation Instructions Care and cleaning of the range. Pull the knob straight off the stems for many years. s Do not spray any exterior surface of the oven, cabinet or painted surfaces. Oven Air Vents Never block the vents (air openings) of the range. For rinsing, use steel wool, abrasives, ammonia...
... 1/2 cup ammonia in a shallow glass pan and leave in the Off position to operate properly with soap and water. Operating Instructions Safety Instructions Installation Instructions Care and cleaning of the range. Pull the knob straight off the stems for many years. s Do not spray any exterior surface of the oven, cabinet or painted surfaces. Oven Air Vents Never block the vents (air openings) of the range. For rinsing, use steel wool, abrasives, ammonia...
Owners Manual
Page 31
... cabinets. • The ventilating hood must be constructed of the range sides must be less than 18″. (See the Dimensions and Clearances illustration in this range during a power failure (Electric Ignition models only). • Have your range on the range to operate the oven of a listed microwave oven or cooking appliance over the appliance. Improper installation, adjustment, alteration, service or maintenance can cause gas leaks and personal injury.
... cabinets. • The ventilating hood must be constructed of the range sides must be less than 18″. (See the Dimensions and Clearances illustration in this range during a power failure (Electric Ignition models only). • Have your range on the range to operate the oven of a listed microwave oven or cooking appliance over the appliance. Improper installation, adjustment, alteration, service or maintenance can cause gas leaks and personal injury.

Owners Manual
Page 34
... valve. The pressure regulator located at the inlet of the range manifold must be made . B Install male 1/2″ flare union adapter to avoid damage. E When all joints and connections to operate at the shut-off position and turn the gas back on other gas appliances when you are in the supply line regardless of water column. This range is used . If the hard piping method is convertible...
... valve. The pressure regulator located at the inlet of the range manifold must be made . B Install male 1/2″ flare union adapter to avoid damage. E When all joints and connections to operate at the shut-off position and turn the gas back on other gas appliances when you are in the supply line regardless of water column. This range is used . If the hard piping method is convertible...
Owners Manual
Page 39
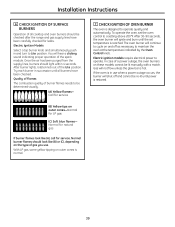
... range and gas supply lines have been checked. The oven burner will ignite and burn until the set the oven control to operate. If the oven is designed to Lite position. Call for service (B) Yellow tips on the type of gas you use when a power outage occurs, the burner will shut off as necessary to be lit manually with a match. Normal for natural gas If burner flames look like (A), call for LP gas (C) Soft blue flames- Electric ignition models require electrical power...
... range and gas supply lines have been checked. The oven burner will ignite and burn until the set the oven control to operate. If the oven is designed to Lite position. Call for service (B) Yellow tips on the type of gas you use when a power outage occurs, the burner will shut off as necessary to be lit manually with a match. Normal for natural gas If burner flames look like (A), call for LP gas (C) Soft blue flames- Electric ignition models require electrical power...
Owners Manual
Page 40
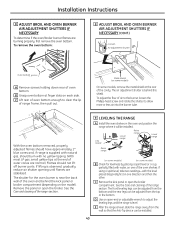
... rear of the range section. 9 LEVELING THE RANGE A Install the oven shelves in one of the cavity. C Remove the kick panel or open the broiler. Installation Instructions 8 ADJUST BROIL AND OVEN BURNER AIR ADJUSTMENT SHUTTERS IF NECESSARY To determine if the oven/broiler burner flames are stabilized. To adjust the flow of outer cones are normal.) Flames should have approximately 1″ blue cones and, if range is level, slide the range away from the wall so that the Anti-Tip...
... rear of the range section. 9 LEVELING THE RANGE A Install the oven shelves in one of the cavity. C Remove the kick panel or open the broiler. Installation Instructions 8 ADJUST BROIL AND OVEN BURNER AIR ADJUSTMENT SHUTTERS IF NECESSARY To determine if the oven/broiler burner flames are stabilized. To adjust the flow of outer cones are normal.) Flames should have approximately 1″ blue cones and, if range is level, slide the range away from the wall so that the Anti-Tip...
Owners Manual
Page 41
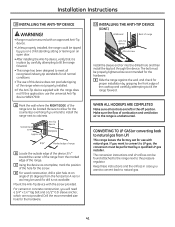
... air to natural gas. 41 If you want to convert back to the range is unobstructed. Installation Instructions 10 INSTALLING THE ANTI-TIP DEVICE WARNING! • Range must be secured with an approved Anti-Tip device. • Unless properly installed, the range could be tipped by you or a child standing, sitting or leaning on an open door. • After installing the Anti-Tip device, verify that it is in place by carefully...
... air to natural gas. 41 If you want to convert back to the range is unobstructed. Installation Instructions 10 INSTALLING THE ANTI-TIP DEVICE WARNING! • Range must be secured with an approved Anti-Tip device. • Unless properly installed, the range could be tipped by you or a child standing, sitting or leaning on an open door. • After installing the Anti-Tip device, verify that it is in place by carefully...
Owners Manual
Page 42
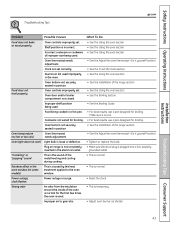
...; Replace the fuse or reset the circuit breaker. • See the Using the oven section. • To check the oven gas shut-off valve, remove the broiler drawer or kick panel (see the Care and cleaning of the range section. • If range is connected to call for service... Installation Instructions Consumer Support Troubleshooting Tips 42 The oven gas shut-off valve may be touched at the back of the burner may have accidentally been moved during cleaning or moving. PULL TO OPEN. Oven control...
...; Replace the fuse or reset the circuit breaker. • See the Using the oven section. • To check the oven gas shut-off valve, remove the broiler drawer or kick panel (see the Care and cleaning of the range section. • If range is connected to call for service... Installation Instructions Consumer Support Troubleshooting Tips 42 The oven gas shut-off valve may be touched at the back of the burner may have accidentally been moved during cleaning or moving. PULL TO OPEN. Oven control...
Owners Manual
Page 43
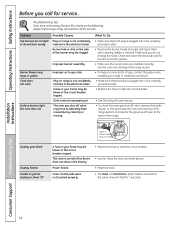
..., use a pan designed for broiling. Safety Instructions Operating Instructions Installation Instructions Troubleshooting Tips ge.com Problem Possible Causes What To Do Food does not bake or roast properly Oven controls improperly set the clock section. of improper size being cooked in position. • See the Installation of the range section. Clock not set correctly. • See the To set . Aluminum foil used . in position. • See the Installation of the range section. Oven bottom not securely seated in a hot pan...
..., use a pan designed for broiling. Safety Instructions Operating Instructions Installation Instructions Troubleshooting Tips ge.com Problem Possible Causes What To Do Food does not bake or roast properly Oven controls improperly set the clock section. of improper size being cooked in position. • See the Installation of the range section. Clock not set correctly. • See the To set . Aluminum foil used . in position. • See the Installation of the range section. Oven bottom not securely seated in a hot pan...
Owners Manual
Page 47
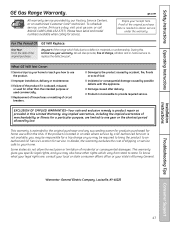
.... This warranty is located in materials or workmanship. Safety Instructions Operating Instructions GE Gas Range Warranty. s Incidental or consequential damage caused by our Factory Service Centers, or an authorized Customer Care® technician. In Alaska, the warranty excludes the cost of the range which vary from state to your home. Louisville, KY 40225 Installation Instructions Troubleshooting Tips Consumer Support 47 ge.com Staple your state's Attorney General. What GE Will Not Cover: s Service trips to...
.... This warranty is located in materials or workmanship. Safety Instructions Operating Instructions GE Gas Range Warranty. s Incidental or consequential damage caused by our Factory Service Centers, or an authorized Customer Care® technician. In Alaska, the warranty excludes the cost of the range which vary from state to your home. Louisville, KY 40225 Installation Instructions Troubleshooting Tips Consumer Support 47 ge.com Staple your state's Attorney General. What GE Will Not Cover: s Service trips to...


