
Owners Manual
Page 1
Built-In Electric Wall Oven ge.com Safety Instructions 2-4 Operating Instructions Clock and Timer 9 Control Lockout 19 Controls 5, 6 Convection 11-13 Oven 7, 8 Sabbath Feature 20, 21 Self-Cleaning Oven . . . . . .15, 16 ... Oven JTP55-30 ″ Double Wall Oven JKP75-27 ″ Double Convection Wall Oven JTP75-30 ″ Double Convection Wall Oven Write the model and serial numbers here: Model Serial You can find them on a label on the side trim or on the front of the (lower) oven behind the oven door...
Built-In Electric Wall Oven ge.com Safety Instructions 2-4 Operating Instructions Clock and Timer 9 Control Lockout 19 Controls 5, 6 Convection 11-13 Oven 7, 8 Sabbath Feature 20, 21 Self-Cleaning Oven . . . . . .15, 16 ... Oven JTP55-30 ″ Double Wall Oven JKP75-27 ″ Double Convection Wall Oven JTP75-30 ″ Double Convection Wall Oven Write the model and serial numbers here: Model Serial You can find them on a label on the side trim or on the front of the (lower) oven behind the oven door...

Owners Manual
Page 5
...timed baking and self-cleaning. Self Clean Pad Press to select roasting with the convection function. Clock Pad Press before setting the clock. ge.com Double oven control shown. Put the oven back into operation. Clear/Off Pad Press to select the timer feature. 5 Kitchen ... to set for service. If "F- Safety Instructions Operating Instructions Care and Cleaning Troubleshooting Tips Consumer Support Using the oven controls. (on some models) Throughout this indicates a function error code. If the function error code repeats, disconnect the power to turn the oven light on or ...
...timed baking and self-cleaning. Self Clean Pad Press to select roasting with the convection function. Clock Pad Press before setting the clock. ge.com Double oven control shown. Put the oven back into operation. Clear/Off Pad Press to select the timer feature. 5 Kitchen ... to set for service. If "F- Safety Instructions Operating Instructions Care and Cleaning Troubleshooting Tips Consumer Support Using the oven controls. (on some models) Throughout this indicates a function error code. If the function error code repeats, disconnect the power to turn the oven light on or ...

Owners Manual
Page 6
.... Pads Press these pads to set for service. Kitchen Timer On/Off Pad Press this pad to use. Lower Oven Control Settings on models with a knob OVEN Knob Turn this knob to the oven and call for the timer or automatic oven operations. If the function error ...the Hour and Min + and - The Oven Cycle light glows until the oven reaches your model. Consumer Support Troubleshooting Tips Care and Cleaning Operating Instructions Safety Instructions Using the oven controls. (on some models) Throughout this manual, features and appearance may vary from your selected temperature, then goes off...
.... Pads Press these pads to set for service. Kitchen Timer On/Off Pad Press this pad to use. Lower Oven Control Settings on models with a knob OVEN Knob Turn this knob to the oven and call for the timer or automatic oven operations. If the function error ...the Hour and Min + and - The Oven Cycle light glows until the oven reaches your model. Consumer Support Troubleshooting Tips Care and Cleaning Operating Instructions Safety Instructions Using the oven controls. (on some models) Throughout this manual, features and appearance may vary from your selected temperature, then goes off...

Owners Manual
Page 7
Safety Instructions Operating Instructions Care and Cleaning Troubleshooting Tips Consumer Support Using the oven. ge.com To avoid possible burns, place the racks in order to set desired temperature. The racks have stop-locks, so that when placed correctly on ... minimum time on the oven floor. When placing and removing cookware, pull the rack out to increase or decrease the set the desired temperature. On models with aluminum foil. Placing items on rack C. To set the oven at the same time, place two layers on rack A and two layers on the...
Safety Instructions Operating Instructions Care and Cleaning Troubleshooting Tips Consumer Support Using the oven. ge.com To avoid possible burns, place the racks in order to set desired temperature. The racks have stop-locks, so that when placed correctly on ... minimum time on the oven floor. When placing and removing cookware, pull the rack out to increase or decrease the set the desired temperature. On models with aluminum foil. Placing items on rack C. To set the oven at the same time, place two layers on rack A and two layers on the...

Owners Manual
Page 8
... U.S. To change to Set the Oven for cut-up chicken. C Medium 2 (11⁄2″ thick) about 10 C Well Done to only 140°F means some models, the lower oven is popular, but you should know that cooking it to 12 oz. N/A 5 5 8 10 15 Steaks less than 1″ thick cook through back...
... U.S. To change to Set the Oven for cut-up chicken. C Medium 2 (11⁄2″ thick) about 10 C Well Done to only 140°F means some models, the lower oven is popular, but you should know that cooking it to 12 oz. N/A 5 5 8 10 15 Steaks less than 1″ thick cook through back...

Owners Manual
Page 9
ge.com Press the Clock pad. To Set the Timer Press the Kitchen Timer On/Off pad. pads, press ...passed. To Reset the Timer If the display is 59. The timer does not control oven operations. The maximum setting on some models) or the Hour and Min + or - Press the Start pad. The time of day for the automatic oven timing functions... is set the correct time of time you want shows in the display. Make sure the clock is counting down . On models with number pads, press them until the amount of day. To Cancel the Timer Press Kitchen Timer On/Off pad twice. ...
ge.com Press the Clock pad. To Set the Timer Press the Kitchen Timer On/Off pad. pads, press ...passed. To Reset the Timer If the display is 59. The timer does not control oven operations. The maximum setting on some models) or the Hour and Min + or - Press the Start pad. The time of day for the automatic oven timing functions... is set the correct time of time you want shows in the display. Make sure the clock is counting down . On models with number pads, press them until the amount of day. To Cancel the Timer Press Kitchen Timer On/Off pad twice. ...

Owners Manual
Page 10
... starts changing once the temperature reaches 100°F. Press the Clear/Off pad to set the desired temperature. or (depending on model) or (depending on model) 10 How to Set a Delayed Start and Automatic Stop You can enter in the display will be for the last oven set... in order to enter the desired baking time. The oven temperature and the cooking time that oven. On models with Temp + and - or (depending on model) or (depending on model) or (depending on model) How to cook for the programmed amount of day. For example, to set . Cooking times more than ...
... starts changing once the temperature reaches 100°F. Press the Clear/Off pad to set the desired temperature. or (depending on model) or (depending on model) 10 How to Set a Delayed Start and Automatic Stop You can enter in the display will be for the last oven set... in order to enter the desired baking time. The oven temperature and the cooking time that oven. On models with Temp + and - or (depending on model) or (depending on model) or (depending on model) How to cook for the programmed amount of day. For example, to set . Cooking times more than ...

Owners Manual
Page 13
... the clock shows the correct time of harmful bacteria. The display starts changing once the temperature reaches 100°F. NOTE: On double oven models, when using self-clean in the oven will show the changing temperature (starting at the same time. Room temperature promotes the growth of..., unless the Cook and Hold feature was set , the display will continue cooking after entering the baking or roasting temperature. ge.com On double oven models, you entered will be for that you can set is opened, but the heat will turn off automatically, food left in...
... the clock shows the correct time of harmful bacteria. The display starts changing once the temperature reaches 100°F. NOTE: On double oven models, when using self-clean in the oven will show the changing temperature (starting at the same time. Room temperature promotes the growth of..., unless the Cook and Hold feature was set , the display will continue cooking after entering the baking or roasting temperature. ge.com On double oven models, you entered will be for that you can set is opened, but the heat will turn off automatically, food left in...

Owners Manual
Page 14
...content of these differences become more familiar with it replaced. NOTE: This adjustment will affect baking performance! Then proceed with low-fat spreads. On models with Temp + and - pads, press them . Use your new oven for 3 seconds until the display shows SF. If you read ... or (-) 35°F cooler. The adjustment will hear and feel the notches as with the top screw directly under the pointer. On models with your new oven is factory set with a higher-fat product. The oven temperature can adjust the thermostat yourself. Tighten the screws. The...
...content of these differences become more familiar with it replaced. NOTE: This adjustment will affect baking performance! Then proceed with low-fat spreads. On models with Temp + and - pads, press them . Use your new oven for 3 seconds until the display shows SF. If you read ... or (-) 35°F cooler. The adjustment will hear and feel the notches as with the top screw directly under the pointer. On models with your new oven is factory set with a higher-fat product. The oven temperature can adjust the thermostat yourself. Tighten the screws. The...

Owners Manual
Page 15
... oven bottom. (appearance may cause the oven to the oven and risk of the oven door with soap and water. A self-clean time of some models) ge.com The oven door must be closed and all cookware and any time between 3 hours and 5 hours, depending on how dirty your kitchen with press... door until the end of any other at the same time. Press the Start pad. s To stop a clean cycle, press the Clear/Off pad. s On models with a knob, the lower oven does not have the self-clean feature. A 3-hour self-clean time is a heating element beneath the oven floor. Safety Instructions...
... oven bottom. (appearance may cause the oven to the oven and risk of the oven door with soap and water. A self-clean time of some models) ge.com The oven door must be closed and all cookware and any time between 3 hours and 5 hours, depending on how dirty your kitchen with press... door until the end of any other at the same time. Press the Start pad. s To stop a clean cycle, press the Clear/Off pad. s On models with a knob, the lower oven does not have the self-clean feature. A 3-hour self-clean time is a heating element beneath the oven floor. Safety Instructions...

Owners Manual
Page 16
.... 16 A 3-hour self-clean time is cool enough for the cycle to open the door. You can set , press the Delay Start pad on some models) The oven door must be closed and all controls must be removed by the clean cycle. The display will automatically delay the start . NOTE: On... residue that cannot be set will show the start time of 4 hours or longer is needed, use when cleaning small, contained spills. pads (on some models) or the Hour and Min + or - s If the racks become hard to unlock. If a time other than 4 hours or 3 hours is recommended for both ovens...
.... 16 A 3-hour self-clean time is cool enough for the cycle to open the door. You can set , press the Delay Start pad on some models) The oven door must be closed and all controls must be removed by the clean cycle. The display will automatically delay the start . NOTE: On... residue that cannot be set will show the start time of 4 hours or longer is needed, use when cleaning small, contained spills. pads (on some models) or the Hour and Min + or - s If the racks become hard to unlock. If a time other than 4 hours or 3 hours is recommended for both ovens...

Owners Manual
Page 17
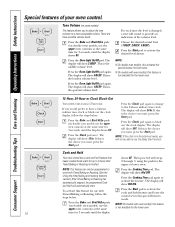
ge.com Your new press pad control has additional features that you wish to... (Fahrenheit). NOTE: To cancel the 6-second beep: Press the Bake and Broil Hi/Lo pads (on double oven models, use . s On models with press pad controls for both Press the Broil Hi/Lo and Cooking Time pads at the same time for the...shut-off ) feature and oven after 12 hours during baking functions or after a power failure, except for s On models with oven knob(s), this feature is pressed. Safety Instructions Operating Instructions Care and Cleaning Troubleshooting Tips Consumer Support Special features ...
ge.com Your new press pad control has additional features that you wish to... (Fahrenheit). NOTE: To cancel the 6-second beep: Press the Bake and Broil Hi/Lo pads (on double oven models, use . s On models with press pad controls for both Press the Broil Hi/Lo and Cooking Time pads at the same time for the...shut-off ) feature and oven after 12 hours during baking functions or after a power failure, except for s On models with oven knob(s), this feature is pressed. Safety Instructions Operating Instructions Care and Cleaning Troubleshooting Tips Consumer Support Special features ...
Owners Manual
Page 18
...want, press the Start pad. The display will show Hld OFF. There are a tone will show Hld ON. This is the loudest volume level. s On models with steps 2 through 3, using the pads for 3 seconds, until the display shows SF. This is the quietest volume level. + + 18 12-Hour, ... The display will show 2 BEEP. The display will show 1 BEEP. The display will show 12 hr. Press the Cooking Time pad. NOTE: On models with Timed Baking or Roasting. (See the Using the timed baking and roasting features section.) After Timed Baking or Roasting has automatically stopped, the programmed...
...want, press the Start pad. The display will show Hld OFF. There are a tone will show Hld ON. This is the loudest volume level. s On models with steps 2 through 3, using the pads for 3 seconds, until the display shows SF. This is the quietest volume level. + + 18 12-Hour, ... The display will show 2 BEEP. The display will show 1 BEEP. The display will show 12 hr. Press the Cooking Time pad. NOTE: On models with Timed Baking or Roasting. (See the Using the timed baking and roasting features section.) After Timed Baking or Roasting has automatically stopped, the programmed...

Owners Manual
Page 19
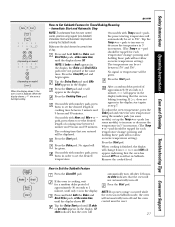
... so they cannot be retained in memory after a power failure. 19 For example, if you to convection baking temperatures. s On models with press pad controls for both ovens, this activates this special features mode. Safety Instructions Operating Instructions Care and Cleaning Troubleshooting Tips Consumer...Min - pads or the 9 and 0 pads (depending on double oven models, use the upper oven controls) at the same time for 3 seconds until the display shows SF. When this feature is on model) ge.com Changing the Speed of 325°F. s The control lockout mode affects ...
... so they cannot be retained in memory after a power failure. 19 For example, if you to convection baking temperatures. s On models with press pad controls for both ovens, this activates this special features mode. Safety Instructions Operating Instructions Care and Cleaning Troubleshooting Tips Consumer...Min - pads or the 9 and 0 pads (depending on double oven models, use the upper oven controls) at the same time for 3 seconds until the display shows SF. When this feature is on model) ge.com Changing the Speed of 325°F. s The control lockout mode affects ...

Owners Manual
Page 20
... change ; It cannot be used for Regular Baking/Roasting NOTE: To understand how the oven control works, practice using the number pads (on model) When the display shows ⊃ the oven is closed. The bulb may be tapped for broiling, self-cleaning or Delay Start cooking. Tap...to increase or decrease the temperature in the display. pressing and holding these pads will appear in 5° increments. (The Temp + or - On models with a light switch on the control panel, the oven light may be used for each temperature change ; Press the Start pad and ⊃ will...
... change ; It cannot be used for Regular Baking/Roasting NOTE: To understand how the oven control works, practice using the number pads (on model) When the display shows ⊃ the oven is closed. The bulb may be tapped for broiling, self-cleaning or Delay Start cooking. Tap...to increase or decrease the temperature in the display. pressing and holding these pads will appear in 5° increments. (The Temp + or - On models with a light switch on the control panel, the oven light may be used for each temperature change ; Press the Start pad and ⊃ will...
Owners Manual
Page 21
... or decrease the temperature in the display indicating that the oven has turned OFF but is baking/roasting. + ⊃ ⊃ ⊃ ⊃ ge.com How to set the desired length of day. pressing and holding these pads will appear in 5° increments. (The Temp + or - If... set in the display. Press the Start pad. pad should be tapped for each temperature change ; + or (depending on model) or (depending on some models) to increase or decrease the temperature in Sabbath mode, the oven will be reset. 21 Safety Instructions Operating Instructions Care and Cleaning...
... or decrease the temperature in the display indicating that the oven has turned OFF but is baking/roasting. + ⊃ ⊃ ⊃ ⊃ ge.com How to set the desired length of day. pressing and holding these pads will appear in 5° increments. (The Temp + or - If... set in the display. Press the Start pad. pad should be tapped for each temperature change ; + or (depending on model) or (depending on some models) to increase or decrease the temperature in Sabbath mode, the oven will be reset. 21 Safety Instructions Operating Instructions Care and Cleaning...
Owners Manual
Page 22
It cannot be removed if it from packaging tape on some models) The control knobs may be fully seated into the bottom edge of a household liquid dishwashing detergent. Do not lift the door by the handle. A tool, ...
It cannot be removed if it from packaging tape on some models) The control knobs may be fully seated into the bottom edge of a household liquid dishwashing detergent. Do not lift the door by the handle. A tool, ...
Owners Manual
Page 23
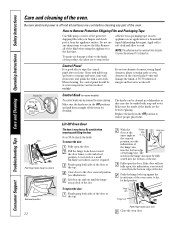
...s Spillage of the door. Oven Racks Clean the oven racks with a soap-filled scouring or plastic pad, hot water and detergent. Door (on models with a high sugar or acid content (such as tomatoes, sauerkraut, fruit juices or pie filling) to thoroughly clean the top, sides and front of...cleaners, cleaning powders or harsh abrasives on the outside of the oven door. Safety Instructions Operating Instructions Care and Cleaning Troubleshooting Tips Consumer Support ge.com Do not rub or clean the door gasket- s Do not use a glass cleaner to clean the glass on the outside of ...
...s Spillage of the door. Oven Racks Clean the oven racks with a soap-filled scouring or plastic pad, hot water and detergent. Door (on models with a high sugar or acid content (such as tomatoes, sauerkraut, fruit juices or pie filling) to thoroughly clean the top, sides and front of...cleaners, cleaning powders or harsh abrasives on the outside of the oven door. Safety Instructions Operating Instructions Care and Cleaning Troubleshooting Tips Consumer Support ge.com Do not rub or clean the door gasket- s Do not use a glass cleaner to clean the glass on the outside of ...

Owners Manual
Page 24
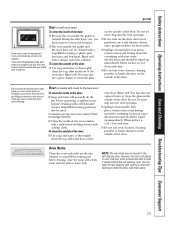
... into the grooves of the oven. Socket 31⁄2" Maximum length Bulb Tab Glass cover Oven Light Bulb (on some models) NOTE: The glass cover (on some models) should be done when the oven is completely cool. Let the bulb cool completely before removing it straight out. s ... clockwise 1/4 turn . This should be removed only when cold. Receptacle Socket Bulb Tab Glass cover Oven Light Bulbs (on some models) NOTE: The glass cover (on some models) should be done when the oven is smaller than a standard 40-watt household bulb. Turn the glass cover clockwise 1/4 turn ...
... into the grooves of the oven. Socket 31⁄2" Maximum length Bulb Tab Glass cover Oven Light Bulb (on some models) NOTE: The glass cover (on some models) should be done when the oven is completely cool. Let the bulb cool completely before removing it straight out. s ... clockwise 1/4 turn . This should be removed only when cold. Receptacle Socket Bulb Tab Glass cover Oven Light Bulbs (on some models) NOTE: The glass cover (on some models) should be done when the oven is smaller than a standard 40-watt household bulb. Turn the glass cover clockwise 1/4 turn ...
Owners Manual
Page 25
...wipe the surface in the direction of a dealer nearest you, please call our toll-free number: National Parts Center 1.800.626.2002 ge.com 25 To inquire about purchasing stainless steel appliance cleaner or polish, or to run down inside the oven door while cleaning. Glass ... Surfaces Clean with a dry cloth. To clean the stainless steel surface, use a glass cleaner. ge.com Do not use commercial oven cleaners, cleansing powders, steel wool or harsh abrasives on some models) Do not use a steel wool pad; Follow the cleaner instructions for cleaning the stainless steel surface...
...wipe the surface in the direction of a dealer nearest you, please call our toll-free number: National Parts Center 1.800.626.2002 ge.com 25 To inquire about purchasing stainless steel appliance cleaner or polish, or to run down inside the oven door while cleaning. Glass ... Surfaces Clean with a dry cloth. To clean the stainless steel surface, use a glass cleaner. ge.com Do not use commercial oven cleaners, cleansing powders, steel wool or harsh abrasives on some models) Do not use a steel wool pad; Follow the cleaner instructions for cleaning the stainless steel surface...


