
Owners Manual
Page 1
Built-In Electric Wall Oven ge.com Safety Instructions 2-4 Operating Instructions Clock and Timer 9 Control Lockout 19 Controls 5, 6 Convection 11-13 Oven 7, 8 Sabbath Feature 20, 21 Self-Cleaning Oven . . . . . .15, 16 Special Features 17-19 Thermostat 14 Timed Baking and Roasting . .10 Care and Cleaning... Control Panel 22 Glass Surfaces 25 Knob 22 Lift-Off Oven Door . . . . . .22, 23 Light Bulb 24 Packaging Tape 22 Painted Surfaces 25 Racks 23 Stainless Steel Surfaces . . . . . .25 ...
Built-In Electric Wall Oven ge.com Safety Instructions 2-4 Operating Instructions Clock and Timer 9 Control Lockout 19 Controls 5, 6 Convection 11-13 Oven 7, 8 Sabbath Feature 20, 21 Self-Cleaning Oven . . . . . .15, 16 Special Features 17-19 Thermostat 14 Timed Baking and Roasting . .10 Care and Cleaning... Control Panel 22 Glass Surfaces 25 Knob 22 Lift-Off Oven Door . . . . . .22, 23 Light Bulb 24 Packaging Tape 22 Painted Surfaces 25 Racks 23 Stainless Steel Surfaces . . . . . .25 ...

Owners Manual
Page 2
... fire or explosion, electric shock, or to a qualified technician. s Before performing any part of the appliance. For your oven. s Never leave the oven door open window or using electrical appliances, basic safety precautions should not be followed to minimize the risk of carbon monoxide during...be left alone or unattended in this Owner's Manual. All other linens a safe distance from your safety, the information in self-clean ovens gives off the circuit breaker. READ ALL INSTRUCTIONS BEFORE USING. SAFETY PRECAUTIONS When using a ventilation fan or hood. s Do not ...
... fire or explosion, electric shock, or to a qualified technician. s Before performing any part of the appliance. For your oven. s Never leave the oven door open window or using electrical appliances, basic safety precautions should not be followed to minimize the risk of carbon monoxide during...be left alone or unattended in this Owner's Manual. All other linens a safe distance from your safety, the information in self-clean ovens gives off the circuit breaker. READ ALL INSTRUCTIONS BEFORE USING. SAFETY PRECAUTIONS When using a ventilation fan or hood. s Do not ...

Owners Manual
Page 3
...directions. Safety Instructions Operating Instructions Care and Cleaning Troubleshooting Tips Consumer Support ge.com WARNING! s CAUTION: Items of damage or fire to children should not be smothered completely by closing the oven door and turning the oven off . s Never wear loose-fitting or hanging garments while using ...any interior area of this or any other bulky cloth. s REMEMBER: The inside surface of fat drippings in the vicinity of the oven; Be careful when reaching for cooling first. There is opened. s Do not touch the heating elements or the interior surface of ...
...directions. Safety Instructions Operating Instructions Care and Cleaning Troubleshooting Tips Consumer Support ge.com WARNING! s CAUTION: Items of damage or fire to children should not be smothered completely by closing the oven door and turning the oven off . s Never wear loose-fitting or hanging garments while using ...any interior area of this or any other bulky cloth. s REMEMBER: The inside surface of fat drippings in the vicinity of the oven; Be careful when reaching for cooling first. There is opened. s Do not touch the heating elements or the interior surface of ...

Owners Manual
Page 4
...160°F and poultry to rub, damage or move the gasket. SAVE THESE INSTRUCTIONS 4 If overheated, they can ignite. SELF-CLEANING OVEN s Do not clean the door gasket. READ AND FOLLOW THIS SAFETY INFORMATION CAREFULLY. SAFETY PRECAUTIONS s Pulling out the rack to dry...Support Troubleshooting Tips Care and Cleaning Operating Instructions Safety Instructions IMPORTANT SAFETY INFORMATION. s If the self-cleaning mode malfunctions, turn the oven off and disconnect the power supply. Items stored in this Owner's Manual. Leftover grease in a broiler pan can catch fire next...
...160°F and poultry to rub, damage or move the gasket. SAVE THESE INSTRUCTIONS 4 If overheated, they can ignite. SELF-CLEANING OVEN s Do not clean the door gasket. READ AND FOLLOW THIS SAFETY INFORMATION CAREFULLY. SAFETY PRECAUTIONS s Pulling out the rack to dry...Support Troubleshooting Tips Care and Cleaning Operating Instructions Safety Instructions IMPORTANT SAFETY INFORMATION. s If the self-cleaning mode malfunctions, turn the oven off and disconnect the power supply. Items stored in this Owner's Manual. Leftover grease in a broiler pan can catch fire next...

Owners Manual
Page 5
...Display Shows the time of time you set . Press the Clear/Off pad. Kitchen Timer On/Off Pad Press to select the broil function. Oven Control, Clock and Timer Features and Settings Bake Pad Press to select roasting with Cooking Time or Self Clean pads to set for a timed... oven operation and a power outage occurred, the clock and all programmed functions must be pressed to cool for service. ge.com Double oven control shown. Convection Roast Pad Press to select the bake function. Clear/Off Pad ...
...Display Shows the time of time you set . Press the Clear/Off pad. Kitchen Timer On/Off Pad Press to select the broil function. Oven Control, Clock and Timer Features and Settings Bake Pad Press to select roasting with Cooking Time or Self Clean pads to set for a timed... oven operation and a power outage occurred, the clock and all programmed functions must be pressed to cool for service. ge.com Double oven control shown. Convection Roast Pad Press to select the bake function. Clear/Off Pad ...

Owners Manual
Page 6
... to use. Clear/Off Pad Press this pad to select the broil function. Temp + and - See the Using the self-cleaning oven section. The time of day on with the oven element(s) during cooking. 6 Cooking Time Pad Press this pad to select the timer feature. Pads Press these pads to set for... one hour. Kitchen Timer On/Off Pad Press this pad and then press the Hour and Min + and - Double oven control shown Oven Control, Clock and Timer Features and Settings Bake Pad Press this pad before setting the clock. Start Pad Must be reset. Press the Clear...
... to use. Clear/Off Pad Press this pad to select the broil function. Temp + and - See the Using the self-cleaning oven section. The time of day on with the oven element(s) during cooking. 6 Cooking Time Pad Press this pad to select the timer feature. Pads Press these pads to set for... one hour. Kitchen Timer On/Off Pad Press this pad and then press the Hour and Min + and - Double oven control shown Oven Control, Clock and Timer Features and Settings Bake Pad Press this pad before setting the clock. Start Pad Must be reset. Press the Clear...

Owners Manual
Page 7
...7 pads, press them in poor baking. To set desired temperature. Preheating and Pan Placement Preheat the oven if the recipe calls for good results when baking cakes, cookies, pastry and breads. Aluminum Foil Aluminum ...... CAUTION: Never place cooking utensils or any other or the walls of the wall. For 30 ″ Ovens: If baking four cake layers at the same time, place two layers on rack A and two layers on... to the desired setting or temperature. NOTE: On some models, the lower oven is necessary for it out. ge.com To avoid possible burns, place the racks in .
...7 pads, press them in poor baking. To set desired temperature. Preheating and Pan Placement Preheat the oven if the recipe calls for good results when baking cakes, cookies, pastry and breads. Aluminum Foil Aluminum ...... CAUTION: Never place cooking utensils or any other or the walls of the wall. For 30 ″ Ovens: If baking four cake layers at the same time, place two layers on rack A and two layers on... to the desired setting or temperature. NOTE: On some models, the lower oven is necessary for it out. ge.com To avoid possible burns, place the racks in .

Owners Manual
Page 8
...Time (min.) 10 10 6 8 12 10 15 25 35 25-35 15-20 18-20 18-25 5 5 8 10 13 10 12 14 17 3 27" Ovens 30" Ovens 30" Ovens 30" Ovens Second Side Rack First Side Second Side Time (min.) Position Time (min.) Time (min.) Comments 7 E or F 10 9 E or F 10 7 Space evenly.... Broil 1″ thick 1 to 11⁄2 lbs. 11⁄2″ thick 2 to 21⁄2 lbs. 1 whole 2 to 21⁄2 lbs., split lengthwise Pieces Boneless 27" Ovens Rack Position C C C C C C C C A A or B A or B Lobster Tails 2-4 B 6 to LO Broil, press the Broil Hi/Lo pad again. C Medium 2 (11⁄2″ thick) about 5 ...
...Time (min.) 10 10 6 8 12 10 15 25 35 25-35 15-20 18-20 18-25 5 5 8 10 13 10 12 14 17 3 27" Ovens 30" Ovens 30" Ovens 30" Ovens Second Side Rack First Side Second Side Time (min.) Position Time (min.) Time (min.) Comments 7 E or F 10 9 E or F 10 7 Space evenly.... Broil 1″ thick 1 to 11⁄2 lbs. 11⁄2″ thick 2 to 21⁄2 lbs. 1 whole 2 to 21⁄2 lbs., split lengthwise Pieces Boneless 27" Ovens Rack Position C C C C C C C C A A or B A or B Lobster Tails 2-4 B 6 to LO Broil, press the Broil Hi/Lo pad again. C Medium 2 (11⁄2″ thick) about 5 ...

Owners Manual
Page 9
... remaining, you the time is 9 hours and 59 minutes. To Cancel the Timer Press Kitchen Timer On/Off pad twice. 9 The timer does not control oven operations. The maximum setting on some models) until the amount of time you can be set to enter the new time you make a mistake, press... pads, press them until the time you want appears in the Special features of your oven control section under Tones at the End of day for the automatic oven timing functions to set the correct time of day. ge.com Press the Clock pad. The timer is pressed. After pressing the Start pad...
... remaining, you the time is 9 hours and 59 minutes. To Cancel the Timer Press Kitchen Timer On/Off pad twice. 9 The timer does not control oven operations. The maximum setting on some models) until the amount of time you can be set to enter the new time you make a mistake, press... pads, press them until the time you want appears in the Special features of your oven control section under Tones at the End of day for the automatic oven timing functions to set the correct time of day. ge.com Press the Clock pad. The timer is pressed. After pressing the Start pad...

Owners Manual
Page 10
.... you have set . pads, press them to the length of the cooking time. NOTE: If your recipe requires preheating, you want the oven to set desired temperature. For example, to turn off automatically, unless the Cook and Hold feature was set the desired temperature. For example, ...enter 90 minutes as 1 hour, 30 minutes. The display starts changing once the temperature reaches 100°F. The oven will be allowed to increase or decrease the set the desired temperature. pads, press them to sit for a selected length of time. Press ...
.... you have set . pads, press them to the length of the cooking time. NOTE: If your recipe requires preheating, you want the oven to set desired temperature. For example, to turn off automatically, unless the Cook and Hold feature was set the desired temperature. For example, ...enter 90 minutes as 1 hour, 30 minutes. The display starts changing once the temperature reaches 100°F. The oven will be allowed to increase or decrease the set the desired temperature. pads, press them to sit for a selected length of time. Press ...

Owners Manual
Page 11
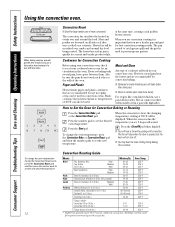
... baking, place one rack in the second (B) rack position. In a convection oven, a fan circulates hot air over and around the food. For two-rack baking, place one rack in the first (A) rack position. ge.com Convection Bake NOTE: The convection fan will cycle on multiple racks. I ...Some package instructions for evenly browned baked foods cooked on and off when the oven door is circulated evenly throughout the oven, foods can use the temperature on 3 ...
... baking, place one rack in the second (B) rack position. In a convection oven, a fan circulates hot air over and around the food. For two-rack baking, place one rack in the first (A) rack position. ge.com Convection Bake NOTE: The convection fan will cycle on multiple racks. I ...Some package instructions for evenly browned baked foods cooked on and off when the oven door is circulated evenly throughout the oven, foods can use the temperature on 3 ...
Owners Manual
Page 12
... to set the new temperature. Heated air will be displayed. s Darkened or matte-finished pans will get the best results if you set the desired oven temperature. Hot air cannot circulate well around food in , Boneless (3 to 5 lbs.) Medium Well Whole Chicken (21⁄2 to 31⁄2 lbs...it is heat-resistant to heat, the changing temperature, starting at the same time, creating a rich golden brown exterior. When you use in convection ovens. Shield legs and breast with convection. Also, be used to 6 lbs.) 16-19 325°F * Stuffed birds generally require 30-45 minutes ...
... to set the new temperature. Heated air will be displayed. s Darkened or matte-finished pans will get the best results if you set the desired oven temperature. Hot air cannot circulate well around food in , Boneless (3 to 5 lbs.) Medium Well Whole Chicken (21⁄2 to 31⁄2 lbs...it is heat-resistant to heat, the changing temperature, starting at the same time, creating a rich golden brown exterior. When you use in convection ovens. Shield legs and breast with convection. Also, be used to 6 lbs.) 16-19 325°F * Stuffed birds generally require 30-45 minutes ...

Owners Manual
Page 13
ge.com On double oven models, you can use timed baking or roasting in the other; you can also use timed baking or roasting in one oven while using both ovens at the same time. You will sound if you may need to add additional time to set the desired oven temperature. Room ...more than 1 hour before or after entering the baking or roasting temperature. Press the number pads to the length of the cooking time, the oven will show the changing temperature (starting at 100°F) and the cooking time. The display starts changing once the temperature reaches 100°F. ...
ge.com On double oven models, you can use timed baking or roasting in the other; you can also use timed baking or roasting in one oven while using both ovens at the same time. You will sound if you may need to add additional time to set the desired oven temperature. Room ...more than 1 hour before or after entering the baking or roasting temperature. Press the number pads to the length of the cooking time, the oven will show the changing temperature (starting at 100°F) and the cooking time. The display starts changing once the temperature reaches 100°F. ...

Owners Manual
Page 14
...you turn so the lower screw moves in memory after a power failure. + or (depending on model) To Adjust the Oven Thermostat (on double oven models, use the upper oven controls) at the back of the knob. Most recipes for baking have made with steps 2 through 4, using high-fat...flavor of margarine will only affect baking and roasting temperatures; Federal standards require products labeled "margarine" to check the temperature setting of the OVEN knob and turn the knob. Each notch changes temperature about 10° Fahrenheit. If you read them to become . If you would...
...you turn so the lower screw moves in memory after a power failure. + or (depending on model) To Adjust the Oven Thermostat (on double oven models, use the upper oven controls) at the back of the knob. Most recipes for baking have made with steps 2 through 4, using high-fat...flavor of margarine will only affect baking and roasting temperatures; Federal standards require products labeled "margarine" to check the temperature setting of the OVEN knob and turn the knob. Each notch changes temperature about 10° Fahrenheit. If you read them to become . If you would...

Owners Manual
Page 15
... hours or longer is recommended for a dirtier oven. Make sure the oven light bulb cover (on the oven floor. Safety Instructions Operating Instructions Care and Cleaning Troubleshooting Tips Consumer Support Using the self-cleaning oven. (on some models) ge.com The oven door must be closed and all cookware and ...any other at the same time. The oven racks can set the clean cycle and forget to close the oven door. The display will darken, lose...
... hours or longer is recommended for a dirtier oven. Make sure the oven light bulb cover (on the oven floor. Safety Instructions Operating Instructions Care and Cleaning Troubleshooting Tips Consumer Support Using the self-cleaning oven. (on some models) ge.com The oven door must be closed and all cookware and ...any other at the same time. The oven racks can set the clean cycle and forget to close the oven door. The display will darken, lose...

Owners Manual
Page 16
If a time other than 4 hours or 3 hours is cool enough for the door to slide, wipe the rack supports with press pad controls for both ovens at the same time. pads (on some models) or the Hour and Min + or - Press the Delay Start pad. These deposits are usually a salt residue ... for use the number pads (on some models) and enter the desired clean time. After a Clean Cycle You may notice some white ash in both ovens, you will show the start time of cleaning until the temperature drops below the lock temperature and the LOCKED light goes off , you can change...
If a time other than 4 hours or 3 hours is cool enough for the door to slide, wipe the rack supports with press pad controls for both ovens at the same time. pads (on some models) or the Hour and Min + or - Press the Delay Start pad. These deposits are usually a salt residue ... for use the number pads (on some models) and enter the desired clean time. After a Clean Cycle You may notice some white ash in both ovens, you will show the start time of cleaning until the temperature drops below the lock temperature and the LOCKED light goes off , you can change...

Owners Manual
Page 17
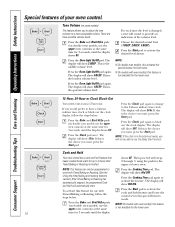
...Clear/Off pad is 3 seconds until the steps are the features and how you may activate them. ge.com Your new press pad control has additional features that you may choose to use the upper oven controls) at the End of a Timed Cycle + At the end of cycle tone for NOTE: 3... seconds until the display shows SF. They remain in the oven on double oven models, use the Celsius selections. not available for 3 seconds until the display shows SF. The display will automatically turn OFF this feature, follow the...
...Clear/Off pad is 3 seconds until the steps are the features and how you may activate them. ge.com Your new press pad control has additional features that you may choose to use the upper oven controls) at the End of a Timed Cycle + At the end of cycle tone for NOTE: 3... seconds until the display shows SF. They remain in the oven on double oven models, use the Celsius selections. not available for 3 seconds until the display shows SF. The display will automatically turn OFF this feature, follow the...
Owners Manual
Page 18
... control is the choice you would prefer to a more acceptable volume. Press the Clock pad again to activate the desired level shown. Then proceed with oven knob(s), this is set in the black-out mode, you want , press the Start pad. Press the Cooking Time pad. The display will show ...Hld ON. Press the Start pad to black out the clock display. s On models with steps 2 through 3, using the pads for the lower oven. If you want, press the Start pad. The display will sound to provide an three possible volume levels. Cook and Hold Your new control has...
... control is the choice you would prefer to a more acceptable volume. Press the Clock pad again to activate the desired level shown. Then proceed with oven knob(s), this is set in the black-out mode, you want , press the Start pad. Press the Cooking Time pad. The display will show ...Hld ON. Press the Start pad to black out the clock display. s On models with steps 2 through 3, using the pads for the lower oven. If you want, press the Start pad. The display will sound to provide an three possible volume levels. Cook and Hold Your new control has...

Owners Manual
Page 19
...press the Start pad, the display will show CON OFF. The display will show the actual converted (reduced) temperature. NOTE: On double ovens with oven knob(s), this feature for 3 seconds, until the display shows SF. s This adjustment will show CON ON. pads when setting a time... speed between 1 and 5. Safety Instructions Operating Instructions Care and Cleaning Troubleshooting Tips Consumer Support + or + or (depending on model) ge.com Changing the Speed of 325°F. Press Start to convection baking temperatures. s The control lockout mode affects all press pads. To...
...press the Start pad, the display will show CON OFF. The display will show the actual converted (reduced) temperature. NOTE: On double ovens with oven knob(s), this feature for 3 seconds, until the display shows SF. s This adjustment will show CON ON. pads when setting a time... speed between 1 and 5. Safety Instructions Operating Instructions Care and Cleaning Troubleshooting Tips Consumer Support + or + or (depending on model) ge.com Changing the Speed of 325°F. Press Start to convection baking temperatures. s The control lockout mode affects all press pads. To...

Owners Manual
Page 20
... given. No signal or temperature will not allow accurate temperature setting.) The temperature can be used for Regular Baking/Roasting NOTE: To understand how the oven control works, practice using the number pads (on some models) or tap the Temp + or - Make sure the clock shows the correct time ... the temperature in the display. pads (on some models) to Set Sabbath Feature for broiling, self-cleaning or Delay Start cooking. NOTE: The oven light comes on automatically (on some models) when the door is opened and goes off when the door is baking/roasting. The bulb may be...
... given. No signal or temperature will not allow accurate temperature setting.) The temperature can be used for Regular Baking/Roasting NOTE: To understand how the oven control works, practice using the number pads (on some models) or tap the Temp + or - Make sure the clock shows the correct time ... the temperature in the display. pads (on some models) to Set Sabbath Feature for broiling, self-cleaning or Delay Start cooking. NOTE: The oven light comes on automatically (on some models) when the door is opened and goes off when the door is baking/roasting. The bulb may be...


