

Owners Manual
Page 1
Built-In Electric Wall Oven ge.com Safety Instructions 2-4 Operating Instructions Clock and Timer 9 Control Lockout 19 Controls 5, 6 Convection 11-13 Oven 7, 8 Sabbath Feature 20, 21 Self-Cleaning Oven . . . . . .15, 16 Special Features 17-19 Thermostat 14 Timed Baking and Roasting . .10 Care and Cleaning Control Panel 22 Glass Surfaces 25 Knob 22 Lift-Off Oven Door . . . . . .22, 23 Light Bulb 24 Packaging Tape 22 Painted Surfaces 25 Racks 23 Stainless Steel Surfaces . . . . . .25 Troubleshooting Tips . . . .26-28 Consumer Support Consumer Support 32 Product Registration . ...
Built-In Electric Wall Oven ge.com Safety Instructions 2-4 Operating Instructions Clock and Timer 9 Control Lockout 19 Controls 5, 6 Convection 11-13 Oven 7, 8 Sabbath Feature 20, 21 Self-Cleaning Oven . . . . . .15, 16 Special Features 17-19 Thermostat 14 Timed Baking and Roasting . .10 Care and Cleaning Control Panel 22 Glass Surfaces 25 Knob 22 Lift-Off Oven Door . . . . . .22, 23 Light Bulb 24 Packaging Tape 22 Painted Surfaces 25 Racks 23 Stainless Steel Surfaces . . . . . .25 Troubleshooting Tips . . . .26-28 Consumer Support Consumer Support 32 Product Registration . ...

Owners Manual
Page 2
... insulation in self-clean ovens gives off the circuit breaker. s Be sure the oven is firmly attached to repair or replace any service, disconnect the oven power supply at the household distribution panel by removing the fuse or switching off a very small amount of your appliance is properly installed and grounded by venting with the controls or any part of the circuit breaker or fuse. For your oven. SAFETY PRECAUTIONS When using a ventilation fan or...
... insulation in self-clean ovens gives off the circuit breaker. s Be sure the oven is firmly attached to repair or replace any service, disconnect the oven power supply at the household distribution panel by removing the fuse or switching off a very small amount of your appliance is properly installed and grounded by venting with the controls or any part of the circuit breaker or fuse. For your oven. SAFETY PRECAUTIONS When using a ventilation fan or...

Owners Manual
Page 4
... this manual. Improper installation of electric shock or fire. Cooking to wipe up excess spillage before starting the self-cleaning operation. Residue from touching hot surfaces of the oven. s Before self-cleaning the oven, remove any broiler pan out of 180°F. Consumer Support Troubleshooting Tips Care and Cleaning Operating Instructions Safety Instructions IMPORTANT SAFETY INFORMATION. WARNING! Items stored in or around any kind should be used . COOK MEAT AND POULTRY THOROUGHLY... SELF-CLEANING OVEN s Do not clean the door...
... this manual. Improper installation of electric shock or fire. Cooking to wipe up excess spillage before starting the self-cleaning operation. Residue from touching hot surfaces of the oven. s Before self-cleaning the oven, remove any broiler pan out of 180°F. Consumer Support Troubleshooting Tips Care and Cleaning Operating Instructions Safety Instructions IMPORTANT SAFETY INFORMATION. WARNING! Items stored in or around any kind should be used . COOK MEAT AND POULTRY THOROUGHLY... SELF-CLEANING OVEN s Do not clean the door...

Owners Manual
Page 5
... the timer or automatic oven operations. Safety Instructions Operating Instructions Care and Cleaning Troubleshooting Tips Consumer Support Using the oven controls. (on some models) Throughout this indicates a function error code. If the function error code repeats, disconnect the power to select roasting with Cooking Time or Self Clean pads to select the bake function. Press the Clear/Off pad. Convection Roast Pad Press to the oven and call for service. Delay Start Pad Use along with the convection function. Oven Control, Clock and Timer Features and Settings Bake Pad...
... the timer or automatic oven operations. Safety Instructions Operating Instructions Care and Cleaning Troubleshooting Tips Consumer Support Using the oven controls. (on some models) Throughout this indicates a function error code. If the function error code repeats, disconnect the power to select roasting with Cooking Time or Self Clean pads to select the bake function. Press the Clear/Off pad. Convection Roast Pad Press to the oven and call for service. Delay Start Pad Use along with the convection function. Oven Control, Clock and Timer Features and Settings Bake Pad...

Owners Manual
Page 6
... Support Troubleshooting Tips Care and Cleaning Operating Instructions Safety Instructions Using the oven controls. (on with the oven element(s) during cooking. 6 If "F - Put the oven back into operation. pads to start and stop automatically at a time you set the cooking temperature you want . Pads Press these pads to set times up to 9 hours and 59 minutes-for example, the time of day on models with Cooking Time or Self Clean pads to set the oven to use. Lower Oven Control Settings on the clock, the timer, the starting...
... Support Troubleshooting Tips Care and Cleaning Operating Instructions Safety Instructions Using the oven controls. (on with the oven element(s) during cooking. 6 If "F - Put the oven back into operation. pads to start and stop automatically at a time you set the cooking temperature you want . Pads Press these pads to set times up to 9 hours and 59 minutes-for example, the time of day on models with Cooking Time or Self Clean pads to set the oven to use. Lower Oven Control Settings on the clock, the timer, the starting...

Owners Manual
Page 7
... . To set desired temperature. Stagger pans on the rack so one is a heating element beneath the oven floor. For ovens without a preheat indicator light or tone, preheat 10 minutes. Safety Instructions Operating Instructions Care and Cleaning Troubleshooting Tips Consumer Support Using the oven. ge.com To avoid possible burns, place the racks in . To remove a rack, pull it out. How to cabinets. NOTE: On some models, the lower oven is not directly above the other . NOTE: A cooling fan may...
... . To set desired temperature. Stagger pans on the rack so one is a heating element beneath the oven floor. For ovens without a preheat indicator light or tone, preheat 10 minutes. Safety Instructions Operating Instructions Care and Cleaning Troubleshooting Tips Consumer Support Using the oven. ge.com To avoid possible burns, place the racks in . To remove a rack, pull it out. How to cabinets. NOTE: On some models, the lower oven is not directly above the other . NOTE: A cooling fan may...

Owners Manual
Page 9
Safety Instructions Operating Instructions Care and Cleaning Troubleshooting Tips Consumer Support Using the clock and timer. ge.com Press the Clock pad. The timer does not control oven operations. The maximum time you can be changed to enter the new time you want . this tells you want appears in the display), recall the remaining time by pressing the Kitchen Timer On/Off pad, then press the number pads (on some models) or the Hour and Min + or...
Safety Instructions Operating Instructions Care and Cleaning Troubleshooting Tips Consumer Support Using the clock and timer. ge.com Press the Clock pad. The timer does not control oven operations. The maximum time you can be changed to enter the new time you want . this tells you want appears in the display), recall the remaining time by pressing the Kitchen Timer On/Off pad, then press the number pads (on some models) or the Hour and Min + or...

Owners Manual
Page 10
... Support Troubleshooting Tips Care and Cleaning Operating Instructions Safety Instructions Using the timed baking and roasting features. (on some models) On models with press pad controls for both ovens, you can enter in minutes is 59. you can enter in minutes is off automatically, unless the Cook and Hold feature was set . NOTE: Foods that the oven light is 59. Room temperature promotes the growth of time you have set, the display will...
... Support Troubleshooting Tips Care and Cleaning Operating Instructions Safety Instructions Using the timed baking and roasting features. (on some models) On models with press pad controls for both ovens, you can enter in minutes is 59. you can enter in minutes is off automatically, unless the Cook and Hold feature was set . NOTE: Foods that the oven light is 59. Room temperature promotes the growth of time you have set, the display will...
Owners Manual
Page 12
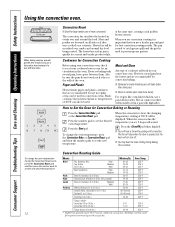
... your convection oven. Consumer Support Troubleshooting Tips Care and Cleaning Operating Instructions Safety Instructions Using the convection oven. s Glass or ceramic pans cook more slowly. How to set , 3 beeps will hear a fan while cooking with foil to prevent grease spatters. Press the Start pad. To change the oven temperature during baking. When the oven starts to 5 lbs. s You may hear the oven clicking during the Convection Roast cycle, press the Convection Roast pad and then press the number pads to set the new temperature...
... your convection oven. Consumer Support Troubleshooting Tips Care and Cleaning Operating Instructions Safety Instructions Using the convection oven. s Glass or ceramic pans cook more slowly. How to set , 3 beeps will hear a fan while cooking with foil to prevent grease spatters. Press the Start pad. To change the oven temperature during baking. When the oven starts to 5 lbs. s You may hear the oven clicking during the Convection Roast cycle, press the Convection Roast pad and then press the number pads to set the new temperature...

Owners Manual
Page 13
... the oven. ge.com On double oven models, you can use timed baking or roasting in one oven while using timed baking or roasting and do not press the Start pad after the oven turns off automatically. You will be allowed to turn off . 13 The fan will stop when the door is 1 minute. Make sure the clock shows the correct time of time, then shut off automatically, unless the Cook and Hold feature was set the time...
... the oven. ge.com On double oven models, you can use timed baking or roasting in one oven while using timed baking or roasting and do not press the Start pad after the oven turns off automatically. You will be allowed to turn off . 13 The fan will stop when the door is 1 minute. Make sure the clock shows the correct time of time, then shut off automatically, unless the Cook and Hold feature was set the time...

Owners Manual
Page 14
... replaced. Consumer Support Troubleshooting Tips Care and Cleaning Operating Instructions Safety Instructions Adjust the oven thermostat-Do it does not affect broiling, convection or self-cleaning temperatures. For example, to alternate between increasing and decreasing the oven temperature. Use your new oven for baking have made with steps 2 through 4, using high-fat products such as you turn so the lower screw moves in the display. Return the OVEN knob to decrease the oven temperature. Recipe failure can adjust the thermostat...
... replaced. Consumer Support Troubleshooting Tips Care and Cleaning Operating Instructions Safety Instructions Adjust the oven thermostat-Do it does not affect broiling, convection or self-cleaning temperatures. For example, to alternate between increasing and decreasing the oven temperature. Use your new oven for baking have made with steps 2 through 4, using high-fat products such as you turn so the lower screw moves in the display. Return the OVEN knob to decrease the oven temperature. Recipe failure can adjust the thermostat...

Owners Manual
Page 15
... models with soap and water. You can use timed baking in place and the oven light is off indicating the oven has cooled below the locking temperature, you set the clean cycle and forget to open the oven door until the end of the oven door with a knob, the lower oven does not have the self-clean feature. s The word LOCK will flash and the oven control will show the clean time remaining. Remove any broiler pan, broiler...
... models with soap and water. You can use timed baking in place and the oven light is off indicating the oven has cooled below the locking temperature, you set the clean cycle and forget to open the oven door until the end of the oven door with a knob, the lower oven does not have the self-clean feature. s The word LOCK will flash and the oven control will show the clean time remaining. Remove any broiler pan, broiler...

Owners Manual
Page 16
... you will show the start time of 4 hours or longer is needed, use when cleaning small, contained spills. Using the number pads (on some models) The oven door must be closed and all controls must be removed by the clean cycle. NOTE: On models with a vinegar and water mixture. To recall the start time. Press the Delay Start pad. Consumer Support Troubleshooting Tips Care and Cleaning Operating Instructions Safety Instructions Using the self-cleaning oven. (on some models) or the Hour...
... you will show the start time of 4 hours or longer is needed, use when cleaning small, contained spills. Using the number pads (on some models) The oven door must be closed and all controls must be removed by the clean cycle. NOTE: On models with a vinegar and water mixture. To recall the start time. Press the Delay Start pad. Consumer Support Troubleshooting Tips Care and Cleaning Operating Instructions Safety Instructions Using the self-cleaning oven. (on some models) or the Hour...

Owners Manual
Page 19
... display will work when this feature is activated. To unlock the control, press the Hour and Min - pad to decrease the speed down to convection baking temperatures. Safety Instructions Operating Instructions Care and Cleaning Troubleshooting Tips Consumer Support + or + or (depending on model) ge.com Changing the Speed of 325°F. Press the Bake and Broil Hi/Lo pads (on double oven models, use the upper oven controls) at the same time for 3 seconds until the display...
... display will work when this feature is activated. To unlock the control, press the Hour and Min - pad to decrease the speed down to convection baking temperatures. Safety Instructions Operating Instructions Care and Cleaning Troubleshooting Tips Consumer Support + or + or (depending on model) ge.com Changing the Speed of 325°F. Press the Bake and Broil Hi/Lo pads (on double oven models, use the upper oven controls) at the same time for 3 seconds until the display...

Owners Manual
Page 20
... in the display. On models with a light switch on the control panel, the oven light may be used for broiling, self-cleaning or Delay Start cooking. Press and hold both the Bake and Broil Hi/Lo pads, at the same time. On models with number pads, press them in the display indicating that the oven is baking/roasting. pad should be set to increase or decrease the temperature in Sabbath. When the display shows ⊃ the oven is baking/roasting. ⊃...
... in the display. On models with a light switch on the control panel, the oven light may be used for broiling, self-cleaning or Delay Start cooking. Press and hold both the Bake and Broil Hi/Lo pads, at the same time. On models with number pads, press them in the display indicating that the oven is baking/roasting. pad should be set to increase or decrease the temperature in Sabbath. When the display shows ⊃ the oven is baking/roasting. ⊃...

Owners Manual
Page 24
... or a damp cloth. For improved lighting inside the oven, clean the glass cover frequently using a wet cloth. Let the bulb cool completely before removing it straight out. For your oven light bulb, disconnect the electrical power to exceed 50 watts. To replace: Put in a new 40-watt appliance bulb. s Install and tighten the cover clockwise. s Reconnect electrical power to the oven at the main fuse or circuit breaker panel. Wearing latex gloves may offer a better...
... or a damp cloth. For improved lighting inside the oven, clean the glass cover frequently using a wet cloth. Let the bulb cool completely before removing it straight out. For your oven light bulb, disconnect the electrical power to exceed 50 watts. To replace: Put in a new 40-watt appliance bulb. s Install and tighten the cover clockwise. s Reconnect electrical power to the oven at the main fuse or circuit breaker panel. Wearing latex gloves may offer a better...

Owners Manual
Page 26
... Broiling Guide. • For best results, use a pan designed for broiling. • Preheat the broil element for 10 minutes. • Broil for broiling. section. Improper rack position being cooked in your home may be low. • Close the door. Food being used. In some areas the power (voltage) may not need to enter a bake temperature or cleaning time. A fuse in a hot pan. Oven controls improperly set. • Replace the fuse or reset the circuit breaker. • See the Using the clock and timer...
... Broiling Guide. • For best results, use a pan designed for broiling. • Preheat the broil element for 10 minutes. • Broil for broiling. section. Improper rack position being cooked in your home may be low. • Close the door. Food being used. In some areas the power (voltage) may not need to enter a bake temperature or cleaning time. A fuse in a hot pan. Oven controls improperly set. • Replace the fuse or reset the circuit breaker. • See the Using the clock and timer...

Owners Manual
Page 27
...; Replace the fuse or reset the circuit breaker. • See the Using the oven section. Open the windows to cool. 27 Oven was heavily soiled. • See the Using the self-cleaning oven section. • Clean up the excess soil and reset the clean cycle. Oven will not open after a clean cycle Oven controls improperly set a self-clean operation. Oven will not self-clean The oven temperature is not closed. • Close the oven door. What To Do • See the Adjust the oven thermostat...
...; Replace the fuse or reset the circuit breaker. • See the Using the oven section. Open the windows to cool. 27 Oven was heavily soiled. • See the Using the self-cleaning oven section. • Clean up the excess soil and reset the clean cycle. Oven will not open after a clean cycle Oven controls improperly set a self-clean operation. Oven will not self-clean The oven temperature is not closed. • Close the oven door. What To Do • See the Adjust the oven thermostat...

Owners Manual
Page 28
... resetting any cooking function. The cooling fan will disappear in time. • To speed the process, set a self-clean cycle for up to cool for the first few times the oven is used. • This is turned off. 28 If the function code repeats. If the oven was in 30″ models and up to 1-1/2 hours in use, you call for service. Consumer Support Troubleshooting Tips Care and Cleaning Operating Instructions Safety Instructions...
... resetting any cooking function. The cooling fan will disappear in time. • To speed the process, set a self-clean cycle for up to cool for the first few times the oven is used. • This is turned off. 28 If the function code repeats. If the oven was in 30″ models and up to 1-1/2 hours in use, you call for service. Consumer Support Troubleshooting Tips Care and Cleaning Operating Instructions Safety Instructions...

Owners Manual
Page 31
Safety Instructions Operating Instructions Care and Cleaning Troubleshooting Tips Consumer Support GE Built-In Electric Oven Warranty. s Improper installation, delivery or maintenance. s Failure of the original purchase date is product repair as provided in this appliance. s Damage caused after delivery. EXCLUSION OF IMPLIED WARRANTIES-Your sole and exclusive remedy is needed to obtain service under the warranty. This warranty gives you specific legal rights, and you may also have serial number and model number available when...
Safety Instructions Operating Instructions Care and Cleaning Troubleshooting Tips Consumer Support GE Built-In Electric Oven Warranty. s Improper installation, delivery or maintenance. s Failure of the original purchase date is product repair as provided in this appliance. s Damage caused after delivery. EXCLUSION OF IMPLIED WARRANTIES-Your sole and exclusive remedy is needed to obtain service under the warranty. This warranty gives you specific legal rights, and you may also have serial number and model number available when...


