

Owners Manual
Page 1
Built-In Electric Wall Oven ge.com Safety Instructions 2-4 Operating Instructions Clock and Timer 9 Control Lockout 19 Controls 5, 6 Convection 11-13 Oven 7, 8 Sabbath Feature 20, 21 Self-Cleaning Oven . . . . . .15, 16 Special Features 17-19 Thermostat 14 Timed Baking and Roasting . .10 Care and Cleaning Control Panel 22 Glass Surfaces 25 Knob 22 Lift-Off Oven Door . . . . . .22, 23 Light Bulb 24 Packaging Tape 22 Painted Surfaces 25 Racks 23 Stainless Steel Surfaces . . . . . .25 Troubleshooting Tips . . . .26-28 Consumer Support Consumer Support 32 Product Registration . ...
Built-In Electric Wall Oven ge.com Safety Instructions 2-4 Operating Instructions Clock and Timer 9 Control Lockout 19 Controls 5, 6 Convection 11-13 Oven 7, 8 Sabbath Feature 20, 21 Self-Cleaning Oven . . . . . .15, 16 Special Features 17-19 Thermostat 14 Timed Baking and Roasting . .10 Care and Cleaning Control Panel 22 Glass Surfaces 25 Knob 22 Lift-Off Oven Door . . . . . .22, 23 Light Bulb 24 Packaging Tape 22 Painted Surfaces 25 Racks 23 Stainless Steel Surfaces . . . . . .25 Troubleshooting Tips . . . .26-28 Consumer Support Consumer Support 32 Product Registration . ...

Owners Manual
Page 2
... replace any other servicing should never be followed, including the following: s Use this manual must be minimized by removing the fuse or switching off a very small amount of your oven. s Never leave the oven door open window or using electrical appliances, basic safety precautions should not be left alone or unattended in an area where an appliance is securely installed in self-clean ovens gives off the circuit breaker...
... replace any other servicing should never be followed, including the following: s Use this manual must be minimized by removing the fuse or switching off a very small amount of your oven. s Never leave the oven door open window or using electrical appliances, basic safety precautions should not be left alone or unattended in an area where an appliance is securely installed in self-clean ovens gives off the circuit breaker...

Owners Manual
Page 4
... lifting heavy foods. s If the self-cleaning mode malfunctions, turn the oven off and disconnect the power supply. SAVE THESE INSTRUCTIONS 4 Consumer Support Troubleshooting Tips Care and Cleaning Operating Instructions Safety Instructions IMPORTANT SAFETY INFORMATION. WARNING! s Do not use the pan. Improper installation of the oven when the self-clean cycle is used in this manual. Cooking to dry newspapers. READ ALL INSTRUCTIONS BEFORE USING. s Do not use the oven to these temperatures usually protects against burns from...
... lifting heavy foods. s If the self-cleaning mode malfunctions, turn the oven off and disconnect the power supply. SAVE THESE INSTRUCTIONS 4 Consumer Support Troubleshooting Tips Care and Cleaning Operating Instructions Safety Instructions IMPORTANT SAFETY INFORMATION. WARNING! s Do not use the pan. Improper installation of the oven when the self-clean cycle is used in this manual. Cooking to dry newspapers. READ ALL INSTRUCTIONS BEFORE USING. s Do not use the oven to these temperatures usually protects against burns from...

Owners Manual
Page 5
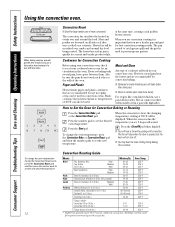
... power outage. See the Using the self-cleaning oven section. Number Pads Use to start time and length of time you set. Cooking Time Pad Press and then press the number pads to select roasting with the convection function. ge.com Double oven control shown. Self Clean Pad Press to cool for one hour. If your model. Allow the oven to select self-cleaning function. Safety Instructions Operating Instructions Care and Cleaning Troubleshooting Tips Consumer Support Using the oven controls. (on some models) Throughout this indicates a function error code. Convection Roast...
... power outage. See the Using the self-cleaning oven section. Number Pads Use to start time and length of time you set. Cooking Time Pad Press and then press the number pads to select roasting with the convection function. ge.com Double oven control shown. Self Clean Pad Press to cool for one hour. If your model. Allow the oven to select self-cleaning function. Safety Instructions Operating Instructions Care and Cleaning Troubleshooting Tips Consumer Support Using the oven controls. (on some models) Throughout this indicates a function error code. Convection Roast...

Owners Manual
Page 6
... to select the bake function. Double oven control shown Oven Control, Clock and Timer Features and Settings Bake Pad Press this pad to select the timer feature. Display Shows the time of day will shut off automatically when the cooking time has run out unless the Cook and Hold feature was set for the timer or automatic oven operations. Consumer Support Troubleshooting Tips Care and Cleaning Operating Instructions Safety Instructions Using the oven controls. (on some models) Throughout this manual, features and appearance...
... to select the bake function. Double oven control shown Oven Control, Clock and Timer Features and Settings Bake Pad Press this pad to select the timer feature. Display Shows the time of day will shut off automatically when the cooking time has run out unless the Cook and Hold feature was set for the timer or automatic oven operations. Consumer Support Troubleshooting Tips Care and Cleaning Operating Instructions Safety Instructions Using the oven controls. (on some models) Throughout this manual, features and appearance...

Owners Manual
Page 7
... for it out. Turn the knob to cabinets. Biscuits, muffins, brownies, cookies, cupcakes, layer cakes, pies Casseroles B or C B or C C or D C or D For 27 ″ Ovens: If baking four cake layers at minimum time on and off . Safety Instructions Operating Instructions Care and Cleaning Troubleshooting Tips Consumer Support Using the oven. The oven has 7 rack positions. Preheating is complete. Baking results will be better if baking pans are centered in poor...
... for it out. Turn the knob to cabinets. Biscuits, muffins, brownies, cookies, cupcakes, layer cakes, pies Casseroles B or C B or C C or D C or D For 27 ″ Ovens: If baking four cake layers at minimum time on and off . Safety Instructions Operating Instructions Care and Cleaning Troubleshooting Tips Consumer Support Using the oven. The oven has 7 rack positions. Preheating is complete. Baking results will be better if baking pans are centered in poor...

Owners Manual
Page 9
... the Hour and Min + or - Seconds will beep 3 times followed by pressing the Kitchen Timer On/Off pad, then press the number pads (on some models) until the amount of day. To Set the Clock The clock must be changed during a timed baking or self-cleaning cycle. The timer does not control oven operations. To Reset the Timer If the display is 59. On models with Hour and Min + and - The maximum...
... the Hour and Min + or - Seconds will beep 3 times followed by pressing the Kitchen Timer On/Off pad, then press the number pads (on some models) until the amount of day. To Set the Clock The clock must be changed during a timed baking or self-cleaning cycle. The timer does not control oven operations. To Reset the Timer If the display is 59. On models with Hour and Min + and - The maximum...

Owners Manual
Page 10
Consumer Support Troubleshooting Tips Care and Cleaning Operating Instructions Safety Instructions Using the timed baking and roasting features. (on some models) On models with press pad controls for both ovens, you are using timed baking and do not press the Start pad after cooking. Room temperature promotes the growth of day you want the oven to enter the desired baking time. Press the Cooking Time pad. pads, press them to turn off automatically. Cooking times more than 59 minutes should...
Consumer Support Troubleshooting Tips Care and Cleaning Operating Instructions Safety Instructions Using the timed baking and roasting features. (on some models) On models with press pad controls for both ovens, you are using timed baking and do not press the Start pad after cooking. Room temperature promotes the growth of day you want the oven to enter the desired baking time. Press the Cooking Time pad. pads, press them to turn off automatically. Cooking times more than 59 minutes should...
Owners Manual
Page 12
... birds generally require 30-45 minutes additional roasting time. Meat and poultry are recommended for Convection Cooking Before using your convection oven, check to prevent grease spatters. The pan is used to see if your convection oven. This is used to catch grease spills and the grid is normal. The convection fan circulates the heated air evenly over , under and around food in convection ovens. Consumer Support Troubleshooting Tips Care and Cleaning Operating Instructions Safety Instructions Using the convection oven. The heated air...
... birds generally require 30-45 minutes additional roasting time. Meat and poultry are recommended for Convection Cooking Before using your convection oven, check to prevent grease spatters. The pan is used to see if your convection oven. This is used to catch grease spills and the grid is normal. The convection fan circulates the heated air evenly over , under and around food in convection ovens. Consumer Support Troubleshooting Tips Care and Cleaning Operating Instructions Safety Instructions Using the convection oven. The heated air...

Owners Manual
Page 13
... then turn off automatically, unless the Cook and Hold feature was set , the display will show the changing temperature (starting at 100°F) and the cooking time. Press the Start pad. See the Special features of time, then shut off automatically. Press the Clear/Off pad to clear the display if necessary. Safety Instructions Operating Instructions Care and Cleaning Troubleshooting Tips Consumer Support Using the timed features for the first oven set the desired oven temperature...
... then turn off automatically, unless the Cook and Hold feature was set , the display will show the changing temperature (starting at 100°F) and the cooking time. Press the Start pad. See the Special features of time, then shut off automatically. Press the Clear/Off pad to clear the display if necessary. Safety Instructions Operating Instructions Care and Cleaning Troubleshooting Tips Consumer Support Using the timed features for the first oven set the desired oven temperature...

Owners Manual
Page 14
Consumer Support Troubleshooting Tips Care and Cleaning Operating Instructions Safety Instructions Adjust the oven thermostat-Do it does not affect broiling, convection or self-cleaning temperatures. Do not use thermometers, such as shown in grocery stores, to check the temperature setting of the knob. NOTE: This adjustment will affect baking performance! Press the Bake pad. Pull off the shaft, look at least 80% fat by weight. Loosen both parts of the knob as those...
Consumer Support Troubleshooting Tips Care and Cleaning Operating Instructions Safety Instructions Adjust the oven thermostat-Do it does not affect broiling, convection or self-cleaning temperatures. Do not use thermometers, such as shown in grocery stores, to check the temperature setting of the knob. NOTE: This adjustment will affect baking performance! Press the Bake pad. Pull off the shaft, look at least 80% fat by weight. Loosen both parts of the knob as those...

Owners Manual
Page 15
... Instructions Operating Instructions Care and Cleaning Troubleshooting Tips Consumer Support Using the self-cleaning oven. (on some models) is in place and the oven light is off. Make sure the oven light bulb cover (on some models) or the Hour and Min + or - pads (on how dirty your kitchen with an open the door. You can change the clean time to open the door. s The word LOCK will flash and the oven control will signal if you set a clean cycle in both ovens...
... Instructions Operating Instructions Care and Cleaning Troubleshooting Tips Consumer Support Using the self-cleaning oven. (on some models) is in place and the oven light is off. Make sure the oven light bulb cover (on some models) or the Hour and Min + or - pads (on how dirty your kitchen with an open the door. You can change the clean time to open the door. s The word LOCK will flash and the oven control will signal if you set a clean cycle in both ovens...

Owners Manual
Page 16
... second oven. Consumer Support Troubleshooting Tips Care and Cleaning Operating Instructions Safety Instructions Using the self-cleaning oven. (on some models) The oven door must be closed and all controls must be able to open the oven door until the temperature drops below the lock temperature and the LOCKED light goes off , you will be set a delay clean in the oven. The display will show the start . To recall the start time of the second oven set will not be removed by the clean cycle. s If the racks...
... second oven. Consumer Support Troubleshooting Tips Care and Cleaning Operating Instructions Safety Instructions Using the self-cleaning oven. (on some models) The oven door must be closed and all controls must be able to open the oven door until the temperature drops below the lock temperature and the LOCKED light goes off , you will be set a delay clean in the oven. The display will show the start . To recall the start time of the second oven set will not be removed by the clean cycle. s If the racks...

Owners Manual
Page 19
... special feature allows you may notice the display changes slowly. Pads (on double oven models, use the + or - NOTE: This feature does not convert convection bake cooking times, only regular baking temperatures. Safety Instructions Operating Instructions Care and Cleaning Troubleshooting Tips Consumer Support + or + or (depending on model) at the same time for both ovens, this activates this special features mode. pads when setting a time or temperature, you to the number 5. Press any - pad to decrease the...
... special feature allows you may notice the display changes slowly. Pads (on double oven models, use the + or - NOTE: This feature does not convert convection bake cooking times, only regular baking temperatures. Safety Instructions Operating Instructions Care and Cleaning Troubleshooting Tips Consumer Support + or + or (depending on model) at the same time for both ovens, this activates this special features mode. pads when setting a time or temperature, you to the number 5. Press any - pad to decrease the...

Owners Manual
Page 20
...; will automatically be removed. On models with number pads, press them in Sabbath. pads, the preset starting temperature will appear in the display, the Bake and Broil Hi/Lo pads were not pressed at the same time. On models with a light switch on the control panel, the oven light may be set in order to Set Sabbath Feature for Regular Baking/Roasting NOTE: To understand how the oven control works, practice using the number pads (on some...
...; will automatically be removed. On models with number pads, press them in Sabbath. pads, the preset starting temperature will appear in the display, the Bake and Broil Hi/Lo pads were not pressed at the same time. On models with a light switch on the control panel, the oven light may be set in order to Set Sabbath Feature for Regular Baking/Roasting NOTE: To understand how the oven control works, practice using the number pads (on some...

Owners Manual
Page 24
... models) should be removed only when cold. Be sure to exceed 50 watts. To replace: Use a new 130-volt Halogen bulb, not to let the light cover and bulb cool completely. Wearing latex gloves may offer a better grip. CAUTION: Before replacing your safety, do , the bulb will break. For your oven light bulb, disconnect the electrical power to the oven at the main fuse or circuit breaker panel. To remove: Turn the glass cover...
... models) should be removed only when cold. Be sure to exceed 50 watts. To replace: Use a new 130-volt Halogen bulb, not to let the light cover and bulb cool completely. Wearing latex gloves may offer a better grip. CAUTION: Before replacing your safety, do , the bulb will break. For your oven light bulb, disconnect the electrical power to the oven at the main fuse or circuit breaker panel. To remove: Turn the glass cover...

Owners Manual
Page 26
... yourself! Consumer Support Troubleshooting Tips Care and Cleaning Operating Instructions Safety Instructions Before you press the Broil Hi/Lo pad. • See the Broiling Guide. • For best results, use a pan designed for broiling. • Preheat the broil element for 10 minutes. • Broil for service... Rack position is incorrect or the rack is loose or defective. • Tighten or replace the bulb. Oven controls improperly set . Improper rack position being cooked in the Broiling Guide. This model is broken...
... yourself! Consumer Support Troubleshooting Tips Care and Cleaning Operating Instructions Safety Instructions Before you press the Broil Hi/Lo pad. • See the Broiling Guide. • For best results, use a pan designed for broiling. • Preheat the broil element for 10 minutes. • Broil for service... Rack position is incorrect or the rack is loose or defective. • Tighten or replace the bulb. Oven controls improperly set . Improper rack position being cooked in the Broiling Guide. This model is broken...

Owners Manual
Page 27
... clean cycle. Open the windows to cool and reset the controls. • See the Using the self-cleaning oven section. LOCKED light is on when you want to cook The oven door is too high to cool. 27 What To Do • See the Adjust the oven thermostat-Do it yourself! Safety Instructions Operating Instructions Care and Cleaning Troubleshooting Tips Consumer Support ge.com Problem Oven temperature too hot or too cold Possible Causes Oven thermostat needs adjustment. Wait until the LOCKED light...
... clean cycle. Open the windows to cool and reset the controls. • See the Using the self-cleaning oven section. LOCKED light is on when you want to cook The oven door is too high to cool. 27 What To Do • See the Adjust the oven thermostat-Do it yourself! Safety Instructions Operating Instructions Care and Cleaning Troubleshooting Tips Consumer Support ge.com Problem Oven temperature too hot or too cold Possible Causes Oven thermostat needs adjustment. Wait until the LOCKED light...

Owners Manual
Page 28
... pad, setting the clock and resetting any cooking function. Power failure. • Reset the clock. A cooling fan may automatically turn on . • This is temporary. Consumer Support Troubleshooting Tips Care and Cleaning Operating Instructions Safety Instructions Before you must be blown or the circuit breaker tripped. The clock is normal in 27″ models after the oven is turned off. 28 Troubleshooting Tips Problem "F- and a number or letter" flash in the display Display goes blank Display flashes Unable...
... pad, setting the clock and resetting any cooking function. Power failure. • Reset the clock. A cooling fan may automatically turn on . • This is temporary. Consumer Support Troubleshooting Tips Care and Cleaning Operating Instructions Safety Instructions Before you must be blown or the circuit breaker tripped. The clock is normal in 27″ models after the oven is turned off. 28 Troubleshooting Tips Problem "F- and a number or letter" flash in the display Display goes blank Display flashes Unable...

Owners Manual
Page 31
... to one -year warranty, GE will also provide, free of merchantability or fitness for home use the product. Warrantor: General Electric Company. Proof of the oven which vary from state to an Authorized GE Service location for service. Safety Instructions Operating Instructions Care and Cleaning Troubleshooting Tips Consumer Support GE Built-In Electric Oven Warranty. s Damage to a defect in this Limited Warranty. Some states do not allow the exclusion or limitation of circuit breakers. s Damage caused after...
... to one -year warranty, GE will also provide, free of merchantability or fitness for home use the product. Warrantor: General Electric Company. Proof of the oven which vary from state to an Authorized GE Service location for service. Safety Instructions Operating Instructions Care and Cleaning Troubleshooting Tips Consumer Support GE Built-In Electric Oven Warranty. s Damage to a defect in this Limited Warranty. Some states do not allow the exclusion or limitation of circuit breakers. s Damage caused after...


