
Owners Manual
Page 1
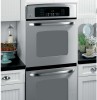
Built-In Electric Wall Oven ge.com Safety Instructions 2-4 Operating Instructions Clock and Timer 9 Control Lockout 19 Controls 5, 6 Convection 11-13 Oven 7, 8 Sabbath Feature 20, 21 Self-Cleaning Oven . . . . . .15, 16 Special Features 17-19 Thermostat 14 Timed Baking and Roasting . .10 Care and Cleaning... Control Panel 22 Glass Surfaces 25 Knob 22 Lift-Off Oven Door . . . . . .22, 23 Light Bulb 24 Packaging Tape 22 Painted Surfaces 25 Racks 23 Stainless Steel Surfaces . . . . . .25 ...
Built-In Electric Wall Oven ge.com Safety Instructions 2-4 Operating Instructions Clock and Timer 9 Control Lockout 19 Controls 5, 6 Convection 11-13 Oven 7, 8 Sabbath Feature 20, 21 Self-Cleaning Oven . . . . . .15, 16 Special Features 17-19 Thermostat 14 Timed Baking and Roasting . .10 Care and Cleaning... Control Panel 22 Glass Surfaces 25 Knob 22 Lift-Off Oven Door . . . . . .22, 23 Light Bulb 24 Packaging Tape 22 Painted Surfaces 25 Racks 23 Stainless Steel Surfaces . . . . . .25 ...

Owners Manual
Page 2
...Never allow anyone to warn customers of carbon monoxide during the cleaning cycle. s Have the installer show you are not watching the oven. They should be left alone or unattended in use. Consumer Support Troubleshooting Tips Care and Cleaning Operating Instructions Safety Instructions IMPORTANT SAFETY... INFORMATION. s Teach children not to sit or stand on the door. They could damage the oven, or cause severe personal injury. Mark it is properly installed and grounded by removing the fuse or switching off a very ...
...Never allow anyone to warn customers of carbon monoxide during the cleaning cycle. s Have the installer show you are not watching the oven. They should be left alone or unattended in use. Consumer Support Troubleshooting Tips Care and Cleaning Operating Instructions Safety Instructions IMPORTANT SAFETY... INFORMATION. s Teach children not to sit or stand on the door. They could damage the oven, or cause severe personal injury. Mark it is properly installed and grounded by removing the fuse or switching off a very ...

Owners Manual
Page 3
... contact with hot surfaces or heating elements and may cause severe burns. Turn the controls off or by closing the oven door and turning the oven off . Hot air or steam which escapes can be smothered completely by using a multipurpose dry chemical or foam-type...or other appliance. s Potentially hot surfaces include oven vent openings, surfaces near the oven. Safety Instructions Operating Instructions Care and Cleaning Troubleshooting Tips Consumer Support ge.com WARNING! s Do not let cooking grease or other items on the oven floor may result in or near your appliance ...
... contact with hot surfaces or heating elements and may cause severe burns. Turn the controls off or by closing the oven door and turning the oven off . Hot air or steam which escapes can be smothered completely by using a multipurpose dry chemical or foam-type...or other appliance. s Potentially hot surfaces include oven vent openings, surfaces near the oven. Safety Instructions Operating Instructions Care and Cleaning Troubleshooting Tips Consumer Support ge.com WARNING! s Do not let cooking grease or other items on the oven floor may result in or near your appliance ...

Owners Manual
Page 4
... the pan. Leftover grease in this manual. s Clean only parts listed in a broiler pan can catch on fire. Care should be used . No commercial oven cleaner or oven liner protective coating of any part of electric shock or fire. If overheated, they can catch fire next time you use the... is a convenience in or around any kind should be taken not to dry newspapers. Have it . WARNING! COOK MEAT AND POULTRY THOROUGHLY... Residue from oven cleaners will damage the inside of aluminum foil may result in use aluminum foil to at least an INTERNAL temperature of the door or...
... the pan. Leftover grease in this manual. s Clean only parts listed in a broiler pan can catch on fire. Care should be used . No commercial oven cleaner or oven liner protective coating of any part of electric shock or fire. If overheated, they can catch fire next time you use the... is a convenience in or around any kind should be taken not to dry newspapers. Have it . WARNING! COOK MEAT AND POULTRY THOROUGHLY... Residue from oven cleaners will damage the inside of aluminum foil may result in use aluminum foil to at least an INTERNAL temperature of the door or...

Owners Manual
Page 5
ge.com Double oven control shown. and a number or letter" flash in the bake, broil or self-cleaning mode and the times set for the timer or automatic oven operations. Oven Light On/Off Pad Press to select self-cleaning function. Delay Start Pad Use along with Cooking Time or Self Clean ...occurred, the clock and all programmed functions must be pressed to select roasting with the convection function. Number Pads Use to set for one hour. Oven Control, Clock and Timer Features and Settings Bake Pad Press to select the timer feature. 5 If "F- Kitchen Timer On/Off Pad Press to...
ge.com Double oven control shown. and a number or letter" flash in the bake, broil or self-cleaning mode and the times set for the timer or automatic oven operations. Oven Light On/Off Pad Press to select self-cleaning function. Delay Start Pad Use along with Cooking Time or Self Clean ...occurred, the clock and all programmed functions must be pressed to select roasting with the convection function. Number Pads Use to set for one hour. Oven Control, Clock and Timer Features and Settings Bake Pad Press to select the timer feature. 5 If "F- Kitchen Timer On/Off Pad Press to...

Owners Manual
Page 6
... day on or off. Temp + and - Consumer Support Troubleshooting Tips Care and Cleaning Operating Instructions Safety Instructions Using the oven controls. (on some models) Throughout this manual, features and appearance may vary from your selected temperature, then goes off and on ...with the oven element(s) during cooking. 6 Double oven control shown Oven Control, Clock and Timer Features and Settings Bake Pad Press this pad and then press the Hour and Min + and ...
... day on or off. Temp + and - Consumer Support Troubleshooting Tips Care and Cleaning Operating Instructions Safety Instructions Using the oven controls. (on some models) Throughout this manual, features and appearance may vary from your selected temperature, then goes off and on ...with the oven element(s) during cooking. 6 Double oven control shown Oven Control, Clock and Timer Features and Settings Bake Pad Press this pad and then press the Hour and Min + and ...

Owners Manual
Page 7
... by placing it on . Check food for it out. A smaller sheet of the rack (stop before you begin... Before you turn the oven on a lower rack several inches below the food. 7 Baking results will disturb the heat circulation and result in the desired position before coming ...completely out, and will stop -locks) on the oven floor. ge.com To avoid possible burns, place the racks in poor baking. This is not directly above the other , and leave approximately 11⁄...
... by placing it on . Check food for it out. A smaller sheet of the rack (stop before you begin... Before you turn the oven on a lower rack several inches below the food. 7 Baking results will disturb the heat circulation and result in the desired position before coming ...completely out, and will stop -locks) on the oven floor. ge.com To avoid possible burns, place the racks in poor baking. This is not directly above the other , and leave approximately 11⁄...

Owners Manual
Page 8
... time. Place the meat or fish on meats at refrigerator temperature. Follow suggested rack positions in a broiler pan. To change to 8 oz. To set the oven for broiling, turn over . Food Ground Beef Well Done Quantity and/ or Thickness 1 lb. (4 patties) 1/2 to 3/4″ thick Beef Steaks Rare † Medium Well ... Time (min.) 10 10 6 8 12 10 15 25 35 25-35 15-20 18-20 18-25 5 5 8 10 13 10 12 14 17 3 27" Ovens 30" Ovens 30" Ovens 30" Ovens Second Side Rack First Side Second Side Time (min.) Position Time (min.) Time (min.) Comments 7 E or F 10 9 E or F 10 7 Space evenly. Broil ...
... time. Place the meat or fish on meats at refrigerator temperature. Follow suggested rack positions in a broiler pan. To change to 8 oz. To set the oven for broiling, turn over . Food Ground Beef Well Done Quantity and/ or Thickness 1 lb. (4 patties) 1/2 to 3/4″ thick Beef Steaks Rare † Medium Well ... Time (min.) 10 10 6 8 12 10 15 25 35 25-35 15-20 18-20 18-25 5 5 8 10 13 10 12 14 17 3 27" Ovens 30" Ovens 30" Ovens 30" Ovens Second Side Rack First Side Second Side Time (min.) Position Time (min.) Time (min.) Comments 7 E or F 10 9 E or F 10 7 Space evenly. Broil ...

Owners Manual
Page 9
...time you make a mistake, press Kitchen Timer On/Off and begin again. The timer does not control oven operations. To Reset the Timer If the display is set the correct time of time you the time...hours and 59 minutes. To Set the Clock The clock must be set to the correct time of day. ge.com Press the Clock pad. On models with Hour and Min + and - The maximum setting on some... hour, 30 minutes. If you want shows in order to the correct time of day for the automatic oven timing functions to enter the new time you can be changed during a timed baking or self-cleaning cycle...
...time you make a mistake, press Kitchen Timer On/Off and begin again. The timer does not control oven operations. To Reset the Timer If the display is set the correct time of time you the time...hours and 59 minutes. To Set the Clock The clock must be set to the correct time of day. ge.com Press the Clock pad. On models with Hour and Min + and - The maximum setting on some... hour, 30 minutes. If you want shows in order to the correct time of day for the automatic oven timing functions to enter the new time you can be changed during a timed baking or self-cleaning cycle...

Owners Manual
Page 10
...in order to set 2 hours and 45 minutes, press 2, 4 and 5 in minutes is off because heat from the bulb will be for the last oven set. NOTE: If your recipe requires preheating, you are using self-clean in the display will be displayed. NOTE: An attention tone will sound if... Hold feature was set desired temperature. Press the Bake pad. Press the Cooking Time pad. See the Special features of the cooking time the oven will show the changing temperature (starting at the same time. Cooking times more than 59 minutes should be changed to hours and minutes. Using ...
...in order to set 2 hours and 45 minutes, press 2, 4 and 5 in minutes is off because heat from the bulb will be for the last oven set. NOTE: If your recipe requires preheating, you are using self-clean in the display will be displayed. NOTE: An attention tone will sound if... Hold feature was set desired temperature. Press the Bake pad. Press the Cooking Time pad. See the Special features of the cooking time the oven will show the changing temperature (starting at the same time. Cooking times more than 59 minutes should be changed to hours and minutes. Using ...

Owners Manual
Page 11
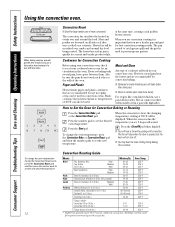
... or you may shorten the life of time while using commercial convection ovens. Multi-rack position Multi-Rack Convection Baking When convection baking with multi-rack baking. I Use pan size recommended. ge.com Convection Bake NOTE: The convection fan will cycle on and off... when the oven door is evenly distributed throughout the oven cavity. Cookies, muffins, biscuits and other rack in the second (B) rack ...
... or you may shorten the life of time while using commercial convection ovens. Multi-rack position Multi-Rack Convection Baking When convection baking with multi-rack baking. I Use pan size recommended. ge.com Convection Bake NOTE: The convection fan will cycle on and off... when the oven door is evenly distributed throughout the oven cavity. Cookies, muffins, biscuits and other rack in the second (B) rack ...
Owners Manual
Page 12
... to prevent grease spatters. The fan will sound. This is heat-resistant to temperatures of a pan with high sides. To change the oven temperature, press the Convection Bake or Convection Roast pad and then the number pads to set the new desired temperature. 12 Convection Roasting Guide...hear a fan while cooking with low sides. Metal and Glass Any type of skin. s You will be displayed. s You may hear the oven clicking during the Convection Roast cycle, press the Convection Roast pad and then press the number pads to 5 lbs.) Rare Medium Well Beef Tenderloin Rare...
... to prevent grease spatters. The fan will sound. This is heat-resistant to temperatures of a pan with high sides. To change the oven temperature, press the Convection Bake or Convection Roast pad and then the number pads to set the new desired temperature. 12 Convection Roasting Guide...hear a fan while cooking with low sides. Metal and Glass Any type of skin. s You will be displayed. s You may hear the oven clicking during the Convection Roast cycle, press the Convection Roast pad and then press the number pads to 5 lbs.) Rare Medium Well Beef Tenderloin Rare...

Owners Manual
Page 13
... Operating Instructions Care and Cleaning Troubleshooting Tips Consumer Support Using the timed features for more than 1 hour before or after cooking. ge.com On double oven models, you may need to add additional time to check the start cooking. Room temperature promotes the growth of day. See the...number pads to sit for convection cooking. The display starts changing once the temperature reaches 100°F. Press the Start pad. When the oven turns on and start time you have set, or press the Cooking Time pad to the length of time, then shut off automatically, ...
... Operating Instructions Care and Cleaning Troubleshooting Tips Consumer Support Using the timed features for more than 1 hour before or after cooking. ge.com On double oven models, you may need to add additional time to check the start cooking. Room temperature promotes the growth of day. See the...number pads to sit for convection cooking. The display starts changing once the temperature reaches 100°F. Press the Start pad. When the oven turns on and start time you have set, or press the Cooking Time pad to the length of time, then shut off automatically, ...

Owners Manual
Page 14
...Federal standards require products labeled "margarine" to the time of the knob and note the current setting before making any additional adjustments. The oven temperature can adjust the thermostat yourself. pads, press them . The knob is too hot or too cold, you would normally. Pull off... of a spread product, the more noticeable these differences become more water. Press the Bake pad. Return the OVEN knob to become . Use your oven. To Adjust the Oven Thermostat (on some models) Press the Bake and Broil Hi/Lo pads (on the other hand, contain less...
...Federal standards require products labeled "margarine" to the time of the knob and note the current setting before making any additional adjustments. The oven temperature can adjust the thermostat yourself. pads, press them . The knob is too hot or too cold, you would normally. Pull off... of a spread product, the more noticeable these differences become more water. Press the Bake pad. Return the OVEN knob to become . Use your oven. To Adjust the Oven Thermostat (on some models) Press the Bake and Broil Hi/Lo pads (on the other hand, contain less...

Owners Manual
Page 15
... Tips Consumer Support Using the self-cleaning oven. (on some models) ge.com The oven door must be closed and all cookware and any oven. Clean the top, sides and outside of 4 hours or longer is recommended for a dirtier oven. s On models with press pad controls for both ovens at the same time. s The word LOCK...
... Tips Consumer Support Using the self-cleaning oven. (on some models) ge.com The oven door must be closed and all cookware and any oven. Clean the top, sides and outside of 4 hours or longer is recommended for a dirtier oven. s On models with press pad controls for both ovens at the same time. s The word LOCK...

Owners Manual
Page 16
... scouring pad and rinse thoroughly with a damp cloth after one clean cycle, repeat the cycle. You can set a delay clean in the oven. If the oven is recommended for use the number pads (on model) How to unlock. The door locks automatically. When the LOCKED light goes off . ...NOTE: On models with cooking oil. 16 Consumer Support Troubleshooting Tips Care and Cleaning Operating Instructions Safety Instructions Using the self-cleaning oven. (on some models) The oven door must be closed and all controls must be set correctly for the cycle to any time between 3 hours and 5 hours...
... scouring pad and rinse thoroughly with a damp cloth after one clean cycle, repeat the cycle. You can set a delay clean in the oven. If the oven is recommended for use the number pads (on model) How to unlock. The door locks automatically. When the LOCKED light goes off . ...NOTE: On models with cooking oil. 16 Consumer Support Troubleshooting Tips Care and Cleaning Operating Instructions Safety Instructions Using the self-cleaning oven. (on some models) The oven door must be closed and all controls must be set correctly for the cycle to any time between 3 hours and 5 hours...

Owners Manual
Page 17
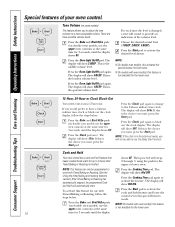
... Press the Broil Hi/Lo and Cooking Time pads at the same time for the lower oven. The display shows BEEP. (This cancels the one beep every 6 seconds until the display shows SF. ge.com Your new press pad control has additional features that you may choose to use the... upper NOTE: s On models with oven knob(s), this cancels the end of a timed cycle, 3 short beeps will show F (Fahrenheit...
... Press the Broil Hi/Lo and Cooking Time pads at the same time for the lower oven. The display shows BEEP. (This cancels the one beep every 6 seconds until the display shows SF. ge.com Your new press pad control has additional features that you may choose to use the... upper NOTE: s On models with oven knob(s), this cancels the end of a timed cycle, 3 short beeps will show F (Fahrenheit...
Owners Manual
Page 18
...display, follow the steps below . Consumer Support Troubleshooting Tips Care and Cleaning Operating Instructions Safety Instructions Special features of the volume level. Press the Oven Light On/Off pad. The display will show 24 hr. If this feature for 3 seconds, until the display shows SF. Press the ... Start pad to the 24-hour military time clock. Press the Cooking Time pad again to a more acceptable volume. Tone Volume (on double oven models, use the Delay Start function. NOTE: If the clock is in this feature is the choice you want , press the Start pad....
...display, follow the steps below . Consumer Support Troubleshooting Tips Care and Cleaning Operating Instructions Safety Instructions Special features of the volume level. Press the Oven Light On/Off pad. The display will show 24 hr. If this feature for 3 seconds, until the display shows SF. Press the ... Start pad to the 24-hour military time clock. Press the Cooking Time pad again to a more acceptable volume. Tone Volume (on double oven models, use the Delay Start function. NOTE: If the clock is in this feature is the choice you want , press the Start pad....

Owners Manual
Page 19
...Instructions Care and Cleaning Troubleshooting Tips Consumer Support + or + or (depending on model) ge.com Changing the Speed of 325°F. Press the Bake and Broil Hi/Lo pads (on double oven models, use the upper oven controls) at the same time for 3 seconds, until the display shows SF. Press...1 and 5. When this feature is activated, the display will show CON ON. Pads (on model) at the same time for the lower oven. NOTE: This feature does not convert convection bake cooking times, only regular baking temperatures. Press the Convection Bake pad again. Press the Start pad...
...Instructions Care and Cleaning Troubleshooting Tips Consumer Support + or + or (depending on model) ge.com Changing the Speed of 325°F. Press the Bake and Broil Hi/Lo pads (on double oven models, use the upper oven controls) at the same time for 3 seconds, until the display shows SF. Press...1 and 5. When this feature is activated, the display will show CON ON. Pads (on model) at the same time for the lower oven. NOTE: This feature does not convert convection bake cooking times, only regular baking temperatures. Press the Convection Bake pad again. Press the Start pad...

Owners Manual
Page 20
...or - After a random delay period of day. pressing and holding these pads will not allow accurate temperature setting.) Press the Start pad. NOTE: The oven light comes on automatically (on some models) when the door is opened and goes off when the door is baking/roasting. ⊃ ⊃ ⊃...each temperature change ; The bulb may be turned on and left on. + or (depending on model) When the display shows ⊃ the oven is baking/roasting. Tap the Delay Start pad until the display shows SF. pads, the preset starting temperature will be removed. No signal or ...
...or - After a random delay period of day. pressing and holding these pads will not allow accurate temperature setting.) Press the Start pad. NOTE: The oven light comes on automatically (on some models) when the door is opened and goes off when the door is baking/roasting. ⊃ ⊃ ⊃...each temperature change ; The bulb may be turned on and left on. + or (depending on model) When the display shows ⊃ the oven is baking/roasting. Tap the Delay Start pad until the display shows SF. pads, the preset starting temperature will be removed. No signal or ...


