
Use and Care Manual
Page 1
... Special Features 10, 11 Thermostat 13 Timed Baking and Roasting 9 Care and Cleaning Control Panel 16 Door 15 Glass Surfaces 16 Heating Element 16 Knob 16 Lift-Off Oven Door 15 Light 17 Oven Interior 17 Painted Surfaces 16 Racks 16 Stainless Steel Surfaces 16 Troubleshooting Tips . . . .18-...20 Consumer Support Accessories 21 Consumer Support . . . Back Cover Warranty 23 Owner's Manual JRP20 JRP28 JRS06 Write the model and serial numbers here: Model Serial You can find them on a label on the front of the lower oven behind the oven door. 49-80588 03-09 JR
... Special Features 10, 11 Thermostat 13 Timed Baking and Roasting 9 Care and Cleaning Control Panel 16 Door 15 Glass Surfaces 16 Heating Element 16 Knob 16 Lift-Off Oven Door 15 Light 17 Oven Interior 17 Painted Surfaces 16 Racks 16 Stainless Steel Surfaces 16 Troubleshooting Tips . . . .18-...20 Consumer Support Accessories 21 Consumer Support . . . Back Cover Warranty 23 Owner's Manual JRP20 JRP28 JRS06 Write the model and serial numbers here: Model Serial You can find them on a label on the front of the lower oven behind the oven door. 49-80588 03-09 JR

Use and Care Manual
Page 4
... kind should be used . ■ Before self-cleaning the oven, remove shiny, silver-colored oven racks (on some models) and all other cookware. ■ Be sure to line oven bottoms. Improper installation of the oven. COOK MEAT AND POULTRY THOROUGHLY... Care should be ... ■ Do not use the pan. ■ Clean only parts listed in lifting heavy foods. SELF-CLEANING OVEN (on some models) ■ Do not clean the door gasket. Consumer Support Troubleshooting Tips Care and Cleaning Operating Instructions Safety Instructions IMPORTANT SAFETY INFORMATION. Residue from ...
... kind should be used . ■ Before self-cleaning the oven, remove shiny, silver-colored oven racks (on some models) and all other cookware. ■ Be sure to line oven bottoms. Improper installation of the oven. COOK MEAT AND POULTRY THOROUGHLY... Care should be ... ■ Do not use the pan. ■ Clean only parts listed in lifting heavy foods. SELF-CLEANING OVEN (on some models) ■ Do not clean the door gasket. Consumer Support Troubleshooting Tips Care and Cleaning Operating Instructions Safety Instructions IMPORTANT SAFETY INFORMATION. Residue from ...

Use and Care Manual
Page 5
...See the Using the self-cleaning oven section. CLEAN Light Flashes while in the display and the oven control signals, this pad to cancel ALL oven operations except the clock and timer. Unlatch the door. If function error code repeats, disconnect power to cook. SELF CLEAN Pad (on some models) Touch this pad and ...LO Pad Touch this point. BROIL Light Flashes while in edit mode-you want your model. Glows when the oven is first turned on or off and on with the COOKING TIME or SELF CLEAN pad to set . Display Shows the operations you can change the length of day will...
...See the Using the self-cleaning oven section. CLEAN Light Flashes while in the display and the oven control signals, this pad to cancel ALL oven operations except the clock and timer. Unlatch the door. If function error code repeats, disconnect power to cook. SELF CLEAN Pad (on some models) Touch this pad and ...LO Pad Touch this point. BROIL Light Flashes while in edit mode-you want your model. Glows when the oven is first turned on or off and on with the COOKING TIME or SELF CLEAN pad to set . Display Shows the operations you can change the length of day will...

Use and Care Manual
Page 8
Not all models. The time of day cannot be able to see it by one minute after you want shows in minutes... remaining time is still showing the time remaining, you may wish to turn off the time of day for the automatic oven timing functions to enter the new time you make a mistake, touch the TIMER/CLOCK pad and begin again. pad to...8 To Set the Clock The clock must be changed during a delayed cooking or a delayed self-cleaning cycle. To Set the Timer The timer does not control oven operations. Times more than 59 minutes should be set to hours and minutes. Touch the TIMER/CLOCK...
Not all models. The time of day cannot be able to see it by one minute after you want shows in minutes... remaining time is still showing the time remaining, you may wish to turn off the time of day for the automatic oven timing functions to enter the new time you make a mistake, touch the TIMER/CLOCK pad and begin again. pad to...8 To Set the Clock The clock must be changed during a delayed cooking or a delayed self-cleaning cycle. To Set the Timer The timer does not control oven operations. Times more than 59 minutes should be set to hours and minutes. Touch the TIMER/CLOCK...

Use and Care Manual
Page 9
... set, touch the DELAY START pad to check the start time you have set the oven control to delay-start cooking. pad, enter the time of time and then turn on some models) GEAppliances.com NOTE: Foods that you can enter in minutes is 59. Touch the ... time countdown. Touch the CLEAR/OFF pad to hours and minutes. pad, enter the desired temperature. Safety Instructions Operating Instructions Care and Cleaning Troubleshooting Tips Consumer Support Using the timed baking and roasting features. (These features are using timed baking and do not touch the START ...
... set, touch the DELAY START pad to check the start time you have set the oven control to delay-start cooking. pad, enter the time of time and then turn on some models) GEAppliances.com NOTE: Foods that you can enter in minutes is 59. Touch the ... time countdown. Touch the CLEAR/OFF pad to hours and minutes. pad, enter the desired temperature. Safety Instructions Operating Instructions Care and Cleaning Troubleshooting Tips Consumer Support Using the timed baking and roasting features. (These features are using timed baking and do not touch the START ...

Use and Care Manual
Page 10
...leave the control set in memory after 3 hours during baking functions or after a power failure, except for 2 seconds. When the display shows your oven control. Touch the START pad to use the Celsius selections. Touch the START pad when the display shows LOC OFF. The display will show LOC...LO pads at the same time for the Sabbath feature, which will automatically turn OFF this feature is on some models) Your control will show F (Fahrenheit). Touch the SELF CLEAN pad. Touch the START pad to be activated while the display is not available for 3 seconds until no shdn...
...leave the control set in memory after 3 hours during baking functions or after a power failure, except for 2 seconds. When the display shows your oven control. Touch the START pad to use the Celsius selections. Touch the START pad when the display shows LOC OFF. The display will show LOC...LO pads at the same time for the Sabbath feature, which will automatically turn OFF this feature is on some models) Your control will show F (Fahrenheit). Touch the SELF CLEAN pad. Touch the START pad to be activated while the display is not available for 3 seconds until no shdn...

Use and Care Manual
Page 12
... temperature in 5° increments. How to 1 minute, ⊃ will not automatically turn off and the oven control must be given. Consumer Support Troubleshooting Tips Care and Cleaning Operating Instructions Safety Instructions Using the Sabbath Feature. (This feature is not available for the lower... oven.) (Designed for use on the Jewish Sabbath and Holidays.) (on some models) when the door is opened and ...
... temperature in 5° increments. How to 1 minute, ⊃ will not automatically turn off and the oven control must be given. Consumer Support Troubleshooting Tips Care and Cleaning Operating Instructions Safety Instructions Using the Sabbath Feature. (This feature is not available for the lower... oven.) (Designed for use on the Jewish Sabbath and Holidays.) (on some models) when the door is opened and ...

Use and Care Manual
Page 13
...standards require products labeled "margarine" to check the temperature setting of the knob. The knob is too hot or too cold, you would normally. Tighten the screws. Return the OVEN knob to decrease the oven temperature. GEAppliances.com You may vary 20-40 degrees. on some models Pull the OVEN knob off the OVEN... oven performance before making any adjustment. For best results with your oven. Safety Instructions Operating Instructions Care and Cleaning Troubleshooting Tips Consumer Support Adjust the oven thermostat-Do it . If you still think your new oven ...
...standards require products labeled "margarine" to check the temperature setting of the knob. The knob is too hot or too cold, you would normally. Tighten the screws. Return the OVEN knob to decrease the oven temperature. GEAppliances.com You may vary 20-40 degrees. on some models Pull the OVEN knob off the OVEN... oven performance before making any adjustment. For best results with your oven. Safety Instructions Operating Instructions Care and Cleaning Troubleshooting Tips Consumer Support Adjust the oven thermostat-Do it . If you still think your new oven ...

Use and Care Manual
Page 14
... door locks automatically. Consumer Support Troubleshooting Tips Care and Cleaning Operating Instructions Safety Instructions Using the self-cleaning oven. (on some models) is in place and the oven light is off. Do not use abrasives or oven cleaners. Clean the top, sides and outside of Cleaning Touch the SELF CLEAN pad. Using the + or - Using the + or - pad, enter...
... door locks automatically. Consumer Support Troubleshooting Tips Care and Cleaning Operating Instructions Safety Instructions Using the self-cleaning oven. (on some models) is in place and the oven light is off. Do not use abrasives or oven cleaners. Clean the top, sides and outside of Cleaning Touch the SELF CLEAN pad. Using the + or - Using the + or - pad, enter...

Use and Care Manual
Page 15
...to remove the adhesive from packaging tape on the outside of marinades, fruit juices, tomato sauces and basting materials containing acids may use oven cleaners, cleaning powders or harsh abrasives on the outside of the door: ■ Soap and water will normally do not need to remain on .... to the broil stop position. To remove the door, open it from all of the film before cleaning any way or if it has become displaced on standard clean model) To clean the inside the gasket is an application of the door squarely over the hinges and slowly lower it ...
...to remove the adhesive from packaging tape on the outside of marinades, fruit juices, tomato sauces and basting materials containing acids may use oven cleaners, cleaning powders or harsh abrasives on the outside of the door: ■ Soap and water will normally do not need to remain on .... to the broil stop position. To remove the door, open it from all of the film before cleaning any way or if it has become displaced on standard clean model) To clean the inside the gasket is an application of the door squarely over the hinges and slowly lower it ...

Use and Care Manual
Page 16
... not allow the water or cleaner to ensure proper placement. Stainless Steel Surfaces (on some models) The control knobs may be cleaned in color, lose their luster and become hard to find the location of the oven. To clean the stainless steel surface, use a glass cleaner. To inquire about purchasing stainless steel appliance cleaner...
... not allow the water or cleaner to ensure proper placement. Stainless Steel Surfaces (on some models) The control knobs may be cleaned in color, lose their luster and become hard to find the location of the oven. To clean the stainless steel surface, use a glass cleaner. To inquire about purchasing stainless steel appliance cleaner...

Use and Care Manual
Page 17
... using a wet cloth. Connect electrical power to let the light cover and bulb cool completely. Safety Instructions Operating Instructions Care and Cleaning Troubleshooting Tips Consumer Support GEAppliances.com Non-Self-Clean Oven Interior (on standard clean models or on lower oven) With proper care, the porcelain enamel finish on the surface. This should be done when the...
... using a wet cloth. Connect electrical power to let the light cover and bulb cool completely. Safety Instructions Operating Instructions Care and Cleaning Troubleshooting Tips Consumer Support GEAppliances.com Non-Self-Clean Oven Interior (on standard clean models or on lower oven) With proper care, the porcelain enamel finish on the surface. This should be done when the...

Use and Care Manual
Page 21
...Plus applicable state sales tax (PST/HST and GST) * The large (standard) broil pan does not fit in 20"/24" ranges. ** The XL pan does not fit in 24" wall ovens, 27" drop-ins or 20"/24" ranges. Date: Month Year Signature 21 Grates Surface Burner Heads and ...Caps Surface Elements and Drip Pans Knobs or Oven Racks Oven Elements Light Bulbs Experience these accessories and many more ! The pan below catches the excess fats and oils. • Genuine GE Part • Easy To Clean...
...Plus applicable state sales tax (PST/HST and GST) * The large (standard) broil pan does not fit in 20"/24" ranges. ** The XL pan does not fit in 24" wall ovens, 27" drop-ins or 20"/24" ranges. Date: Month Year Signature 21 Grates Surface Burner Heads and ...Caps Surface Elements and Drip Pans Knobs or Oven Racks Oven Elements Light Bulbs Experience these accessories and many more ! The pan below catches the excess fats and oils. • Genuine GE Part • Easy To Clean...

Use and Care Manual
Page 23
...the original purchaser and any succeeding owner for products purchased for service. Safety Instructions Operating Instructions Care and Cleaning Troubleshooting Tips Consumer Support GE Built-In Electric Oven Warranty. Proof of the product if it is not available, you may be required to bring the product... affairs office or your home to teach you may be responsible for a trip charge or you may also have serial number and model number available when calling for home use the product. ■ Improper installation, delivery or maintenance. ■ Failure of the original...
...the original purchaser and any succeeding owner for products purchased for service. Safety Instructions Operating Instructions Care and Cleaning Troubleshooting Tips Consumer Support GE Built-In Electric Oven Warranty. Proof of the product if it is not available, you may be required to bring the product... affairs office or your home to teach you may be responsible for a trip charge or you may also have serial number and model number available when calling for home use the product. ■ Improper installation, delivery or maintenance. ■ Failure of the original...
Quick Specs
Page 1
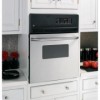
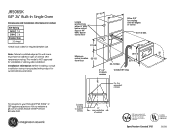
... 44" MIN. This model is an important, required step in inches) KW Rating 240V 3.4 208V 2.6 Breaker Size 20 Amps† †Check local codes for stackable or side-by Underwriters Laboratories 320302 JRS06SK GE® 24" Built-In Single Oven Dimensions and Installation Information... (in the installation of at ge.com or call GE Answer Center® service, 800.626.2000. R Specification Created 7/05 Listed ...
... 44" MIN. This model is an important, required step in inches) KW Rating 240V 3.4 208V 2.6 Breaker Size 20 Amps† †Check local codes for stackable or side-by Underwriters Laboratories 320302 JRS06SK GE® 24" Built-In Single Oven Dimensions and Installation Information... (in the installation of at ge.com or call GE Answer Center® service, 800.626.2000. R Specification Created 7/05 Listed ...
Quick Specs
Page 2
... oven capacity • Audible preheat signal - Features an audible signal that activates when the oven has reached the desired cooking temperature • Certified Sabbath mode - Provides a convenient viewing area to -use and allow consumers to make the most of food • Interior oven light - JRS06SK GE® 24" Built-In Single Oven Features and Benefits • Electronic oven...
... oven capacity • Audible preheat signal - Features an audible signal that activates when the oven has reached the desired cooking temperature • Certified Sabbath mode - Provides a convenient viewing area to -use and allow consumers to make the most of food • Interior oven light - JRS06SK GE® 24" Built-In Single Oven Features and Benefits • Electronic oven...


