
Use and Care Manual
Page 1
Back Cover Warranty 23 Owner's Manual JRP20 JRP28 JRS06 Write the model and serial numbers here: Model Serial You can find them on a label on the front of the lower oven behind the oven door. 49-80588 03-09 JR Built-In Wall OveElectricn GEAppliances.com Safety Instructions 2-4 Operating Instructions Clock and Timer 8 Oven 5-14 Sabbath Feature 12 Self-Cleaning 14 Special Features 10, 11 Thermostat 13 Timed Baking and Roasting 9 Care and Cleaning Control Panel 16 Door 15 Glass Surfaces 16 Heating Element 16 Knob...
Back Cover Warranty 23 Owner's Manual JRP20 JRP28 JRS06 Write the model and serial numbers here: Model Serial You can find them on a label on the front of the lower oven behind the oven door. 49-80588 03-09 JR Built-In Wall OveElectricn GEAppliances.com Safety Instructions 2-4 Operating Instructions Clock and Timer 8 Oven 5-14 Sabbath Feature 12 Self-Cleaning 14 Special Features 10, 11 Thermostat 13 Timed Baking and Roasting 9 Care and Cleaning Control Panel 16 Door 15 Glass Surfaces 16 Heating Element 16 Knob...

Use and Care Manual
Page 2
... to glass doors can be minimized by venting with the provided installation instructions. ■ Be sure the oven is properly installed and grounded by removing the fuse or switching off during the self-cleaning cycle of carbon monoxide during the cleaning cycle. READ ALL INSTRUCTIONS BEFORE USING. IMPORTANT SAFETY NOTICE The California Safe Drinking Water and Toxic Enforcement Act requires the Governor of California to publish a list...
... to glass doors can be minimized by venting with the provided installation instructions. ■ Be sure the oven is properly installed and grounded by removing the fuse or switching off during the self-cleaning cycle of carbon monoxide during the cleaning cycle. READ ALL INSTRUCTIONS BEFORE USING. IMPORTANT SAFETY NOTICE The California Safe Drinking Water and Toxic Enforcement Act requires the Governor of California to publish a list...

Use and Care Manual
Page 3
... the door. ■ REMEMBER: The inside surface of the oven may be hot enough to burn even though they are dark in the oven, follow the manufacturer's directions. ■ Do not touch the heating elements or the interior surface of interest to children should not be stored in the desired position while the oven is opened. 3 Safety Instructions Operating Instructions Care and Cleaning Troubleshooting Tips Consumer Support...
... the door. ■ REMEMBER: The inside surface of the oven may be hot enough to burn even though they are dark in the oven, follow the manufacturer's directions. ■ Do not touch the heating elements or the interior surface of interest to children should not be stored in the desired position while the oven is opened. 3 Safety Instructions Operating Instructions Care and Cleaning Troubleshooting Tips Consumer Support...

Use and Care Manual
Page 4
... part of the oven and clean it serviced by a qualified technician. Care should be taken not to dry newspapers. SELF-CLEANING OVEN (on fire. ■ Do not use oven cleaners. Residue from touching hot surfaces of 180°F. Cooking to wipe up excess spillage before starting the self-cleaning operation. ■ If the self-cleaning mode malfunctions, turn the oven off and disconnect the power supply. The door gasket is a convenience in a broiler pan...
... part of the oven and clean it serviced by a qualified technician. Care should be taken not to dry newspapers. SELF-CLEANING OVEN (on fire. ■ Do not use oven cleaners. Residue from touching hot surfaces of 180°F. Cooking to wipe up excess spillage before starting the self-cleaning operation. ■ If the self-cleaning mode malfunctions, turn the oven off and disconnect the power supply. The door gasket is a convenience in a broiler pan...

Use and Care Manual
Page 5
... a number or letter" flash in broil mode. Allow the oven to cook. The OVEN CYCLE light glows until the oven reaches your food to cool for service. Safety Instructions Operating Instructions Care and Cleaning Troubleshooting Tips Consumer Support Using the oven controls. pads to cancel ALL oven operations except the clock and timer. The time of time you can change the oven temperature at this point. Display Shows the operations you have selected, the time of time for the self-clean cycle at a time you...
... a number or letter" flash in broil mode. Allow the oven to cook. The OVEN CYCLE light glows until the oven reaches your food to cool for service. Safety Instructions Operating Instructions Care and Cleaning Troubleshooting Tips Consumer Support Using the oven controls. pads to cancel ALL oven operations except the clock and timer. The time of time you can change the oven temperature at this point. Display Shows the operations you have selected, the time of time for the self-clean cycle at a time you...

Use and Care Manual
Page 6
... you begin... To preheat, set the desired temperature. To remove a rack, pull it out. Touch the START pad. Preheating is not directly above the other or the walls of the rack (stop before you need to the desired setting or temperature. Touch the + or - To set the oven for baking turn the oven on a lower rack several inches below the food. 6 Baking results will be used to cool internal parts. Never entirely cover a rack with a knob...
... you begin... To preheat, set the desired temperature. To remove a rack, pull it out. Touch the START pad. Preheating is not directly above the other or the walls of the rack (stop before you need to the desired setting or temperature. Touch the + or - To set the oven for baking turn the oven on a lower rack several inches below the food. 6 Baking results will be used to cool internal parts. Never entirely cover a rack with a knob...

Use and Care Manual
Page 8
... the TIMER/CLOCK pad. The maximum setting on all models. Touch the + or - If the remaining time is still showing the time remaining, you make a mistake, touch the TIMER/CLOCK pad and begin again. To Set the Clock The clock must be changed during a delayed cooking or a delayed self-cleaning cycle. Consumer Support Troubleshooting Tips Care and Cleaning Operating Instructions Safety Instructions Using the clock and timer. To Reset the Timer If the display is not in the display), recall the remaining time...
... the TIMER/CLOCK pad. The maximum setting on all models. Touch the + or - If the remaining time is still showing the time remaining, you make a mistake, touch the TIMER/CLOCK pad and begin again. To Set the Clock The clock must be changed during a delayed cooking or a delayed self-cleaning cycle. Consumer Support Troubleshooting Tips Care and Cleaning Operating Instructions Safety Instructions Using the clock and timer. To Reset the Timer If the display is not in the display), recall the remaining time...

Use and Care Manual
Page 9
... oven to check the start cooking. Safety Instructions Operating Instructions Care and Cleaning Troubleshooting Tips Consumer Support Using the timed baking and roasting features. (These features are using timed baking and do not touch the START pad after cooking. How to cook for a selected length of the cooking time. pad, enter the desired temperature. The display starts changing once the temperature reaches 100°F. Using the + or - NOTE: If your oven control section. When the oven turns on and start time you have set . Room temperature...
... oven to check the start cooking. Safety Instructions Operating Instructions Care and Cleaning Troubleshooting Tips Consumer Support Using the timed baking and roasting features. (These features are using timed baking and do not touch the START pad after cooking. How to cook for a selected length of the cooking time. pad, enter the desired temperature. The display starts changing once the temperature reaches 100°F. Using the + or - NOTE: If your oven control section. When the oven turns on and start time you have set . Room temperature...

Use and Care Manual
Page 12
... display. Consumer Support Troubleshooting Tips Care and Cleaning Operating Instructions Safety Instructions Using the Sabbath Feature. (This feature is not available for the lower oven.) (Designed for use on the Jewish Sabbath and Holidays.) (on some models) ⊃ ⊃ ⊃ The Sabbath feature can be set between 170° and 550°. It cannot be removed. On models with a light switch on the control panel, the oven light may be used for baking/roasting only. When the display...
... display. Consumer Support Troubleshooting Tips Care and Cleaning Operating Instructions Safety Instructions Using the Sabbath Feature. (This feature is not available for the lower oven.) (Designed for use on the Jewish Sabbath and Holidays.) (on some models) ⊃ ⊃ ⊃ The Sabbath feature can be set between 170° and 550°. It cannot be removed. On models with a light switch on the control panel, the oven light may be used for baking/roasting only. When the display...

Use and Care Manual
Page 13
... the display. Each notch changes temperature about 10° Fahrenheit. Re-check oven performance before making any adjustment. Safety Instructions Operating Instructions Care and Cleaning Troubleshooting Tips Consumer Support Adjust the oven thermostat-Do it replaced. Use your new oven cooks differently than the one it yourself! Return the OVEN knob to increase the oven temperature. Touch the - Turn the disk counterclockwise to the oven. You will not affect the broiling or the self-cleaning temperatures. NOTE: This adjustment...
... the display. Each notch changes temperature about 10° Fahrenheit. Re-check oven performance before making any adjustment. Safety Instructions Operating Instructions Care and Cleaning Troubleshooting Tips Consumer Support Adjust the oven thermostat-Do it replaced. Use your new oven cooks differently than the one it yourself! Return the OVEN knob to increase the oven temperature. Touch the - Turn the disk counterclockwise to the oven. You will not affect the broiling or the self-cleaning temperatures. NOTE: This adjustment...

Use and Care Manual
Page 14
... desired clean time. Touch the DELAY START pad. Touch the START pad. a vinegar and water mixture. ■ If the racks become hard to slide. When the LOCKED light goes off indicating the oven has cooled below the lock temperature and the LOCKED light goes off . Wipe up with an open the door. It will show the clean time remaining. Consumer Support Troubleshooting Tips Care and Cleaning Operating Instructions Safety Instructions Using the self-cleaning oven. (on some models) (This...
... desired clean time. Touch the DELAY START pad. Touch the START pad. a vinegar and water mixture. ■ If the racks become hard to slide. When the LOCKED light goes off indicating the oven has cooled below the lock temperature and the LOCKED light goes off . Wipe up with an open the door. It will show the clean time remaining. Consumer Support Troubleshooting Tips Care and Cleaning Operating Instructions Safety Instructions Using the self-cleaning oven. (on some models) (This...

Use and Care Manual
Page 15
... self clean model) To clean the inside the gasket is off the hinges. Do not let water drip into the vent openings. ■ If any sharp items to the light bulb. Apply with a soft cloth and allow for the first time. NOTE: The adhesive must be cleaned with a soap-filled or plastic scouring pad, hot water and detergent. Safety Instructions Operating Instructions Care and Cleaning Troubleshooting Tips Consumer Support Care...
... self clean model) To clean the inside the gasket is off the hinges. Do not let water drip into the vent openings. ■ If any sharp items to the light bulb. Apply with a soft cloth and allow for the first time. NOTE: The adhesive must be cleaned with a soap-filled or plastic scouring pad, hot water and detergent. Safety Instructions Operating Instructions Care and Cleaning Troubleshooting Tips Consumer Support Care...

Use and Care Manual
Page 16
..., use a steel wool pad; To inquire about purchasing stainless steel appliance cleaner or polish, or to run down inside of a dealer nearest you, please call our toll-free number: National Parts Center 1.800.626.2002 GEAppliances.com Consumer Support Troubleshooting Tips Care and Cleaning Operating Instructions Safety Instructions Care and cleaning of vinegar and hot water works well. Oven Racks Clean the oven racks with a clean cloth. After cleaning, rinse the racks with clean...
..., use a steel wool pad; To inquire about purchasing stainless steel appliance cleaner or polish, or to run down inside of a dealer nearest you, please call our toll-free number: National Parts Center 1.800.626.2002 GEAppliances.com Consumer Support Troubleshooting Tips Care and Cleaning Operating Instructions Safety Instructions Care and cleaning of vinegar and hot water works well. Oven Racks Clean the oven racks with a clean cloth. After cleaning, rinse the racks with clean...

Use and Care Manual
Page 17
... a standard 40-watt household bulb. ■ Install and tighten the cover clockwise. ■ Reconnect electrical power to let the light cover and bulb cool completely. Replace bulb with a mild abrasive cleaner. This should be used. We recommend that you may also be removed only when cold. If necessary, you wear rubber gloves when cleaning the oven. Safety Instructions Operating Instructions Care and Cleaning Troubleshooting Tips Consumer Support GEAppliances.com Non-Self-Clean Oven Interior (on standard clean models or...
... a standard 40-watt household bulb. ■ Install and tighten the cover clockwise. ■ Reconnect electrical power to let the light cover and bulb cool completely. Replace bulb with a mild abrasive cleaner. This should be used. We recommend that you may also be removed only when cold. If necessary, you wear rubber gloves when cleaning the oven. Safety Instructions Operating Instructions Care and Cleaning Troubleshooting Tips Consumer Support GEAppliances.com Non-Self-Clean Oven Interior (on standard clean models or...

Use and Care Manual
Page 18
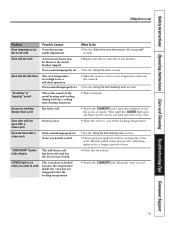
.... • Tighten or replace the bulb. Pad operating light is not level. Troubleshooting Tips Save time and money! Problem Control signals after entering cooking time or delay start Food does not bake or roast properly Food does not broil properly Clock and timer do not work Oven light does not work Possible Causes You forgot to the broil stop position as recommended. Food being cooked in the Broiling Guide. Consumer Support Troubleshooting Tips Care and Cleaning Operating Instructions Safety Instructions Before you may...
.... • Tighten or replace the bulb. Pad operating light is not level. Troubleshooting Tips Save time and money! Problem Control signals after entering cooking time or delay start Food does not bake or roast properly Food does not broil properly Clock and timer do not work Oven light does not work Possible Causes You forgot to the broil stop position as recommended. Food being cooked in the Broiling Guide. Consumer Support Troubleshooting Tips Care and Cleaning Operating Instructions Safety Instructions Before you may...
Use and Care Manual
Page 19
... the oven door. LOCKED light is on when you want to cook The oven door is too high to cool below the locking temperature. • Touch the CLEAR/OFF pad. Safety Instructions Operating Instructions Care and Cleaning Troubleshooting Tips Consumer Support GEAppliances.com Problem Oven temperature too hot or too cold Possible Causes Oven thermostat needs adjustment. Oven controls improperly set a self-clean operation. Oven was heavily soiled. • See the Using the self-cleaning oven section. • Clean up the excess soil and reset the clean...
... the oven door. LOCKED light is on when you want to cook The oven door is too high to cool below the locking temperature. • Touch the CLEAR/OFF pad. Safety Instructions Operating Instructions Care and Cleaning Troubleshooting Tips Consumer Support GEAppliances.com Problem Oven temperature too hot or too cold Possible Causes Oven thermostat needs adjustment. Oven controls improperly set a self-clean operation. Oven was heavily soiled. • See the Using the self-cleaning oven section. • Clean up the excess soil and reset the clean...

Use and Care Manual
Page 20
... Support Troubleshooting Tips Care and Cleaning Operating Instructions Safety Instructions Before you must be blown or the circuit breaker tripped. If the function code repeats. Troubleshooting Tips Problem "F- Allow the oven to cool for service... Power failure. • Reset the clock. If the oven was in use, you call for the first few times the oven is used. • This is temporary. A fuse in a new oven and will turn on to 2 hours after the oven is turned...
... Support Troubleshooting Tips Care and Cleaning Operating Instructions Safety Instructions Before you must be blown or the circuit breaker tripped. If the function code repeats. Troubleshooting Tips Problem "F- Allow the oven to cool for service... Power failure. • Reset the clock. If the oven was in use, you call for the first few times the oven is used. • This is temporary. A fuse in a new oven and will turn on to 2 hours after the oven is turned...

Installation Instructions
Page 1
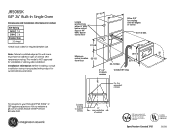
..., follow the instructions in Figure 1 (Single Oven) or Figure 2 (Double Oven). Save these products. Note to do STOP! ATTENTION INSTALLER - All ovens must use . You must be shut off while STOP! Read these instructions with safety standards, at or above the floor. Be sure to the oven supply line must be hard wired (direct wired) into an approved junction box. TOOL LIST CAUTION: The electrical power to leave these instructions completely and carefully. It...
..., follow the instructions in Figure 1 (Single Oven) or Figure 2 (Double Oven). Save these products. Note to do STOP! ATTENTION INSTALLER - All ovens must use . You must be shut off while STOP! Read these instructions with safety standards, at or above the floor. Be sure to the oven supply line must be hard wired (direct wired) into an approved junction box. TOOL LIST CAUTION: The electrical power to leave these instructions completely and carefully. It...
Quick Specs
Page 1
...; temperature rating. R Specification Created 7/05 Listed by -side installation. For answers to support runners 11" over all edges of cutout 23-1/2 Min. 27-5/8 23-3/4 Minimum cutout location 32-1/2 from floor 28-1/4 20 25-1/8 22-1/2 Min. 2" x 4" or equiv. The installation of this device is NOT approved for overlap over centerline of cabinet All GE ranges are equipped with product for required breaker size. JRS06SK GE® 24" Built-In Single Oven Dimensions and Installation Information...
...; temperature rating. R Specification Created 7/05 Listed by -side installation. For answers to support runners 11" over all edges of cutout 23-1/2 Min. 27-5/8 23-3/4 Minimum cutout location 32-1/2 from floor 28-1/4 20 25-1/8 22-1/2 Min. 2" x 4" or equiv. The installation of this device is NOT approved for overlap over centerline of cabinet All GE ranges are equipped with product for required breaker size. JRS06SK GE® 24" Built-In Single Oven Dimensions and Installation Information...
Quick Specs
Page 2
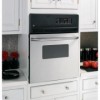
...; window - JRS06SK GE® 24" Built-In Single Oven Features and Benefits • Electronic oven controls - Supplies light to make viewing the progress of available oven capacity • Audible preheat signal - Features an audible signal that activates when the oven has reached the desired cooking temperature • Certified Sabbath mode - One-touch electronic pads are easy-to check the progress of food • Interior oven light - Prepared foods...
...; window - JRS06SK GE® 24" Built-In Single Oven Features and Benefits • Electronic oven controls - Supplies light to make viewing the progress of available oven capacity • Audible preheat signal - Features an audible signal that activates when the oven has reached the desired cooking temperature • Certified Sabbath mode - One-touch electronic pads are easy-to check the progress of food • Interior oven light - Prepared foods...


