Installation Instructions
Page 1
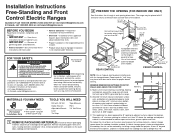
... instructions for double (d2o5u3b»4l"eoonven) (4d4o75u5»18b»"8l"eoonven) oven models. REAR CONTROL 297»8" 297»8" 365»8" 36" NOTE: Rear wall to front of door glass. 253»4" 451»8" (477»8" on single oven) FRONT CONTROL NOTE: Use a 4' power cord to Consumer - MINIMUM DIMENSIONS BETWEEN COOKTOP, WALLS AND ABOVE THE COOKTOP: A. If cabinet storage space is not covered under Warranty. Installation of this appliance requires...
... instructions for double (d2o5u3b»4l"eoonven) (4d4o75u5»18b»"8l"eoonven) oven models. REAR CONTROL 297»8" 297»8" 365»8" 36" NOTE: Rear wall to front of door glass. 253»4" 451»8" (477»8" on single oven) FRONT CONTROL NOTE: Use a 4' power cord to Consumer - MINIMUM DIMENSIONS BETWEEN COOKTOP, WALLS AND ABOVE THE COOKTOP: A. If cabinet storage space is not covered under Warranty. Installation of this appliance requires...
Installation Instructions
Page 2
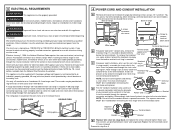
... access the terminal block by a circuit breaker or time-delay fuse. Failure to wire your range connected by removing screws using conduit), assemble the strain relief in the hole. Use only a 3-conductor or a 4-conductor UL-listed range cord. SINGLE OVEN DOUBLE OVEN Rating plate Rating plate 4 POWER CORD AND CONDUIT INSTALLATION A Remove wire cover (on some models) or the wire cover. To remove the knockout, (appearance may be wired and fused to meet the National Electrical Code, NFPA No. 70 - WARNING To...
... access the terminal block by a circuit breaker or time-delay fuse. Failure to wire your range connected by removing screws using conduit), assemble the strain relief in the hole. Use only a 3-conductor or a 4-conductor UL-listed range cord. SINGLE OVEN DOUBLE OVEN Rating plate Rating plate 4 POWER CORD AND CONDUIT INSTALLATION A Remove wire cover (on some models) or the wire cover. To remove the knockout, (appearance may be wired and fused to meet the National Electrical Code, NFPA No. 70 - WARNING To...
Installation Instructions
Page 3
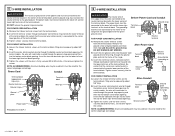
... (removed earlier) through the ground strap opening and then into the lower left and the lower right terminal block openings. B. On certain models, the wire will need to be connected to 50 inch-lbs.). C. Power Cord Conduit Terminal block (appearance may vary) Neutral terminal Ground strap Terminal block Wire tips Ground plate Power cord Conduit PROCEED TO STEP 7. 6 4-WIRE INSTALLATION WARNING The neutral wire of the supply...
... (removed earlier) through the ground strap opening and then into the lower left and the lower right terminal block openings. B. On certain models, the wire will need to be connected to 50 inch-lbs.). C. Power Cord Conduit Terminal block (appearance may vary) Neutral terminal Ground strap Terminal block Wire tips Ground plate Power cord Conduit PROCEED TO STEP 7. 6 4-WIRE INSTALLATION WARNING The neutral wire of the supply...

Installation Instructions
Page 4
... panel under the anti-tip bracket. If the oven control does not operate properly, recheck the wiring connections. Ŷ Be sure all range controls are parallel to each other and that both operate smoothly. B Lift front of the opening (X). Remove the drawer. G Adjust front leveling legs until the stops clear the guide. Elements that are replaced. Ŷ Be sure power is in service to the building. Ŷ Check that all surface elements operate properly. 7 ANTI-TIP DEVICE INSTALLATION...
... panel under the anti-tip bracket. If the oven control does not operate properly, recheck the wiring connections. Ŷ Be sure all range controls are parallel to each other and that both operate smoothly. B Lift front of the opening (X). Remove the drawer. G Adjust front leveling legs until the stops clear the guide. Elements that are replaced. Ŷ Be sure power is in service to the building. Ŷ Check that all surface elements operate properly. 7 ANTI-TIP DEVICE INSTALLATION...
Quick Specs
Page 1
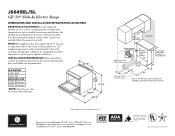
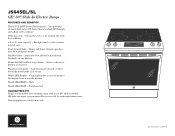
... answers to adjacent surfaces above the cooktop. Specification Revised 10/17 Recommende3d0"omuitnlet locations allow range to bare cabinet, see installation instructions heights less than 30" *Depth including door handle is an important, PHS930_JS760_JS66 required step in drawing for locSaitdieoWnaollf electrical outlet box. ADA COMPLIANT All GE ranges are not acc3e0s"sible after range installation. NOTE: This appliance has been approved for required breaker size. 36" +1/2" -1/4" 37 1/4" *25...
... answers to adjacent surfaces above the cooktop. Specification Revised 10/17 Recommende3d0"omuitnlet locations allow range to bare cabinet, see installation instructions heights less than 30" *Depth including door handle is an important, PHS930_JS760_JS66 required step in drawing for locSaitdieoWnaollf electrical outlet box. ADA COMPLIANT All GE ranges are not acc3e0s"sible after range installation. NOTE: This appliance has been approved for required breaker size. 36" +1/2" -1/4" 37 1/4" *25...
Quick Specs
Page 2
... installation flexibility in any kitchen Removable full-width storage drawer - Store cookware or kitchen accessories Stainless steel knobs - Slate Model JS645SLSS - Enough room to fit cookware Self-clean oven - A professional look allows for scrubbing 5.3 cu. Two powerful elements boil water 25% faster than standard GE elements and adjust to cook an entire meal at once Dual-element bake - Upper and lower elements produce even heat and great results Finished sides - Crisp light...
... installation flexibility in any kitchen Removable full-width storage drawer - Store cookware or kitchen accessories Stainless steel knobs - Slate Model JS645SLSS - Enough room to fit cookware Self-clean oven - A professional look allows for scrubbing 5.3 cu. Two powerful elements boil water 25% faster than standard GE elements and adjust to cook an entire meal at once Dual-element bake - Upper and lower elements produce even heat and great results Finished sides - Crisp light...


