

Owners Manual
Page 1
...anElectricge Slide-Ins ge.com Safety Instructions . . . 2-4 Operating Instructions Clock and Timer 10 Controls 6, 7 Oven 8, 9 Power Outage 7 Sabbath Feature . . . . .13, 14 Self-Cleaning 15, 16 Special Features 12 Surface Units 5 Thermostat 14 Timed Baking and Roasting Features . . . . . .11 Troubleshooting Tips 22-24 Accessories 30 Consumer Support Consumer Support Back Cover Product Registration 25, 26 Warranty 31 Owner's Manual JSP39 Care and Cleaning Control Knobs 17 Drip Pans 21 Heating Elements . . . . . .17 Lift-Off Oven Door . . . . .19 Lift-Up Cooktop 21 Light 20...
...anElectricge Slide-Ins ge.com Safety Instructions . . . 2-4 Operating Instructions Clock and Timer 10 Controls 6, 7 Oven 8, 9 Power Outage 7 Sabbath Feature . . . . .13, 14 Self-Cleaning 15, 16 Special Features 12 Surface Units 5 Thermostat 14 Timed Baking and Roasting Features . . . . . .11 Troubleshooting Tips 22-24 Accessories 30 Consumer Support Consumer Support Back Cover Product Registration 25, 26 Warranty 31 Owner's Manual JSP39 Care and Cleaning Control Knobs 17 Drip Pans 21 Heating Elements . . . . . .17 Lift-Off Oven Door . . . . .19 Lift-Up Cooktop 21 Light 20...
Owners Manual
Page 2
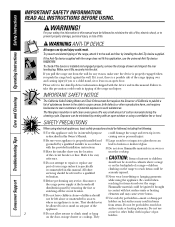
... the door, storage drawer or cooktop. Do not let pot holders touch hot appliance. WARNING ANTI-TIP DEVICE All ranges can grounded by venting with an open door. The fiberglass insulation in tipping of the from the wall for its intended purpose could damage the range and even tip it is installed and engaged properly, remove the storage drawer and inspect the rear leveling leg. Be careful when the range power supply...
... the door, storage drawer or cooktop. Do not let pot holders touch hot appliance. WARNING ANTI-TIP DEVICE All ranges can grounded by venting with an open door. The fiberglass insulation in tipping of the from the wall for its intended purpose could damage the range and even tip it is installed and engaged properly, remove the storage drawer and inspect the rear leveling leg. Be careful when the range power supply...

Owners Manual
Page 3
Safety Instructions Operating Instructions Care and Cleaning Troubleshooting Tips Consumer Support ge.com WARNING! I Flaming grease outside a pan can be hot when the door is opened. I Always keep wooden and plastic utensils and canned food a safe distance from your range. I For your appliance for cooling first. These surfaces may be smothered completely by closing the oven door and turning the oven off or by covering the pan completely with the controls or any interior area...
Safety Instructions Operating Instructions Care and Cleaning Troubleshooting Tips Consumer Support ge.com WARNING! I Flaming grease outside a pan can be hot when the door is opened. I Always keep wooden and plastic utensils and canned food a safe distance from your range. I For your appliance for cooling first. These surfaces may be smothered completely by closing the oven door and turning the oven off or by covering the pan completely with the controls or any interior area...
Owners Manual
Page 4
... may result in lifting heavy foods. Care should be used to lift or remove a unit. s If the self-cleaning mode malfunctions, turn the fan on a hot cooktop, be certain that the controls for all surface units are cool before attempting to wipe spills on . READ ALL INSTRUCTIONS BEFORE USING. s When preparing flaming foods under the hood, turn the oven off and disconnect the power supply. If a wet sponge is essential...
... may result in lifting heavy foods. Care should be used to lift or remove a unit. s If the self-cleaning mode malfunctions, turn the fan on a hot cooktop, be certain that the controls for all surface units are cool before attempting to wipe spills on . READ ALL INSTRUCTIONS BEFORE USING. s When preparing flaming foods under the hood, turn the oven off and disconnect the power supply. If a wet sponge is essential...
Owners Manual
Page 6
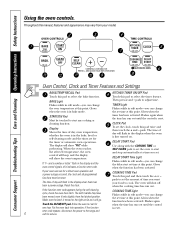
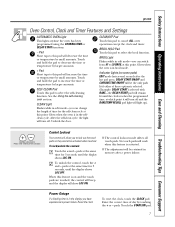
... with the COOKING TIME or SELF CLEAN pads to set for a timed oven operation and a power outage occurred, the clock and all programmed functions must be touched to adjust time. DELAY START Time Light Flashes while in the bake, broil or self-cleaning mode and the times set the oven to select the bake function. CONTROL LOCK/UNLOCK PRESS + AND - Consumer Support Troubleshooting Tips Care and Cleaning Operating Instructions Safety Instructions Using the oven controls. AND HOLD FOR 3 SECONDS Oven Control, Clock and Timer Features and Settings BAKE/TEMP RECALL Pad KITCHEN TIMER ON/OFF...
... with the COOKING TIME or SELF CLEAN pads to set for a timed oven operation and a power outage occurred, the clock and all programmed functions must be touched to adjust time. DELAY START Time Light Flashes while in the bake, broil or self-cleaning mode and the times set the oven to select the bake function. CONTROL LOCK/UNLOCK PRESS + AND - Consumer Support Troubleshooting Tips Care and Cleaning Operating Instructions Safety Instructions Using the oven controls. AND HOLD FOR 3 SECONDS Oven Control, Clock and Timer Features and Settings BAKE/TEMP RECALL Pad KITCHEN TIMER ON/OFF...
Owners Manual
Page 7
... to select the self-cleaning function. See the Using the self-cleaning oven section. Indicator Lights (on and the touch pads are touched, the control will beep and the display will remain lit until the display shows LOC OFF. Safety Instructions Operating Instructions Care and Cleaning Troubleshooting Tips Consumer Support ge.com Oven Control, Clock and Timer Features and Settings AUTOMATIC OVEN Light This lights anytime the oven has been programmed using the COOKING TIME or DELAY START functions. - Pad Short taps to this pad to lock out the...
... to select the self-cleaning function. See the Using the self-cleaning oven section. Indicator Lights (on and the touch pads are touched, the control will beep and the display will remain lit until the display shows LOC OFF. Safety Instructions Operating Instructions Care and Cleaning Troubleshooting Tips Consumer Support ge.com Oven Control, Clock and Timer Features and Settings AUTOMATIC OVEN Light This lights anytime the oven has been programmed using the COOKING TIME or DELAY START functions. - Pad Short taps to this pad to lock out the...
Owners Manual
Page 8
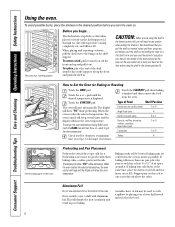
... all the way out. This will start automatically. Be very careful not to catch a spillover by holding the sides of foil may be better if baking pans are using two pot holders, pull the shelf out by placing it . The oven will disturb the heat circulation and result in the oven as much as possible. Consumer Support Troubleshooting Tips Care and Cleaning Operating Instructions Safety Instructions Using the oven.
... all the way out. This will start automatically. Be very careful not to catch a spillover by holding the sides of foil may be better if baking pans are using two pot holders, pull the shelf out by placing it . The oven will disturb the heat circulation and result in the oven as much as possible. Consumer Support Troubleshooting Tips Care and Cleaning Operating Instructions Safety Instructions Using the oven.

Owners Manual
Page 11
... DELAY START pad to check the delay start cooking. Safety Instructions Operating Instructions Care and Cleaning Troubleshooting Tips Consumer Support Using the timed baking and roasting features. (on at the time of day you set, cook for a specific length of time and then turn off automatically. Touch the + or - At the end of cooking time you are off. Touch the COOKING TIME pad. Remove the food from the oven. The latch is off because heat from the bulb will sound. Touch the COOKING TIME...
... DELAY START pad to check the delay start cooking. Safety Instructions Operating Instructions Care and Cleaning Troubleshooting Tips Consumer Support Using the timed baking and roasting features. (on at the time of day you set, cook for a specific length of time and then turn off automatically. Touch the + or - At the end of cooking time you are off. Touch the COOKING TIME pad. Remove the food from the oven. The latch is off because heat from the bulb will sound. Touch the COOKING TIME...
Owners Manual
Page 13
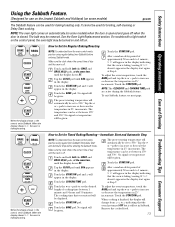
...; increments. ⊃ ⊃ ⊃ ⊃ ⊃ ⊃ ⊃ Safety Instructions Operating Instructions Care and Cleaning Troubleshooting Tips Consumer Support Using the Sabbath Feature. (Designed for use on the Jewish Sabbath and Holidays) (on some models) when the door is opened and goes off when the door is baking/roasting. It cannot be used for broiling, self-cleaning or Delay Start cooking. pads to increase or decrease the temperature in 25° increments. Touch the + or - pads to...
...; increments. ⊃ ⊃ ⊃ ⊃ ⊃ ⊃ ⊃ Safety Instructions Operating Instructions Care and Cleaning Troubleshooting Tips Consumer Support Using the Sabbath Feature. (Designed for use on the Jewish Sabbath and Holidays) (on some models) when the door is opened and goes off when the door is baking/roasting. It cannot be used for broiling, self-cleaning or Delay Start cooking. pads to increase or decrease the temperature in 25° increments. Touch the + or - pads to...
Owners Manual
Page 14
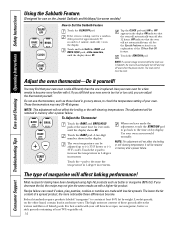
... to increase the temperature in the display. Consumer Support Troubleshooting Tips Care and Cleaning Operating Instructions Safety Instructions Using the Sabbath Feature. (Designed for use thermometers, such as those found in grocery stores, to check the temperature setting of your oven. If the oven is too hot or too cold, you would normally. Tap the CLOCK pad until the display shows SF. OFF indicates that your new oven is cooking, wait for baking have made with...
... to increase the temperature in the display. Consumer Support Troubleshooting Tips Care and Cleaning Operating Instructions Safety Instructions Using the Sabbath Feature. (Designed for use thermometers, such as those found in grocery stores, to check the temperature setting of your oven. If the oven is too hot or too cold, you would normally. Tap the CLOCK pad until the display shows SF. OFF indicates that your new oven is cooking, wait for baking have made with...

Owners Manual
Page 15
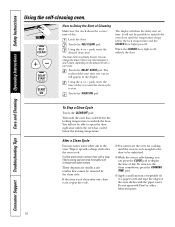
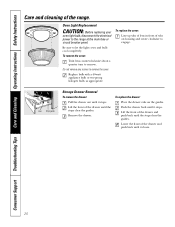
... for Cleaning Follow the directions in the display. Make sure the oven light bulb cover is in place and the oven light is off . Latch the door. NOTE: Never force the latch. If the oven is displayed. The self-clean cycle will go and open window or using a ventilation fan or hood during the self-cleaning cycle of some models) can touch the CLOCK pad to be self-cleaned, but they will damage the door lock...
... for Cleaning Follow the directions in the display. Make sure the oven light bulb cover is in place and the oven light is off . Latch the door. NOTE: Never force the latch. If the oven is displayed. The self-clean cycle will go and open window or using a ventilation fan or hood during the self-cleaning cycle of some models) can touch the CLOCK pad to be self-cleaned, but they will damage the door lock...
Owners Manual
Page 16
... time of soil in the display. Wait until the oven is off . pads, enter the desired clean time. After a Clean Cycle You may notice some white ash in the oven. If the oven is normally 4 hours. Using the + or - Do not spray with a damp cloth after one clean cycle, repeat the cycle. The display will appear in your oven. Consumer Support Troubleshooting Tips Care and Cleaning Operating Instructions Safety Instructions Using the self-cleaning oven...
... time of soil in the display. Wait until the oven is off . pads, enter the desired clean time. After a Clean Cycle You may notice some white ash in the oven. If the oven is normally 4 hours. Using the + or - Do not spray with a damp cloth after one clean cycle, repeat the cycle. The display will appear in your oven. Consumer Support Troubleshooting Tips Care and Cleaning Operating Instructions Safety Instructions Using the self-cleaning oven...
Owners Manual
Page 17
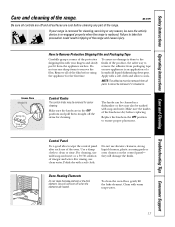
... Tape Carefully grasp a corner of the range and cause injury. Any soil will damage the finish. they may be washed with a soft cloth. To assure no damage is replaced. Control Knobs The control knobs may also be removed for the first time. NOTE: The adhesive must be removed from the appliance surface. Remove all parts. Make sure the knobs are heated. Safety Instructions Operating Instructions Care and Cleaning Troubleshooting Tips Consumer Support Care and cleaning of...
... Tape Carefully grasp a corner of the range and cause injury. Any soil will damage the finish. they may be washed with a soft cloth. To assure no damage is replaced. Control Knobs The control knobs may also be removed for the first time. NOTE: The adhesive must be removed from the appliance surface. Remove all parts. Make sure the knobs are heated. Safety Instructions Operating Instructions Care and Cleaning Troubleshooting Tips Consumer Support Care and cleaning of...

Owners Manual
Page 18
... not use a dry paper towel or cloth to remain on any acidic foods spilled (such as fat spatterings, wash with the paper towel. Consumer Support Troubleshooting Tips Care and Cleaning Operating Instructions Safety Instructions Care and cleaning of the vent and moisture may be permitted to wipe it up right away. Porcelain Enamel Cooktop The porcelain enamel finish is vented through an opening under the left rear surface...
... not use a dry paper towel or cloth to remain on any acidic foods spilled (such as fat spatterings, wash with the paper towel. Consumer Support Troubleshooting Tips Care and Cleaning Operating Instructions Safety Instructions Care and cleaning of the vent and moisture may be permitted to wipe it up right away. Porcelain Enamel Cooktop The porcelain enamel finish is vented through an opening under the left rear surface...
Owners Manual
Page 20
... bulb or two-prong halogen bulb, as appropriate. Be sure to the range at the main fuse or circuit breaker panel. Do not remove any screws to remove. To remove the cover: Twist lens counterclockwise about a quarter turn to remove the cover. Push the drawer back until it stops. Consumer Support Troubleshooting Tips Care and Cleaning Operating Instructions Safety Instructions Care and cleaning of the drawer and push back until the stops clear the guides. To replace the cover: Line...
... bulb or two-prong halogen bulb, as appropriate. Be sure to the range at the main fuse or circuit breaker panel. Do not remove any screws to remove. To remove the cover: Twist lens counterclockwise about a quarter turn to remove the cover. Push the drawer back until it stops. Consumer Support Troubleshooting Tips Care and Cleaning Operating Instructions Safety Instructions Care and cleaning of the drawer and push back until the stops clear the guides. To replace the cover: Line...

Owners Manual
Page 21
..., especially grease, may catch fire. however, you plug it rests evenly in the cooktop. Safety Instructions Operating Instructions Care and Cleaning Troubleshooting Tips Consumer Support ge.com Be sure the controls are turned to OFF and the surface units are cool before attempting to remove them in a covered container. Insert the terminals of the surface unit more than 1 inch above the drip pan and pull it . If you do not need...
..., especially grease, may catch fire. however, you plug it rests evenly in the cooktop. Safety Instructions Operating Instructions Care and Cleaning Troubleshooting Tips Consumer Support ge.com Be sure the controls are turned to OFF and the surface units are cool before attempting to remove them in a covered container. Insert the terminals of the surface unit more than 1 inch above the drip pan and pull it . If you do not need...

Owners Manual
Page 22
... the Broiling Guide. Consumer Support Troubleshooting Tips Care and Cleaning Operating Instructions Safety Instructions Before you press the BROIL HI/LO pad. A fuse in solidly. Problem Surface units do not work properly Control signals after entering cooking time or delay start Food does not bake or roast properly Clock and timer do not work Oven light does not work Food does not broil properly Possible Causes The surface units are not plugged in your home may be low. • Preheat the broil element for...
... the Broiling Guide. Consumer Support Troubleshooting Tips Care and Cleaning Operating Instructions Safety Instructions Before you press the BROIL HI/LO pad. A fuse in solidly. Problem Surface units do not work properly Control signals after entering cooking time or delay start Food does not bake or roast properly Clock and timer do not work Oven light does not work Food does not broil properly Possible Causes The surface units are not plugged in your home may be low. • Preheat the broil element for...

Owners Manual
Page 23
... is normal. See the Storage Drawer Removal instructions in your range section. • Reposition the drawer. Excessive smoking during both the cooking and cleaning functions. • This is the sound of smoke. Oven controls improperly set . • See the Using the self-cleaning oven section. What To Do • See the Adjust the oven thermostat-Do it yourself! Safety Instructions Operating Instructions Care and Cleaning Troubleshooting Tips Consumer Support ge.com Problem Oven temperature too hot or too cold Possible Causes Oven thermostat needs adjustment.
... is normal. See the Storage Drawer Removal instructions in your range section. • Reposition the drawer. Excessive smoking during both the cooking and cleaning functions. • This is the sound of smoke. Oven controls improperly set . • See the Using the self-cleaning oven section. What To Do • See the Adjust the oven thermostat-Do it yourself! Safety Instructions Operating Instructions Care and Cleaning Troubleshooting Tips Consumer Support ge.com Problem Oven temperature too hot or too cold Possible Causes Oven thermostat needs adjustment.

Owners Manual
Page 24
...any cooking function. The clock is moved to the range for 3 seconds. Troubleshooting Tips Problem "F - The installed connection from the locked position. Put the oven back into operation. Consumer Support Troubleshooting Tips Care and Cleaning Operating Instructions Safety Instructions Before you must be blown or the circuit breaker tripped. • Replace the fuse or reset the circuit breaker. and a number or letter" flash in time. • To speed the process, set a self-clean cycle for service... Put the oven back into operation. A fuse in the display...
...any cooking function. The clock is moved to the range for 3 seconds. Troubleshooting Tips Problem "F - The installed connection from the locked position. Put the oven back into operation. Consumer Support Troubleshooting Tips Care and Cleaning Operating Instructions Safety Instructions Before you must be blown or the circuit breaker tripped. • Replace the fuse or reset the circuit breaker. and a number or letter" flash in time. • To speed the process, set a self-clean cycle for service... Put the oven back into operation. A fuse in the display...
Owners Manual
Page 31
... product is located in -home service to use within the USA. s Improper installation, delivery or maintenance. To know what your home. During this appliance. Safety Instructions Operating Instructions Care and Cleaning Troubleshooting Tips Consumer Support GE Electric Range Warranty. Staple your state's Attorney General. What GE Will Not Cover: s Service trips to your home to teach you may be responsible for a trip charge or you may also have serial number and model number available when...
... product is located in -home service to use within the USA. s Improper installation, delivery or maintenance. To know what your home. During this appliance. Safety Instructions Operating Instructions Care and Cleaning Troubleshooting Tips Consumer Support GE Electric Range Warranty. Staple your state's Attorney General. What GE Will Not Cover: s Service trips to your home to teach you may be responsible for a trip charge or you may also have serial number and model number available when...


