
User Manual
Page 1
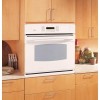
Owner's Manual JT912-30 ″ Single Wall Oven JT952-30 ″ Double Wall Oven 49-80470 07-07 JR ge.com Electric Convection Built-In Oven Safety Instructions 2-4 Operating Instructions Clock and Timer 12 Control Lockout 12 Controls 5 Convection 15-17 Oven 10, 11... Special Features 6-8 Thermostat 19 Timed Baking and Roasting 13, 18 Care and Cleaning Cleaning Oven Door 23 Control Panel 25 Lift-Off Oven Door 23 Light Bulb 22 Oven Floor 23 Probe 24 Removing Packaging Tape . . . .22 Shelves 24 Stainless Steel Surfaces 25 Troubleshooting Tips . . . . .26-28 Consumer Support ...
Owner's Manual JT912-30 ″ Single Wall Oven JT952-30 ″ Double Wall Oven 49-80470 07-07 JR ge.com Electric Convection Built-In Oven Safety Instructions 2-4 Operating Instructions Clock and Timer 12 Control Lockout 12 Controls 5 Convection 15-17 Oven 10, 11... Special Features 6-8 Thermostat 19 Timed Baking and Roasting 13, 18 Care and Cleaning Cleaning Oven Door 23 Control Panel 25 Lift-Off Oven Door 23 Light Bulb 22 Oven Floor 23 Probe 24 Removing Packaging Tape . . . .22 Shelves 24 Stainless Steel Surfaces 25 Troubleshooting Tips . . . . .26-28 Consumer Support ...

User Manual
Page 5
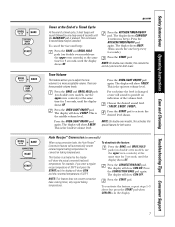
.... Put the oven back into operation. If your oven was set the amount of operation for service. CONVECTION ROAST Pad Press to turn the oven light on the clock, the timer, the oven temperature, the internal food temperature, the start and stop automatically at a time you want your model....) ge.com Double oven control shown. Press the CLEAR/OFF pad. OVEN LIGHT ON/OFF Pad Press to select roasting with COOKING TIME or SELF CLEAN STD/LOW pads to set the oven...
.... Put the oven back into operation. If your oven was set the amount of operation for service. CONVECTION ROAST Pad Press to turn the oven light on the clock, the timer, the oven temperature, the internal food temperature, the start and stop automatically at a time you want your model....) ge.com Double oven control shown. Press the CLEAR/OFF pad. OVEN LIGHT ON/OFF Pad Press to select roasting with COOKING TIME or SELF CLEAN STD/LOW pads to set the oven...
User Manual
Page 7
...on some models) When using convection bake, the Auto Recipe™ Conversion feature will sound to convection baking temperatures. Press the OVEN LIGHT ON/OFF pad again. This feature is pressed. NOTE: This feature does not convert convection bake cooking times, only regular baking temperatures...the CLEAR/OFF pad is activated so the display will show CON OFF. Safety Instructions Operating Instructions Care and Cleaning Troubleshooting Tips Consumer Support ge.com Tones at the End of a Timed Cycle At the end of a timed cycle, 3 short beeps will sound followed by ...
...on some models) When using convection bake, the Auto Recipe™ Conversion feature will sound to convection baking temperatures. Press the OVEN LIGHT ON/OFF pad again. This feature is pressed. NOTE: This feature does not convert convection bake cooking times, only regular baking temperatures...the CLEAR/OFF pad is activated so the display will show CON OFF. Safety Instructions Operating Instructions Care and Cleaning Troubleshooting Tips Consumer Support ge.com Tones at the End of a Timed Cycle At the end of a timed cycle, 3 short beeps will sound followed by ...

User Manual
Page 9
...the display, the BAKE and BROIL HI/LO pads were not touched at Step 4. Touch the START pad. NOTE: The oven light comes on automatically (on some models) ge.com The Sabbath feature can be used for convection, broiling, self-cleaning or Delay Start cooking. The bulb may be removed. ...See the Oven Light Replacement section. On models with a light switch on the control panel, the oven light may be turned on and left on...
...the display, the BAKE and BROIL HI/LO pads were not touched at Step 4. Touch the START pad. NOTE: The oven light comes on automatically (on some models) ge.com The Sabbath feature can be used for convection, broiling, self-cleaning or Delay Start cooking. The bulb may be removed. ...See the Oven Light Replacement section. On models with a light switch on the control panel, the oven light may be turned on and left on...
User Manual
Page 10
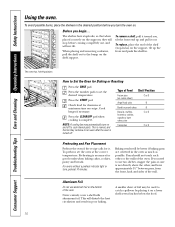
... pad. NOTE: A cooling fan may automatically turn the oven on the support, tilt up and pull it toward you begin... For ovens without a preheat indicator light or tone, preheat 10 minutes. Aluminum Foil Do not use two shelves, stagger the pans so one is complete. Never entirely cover a shelf with aluminum...
... pad. NOTE: A cooling fan may automatically turn the oven on the support, tilt up and pull it toward you begin... For ovens without a preheat indicator light or tone, preheat 10 minutes. Aluminum Foil Do not use two shelves, stagger the pans so one is complete. Never entirely cover a shelf with aluminum...

User Manual
Page 13
Be sure that the oven light is off because heat from the bulb will turn on immediately and cook for a selected length of time. To display the time set for the ... the baking temperature. 13 Safety Instructions Operating Instructions Care and Cleaning Troubleshooting Tips Consumer Support Using the timed baking and roasting features. (on some models) ge.com On double oven models, you can set the oven control to delay-start the oven, cook for a specific length of time and then turn...
Be sure that the oven light is off because heat from the bulb will turn on immediately and cook for a selected length of time. To display the time set for the ... the baking temperature. 13 Safety Instructions Operating Instructions Care and Cleaning Troubleshooting Tips Consumer Support Using the timed baking and roasting features. (on some models) ge.com On double oven models, you can set the oven control to delay-start the oven, cook for a specific length of time and then turn...

User Manual
Page 18
... the START pad. Remember, even though the oven shuts off . Press the number pads to check the start the oven, cook for that the oven light is 1 minute. programmed amount of the cooking time. If you would like to check the times you have set, press the DELAY START pad to...
... the START pad. Remember, even though the oven shuts off . Press the number pads to check the start the oven, cook for that the oven light is 1 minute. programmed amount of the cooking time. If you would like to check the times you have set, press the DELAY START pad to...

User Manual
Page 20
.... s The words LOCKED will flash and the oven control will automatically delay its start until the temperature drops below the lock temperature and the LOCKED light goes off. 20 The door locks automatically. The display will be possible to any time between 3 hours and 5 hours, depending on how dirty ... bottom. (appearance may vary) Before a Clean Cycle We recommend venting your oven is in both ovens at the same time. When the LOCKED light goes off during the first self-clean cycle. The oven door must be closed and all cookware and any oven. Remove broiler pan, broiler grid...
.... s The words LOCKED will flash and the oven control will automatically delay its start until the temperature drops below the lock temperature and the LOCKED light goes off. 20 The door locks automatically. The display will be possible to any time between 3 hours and 5 hours, depending on how dirty ... bottom. (appearance may vary) Before a Clean Cycle We recommend venting your oven is in both ovens at the same time. When the LOCKED light goes off during the first self-clean cycle. The oven door must be closed and all cookware and any oven. Remove broiler pan, broiler grid...

User Manual
Page 21
... with a soap-filled steel-wool pad and rinse thoroughly with cooking oil. 21 Safety Instructions Operating Instructions Care and Cleaning Troubleshooting Tips Consumer Support ge.com The oven door must be closed and all controls must be set correctly for use the number pads and enter the desired clean time... time or twice for a dirtier oven. The second oven set the oven for cooking until the temperature drops below the lock temperature and the LOCKED light goes off , you can change the clean time to any time between 3 hours and 5 hours, depending on the controls for the door to the...
... with a soap-filled steel-wool pad and rinse thoroughly with cooking oil. 21 Safety Instructions Operating Instructions Care and Cleaning Troubleshooting Tips Consumer Support ge.com The oven door must be closed and all controls must be set correctly for use the number pads and enter the desired clean time... time or twice for a dirtier oven. The second oven set the oven for cooking until the temperature drops below the lock temperature and the LOCKED light goes off , you can change the clean time to any time between 3 hours and 5 hours, depending on the controls for the door to the...
User Manual
Page 22
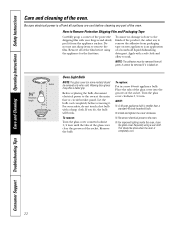
NOTE: The adhesive must be removed if it is an application of the oven. Socket 31⁄2" Maximum length Bulb Tab Glass cover Oven Light Bulb NOTE: The glass cover (on new appliances is baked on. Place the tabs of the glass cover into the grooves of the oven. Do ... cover clear the grooves of the product, the safest way to remove the film. NOTE: s A 40-watt appliance bulb is completely cool. 22 s For improved lighting inside the oven, clean the glass cover frequently using the appliance for the first time. This should be done when the oven is smaller than...
NOTE: The adhesive must be removed if it is an application of the oven. Socket 31⁄2" Maximum length Bulb Tab Glass cover Oven Light Bulb NOTE: The glass cover (on new appliances is baked on. Place the tabs of the glass cover into the grooves of the oven. Do ... cover clear the grooves of the product, the safest way to remove the film. NOTE: s A 40-watt appliance bulb is completely cool. 22 s For improved lighting inside the oven, clean the glass cover frequently using the appliance for the first time. This should be done when the oven is smaller than...

User Manual
Page 26
... a bake temperature or cleaning time. Oven controls improperly set . Troubleshooting Tips Save time and money! Make sure it yourself! Light bulb is not level. Problem Control signals after entering cooking time or delay start Food does not bake or roast properly Food ... element for 10 minutes. • Broil for broiling. Incorrect cookware or cookware of time recommended in a hot pan. Pad operating light is plugged into the outlet in place. Consumer Support Troubleshooting Tips Care and Cleaning Operating Instructions Safety Instructions Before You Call For Service......
... a bake temperature or cleaning time. Oven controls improperly set . Troubleshooting Tips Save time and money! Make sure it yourself! Light bulb is not level. Problem Control signals after entering cooking time or delay start Food does not bake or roast properly Food ... element for 10 minutes. • Broil for broiling. Incorrect cookware or cookware of time recommended in a hot pan. Pad operating light is plugged into the outlet in place. Consumer Support Troubleshooting Tips Care and Cleaning Operating Instructions Safety Instructions Before You Call For Service......

User Manual
Page 27
...Instructions Care and Cleaning Troubleshooting Tips Consumer Support ge.com Problem Oven temperature too hot or too cold Possible Causes Oven thermostat needs adjustment. Excessive smoking during both the cooking and cleaning functions. • This is normal. Wait until the LOCKED light goes off. Oven controls improperly set . &#...soiled. • See the Using the self-cleaning oven section. • Clean up the excess soil and reset the clean cycle. LOCKED light is on when you want to cook The oven door is too high to self-clean again or for a longer period of the metal...
...Instructions Care and Cleaning Troubleshooting Tips Consumer Support ge.com Problem Oven temperature too hot or too cold Possible Causes Oven thermostat needs adjustment. Excessive smoking during both the cooking and cleaning functions. • This is normal. Wait until the LOCKED light goes off. Oven controls improperly set . &#...soiled. • See the Using the self-cleaning oven section. • Clean up the excess soil and reset the clean cycle. LOCKED light is on when you want to cook The oven door is too high to self-clean again or for a longer period of the metal...


