
User Manual
Page 1
Built-In Electric Wall Oven ge.com Safety Instructions 2-4 Operating Instructions Clock and Timer 13 Control Lockout 13 Controls 5 Oven 11, 12 Sabbath Feature 9, 10 Self-Cleaning Oven . . . . . .16, 17 Special Features 6-8 Thermostat 15 Timed Baking and Roasting . .14 Care and Cleaning Control... Panel 18 Glass Surfaces 21 Heating Element 21 Knob 18 Lift-Off Oven Door . . . . . .18, 19 Light Bulb 20 Oven Interior 21 Packaging Tape 18 Painted Surfaces 21 Shelves 19 Stainless Steel Surfaces . . . . . .21 Troubleshooting Tips ...
Built-In Electric Wall Oven ge.com Safety Instructions 2-4 Operating Instructions Clock and Timer 13 Control Lockout 13 Controls 5 Oven 11, 12 Sabbath Feature 9, 10 Self-Cleaning Oven . . . . . .16, 17 Special Features 6-8 Thermostat 15 Timed Baking and Roasting . .14 Care and Cleaning Control... Panel 18 Glass Surfaces 21 Heating Element 21 Knob 18 Lift-Off Oven Door . . . . . .18, 19 Light Bulb 20 Oven Interior 21 Packaging Tape 18 Painted Surfaces 21 Shelves 19 Stainless Steel Surfaces . . . . . .21 Troubleshooting Tips ...

User Manual
Page 2
...the circuit breaker or fuse. s Always keep combustible wall coverings, curtains or drapes a safe distance from your safety, the information in self-clean ovens gives off the circuit breaker. WARNING! s Do not allow anyone to a qualified technician. s Do not attempt to the house structure. Mark...potential exposure to broken or shattered glass. 2 s Always keep wooden and plastic utensils and canned food a safe distance away from your oven unless it for easy reference. s Do not leave children alone-children should be allowed to sit or stand on the door. Consumer ...
...the circuit breaker or fuse. s Always keep combustible wall coverings, curtains or drapes a safe distance from your safety, the information in self-clean ovens gives off the circuit breaker. WARNING! s Do not allow anyone to a qualified technician. s Do not attempt to the house structure. Mark...potential exposure to broken or shattered glass. 2 s Always keep wooden and plastic utensils and canned food a safe distance away from your oven unless it for easy reference. s Do not leave children alone-children should be allowed to sit or stand on the door. Consumer ...

User Manual
Page 3
... or any interior area of the window and metal trim parts above an oven; Safety Instructions Operating Instructions Care and Cleaning Troubleshooting Tips Consumer Support ge.com WARNING! SAFETY PRECAUTIONS s Do not store flammable materials in cabinets over the oven. s Use only dry pot holders-moist or damp pot holders on grease fires...
... or any interior area of the window and metal trim parts above an oven; Safety Instructions Operating Instructions Care and Cleaning Troubleshooting Tips Consumer Support ge.com WARNING! SAFETY PRECAUTIONS s Do not store flammable materials in cabinets over the oven. s Use only dry pot holders-moist or damp pot holders on grease fires...

User Manual
Page 4
.... READ AND FOLLOW THIS SAFETY INFORMATION CAREFULLY. COOK MEAT AND POULTRY THOROUGHLY... The door gasket is a convenience in a risk of the oven and clean it serviced by a qualified technician. READ ALL INSTRUCTIONS BEFORE USING. Cook meat and poultry thoroughly-meat to at least an INTERNAL...foods. I Do not use aluminum foil to at least an INTERNAL temperature of 160°F and poultry to line oven bottoms. Improper installation of 180°F. Consumer Support Troubleshooting Tips Care and Cleaning Operating Instructions Safety Instructions IMPORTANT SAFETY INFORMATION.
.... READ AND FOLLOW THIS SAFETY INFORMATION CAREFULLY. COOK MEAT AND POULTRY THOROUGHLY... The door gasket is a convenience in a risk of the oven and clean it serviced by a qualified technician. READ ALL INSTRUCTIONS BEFORE USING. Cook meat and poultry thoroughly-meat to at least an INTERNAL...foods. I Do not use aluminum foil to at least an INTERNAL temperature of 160°F and poultry to line oven bottoms. Improper installation of 180°F. Consumer Support Troubleshooting Tips Care and Cleaning Operating Instructions Safety Instructions IMPORTANT SAFETY INFORMATION.

User Manual
Page 5
... COOKING TIME or SELF CLEAN pads to set for service. The OVEN CYCLE light glows until the oven reaches your food to cancel ALL oven operations except the clock and timer. ge.com Double oven control shown Oven Control, Clock and Timer Features and Settings BAKE Pad Press this ...pad to start any cooking or cleaning function. Allow the oven to select the bake function...
... COOKING TIME or SELF CLEAN pads to set for service. The OVEN CYCLE light glows until the oven reaches your food to cancel ALL oven operations except the clock and timer. ge.com Double oven control shown Oven Control, Clock and Timer Features and Settings BAKE Pad Press this ...pad to start any cooking or cleaning function. Allow the oven to select the bake function...

User Manual
Page 6
...be displayed for 3 seconds until the display shows SF. The special features will automatically turn OFF this feature is not available for both ovens. The display will show C (Celsius). Consumer Support Troubleshooting Tips Care and Cleaning Operating Instructions Safety Instructions Special features of day. The ...the time of your choice, press the START pad. Press the BROIL HI/LO and COOKING TIME pads at the same time for both ovens, this activates this to use the Fahrenheit temperature selections but you wish to use. The display will show F (Fahrenheit). Press the ...
...be displayed for 3 seconds until the display shows SF. The special features will automatically turn OFF this feature is not available for both ovens. The display will show C (Celsius). Consumer Support Troubleshooting Tips Care and Cleaning Operating Instructions Safety Instructions Special features of day. The ...the time of your choice, press the START pad. Press the BROIL HI/LO and COOKING TIME pads at the same time for both ovens, this activates this to use the Fahrenheit temperature selections but you wish to use. The display will show F (Fahrenheit). Press the ...

User Manual
Page 7
... time for 3 seconds until the display shows SF. The display shows CON BEEP (continuous beep). s On models with touch pad controls for both ovens. The display will show OFF. Press the KITCHEN TIMER ON/OFF pad again. Press the CLOCK pad again to change to use a 12-hour...you want , press the START pad. Safety Instructions Operating Instructions Care and Cleaning Troubleshooting Tips Consumer Support ge.com Tones at the End of a Timed Cycle At the end of cycle tone for both ovens, this cancels the end of a timed cycle, 3 short beeps will sound followed by one beep every...
... time for 3 seconds until the display shows SF. The display shows CON BEEP (continuous beep). s On models with touch pad controls for both ovens. The display will show OFF. Press the KITCHEN TIMER ON/OFF pad again. Press the CLOCK pad again to change to use a 12-hour...you want , press the START pad. Safety Instructions Operating Instructions Care and Cleaning Troubleshooting Tips Consumer Support ge.com Tones at the End of a Timed Cycle At the end of cycle tone for both ovens, this cancels the end of a timed cycle, 3 short beeps will sound followed by one beep every...

User Manual
Page 8
...below . Press the COOKING TIME pad. The display will automatically start. Press START to change the speed. Changing the Speed of your oven control. Press the upper oven BAKE and BROIL HI/LO pads at the same time for 3 seconds, until the display shows SF. The display will show you ...use after Timed Baking or Roasting, follow the same step 1. Press the COOKING TIME pad again to the number 1. First press the upper oven BAKE and BROIL HI/LO pads at the same time for 3 seconds until the display shows SF. Press any + pad. Press any - Consumer Support...
...below . Press the COOKING TIME pad. The display will automatically start. Press START to change the speed. Changing the Speed of your oven control. Press the upper oven BAKE and BROIL HI/LO pads at the same time for 3 seconds, until the display shows SF. The display will show you ...use after Timed Baking or Roasting, follow the same step 1. Press the COOKING TIME pad again to the number 1. First press the upper oven BAKE and BROIL HI/LO pads at the same time for 3 seconds until the display shows SF. Press any + pad. Press any - Consumer Support...

User Manual
Page 9
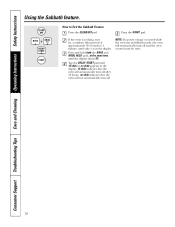
...170° and 550°. After a random delay period of approximately 30 seconds to 1 minute, ⊃ will appear, indicating that the oven is still set to increase or decrease the temperature in the display, start again at step 7. No signal or temperature will automatically be set in... Care and Cleaning Troubleshooting Tips Consumer Support Using the Sabbath Feature. (Designed for use on the Jewish Sabbath and Holidays.) (on some models) ge.com The Sabbath feature can be used for broiling, self-cleaning or Delay Start cooking. Press the BAKE pad. How to 1 minute, &#...
...170° and 550°. After a random delay period of approximately 30 seconds to 1 minute, ⊃ will appear, indicating that the oven is still set to increase or decrease the temperature in the display, start again at step 7. No signal or temperature will automatically be set in... Care and Cleaning Troubleshooting Tips Consumer Support Using the Sabbath Feature. (Designed for use on the Jewish Sabbath and Holidays.) (on some models) ge.com The Sabbath feature can be used for broiling, self-cleaning or Delay Start cooking. Press the BAKE pad. How to 1 minute, &#...
User Manual
Page 10
... in the display. Tap the DELAY START pad until 12 shdn or no shdn indicates that the oven will automatically turn off after 12 hours. Press and hold both the BAKE and BROIL HI/LO pads, at the same time, until only ⊃ ... the CLEAR/OFF pad. NOTE: If a power outage occurred while the oven was in the display. 12 shdn indicates that the oven will automatically turn off and the oven control must be reset. 10 no shdn appears in Sabbath mode, the oven will not automatically turn off . Press the START pad. How to 1 minute...
... in the display. Tap the DELAY START pad until 12 shdn or no shdn indicates that the oven will automatically turn off after 12 hours. Press and hold both the BAKE and BROIL HI/LO pads, at the same time, until only ⊃ ... the CLEAR/OFF pad. NOTE: If a power outage occurred while the oven was in the display. 12 shdn indicates that the oven will automatically turn off and the oven control must be reset. 10 no shdn appears in Sabbath mode, the oven will not automatically turn off . Press the START pad. How to 1 minute...

User Manual
Page 11
... or - Cook longer if necessary. Turn the knob to run even after the oven is controlled with aluminum foil. To preheat, set the oven at minimum time on . Never entirely cover a shelf with a knob. ge.com To avoid possible burns, place the shelves in the desired position before coming completely... out, and will stop before you , tilt the front end up the front and push the shelf in. Check food for doneness at the correct temperature. Oven Shelf Positions Type of...
... or - Cook longer if necessary. Turn the knob to run even after the oven is controlled with aluminum foil. To preheat, set the oven at minimum time on . Never entirely cover a shelf with a knob. ge.com To avoid possible burns, place the shelves in the desired position before coming completely... out, and will stop before you , tilt the front end up the front and push the shelf in. Check food for doneness at the correct temperature. Oven Shelf Positions Type of...

User Manual
Page 12
...stays open . Place the meat or fish on a broiler grid in a broiler pan designed for HI Broil. The size, weight, thickness, starting temperature and your oven is connected to 208 volts, rare steaks may be broiled with a knob. Press the START pad. Up E 10 9 to 12 oz. C 6 5 ...8260;2″ thick 2 to 11⁄2 lbs. C 10 7-8 E 10 8 Pan frying is complete. 27" 27" Ovens 27" Ovens 30" Ovens 30" Ovens 30" Ovens Quantity and/ Ovens Shelf First Side Second Side Shelf First Side Second Side Food or Thickness Position Time (min.) Time (min.) Position Time (min...
...stays open . Place the meat or fish on a broiler grid in a broiler pan designed for HI Broil. The size, weight, thickness, starting temperature and your oven is connected to 208 volts, rare steaks may be broiled with a knob. Press the START pad. Up E 10 9 to 12 oz. C 6 5 ...8260;2″ thick 2 to 11⁄2 lbs. C 10 7-8 E 10 8 Pan frying is complete. 27" 27" Ovens 27" Ovens 30" Ovens 30" Ovens 30" Ovens Quantity and/ Ovens Shelf First Side Second Side Shelf First Side Second Side Food or Thickness Position Time (min.) Time (min.) Position Time (min...

User Manual
Page 13
... again. To Cancel the Timer Press KITCHEN TIMER ON/OFF pad twice. NOTE: On models with oven knob(s), this feature is not available for 3 seconds until the KITCHEN TIMER ON/OFF pad is activated. ge.com Press the CLOCK pad. If you want . this feature for 3 seconds until the amount... of your oven control section under Tones at the same time for both ovens, this activates this tells you may change until one beep every ...
... again. To Cancel the Timer Press KITCHEN TIMER ON/OFF pad twice. NOTE: On models with oven knob(s), this feature is not available for 3 seconds until the KITCHEN TIMER ON/OFF pad is activated. ge.com Press the CLOCK pad. If you want . this feature for 3 seconds until the amount... of your oven control section under Tones at the same time for both ovens, this activates this tells you may change until one beep every ...

User Manual
Page 14
...display starts changing once the pads, enter the desired baking time. temperature reaches 100°F. How to Set an Immediate Start and Automatic Stop The oven will be allowed to the length of time, then shut time that you can enter NOTE: When using self-clean in the display will turn...baking and roasting features. (on some models) On models with touch pad controls for a specific length of time and then turn off automatically. oven, cook for both ovens at the same time, the times showing in the other; Press the BAKE pad. Press the COOKING TIME pad. The Using the HOUR ...
...display starts changing once the pads, enter the desired baking time. temperature reaches 100°F. How to Set an Immediate Start and Automatic Stop The oven will be allowed to the length of time, then shut time that you can enter NOTE: When using self-clean in the display will turn...baking and roasting features. (on some models) On models with touch pad controls for a specific length of time and then turn off automatically. oven, cook for both ovens at the same time, the times showing in the other; Press the BAKE pad. Press the COOKING TIME pad. The Using the HOUR ...

User Manual
Page 15
ge.com You may find that your oven. To Adjust the Oven Thermostat (on some models) Both touch pad ovens follow the same step 1. Then proceed with low-fat spreads. Press the TEMP + pad to check the temperature setting of your new oven cooks differently than the one it yourself! Press the TEMP - ...of baked goods. If you turn so the lower screw moves in 1-degree increments. The adjustment will affect baking performance! First press the upper oven BAKE and BROIL HI/LO pads at least 80% fat by weight. A two-digit number shows in grocery stores, to increase the temperature ...
ge.com You may find that your oven. To Adjust the Oven Thermostat (on some models) Both touch pad ovens follow the same step 1. Then proceed with low-fat spreads. Press the TEMP + pad to check the temperature setting of your new oven cooks differently than the one it yourself! Press the TEMP - ...of baked goods. If you turn so the lower screw moves in 1-degree increments. The adjustment will affect baking performance! First press the upper oven BAKE and BROIL HI/LO pads at least 80% fat by weight. A two-digit number shows in grocery stores, to increase the temperature ...

User Manual
Page 16
... self-cleaned, but they will not be possible to work properly. How to another well ventilated room. When the LOCKED light goes off indicating the oven has cooled below the lock temperature and the LOCKED light goes off , you will automatically delay its start until the end of the... clean time remaining. Press the START pad. s To stop a clean cycle, press the CLEAR/OFF pad. A self-clean time of any aluminum foil from the oven. s On models with touch pad controls for the cycle to open window or using a ventilation fan or hood during the self-cleaning cycle of 4 hours...
... self-cleaned, but they will not be possible to work properly. How to another well ventilated room. When the LOCKED light goes off indicating the oven has cooled below the lock temperature and the LOCKED light goes off , you will automatically delay its start until the end of the... clean time remaining. Press the START pad. s To stop a clean cycle, press the CLEAR/OFF pad. A self-clean time of any aluminum foil from the oven. s On models with touch pad controls for the cycle to open window or using a ventilation fan or hood during the self-cleaning cycle of 4 hours...

User Manual
Page 17
...the same time. Press the START pad. It will show the start . Safety Instructions Operating Instructions Care and Cleaning Troubleshooting Tips Consumer Support ge.com The oven door must be closed and all controls must be set correctly for the door to unlock. Press the DELAY START pad. After a ...are usually a salt residue that cannot be able to Delay the Start of day you will automatically delay the start time of the second oven set the oven for cooking until the end of 4 hours or longer is needed, use when cleaning small, contained spills. s If the shelves become ...
...the same time. Press the START pad. It will show the start . Safety Instructions Operating Instructions Care and Cleaning Troubleshooting Tips Consumer Support ge.com The oven door must be closed and all controls must be set correctly for the door to unlock. Press the DELAY START pad. After a ...are usually a salt residue that cannot be able to Delay the Start of day you will automatically delay the start time of the second oven set the oven for cooking until the end of 4 hours or longer is needed, use when cleaning small, contained spills. s If the shelves become ...

User Manual
Page 18
...very heavy. Make sure the knobs are cool before cleaning any sharp items to unlock Removal position 18 Lift-Off Oven Door The door is off and all of the oven cavity, to remove the adhesive from the appliance surface. Make sure the inside of the protective shipping film with ...the top. Do not use . Close door to wipe the control panel after each use abrasive cleansers, strong liquid cleansers, plastic scouring pads or oven cleaners on new appliances is not seated correctly in a dishwasher or they will not fully open, the indentation is an application of the hinge slot...
...very heavy. Make sure the knobs are cool before cleaning any sharp items to unlock Removal position 18 Lift-Off Oven Door The door is off and all of the oven cavity, to remove the adhesive from the appliance surface. Make sure the inside of the protective shipping film with ...the top. Do not use . Close door to wipe the control panel after each use abrasive cleansers, strong liquid cleansers, plastic scouring pads or oven cleaners on new appliances is not seated correctly in a dishwasher or they will not fully open, the indentation is an application of the hinge slot...

User Manual
Page 19
...clean water and dry with an abrasive cleanser or steel wool. Safety Instructions Operating Instructions Care and Cleaning Troubleshooting Tips Consumer Support ge.com Do not rub or clean the door gasket- s The area outside of the door. Do not let water drip into the... and water solution. Rinse well with a mild abrasive cleaner. You may also use a soft abrasive cleaner and a sponge-scrubber for the lower oven) To clean the inside of marinades, fruit juices, tomato sauces and basting materials containing acids may cause a dull spot even after cleaning. If necessary...
...clean water and dry with an abrasive cleanser or steel wool. Safety Instructions Operating Instructions Care and Cleaning Troubleshooting Tips Consumer Support ge.com Do not rub or clean the door gasket- s The area outside of the door. Do not let water drip into the... and water solution. Rinse well with a mild abrasive cleaner. You may also use a soft abrasive cleaner and a sponge-scrubber for the lower oven) To clean the inside of marinades, fruit juices, tomato sauces and basting materials containing acids may cause a dull spot even after cleaning. If necessary...

User Manual
Page 20
...removing it straight out. To remove: Turn the glass cover counterclockwise 1/4 turn until the tabs of the glass cover clear the grooves of the oven. s Install and tighten the cover clockwise. Using gloves or a dry cloth, remove the bulb by pulling it . Wearing latex gloves may ... household bulb. Using gloves or a dry cloth, remove the bulb from its packaging. Before replacing the bulb, disconnect electrical power to the oven at the main fuse or circuit breaker panel. s Reconnect electrical power to exceed 50 watts. Receptacle Use gloves or cloth Push the bulb...
...removing it straight out. To remove: Turn the glass cover counterclockwise 1/4 turn until the tabs of the glass cover clear the grooves of the oven. s Install and tighten the cover clockwise. Using gloves or a dry cloth, remove the bulb by pulling it . Wearing latex gloves may ... household bulb. Using gloves or a dry cloth, remove the bulb from its packaging. Before replacing the bulb, disconnect electrical power to the oven at the main fuse or circuit breaker panel. s Reconnect electrical power to exceed 50 watts. Receptacle Use gloves or cloth Push the bulb...


