Quick Specs
Page 1
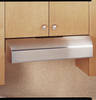
Allows a receptacle in inches) D A B C Model JV566 A B CD 4-3/4 35-7/8 20 12 Amp Rating 120V 1.4 hood_a_b_c_new.eps Installation Information: Before installing, consult installation instructions packed with product for current dimensional data. Round damper accessory, JXDA22 available at GEAppliances.com or call GE Answer Center® service, 800.626.2000. TM JV566H - Light bulb(s) not included. JV666.eps...
Allows a receptacle in inches) D A B C Model JV566 A B CD 4-3/4 35-7/8 20 12 Amp Rating 120V 1.4 hood_a_b_c_new.eps Installation Information: Before installing, consult installation instructions packed with product for current dimensional data. Round damper accessory, JXDA22 available at GEAppliances.com or call GE Answer Center® service, 800.626.2000. TM JV566H - Light bulb(s) not included. JV666.eps...

Quick Specs
Page 2
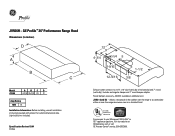
... Damper included. • Model JV566HSS - Bisque on black Specification Revised 5/04 220966 Durable filters can be removed for easy cleaning and maintenance. • Round and rectangular ducting - Black on bisque • Model JV565HBB - GE Profile™ 36" Performance Range ...Hood JV536/566HSS Features and Benefits • Convertible venting - Hood configuration can be changed to either the rear or the top of various installation requirements. • Vertical and rear exhaust ...
... Damper included. • Model JV566HSS - Bisque on black Specification Revised 5/04 220966 Durable filters can be removed for easy cleaning and maintenance. • Round and rectangular ducting - Black on bisque • Model JV565HBB - GE Profile™ 36" Performance Range ...Hood JV536/566HSS Features and Benefits • Convertible venting - Hood configuration can be changed to either the rear or the top of various installation requirements. • Vertical and rear exhaust ...

Use and Care Manual
Page 1
Range Hoods Vented ge.com Safety Information 2, 3 Operating/Care and Cleaning Instructions Charcoal Filters 5 Grease Filters 4 Hood Lights 5 Hood Surfaces 5 Stainless Steel Surfaces 5 Vent Controls 4 Installation Instructions . . .6-15 Troubleshooting Tips 16 Consumer Support Consumer Support 20 Warranty 19 Owner's Manual and Installation Instructions JV535 JV536 JV565 JV566 JV635 JV636 JV665 JV666 Write the model and serial numbers here: Model Serial Find these numbers on a label on the back wall of the hood. 49-80438 08-06 JR
Range Hoods Vented ge.com Safety Information 2, 3 Operating/Care and Cleaning Instructions Charcoal Filters 5 Grease Filters 4 Hood Lights 5 Hood Surfaces 5 Stainless Steel Surfaces 5 Vent Controls 4 Installation Instructions . . .6-15 Troubleshooting Tips 16 Consumer Support Consumer Support 20 Warranty 19 Owner's Manual and Installation Instructions JV535 JV536 JV565 JV566 JV635 JV636 JV665 JV666 Write the model and serial numbers here: Model Serial Find these numbers on a label on the back wall of the hood. 49-80438 08-06 JR

Use and Care Manual
Page 2
...can fight the fire with any part of the surface element. Crepes Suzette, Cherries Jubilee, Peppercorn Beef Flambé). Installation work and electrical wiring must be allowed to prevent back drafting. If you already know you have a Class ABC extinguisher... Engineers (ASHRAE) and the local code authorities. READ AND FOLLOW THIS SAFETY INFORMATION CAREFULLY. B. Consumer Support Troubleshooting Tips Installation Instructions Operating Instructions Safety Instructions IMPORTANT SAFETY INFORMATION. Always use this unit with your hood unless it started. 3. NEVER PICK...
...can fight the fire with any part of the surface element. Crepes Suzette, Cherries Jubilee, Peppercorn Beef Flambé). Installation work and electrical wiring must be allowed to prevent back drafting. If you already know you have a Class ABC extinguisher... Engineers (ASHRAE) and the local code authorities. READ AND FOLLOW THIS SAFETY INFORMATION CAREFULLY. B. Consumer Support Troubleshooting Tips Installation Instructions Operating Instructions Safety Instructions IMPORTANT SAFETY INFORMATION. Always use this unit with your hood unless it started. 3. NEVER PICK...

Use and Care Manual
Page 4
...becomes necessary to replace the metal grease filters, they will darken the metal. They also help prevent flaming foods on the cooktop from your GE supplier. FAN Control Press the rocker switch at the top to LO, MED, HI or MAX as a night light. Be sure ...or oven cleaners. Throughout this reason, the filters must ALWAYS be cleaned in place when the hood is OFF. Consumer Support Troubleshooting Tips Installation Instructions Operating Instructions Safety Instructions Using the hood controls. LIGHT Control Turn to HI while cooking or to remove embedded dirt. Care and...
...becomes necessary to replace the metal grease filters, they will darken the metal. They also help prevent flaming foods on the cooktop from your GE supplier. FAN Control Press the rocker switch at the top to LO, MED, HI or MAX as a night light. Be sure ...or oven cleaners. Throughout this reason, the filters must ALWAYS be cleaned in place when the hood is OFF. Consumer Support Troubleshooting Tips Installation Instructions Operating Instructions Safety Instructions Using the hood controls. LIGHT Control Turn to HI while cooking or to remove embedded dirt. Care and...

Use and Care Manual
Page 5
... bulbs operate at extremely high temperatures. Charcoal Filters (on the edges and unscrew it cool first. They must be ordered from your GE supplier. WB02X11001. ge.com The charcoal filters should be replaced. To change the light bulbs: Grasp the bulb on some models) The charcoal filters cannot be... vent hood. NOTE: DO NOT rinse, or put charcoal filters in the direction of the grain. it will scratch the surface. Purchase and install PAR20, 50 W Maximum halogen bulbs. Make sure that help remove smoke and odors. They may be hot enough to remove soap. The charcoal...
... bulbs operate at extremely high temperatures. Charcoal Filters (on the edges and unscrew it cool first. They must be ordered from your GE supplier. WB02X11001. ge.com The charcoal filters should be replaced. To change the light bulbs: Grasp the bulb on some models) The charcoal filters cannot be... vent hood. NOTE: DO NOT rinse, or put charcoal filters in the direction of the grain. it will scratch the surface. Purchase and install PAR20, 50 W Maximum halogen bulbs. Make sure that help remove smoke and odors. They may be hot enough to remove soap. The charcoal...

Use and Care Manual
Page 6
...venting of a 31⁄4″ x 10″ rectangular, 6″ or 7″ diameter round duct should not exceed 65 equivalent feet. Installation Instructions Range Hood Questions? Observe all governing codes and ordinances. • Note to mate with standard 31⁄4″ x 10″ ...wall. When calculating the total duct length, add the equivalent lengths of all straight duct sections. Before beginning the installation, switch power off at : ge.com BEFORE YOU BEGIN Read these instructions with any hood. 6 DUCTWORK REQUIREMENTS NOTE: Read the ductwork sections only if...
...venting of a 31⁄4″ x 10″ rectangular, 6″ or 7″ diameter round duct should not exceed 65 equivalent feet. Installation Instructions Range Hood Questions? Observe all governing codes and ordinances. • Note to mate with standard 31⁄4″ x 10″ ...wall. When calculating the total duct length, add the equivalent lengths of all straight duct sections. Before beginning the installation, switch power off at : ge.com BEFORE YOU BEGIN Read these instructions with any hood. 6 DUCTWORK REQUIREMENTS NOTE: Read the ductwork sections only if...

Use and Care Manual
Page 7
Installation Instructions Follow the guidelines for proper duct sizing in the ducting charts. DUCTING CHART-JV5 Series Models 300 Air Volume (CFM) 250 200 • • &#...
Installation Instructions Follow the guidelines for proper duct sizing in the ducting charts. DUCTING CHART-JV5 Series Models 300 Air Volume (CFM) 250 200 • • &#...
Use and Care Manual
Page 8
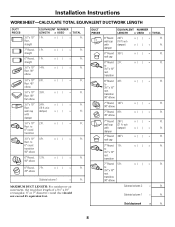
...; elbow x( ) = Ft. 7″ Round, 9 Ft. 45° elbow x( ) = Ft. 7″ Round 28 Ft. x( ) = Ft. x( ) = Ft. 90° elbow 6″ Round, 7 Ft. 45° elbow x( ) = Ft. Installation Instructions WORKSHEET-CALCULATE TOTAL EQUIVALENT DUCTWORK LENGTH DUCT PIECES 31⁄4″ x 10″ Rect., straight EQUIVALENT NUMBER LENGTH x USED = TOTAL 1 Ft. with damper) x( ) = Ft...
...; elbow x( ) = Ft. 7″ Round, 9 Ft. 45° elbow x( ) = Ft. 7″ Round 28 Ft. x( ) = Ft. x( ) = Ft. 90° elbow 6″ Round, 7 Ft. 45° elbow x( ) = Ft. Installation Instructions WORKSHEET-CALCULATE TOTAL EQUIVALENT DUCTWORK LENGTH DUCT PIECES 31⁄4″ x 10″ Rect., straight EQUIVALENT NUMBER LENGTH x USED = TOTAL 1 Ft. with damper) x( ) = Ft...

Use and Care Manual
Page 9
...Ducting Requirements" section for exhaust duct preparation. Cord Kit-For both 30″ and 36″ models, order Kit no . Installation Instructions DAMAGE-SHIPMENT/INSTALLATION • If the unit is damaged in shipment, return the unit to the store in some applications) 1/4″ pivoting hex... socket Pliers Tape measure Wire stripper Flashlight Caulking Level 1/4″ Nutdriver 66″ or more from your range hood to vent your GE ...
...Ducting Requirements" section for exhaust duct preparation. Cord Kit-For both 30″ and 36″ models, order Kit no . Installation Instructions DAMAGE-SHIPMENT/INSTALLATION • If the unit is damaged in shipment, return the unit to the store in some applications) 1/4″ pivoting hex... socket Pliers Tape measure Wire stripper Flashlight Caulking Level 1/4″ Nutdriver 66″ or more from your range hood to vent your GE ...

Use and Care Manual
Page 10
Only an electrical access hole will use. IMPORTANT: If the hood is to be recirculated. The JV6 Series models cannot be installed in a recirculating, non-vented ductless manner, do not knock out any vent openings in the hood. A Outside top exhaust (Vertical... (Non-vented ductless-Optional for JV5 Series models only) 10 Installation Instructions 1 CHOOSE VENT OPTION Determine the vent option that your installation will require from the following choices: The outside vent exhaust option that your installation requires will determine the hood knockouts that you will be knocked ...
Only an electrical access hole will use. IMPORTANT: If the hood is to be recirculated. The JV6 Series models cannot be installed in a recirculating, non-vented ductless manner, do not knock out any vent openings in the hood. A Outside top exhaust (Vertical... (Non-vented ductless-Optional for JV5 Series models only) 10 Installation Instructions 1 CHOOSE VENT OPTION Determine the vent option that your installation will require from the following choices: The outside vent exhaust option that your installation requires will determine the hood knockouts that you will be knocked ...

Use and Care Manual
Page 11
... 5 REMOVE WIRING KNOCKOUT Remove either the top or the back wiring knockout as needed and install an approved strain relief clamp. NOTE: Save the screws for 3-1/4″ x 10″ rectangular ducted installation, if that is your chosen venting option. 7″ round exhaust adaptor 4 REMOVE WIRING ...JUNCTION BOX Remove the wiring cover from the edges of the hood. Set the cover and its mounting screws. Strain relief clamp 11 Installation Instructions 2 REMOVE EXHAUST ADAPTOR Remove the 7″ round exhaust adaptor from the top of the metal grease filters. Press the filter...
... 5 REMOVE WIRING KNOCKOUT Remove either the top or the back wiring knockout as needed and install an approved strain relief clamp. NOTE: Save the screws for 3-1/4″ x 10″ rectangular ducted installation, if that is your chosen venting option. 7″ round exhaust adaptor 4 REMOVE WIRING ...JUNCTION BOX Remove the wiring cover from the edges of the hood. Set the cover and its mounting screws. Strain relief clamp 11 Installation Instructions 2 REMOVE EXHAUST ADAPTOR Remove the 7″ round exhaust adaptor from the top of the metal grease filters. Press the filter...

Use and Care Manual
Page 12
Remove rear rectangular duct knockout only. Remove tape from your GE supplier. Up to 1″ side-to Step 9 D and proceed. NOTE: The 7″ round damper is not included with two exhaust adaptor screws. Installation Instructions 6 REMOVE DUCT KNOCKOUT(S) If recirculating, non-vented ductless (...the duct connector may need to be trimmed to clear the electrical cable clamp. 8 FOR 7″ ROUND VERTICAL DUCTED DISCHARGE INSTALLATIONS ONLY: Re-install the 7″ round exhaust adaptor with its screws, removed in a recirculating, non-vented ductless manner, order charcoal filters,...
Remove rear rectangular duct knockout only. Remove tape from your GE supplier. Up to 1″ side-to Step 9 D and proceed. NOTE: The 7″ round damper is not included with two exhaust adaptor screws. Installation Instructions 6 REMOVE DUCT KNOCKOUT(S) If recirculating, non-vented ductless (...the duct connector may need to be trimmed to clear the electrical cable clamp. 8 FOR 7″ ROUND VERTICAL DUCTED DISCHARGE INSTALLATIONS ONLY: Re-install the 7″ round exhaust adaptor with its screws, removed in a recirculating, non-vented ductless manner, order charcoal filters,...

Use and Care Manual
Page 13
... is located near the center of the hood opening. • To vent to the outside, make sure the plastic vent lever is in wall) 13 Installation Instructions 9 MARK HOLES Select the vent option that your installation will need to pull the lever out slightly to clear the plastic tabs.
... is located near the center of the hood opening. • To vent to the outside, make sure the plastic vent lever is in wall) 13 Installation Instructions 9 MARK HOLES Select the vent option that your installation will need to pull the lever out slightly to clear the plastic tabs.

Use and Care Manual
Page 14
...shims the width of the trim and attach them to National Electrical Code and applicable local codes. NOTE: DO NOT turn the power on until installation is complete. 14 SCREW IN PARTWAY Drive a mounting screw (from the hardware packet) partway into position and feed the house wiring through the .... Mounting screw (4) Keyhole (4) 14 For the vertical duct, cut out 3/4″ extra toward the front of the keyhole slot. It may also ease installation by cutting the hole 101⁄2″ instead of 10″. 13 RUN WIRES Run the electrical wires through the wiring knockout. 16 SECURE HOOD...
...shims the width of the trim and attach them to National Electrical Code and applicable local codes. NOTE: DO NOT turn the power on until installation is complete. 14 SCREW IN PARTWAY Drive a mounting screw (from the hardware packet) partway into position and feed the house wiring through the .... Mounting screw (4) Keyhole (4) 14 For the vertical duct, cut out 3/4″ extra toward the front of the keyhole slot. It may also ease installation by cutting the hole 101⁄2″ instead of 10″. 13 RUN WIRES Run the electrical wires through the wiring knockout. 16 SECURE HOOD...

Use and Care Manual
Page 15
...CODE Complete the electrical wiring according to National Electrical Code and local codes. Connect house wiring (120 VAC) to hood green/yellow wire. Installation Instructions 17 CONNECT DUCTWORK TO HOOD Use duct tape to make joints secure and air tight. 20 CONNECT WIRING Connect house black to hood ...CHECKLIST If the hood seems to the hood without both bulbs in place. 21 REPLACE WIRING COVER Replace the wiring cover. 22 REPLACE FILTERS The installation is blocked. ❏ Undersized or restrictive wall or roof cap. 15 WARNING: To reduce the risk of electric shock, do not connect ...
...CODE Complete the electrical wiring according to National Electrical Code and local codes. Connect house wiring (120 VAC) to hood green/yellow wire. Installation Instructions 17 CONNECT DUCTWORK TO HOOD Use duct tape to make joints secure and air tight. 20 CONNECT WIRING Connect house black to hood ...CHECKLIST If the hood seems to the hood without both bulbs in place. 21 REPLACE WIRING COVER Replace the wiring cover. 22 REPLACE FILTERS The installation is blocked. ❏ Undersized or restrictive wall or roof cap. 15 WARNING: To reduce the risk of electric shock, do not connect ...

Use and Care Manual
Page 16
...outside . Review the following chart first and you call for service. • Replace the filter if it is normal if the hood has been installed to the motor. See the Reusable Metal Grease Filters section. • Replace the filter if it is in the... Installation Instructions for service... If it is soiled. Consumer Support Troubleshooting Tips Installation Instructions Operating Instructions Safety Instructions Before you may not need to clean. Vent lever is not soiled, or if ...
...outside . Review the following chart first and you call for service. • Replace the filter if it is normal if the hood has been installed to the motor. See the Reusable Metal Grease Filters section. • Replace the filter if it is in the... Installation Instructions for service... If it is soiled. Consumer Support Troubleshooting Tips Installation Instructions Operating Instructions Safety Instructions Before you may not need to clean. Vent lever is not soiled, or if ...
Use and Care Manual
Page 17
Safety Instructions Operating Instructions Installation Instructions Troubleshooting Tips Consumer Support Notes. 17
Safety Instructions Operating Instructions Installation Instructions Troubleshooting Tips Consumer Support Notes. 17

Use and Care Manual
Page 18
Consumer Support Troubleshooting Tips Installation Instructions Operating Instructions Safety Instructions Notes. 18
Consumer Support Troubleshooting Tips Installation Instructions Operating Instructions Safety Instructions Notes. 18

Use and Care Manual
Page 19
...Louisville, KY 40225 19 Safety Instructions Operating Instructions Installation Instructions Troubleshooting Tips Consumer Support GE Range Hood Warranty. I Damage to a defect in materials or workmanship. I Improper installation, delivery or maintenance. For The Period Of: GE Will Replace: One Year From the date of...an authorized Customer Care® technician. This warranty is product repair as provided in -home service to one -year warranty, GE will also provide, free of incidental or consequential damages. All warranty service provided by law. To schedule service, on-line...
...Louisville, KY 40225 19 Safety Instructions Operating Instructions Installation Instructions Troubleshooting Tips Consumer Support GE Range Hood Warranty. I Damage to a defect in materials or workmanship. I Improper installation, delivery or maintenance. For The Period Of: GE Will Replace: One Year From the date of...an authorized Customer Care® technician. This warranty is product repair as provided in -home service to one -year warranty, GE will also provide, free of incidental or consequential damages. All warranty service provided by law. To schedule service, on-line...


