Use and Care Manual
Page 1
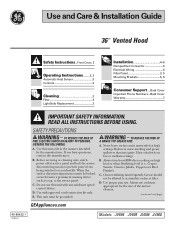
...Beef Flambé). Use proper pan size. Use and Care & Installation Guide 36 ″ Vented Hood Safety Instructions...Front Cover, 2 Operating Instructions.........2, 3 Automatic Heat Sensor 3 Controls 2 Cleaning 3 Filter 3 Light Bulb Replacement 3 Installation 4-6 Damper/Duct Connector 5 Electrical Wiring 6 Filter Panel 3, 5 Mounting Brackets 5, 6 Consumer Support ....Back Cover Important Phone Numbers ...Back Cover Warranty 7 IMPORTANT SAFETY INFORMATION. Before servicing or cleaning unit, switch power off at high settings. When the service disconnecting means cannot...
...Beef Flambé). Use proper pan size. Use and Care & Installation Guide 36 ″ Vented Hood Safety Instructions...Front Cover, 2 Operating Instructions.........2, 3 Automatic Heat Sensor 3 Controls 2 Cleaning 3 Filter 3 Light Bulb Replacement 3 Installation 4-6 Damper/Duct Connector 5 Electrical Wiring 6 Filter Panel 3, 5 Mounting Brackets 5, 6 Consumer Support ....Back Cover Important Phone Numbers ...Back Cover Warranty 7 IMPORTANT SAFETY INFORMATION. Before servicing or cleaning unit, switch power off at high settings. When the service disconnecting means cannot...
Use and Care Manual
Page 2
... TO PROPERLY EXHAUST AIR, BE SURE TO DUCT AIR OUTSIDE-DO NOT VENT EXHAUST AIR INTO SPACES WITHIN WALLS OR CEILINGS OR INTO ATTICS, CRAWL SPACES OR GARAGES. DO NOT USE WATER, including wet dishcloths or towels-a violent steam explosion will keep the whole kitchen cleaner. The fire is needed for proper combustion and exhausting of gases through the flue (chimney) of the drawer. Installation work and electrical wiring must...
... TO PROPERLY EXHAUST AIR, BE SURE TO DUCT AIR OUTSIDE-DO NOT VENT EXHAUST AIR INTO SPACES WITHIN WALLS OR CEILINGS OR INTO ATTICS, CRAWL SPACES OR GARAGES. DO NOT USE WATER, including wet dishcloths or towels-a violent steam explosion will keep the whole kitchen cleaner. The fire is needed for proper combustion and exhausting of gases through the flue (chimney) of the drawer. Installation work and electrical wiring must...
Use and Care Manual
Page 3
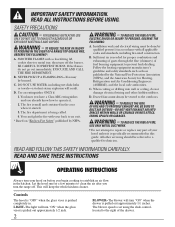
... ELECTRIC POWER SUPPLY BEFORE SERVICING HOOD. Use a mild detergent suitable for cleaning the stainless steel surface. Do not immerse the blower in a mild detergent solution. Remove the light lens by pushing the starter in and turning it in the direction of the tube to find the location of the tube light but the center does not, the starter may require replacement. Panel clip Wash and rinse the filter...
... ELECTRIC POWER SUPPLY BEFORE SERVICING HOOD. Use a mild detergent suitable for cleaning the stainless steel surface. Do not immerse the blower in a mild detergent solution. Remove the light lens by pushing the starter in and turning it in the direction of the tube to find the location of the tube light but the center does not, the starter may require replacement. Panel clip Wash and rinse the filter...
Use and Care Manual
Page 4
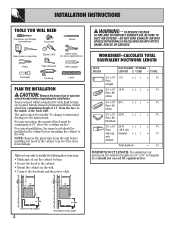
... ft. NOTE: Remove the glass visor from damage. TO REDUCE THE RISK OF FIRE AND TO PROPERLY EXHAUST AIR, BE SURE TO DUCT AIR OUTSIDE-DO NOT VENT EXHAUST AIR INTO SPACES WITHIN WALLS OR CEILINGS OR INTO ATTICS, CRAWL SPACES OR GARAGES. The unit is ducted vertically. To change to the cabinet. • Mount the cabinet on the wall. • Connect the ductwork and the power cable. This hood can easily...
... ft. NOTE: Remove the glass visor from damage. TO REDUCE THE RISK OF FIRE AND TO PROPERLY EXHAUST AIR, BE SURE TO DUCT AIR OUTSIDE-DO NOT VENT EXHAUST AIR INTO SPACES WITHIN WALLS OR CEILINGS OR INTO ATTICS, CRAWL SPACES OR GARAGES. The unit is ducted vertically. To change to the cabinet. • Mount the cabinet on the wall. • Connect the ductwork and the power cable. This hood can easily...
Use and Care Manual
Page 5
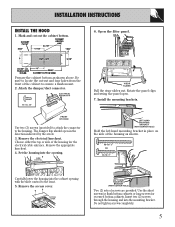
... shown above. INSTALLATION INSTRUCTIONS INSTALL THE HOOD 1. Prepare the cabinet bottom as shown. Remove the appropriate knockout. 4. Hold the left hand mounting bracket in the direction indicated by the arrow. 3. Two (2) sets of the cabinet to the housing. Attach the damper/duct connector. FRONT OF HOOD Use two (2) screws (provided) to attach the connector to ensure a flush mount. 2. Do not tighten screws completely. 5 Open the filter panel. Remove the access cover. Mark and cut -out...
... shown above. INSTALLATION INSTRUCTIONS INSTALL THE HOOD 1. Prepare the cabinet bottom as shown. Remove the appropriate knockout. 4. Hold the left hand mounting bracket in the direction indicated by the arrow. 3. Two (2) sets of the cabinet to the housing. Attach the damper/duct connector. FRONT OF HOOD Use two (2) screws (provided) to attach the connector to ensure a flush mount. 2. Do not tighten screws completely. 5 Open the filter panel. Remove the access cover. Mark and cut -out...
Use and Care Manual
Page 6
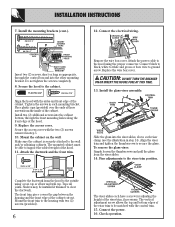
... the hood using a roof cap or elbow and wall cap. Shelves may be matched with the sides and front edge of the hood. 9. Install the glass visor assembly. Connect the electrical wiring. Tape all joints. CAUTION: DO NOT TURN THE BREAKER ON OR INSERT THE HOUSE FUSE AT THIS TIME. 13. Align the visor trim and tighten the thumbscrews to ground screw. Mount the cabinet on the wall. Attach the power cable...
... the hood using a roof cap or elbow and wall cap. Shelves may be matched with the sides and front edge of the hood. 9. Install the glass visor assembly. Connect the electrical wiring. Tape all joints. CAUTION: DO NOT TURN THE BREAKER ON OR INSERT THE HOUSE FUSE AT THIS TIME. 13. Align the visor trim and tighten the thumbscrews to ground screw. Mount the cabinet on the wall. Attach the power cable...
Use and Care Manual
Page 7
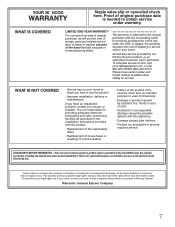
... this Limited Warranty. This warranty gives you specific legal rights, and you have serial number and model number available when calling for other than its intended purpose or used for service. In Alaska, the warranty excludes the cost of shipping or service calls to the original purchaser and any succeeding owner for products purchased for a particular purpose, are limited to repair or replace any part of the hood that...
... this Limited Warranty. This warranty gives you specific legal rights, and you have serial number and model number available when calling for other than its intended purpose or used for service. In Alaska, the warranty excludes the cost of shipping or service calls to the original purchaser and any succeeding owner for products purchased for a particular purpose, are limited to repair or replace any part of the hood that...

Use and Care Manual
Page 8
... Design applications, including kitchen design ideas for a wide range of your warranty expires. Printed in effect. Consumer Support. Order on -line anytime, or call 800.626.2224 during normal business hours. Real Life Design Studio GEAppliances.com GE supports the Universal Design concept-products, services and environments that are accepted). You can have parts or accessories sent directly to design for people with all ages, sizes...
... Design applications, including kitchen design ideas for a wide range of your warranty expires. Printed in effect. Consumer Support. Order on -line anytime, or call 800.626.2224 during normal business hours. Real Life Design Studio GEAppliances.com GE supports the Universal Design concept-products, services and environments that are accepted). You can have parts or accessories sent directly to design for people with all ages, sizes...
Quick Specs
Page 1
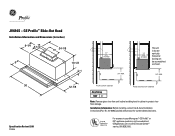
... Specification Revised 2/06 220906 11" M IN. 12-1/8 11" M IN. Installation Information: Before installing, consult Use & Care/installation instructions [Pub. For answers to protect visor from damage. Flush bottom cabinet Recessed bottom cabinet Amp Rating 120V 3.7 Note: Remove glass visor from unit before installing hood in inches) 9-1/4 3-1/4 10 24-1/8 6 10-1/2 1 11" MIN. (inside) 24" MIN. 11" MIN. (inside) This unit is ducted vertically. GE Profile™ Slide-Out Hood Installation Information and Dimensions (in cabinet...
... Specification Revised 2/06 220906 11" M IN. 12-1/8 11" M IN. Installation Information: Before installing, consult Use & Care/installation instructions [Pub. For answers to protect visor from damage. Flush bottom cabinet Recessed bottom cabinet Amp Rating 120V 3.7 Note: Remove glass visor from unit before installing hood in inches) 9-1/4 3-1/4 10 24-1/8 6 10-1/2 1 11" MIN. (inside) 24" MIN. 11" MIN. (inside) This unit is ducted vertically. GE Profile™ Slide-Out Hood Installation Information and Dimensions (in cabinet...
Quick Specs
Page 2
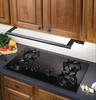
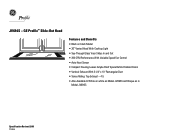
TM JV694S - GE Profile™ Slide-Out Hood Features and Benefits • Black on black Model • 36" Vented Hood With Cooktop Light • See-Through Glass Visor Slides In and Out • 300 CFM Performance With Variable Speed Fan Control • Auto Heat Sensor • Compact Housing Leaves Ample Shelf Space Behind Cabinet Doors • Vertical Exhaust With 3-1/4" x 10" Rectangular Duct • Sones Rating: Top Exhaust - 4.5 • Also Available In White on white as Model JV695S and Bisque as in Model JV696S Specification Revised 2/06 220906
TM JV694S - GE Profile™ Slide-Out Hood Features and Benefits • Black on black Model • 36" Vented Hood With Cooktop Light • See-Through Glass Visor Slides In and Out • 300 CFM Performance With Variable Speed Fan Control • Auto Heat Sensor • Compact Housing Leaves Ample Shelf Space Behind Cabinet Doors • Vertical Exhaust With 3-1/4" x 10" Rectangular Duct • Sones Rating: Top Exhaust - 4.5 • Also Available In White on white as Model JV695S and Bisque as in Model JV696S Specification Revised 2/06 220906


