Use and Care Manual
Page 1
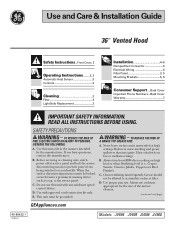
...Beef Flambé). Always turn hood ON when cooking on low or medium settings. Use and Care & Installation Guide 36 ″ Vented Hood Safety Instructions...Front Cover, 2 Operating Instructions.........2, 3 Automatic Heat Sensor 3 Controls 2 Cleaning 3 ...Filter 3 Light Bulb Replacement 3 Installation 4-6 Damper/Duct Connector 5 Electrical Wiring 6 Filter Panel 3, 5 Mounting Brackets 5, 6 Consumer Support ....Back Cover Important Phone Numbers ...
...Beef Flambé). Always turn hood ON when cooking on low or medium settings. Use and Care & Installation Guide 36 ″ Vented Hood Safety Instructions...Front Cover, 2 Operating Instructions.........2, 3 Automatic Heat Sensor 3 Controls 2 Cleaning 3 ...Filter 3 Light Bulb Replacement 3 Installation 4-6 Damper/Duct Connector 5 Electrical Wiring 6 Filter Panel 3, 5 Mounting Brackets 5, 6 Consumer Support ....Back Cover Important Phone Numbers ...
Use and Care Manual
Page 2
... and safety standards such as those published by qualified person(s) in this guide. Ducted fans must be referred to prevent back drafting. IMPORTANT SAFETY INFORMATION. B. Installation work and electrical wiring must always be burned. All other hidden utilities. The blower speed is being called. 4.
... and safety standards such as those published by qualified person(s) in this guide. Ducted fans must be referred to prevent back drafting. IMPORTANT SAFETY INFORMATION. B. Installation work and electrical wiring must always be burned. All other hidden utilities. The blower speed is being called. 4.
Use and Care Manual
Page 3
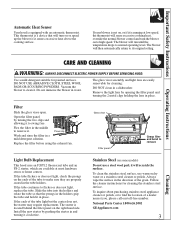
.... Always wipe the surface in water. Filter Slide the glass visor open. Flex the filter in place. If the tube continues to normal operating level. Install the new starter by opening the filter panel and turning the 2 metal clips holding the lens in a dishwasher. Follow the cleaner instructions for painted surfaces...
.... Always wipe the surface in water. Filter Slide the glass visor open. Flex the filter in place. If the tube continues to normal operating level. Install the new starter by opening the filter panel and turning the 2 metal clips holding the lens in a dishwasher. Follow the cleaner instructions for painted surfaces...
Use and Care Manual
Page 4
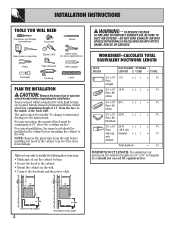
... OUTSIDE-DO NOT VENT EXHAUST AIR INTO SPACES WITHIN WALLS OR CEILINGS OR INTO ATTICS, CRAWL SPACES OR GARAGES. x( ) = Ft. INSTALLATION INSTRUCTIONS TOOLS YOU WILL NEED Flat blade and Phillips screwdrivers Duct tape Pencil Saw (saber or keyhole) Electric drill Metal snips (in the ...; 24 Ft. For safe operation, the mounted hood must be a minimum of a 31⁄4″ x 10″ rectangular duct should be installed by following these basic steps: • Mark and cut out the cabinet bottom. • Secure the hood to horizontal ducting see the instructions. with...
... OUTSIDE-DO NOT VENT EXHAUST AIR INTO SPACES WITHIN WALLS OR CEILINGS OR INTO ATTICS, CRAWL SPACES OR GARAGES. x( ) = Ft. INSTALLATION INSTRUCTIONS TOOLS YOU WILL NEED Flat blade and Phillips screwdrivers Duct tape Pencil Saw (saber or keyhole) Electric drill Metal snips (in the ...; 24 Ft. For safe operation, the mounted hood must be a minimum of a 31⁄4″ x 10″ rectangular duct should be installed by following these basic steps: • Mark and cut out the cabinet bottom. • Secure the hood to horizontal ducting see the instructions. with...
Use and Care Manual
Page 5
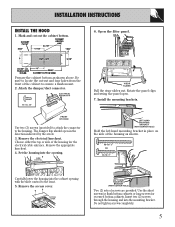
... indicated by the arrow. 3. Use the short screws for flush bottom cabinets or long screws for the electrical cable entrance. Attach the damper/duct connector. Install the mounting brackets. Be sure to locate the cut out the cabinet bottom. 6. Rotate the panel clips and swing the panel open in place on.... Two (2) sets of the housing for recessed bottom cabinets. Do not tighten screws completely. 5 VISOR SLIDES Pull the visor slides out. Remove the electrical knockout. INSTALLATION INSTRUCTIONS INSTALL THE HOOD 1.
... indicated by the arrow. 3. Use the short screws for flush bottom cabinets or long screws for the electrical cable entrance. Attach the damper/duct connector. Install the mounting brackets. Be sure to locate the cut out the cabinet bottom. 6. Rotate the panel clips and swing the panel open in place on.... Two (2) sets of the housing for recessed bottom cabinets. Do not tighten screws completely. 5 VISOR SLIDES Pull the visor slides out. Remove the electrical knockout. INSTALLATION INSTRUCTIONS INSTALL THE HOOD 1.
Use and Care Manual
Page 6
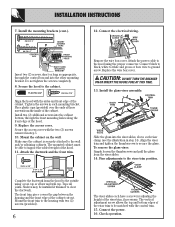
... to clear the ductwork. Attach the power cable to the hood using a roof cap or elbow and wall cap. Shelves may be installed if trimmed to the wall and/or adjoining cabinets. VISOR TRIM VISOR SLIDE Slide the glass into the visor slides, above each visor ...screws into the other mounting bracket. Attach the ductwork and the front trim. Connect the electrical wiring. Replace the access cover. Check operation. Install the glass visor assembly. Fine adjustments to the outside using the proper connector. Insert two (2) screws, short or long as appropriate, through ...
... to clear the ductwork. Attach the power cable to the hood using a roof cap or elbow and wall cap. Shelves may be installed if trimmed to the wall and/or adjoining cabinets. VISOR TRIM VISOR SLIDE Slide the glass into the visor slides, above each visor ...screws into the other mounting bracket. Attach the ductwork and the front trim. Connect the electrical wiring. Replace the access cover. Check operation. Install the glass visor assembly. Fine adjustments to the outside using the proper connector. Insert two (2) screws, short or long as appropriate, through ...
Use and Care Manual
Page 7
...floods or acts of merchantability or fitness for service. To schedule service on-line, visit us at GEAppliances.com, or call 800.GE.CARES (800.432.2737). WHAT IS COVERED LIMITED ONE-YEAR WARRANTY For one year or the shortest period allowed by law. Any ...are responsible for providing adequate electrical, exhausting and other than its intended purpose or used for home use the product. • Improper installation, delivery or maintenance. Warrantor: General Electric Company 7 In Alaska, the warranty excludes the cost of original purchase date is product repair...
...floods or acts of merchantability or fitness for service. To schedule service on-line, visit us at GEAppliances.com, or call 800.GE.CARES (800.432.2737). WHAT IS COVERED LIMITED ONE-YEAR WARRANTY For one year or the shortest period allowed by law. Any ...are responsible for providing adequate electrical, exhausting and other than its intended purpose or used for home use the product. • Improper installation, delivery or maintenance. Warrantor: General Electric Company 7 In Alaska, the warranty excludes the cost of original purchase date is product repair...
Quick Specs
Page 1
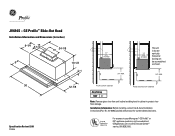
...] packed with product for current dimensional data. TM JV694S - GE Profile™ Slide-Out Hood Installation Information and Dimensions (in cabinet to your Monogram,® GE Profile™ or Listed by GE® appliance questions, visit our website at Underwriters GEAppliances.com or... call GE Answer Center® R Laboratories service, 800.626.2000. ...
...] packed with product for current dimensional data. TM JV694S - GE Profile™ Slide-Out Hood Installation Information and Dimensions (in cabinet to your Monogram,® GE Profile™ or Listed by GE® appliance questions, visit our website at Underwriters GEAppliances.com or... call GE Answer Center® R Laboratories service, 800.626.2000. ...


