
Quick Specs
Page 1
... out hood JV960SC - Installation Information: Before installing, consult Use & Care/installation instructions [Pub. No. 49-8463] packed with product for current dimensional data. Flush bottom cabinet Recessed bottom cabinet Amp Rating 120V 3.7 Note: Remove glass visor from unit before installing hood in inches) 9-1/4 3-1/4 10 24-1/8 6 7-5/8-36" 36 10-1/2 4-1/4 1 12-1/8 Specification Revised 2/06 220952 11" MIN. (inside) 24" MIN. 11" MIN. (inside) This unit is ducted vertically. Horizontal ducting can be...
... out hood JV960SC - Installation Information: Before installing, consult Use & Care/installation instructions [Pub. No. 49-8463] packed with product for current dimensional data. Flush bottom cabinet Recessed bottom cabinet Amp Rating 120V 3.7 Note: Remove glass visor from unit before installing hood in inches) 9-1/4 3-1/4 10 24-1/8 6 7-5/8-36" 36 10-1/2 4-1/4 1 12-1/8 Specification Revised 2/06 220952 11" MIN. (inside) 24" MIN. 11" MIN. (inside) This unit is ducted vertically. Horizontal ducting can be...
Quick Specs
Page 2
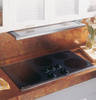
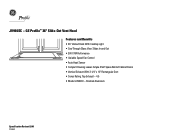
TM JV960SC - GE Profile™ 36" Slide-Out Vent Hood Features and Benefits • 36" Vented Hood With Cooktop Light • See-Through Glass Visor Slides In and Out • 300 CFM Performance • Variable Speed Fan Control • Auto Heat Sensor • Compact Housing Leaves Ample Shelf Space Behind Cabinet Doors • Vertical Exhaust With 3-1/4" x 10" Rectangular Duct • Sones Rating: Top Exhaust - 4.5 • Model JV960SC - Brushed Aluminum Specification Revised 2/06 220952
TM JV960SC - GE Profile™ 36" Slide-Out Vent Hood Features and Benefits • 36" Vented Hood With Cooktop Light • See-Through Glass Visor Slides In and Out • 300 CFM Performance • Variable Speed Fan Control • Auto Heat Sensor • Compact Housing Leaves Ample Shelf Space Behind Cabinet Doors • Vertical Exhaust With 3-1/4" x 10" Rectangular Duct • Sones Rating: Top Exhaust - 4.5 • Model JV960SC - Brushed Aluminum Specification Revised 2/06 220952
Use and Care Manual
Page 1
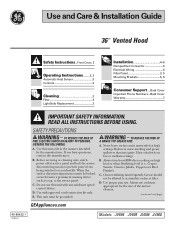
...or when flambeing food (i.e., Crepes Suzette, Cherries Jubilee, Peppercorn Beef Flambé). Use and Care & Installation Guide 36 ″ Vented Hood Safety Instructions...Front Cover, 2 Operating Instructions.........2, 3 Automatic Heat Sensor 3 Controls 2 Cleaning 3 Filter 3 Light Bulb Replacement 3 Installation 4-6 Damper/Duct Connector 5 Electrical Wiring 6 Filter Panel 3, 5 Mounting Brackets 5, 6 Consumer Support ....Back Cover Important Phone Numbers ...Back Cover Warranty 7 IMPORTANT SAFETY INFORMATION. SAFETY PRECAUTIONS WARNING - If you have questions, contact the...
...or when flambeing food (i.e., Crepes Suzette, Cherries Jubilee, Peppercorn Beef Flambé). Use and Care & Installation Guide 36 ″ Vented Hood Safety Instructions...Front Cover, 2 Operating Instructions.........2, 3 Automatic Heat Sensor 3 Controls 2 Cleaning 3 Filter 3 Light Bulb Replacement 3 Installation 4-6 Damper/Duct Connector 5 Electrical Wiring 6 Filter Panel 3, 5 Mounting Brackets 5, 6 Consumer Support ....Back Cover Important Phone Numbers ...Back Cover Warranty 7 IMPORTANT SAFETY INFORMATION. SAFETY PRECAUTIONS WARNING - If you have questions, contact the...
Use and Care Manual
Page 2
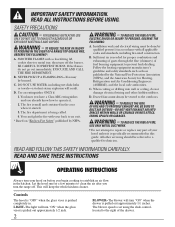
... by qualified person(s) in this guide. READ AND SAVE THESE INSTRUCTIONS OPERATING INSTRUCTIONS Always turn off . The blower speed is set using the slide control, located to an exit. * Based on before you turn "ON" when the drawer is specifically recommended in accordance with all applicable codes and standards, including fire-rated construction. FOR GENERAL VENTILATING USE ONLY. DO NOT USE TO EXHAUST HAZARDOUS OR EXPLOSIVE MATERIALS AND...
... by qualified person(s) in this guide. READ AND SAVE THESE INSTRUCTIONS OPERATING INSTRUCTIONS Always turn off . The blower speed is set using the slide control, located to an exit. * Based on before you turn "ON" when the drawer is specifically recommended in accordance with all applicable codes and standards, including fire-rated construction. FOR GENERAL VENTILATING USE ONLY. DO NOT USE TO EXHAUST HAZARDOUS OR EXPLOSIVE MATERIALS AND...
Use and Care Manual
Page 3
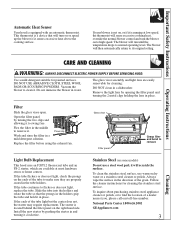
.... Stainless Steel (on the right hand side. To clean the stainless steel surface, use a steel wool pad; Important Safety Instructions Operating Instructions Automatic Heat Sensor Your hood is running at most hardware stores or home centers. Vacuum the blower to remove it clockwise. Remove the light lens by pushing the starter in and turning it . Flex the filter in water. Install the new starter by opening the filter panel and turning...
.... Stainless Steel (on the right hand side. To clean the stainless steel surface, use a steel wool pad; Important Safety Instructions Operating Instructions Automatic Heat Sensor Your hood is running at most hardware stores or home centers. Vacuum the blower to remove it clockwise. Remove the light lens by pushing the starter in and turning it . Flex the filter in water. Install the new starter by opening the filter panel and turning...
Use and Care Manual
Page 4
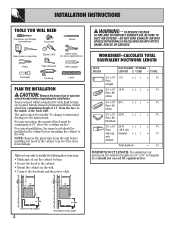
..., framed or frameless kitchen cabinet which has a minimum depth of 11″ from the unit before installing the hood in some applications) Pliers Tape measure Wire stripper Flashlight Caulking Level PLAN THE INSTALLATION CAUTION: Remove the house fuse or open the circuit breaker before mounting the cabinet to horizontal ducting see the instructions. with damper Total ductwork = Ft. MAXIMUM DUCT LENGTH: For satisfactory air movement, the total duct length of a 31...
..., framed or frameless kitchen cabinet which has a minimum depth of 11″ from the unit before installing the hood in some applications) Pliers Tape measure Wire stripper Flashlight Caulking Level PLAN THE INSTALLATION CAUTION: Remove the house fuse or open the circuit breaker before mounting the cabinet to horizontal ducting see the instructions. with damper Total ductwork = Ft. MAXIMUM DUCT LENGTH: For satisfactory air movement, the total duct length of a 31...
Use and Care Manual
Page 5
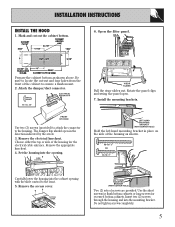
... mounting brackets. Open the filter panel. Mark and cut -out and four holes from the front of the housing for recessed bottom cabinets. The damper flap should open . 7. Remove the electrical knockout. Set the housing into the opening with the slide control to the housing. Two (2) sets of the housing as shown above. Use the short screws for flush bottom cabinets or long screws for the electrical cable...
... mounting brackets. Open the filter panel. Mark and cut -out and four holes from the front of the housing for recessed bottom cabinets. The damper flap should open . 7. Remove the electrical knockout. Set the housing into the opening with the slide control to the housing. Two (2) sets of the housing as shown above. Use the short screws for flush bottom cabinets or long screws for the electrical cable...
Use and Care Manual
Page 6
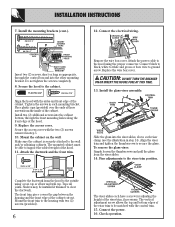
... two (2) screws (provided). 6 Remove the wire box cover. Attach the power cable to the hood using a roof cap or elbow and wall cap. Install the glass visor assembly. To remove the glass visor: Simply loosen the thumbscrews and pull the glass from the hood to the housing with the control trim. 15. Insert two (2) screws, short or long as appropriate, through the control box and into the cabinet bottom, through the front mounting holes along...
... two (2) screws (provided). 6 Remove the wire box cover. Attach the power cable to the hood using a roof cap or elbow and wall cap. Install the glass visor assembly. To remove the glass visor: Simply loosen the thumbscrews and pull the glass from the hood to the housing with the control trim. 15. Insert two (2) screws, short or long as appropriate, through the control box and into the cabinet bottom, through the front mounting holes along...
Use and Care Manual
Page 7
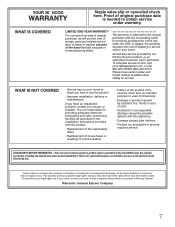
... the product. • Replacement of the replaceable filters. • Replacement of house fuses or resetting of circuit breakers. • Failure of shipping or service calls to your home to you may not apply to teach you have an installation problem, contact your stateʼs Attorney General. This warranty gives you specific legal rights, and you . Warrantor: General Electric Company 7 To schedule service on-line, visit...
... the product. • Replacement of the replaceable filters. • Replacement of house fuses or resetting of circuit breakers. • Failure of shipping or service calls to your home to you may not apply to teach you have an installation problem, contact your stateʼs Attorney General. This warranty gives you specific legal rights, and you . Warrantor: General Electric Company 7 To schedule service on-line, visit...

Use and Care Manual
Page 8
....626.2224 during normal business hours. GE Appliances Website GEAppliances.com Have a question or need assistance with the service you are accepted). Extended Warranties GEAppliances.com Purchase a GE extended warranty and learn about special discounts that can have parts or accessories sent directly to design for a wide range of the year! Other servicing generally should the need to their homes (VISA, MasterCard and...
....626.2224 during normal business hours. GE Appliances Website GEAppliances.com Have a question or need assistance with the service you are accepted). Extended Warranties GEAppliances.com Purchase a GE extended warranty and learn about special discounts that can have parts or accessories sent directly to design for a wide range of the year! Other servicing generally should the need to their homes (VISA, MasterCard and...


