
Quick Specs
Page 1
...from unit before installing hood in inches) 9-1/4 3-1/4 10 24-1/8 6 7-5/8-36" 36 10-1/2 4-1/4 1 12-1/8 Specification Revised 2/06 220952 11" MIN. (inside) 24" MIN. 11" MIN. (inside) This unit is ducted vertically. GE Profile™ 36" Slide-Out Vent Hood Installation Information and Dimensions... (in cabinet to your Monogram,® GE Profile™ or Listed by GE® appliance questions, visit our website at Underwriters GEAppliances.com...
...from unit before installing hood in inches) 9-1/4 3-1/4 10 24-1/8 6 7-5/8-36" 36 10-1/2 4-1/4 1 12-1/8 Specification Revised 2/06 220952 11" MIN. (inside) 24" MIN. 11" MIN. (inside) This unit is ducted vertically. GE Profile™ 36" Slide-Out Vent Hood Installation Information and Dimensions... (in cabinet to your Monogram,® GE Profile™ or Listed by GE® appliance questions, visit our website at Underwriters GEAppliances.com...
Quick Specs
Page 2
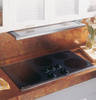
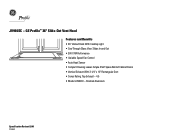
Brushed Aluminum Specification Revised 2/06 220952 TM JV960SC - GE Profile™ 36" Slide-Out Vent Hood Features and Benefits • 36" Vented Hood With Cooktop Light • See-Through Glass Visor Slides In and Out • 300 CFM Performance • Variable Speed Fan Control • Auto Heat Sensor • Compact Housing Leaves Ample Shelf Space Behind Cabinet Doors • Vertical Exhaust With 3-1/4" x 10" Rectangular Duct • Sones Rating: Top Exhaust - 4.5 • Model JV960SC -
Brushed Aluminum Specification Revised 2/06 220952 TM JV960SC - GE Profile™ 36" Slide-Out Vent Hood Features and Benefits • 36" Vented Hood With Cooktop Light • See-Through Glass Visor Slides In and Out • 300 CFM Performance • Variable Speed Fan Control • Auto Heat Sensor • Compact Housing Leaves Ample Shelf Space Behind Cabinet Doors • Vertical Exhaust With 3-1/4" x 10" Rectangular Duct • Sones Rating: Top Exhaust - 4.5 • Model JV960SC -
Use and Care Manual
Page 1
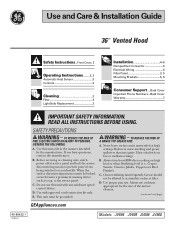
... from being switched on low or medium settings. Grease should not be allowed to the service panel. Use and Care & Installation Guide 36 ″ Vented Hood Safety Instructions...Front Cover, 2 Operating Instructions.........2, 3 Automatic Heat Sensor 3 Controls 2 Cleaning 3 Filter 3 Light Bulb Replacement 3 Installation 4-6 Damper/Duct ...80422-1 09-09 JR Models: JV694 JV695 JV696 JV960 Use with any solid-state speed control device. E. B. Always turn hood ON when cooking on fan or filter. Always use this unit only in the manner intended by the manufacturer. Use this ...
... from being switched on low or medium settings. Grease should not be allowed to the service panel. Use and Care & Installation Guide 36 ″ Vented Hood Safety Instructions...Front Cover, 2 Operating Instructions.........2, 3 Automatic Heat Sensor 3 Controls 2 Cleaning 3 Filter 3 Light Bulb Replacement 3 Installation 4-6 Damper/Duct ...80422-1 09-09 JR Models: JV694 JV695 JV696 JV960 Use with any solid-state speed control device. E. B. Always turn hood ON when cooking on fan or filter. Always use this unit only in the manner intended by the manufacturer. Use this ...
Use and Care Manual
Page 2
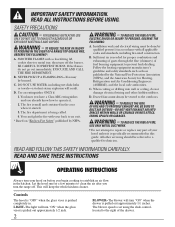
If the flames do not damage electrical wiring and other servicing should be vented to clean the air after you turn your hood on "Kitchen Fire Safety" published by NFPA. DO NOT USE WATER, including wet dishcloths or towels-a violent steam explosion will keep the whole kitchen cleaner. ... technician. B. C. Ducted fans must be burned. TO REDUCE THE RISK OF FIRE AND TO PROPERLY EXHAUST AIR, BE SURE TO DUCT AIR OUTSIDE-DO NOT VENT EXHAUST AIR INTO SPACES WITHIN WALLS OR CEILINGS OR INTO ATTICS, CRAWL SPACES OR GARAGES. LIGHT-The light will turn "ON" when the glass visor...
If the flames do not damage electrical wiring and other servicing should be vented to clean the air after you turn your hood on "Kitchen Fire Safety" published by NFPA. DO NOT USE WATER, including wet dishcloths or towels-a violent steam explosion will keep the whole kitchen cleaner. ... technician. B. C. Ducted fans must be burned. TO REDUCE THE RISK OF FIRE AND TO PROPERLY EXHAUST AIR, BE SURE TO DUCT AIR OUTSIDE-DO NOT VENT EXHAUST AIR INTO SPACES WITHIN WALLS OR CEILINGS OR INTO ATTICS, CRAWL SPACES OR GARAGES. LIGHT-The light will turn "ON" when the glass visor...
Use and Care Manual
Page 4
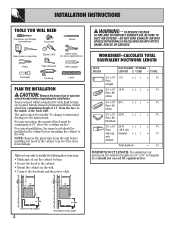
TO REDUCE THE RISK OF FIRE AND TO PROPERLY EXHAUST AIR, BE SURE TO DUCT AIR OUTSIDE-DO NOT VENT EXHAUST AIR INTO SPACES WITHIN WALLS OR CEILINGS OR INTO ATTICS, CRAWL SPACES OR GARAGES. Rect. 90° elbow 31⁄4″ x 10″ 8... applications) Pliers Tape measure Wire stripper Flashlight Caulking Level PLAN THE INSTALLATION CAUTION: Remove the house fuse or open the circuit breaker before installing the hood in the cabinet before mounting the cabinet to protect the visor from damage. x( ) = Ft. x( ) = Ft. with damper Total ductwork = Ft. Rect. (18 ft. w/o...
TO REDUCE THE RISK OF FIRE AND TO PROPERLY EXHAUST AIR, BE SURE TO DUCT AIR OUTSIDE-DO NOT VENT EXHAUST AIR INTO SPACES WITHIN WALLS OR CEILINGS OR INTO ATTICS, CRAWL SPACES OR GARAGES. Rect. 90° elbow 31⁄4″ x 10″ 8... applications) Pliers Tape measure Wire stripper Flashlight Caulking Level PLAN THE INSTALLATION CAUTION: Remove the house fuse or open the circuit breaker before installing the hood in the cabinet before mounting the cabinet to protect the visor from damage. x( ) = Ft. x( ) = Ft. with damper Total ductwork = Ft. Rect. (18 ft. w/o...


