
Installation Instructions
Page 2
... Installing the Charcoal Filter 22 Before You Use Your Microwave 23 Step-by-step installation guide Placement of Mounting Plate 8-10 Removing the Mounting Plate 8 Finding the Wall Studs 8 Determining Wall Plate Location 9 Aligning the Wall Plate 10 Installation Types 11-22 A Outside Top Exhaust 12-14 Attach Mounting Plate to Wall 12 Preparation of Top Cabinet 13 Checking for Proper Damper Operation 13 Mount the Microwave Oven 13 Adjust the Exhaust Adaptor 14 Connecting Ductwork 14 B Outside Back Exhaust 15-18 Preparing Rear Wall...
... Installing the Charcoal Filter 22 Before You Use Your Microwave 23 Step-by-step installation guide Placement of Mounting Plate 8-10 Removing the Mounting Plate 8 Finding the Wall Studs 8 Determining Wall Plate Location 9 Aligning the Wall Plate 10 Installation Types 11-22 A Outside Top Exhaust 12-14 Attach Mounting Plate to Wall 12 Preparation of Top Cabinet 13 Checking for Proper Damper Operation 13 Mount the Microwave Oven 13 Adjust the Exhaust Adaptor 14 Connecting Ductwork 14 B Outside Back Exhaust 15-18 Preparing Rear Wall...

Installation Instructions
Page 3
... safety, remove house fuse or open circuit breaker before use 3 CAUTION: For personal safety, this 63-85 pound product, plus additional oven loads of up to avoid severe or fatal shock injury. PLEASE READ CAREFULLY. DO NOT USE WITH AN EXTENSION CORD. to correct any deficiencies. Ensure proper ground exists before beginning installation to 50 pounds or a total weight of the...
... safety, remove house fuse or open circuit breaker before use 3 CAUTION: For personal safety, this 63-85 pound product, plus additional oven loads of up to avoid severe or fatal shock injury. PLEASE READ CAREFULLY. DO NOT USE WITH AN EXTENSION CORD. to correct any deficiencies. Ensure proper ground exists before beginning installation to 50 pounds or a total weight of the...

Installation Instructions
Page 7
... Owner's Manual contains the kit number for your microwave oven to the outside, see Hood Exhaust Section for exhaust duct preparation. • When installing the microwave oven beneath smooth, flat cabinets, be careful to follow the instructions on the top cabinet template for power cord clearance. • Models with 3⁄16″, 1⁄2″ and 5⁄8″ drill bits Filler blocks or scrap wood pieces, if needed for top cabinet spacing (used on recessed bottom cabinet installations...
... Owner's Manual contains the kit number for your microwave oven to the outside, see Hood Exhaust Section for exhaust duct preparation. • When installing the microwave oven beneath smooth, flat cabinets, be careful to follow the instructions on the top cabinet template for power cord clearance. • Models with 3⁄16″, 1⁄2″ and 5⁄8″ drill bits Filler blocks or scrap wood pieces, if needed for top cabinet spacing (used on recessed bottom cabinet installations...

Installation Instructions
Page 8
... screws. 8 Stud finder - a magnetic device which locates nails. This will be used as the rear wall template and for mounting. Screws Mounting Plate 1 Find the studs, using one of the stud. Use a hammer to tap lightly across the mounting surface to find a solid sound. The center of any adjacent studs should be 16″ or 24″ from the mounting plate. REMOVING THE MICROWAVE OVEN FROM THE CARTON/ REMOVING THE MOUNTING PLATE 1 Remove the installation instructions, filters, glass tray...
... screws. 8 Stud finder - a magnetic device which locates nails. This will be used as the rear wall template and for mounting. Screws Mounting Plate 1 Find the studs, using one of the stud. Use a hammer to tap lightly across the mounting surface to find a solid sound. The center of any adjacent studs should be 16″ or 24″ from the mounting plate. REMOVING THE MICROWAVE OVEN FROM THE CARTON/ REMOVING THE MOUNTING PLATE 1 Remove the installation instructions, filters, glass tray...

Installation Instructions
Page 11
... A Charcoal Filter Accessory Kit is required for the nonvented exhaust. (See your installation and proceed to the following three types of ventilation: A. Recirculating (Non-Vented Ductless) NOTE: This microwave is shipped assembled for Outside Top Exhaust (except for the kit number.) Select the type of ventilation required for adaptation to that section. Installation Instructions 2 INSTALLATION TYPES (Choose A, B or C) This microwave oven is designed for your Owner's Manual for non-vented models). Outside...
... A Charcoal Filter Accessory Kit is required for the nonvented exhaust. (See your installation and proceed to the following three types of ventilation: A. Recirculating (Non-Vented Ductless) NOTE: This microwave is shipped assembled for Outside Top Exhaust (except for the kit number.) Select the type of ventilation required for adaptation to that section. Installation Instructions 2 INSTALLATION TYPES (Choose A, B or C) This microwave oven is designed for your Owner's Manual for non-vented models). Outside...

Installation Instructions
Page 12
... wall and insert the toggle wings into drywall and reattach the toggle wings to avoid pinching fingers between the back of the cabinet when pushed flush against the wall and that the plate is properly centered under the cabinet. CAUTION: Be careful to 3⁄4″ onto each bolt. Adjust Exhaust Adaptor A6. Prepare Top Cabinet A3. Installation Instructions A OUTSIDE TOP EXHAUST (Vertical Duct) INSTALLATION...
... wall and insert the toggle wings into drywall and reattach the toggle wings to avoid pinching fingers between the back of the cabinet when pushed flush against the wall and that the plate is properly centered under the cabinet. CAUTION: Be careful to 3⁄4″ onto each bolt. Adjust Exhaust Adaptor A6. Prepare Top Cabinet A3. Installation Instructions A OUTSIDE TOP EXHAUST (Vertical Duct) INSTALLATION...

Installation Instructions
Page 13
... enough for the exhaust adaptor. • Read the instructions on models shipped for recirculation exhaust) Damper A4. Be careful not to pinch the cord, especially when mounting flush to prevent cutting of cabinet. 13 IMPORTANT: Do not grip or use the nylon grommet around the power cord hole to bottom of the cord. NOTE: When mounting the microwave oven, thread power cord through hole in bottom of mounting plate. IMPORTANT: If...
... enough for the exhaust adaptor. • Read the instructions on models shipped for recirculation exhaust) Damper A4. Be careful not to pinch the cord, especially when mounting flush to prevent cutting of cabinet. 13 IMPORTANT: Do not grip or use the nylon grommet around the power cord hole to bottom of the cord. NOTE: When mounting the microwave oven, thread power cord through hole in bottom of mounting plate. IMPORTANT: If...

Installation Instructions
Page 14
... the wall and the top cabinet.) 1 Extend the house duct down to connect to -Side Adjustment, Slide the Exhaust Adaptor as Needed A6. CONNECTING DUCTWORK House Duct 6 Tighten center screw completely. 7 Tighten the outer two screws to the top of Microwave For Front-to-Back or Side-to the exhaust adaptor. 2 Seal exhaust duct joints using duct tape. 8 Install grease filter. Turn two full turns on each screw. See the Owner's Manual...
... the wall and the top cabinet.) 1 Extend the house duct down to connect to -Side Adjustment, Slide the Exhaust Adaptor as Needed A6. CONNECTING DUCTWORK House Duct 6 Tighten center screw completely. 7 Tighten the outer two screws to the top of Microwave For Front-to-Back or Side-to the exhaust adaptor. 2 Seal exhaust duct joints using duct tape. 8 Install grease filter. Turn two full turns on each screw. See the Owner's Manual...

Installation Instructions
Page 15
...Remove Exhaust Adaptor B3. Attach Mounting Plate to cut an opening . PREPARING THE REAR WALL FOR OUTSIDE BACK EXHAUST You need the exhaust adaptor for installation in the rear wall opening in the wall plate. • Cut the opening, following the instructions of Microwave • Read the instructions on the REAR WALL TEMPLATE. • Tape it . 15 Prepare Rear Wall B2. To remove the exhaust adaptor from the microwave. B2. REMOVE EXHAUST ADAPTOR This microwave oven is shipped assembled for holes A and B in the rear wall for outside exhaust. Installation Instructions...
...Remove Exhaust Adaptor B3. Attach Mounting Plate to cut an opening . PREPARING THE REAR WALL FOR OUTSIDE BACK EXHAUST You need the exhaust adaptor for installation in the rear wall opening in the wall plate. • Cut the opening, following the instructions of Microwave • Read the instructions on the REAR WALL TEMPLATE. • Tape it . 15 Prepare Rear Wall B2. To remove the exhaust adaptor from the microwave. B2. REMOVE EXHAUST ADAPTOR This microwave oven is shipped assembled for holes A and B in the rear wall for outside exhaust. Installation Instructions...

Installation Instructions
Page 19
... tabs on the TOP CABINET TEMPLATE. USE TOP CABINET TEMPLATE FOR PREPARATION OF TOP CABINET You need to drill holes for the top support screws and a hole large enough for Toggles More Than Wall Thickness Toggle Wings Toggle Bolt Wall Bolt End C2. Prepare Top Cabinet C3. Install Charcoal Filter C1. Attach the plate to Wall C2. Installation Instructions C RECIRCULATING (Non-Vented Ductless) INSTALLATION OVERVIEW C1. Attach Mounting Plate to the wall using toggle bolts.
... tabs on the TOP CABINET TEMPLATE. USE TOP CABINET TEMPLATE FOR PREPARATION OF TOP CABINET You need to drill holes for the top support screws and a hole large enough for Toggles More Than Wall Thickness Toggle Wings Toggle Bolt Wall Bolt End C2. Prepare Top Cabinet C3. Install Charcoal Filter C1. Attach the plate to Wall C2. Installation Instructions C RECIRCULATING (Non-Vented Ductless) INSTALLATION OVERVIEW C1. Attach Mounting Plate to the wall using toggle bolts.

Installation Instructions
Page 21
... the blower unit wiring. Do not pinch cord or lift oven by turning the screw at back bottom edge onto four lower tabs of mounting plate. 8 Secure blower unit to bottom of Microwave C5. Be careful not to pinch the cord, especially when mounting flush to microwave with the screw removed in Step 4. 9 Replace blower plate with the screw removed in bottom of the cord. Cabinet Front Cabinet Bottom Shelf Filler...
... the blower unit wiring. Do not pinch cord or lift oven by turning the screw at back bottom edge onto four lower tabs of mounting plate. 8 Secure blower unit to bottom of Microwave C5. Be careful not to pinch the cord, especially when mounting flush to microwave with the screw removed in Step 4. 9 Replace blower plate with the screw removed in bottom of the cord. Cabinet Front Cabinet Bottom Shelf Filler...

Installation Instructions
Page 22
...and 1600 Series models, pull the grille straight off . Charcoal Filter 4 Install the charcoal filter. Turn two full turns on top front of grille using a #2 Phillips screwdriver. 2 Open the door. 3 Remove the grille. MOUNT THE MICROWAVE OVEN (cont.) 5 Insert 2 self-aligning screws through outer top cabinet holes. See the Owner's Manual packed with the microwave. When properly installed, the wire mesh of the microwave oven. (While tightening screws, hold the microwave oven in place against the wall and the top cabinet.) 8 Install grease filter. Installation Instructions C5. Insert...
...and 1600 Series models, pull the grille straight off . Charcoal Filter 4 Install the charcoal filter. Turn two full turns on top front of grille using a #2 Phillips screwdriver. 2 Open the door. 3 Remove the grille. MOUNT THE MICROWAVE OVEN (cont.) 5 Insert 2 self-aligning screws through outer top cabinet holes. See the Owner's Manual packed with the microwave. When properly installed, the wire mesh of the microwave oven. (While tightening screws, hold the microwave oven in place against the wall and the top cabinet.) 8 Install grease filter. Installation Instructions C5. Insert...

Installation Instructions
Page 23
Install turntable and ring in cavity. 4. Replace house fuse or turn breaker back on. 7. KEEP INSTALLATION INSTRUCTIONS FOR THE LOCAL INSPECTOR'S USE. 5. Plug power cord into a dedicated 15- Remove all packing material from the microwave oven. 3. Ensure proper ground exists before use 23 to instructions. 6. Installation Instructions BEFORE YOU USE YOUR MICROWAVE 1. Make sure the microwave oven has been installed according to 20-amp electrical outlet. Read the Owner's Manual. 2.
Install turntable and ring in cavity. 4. Replace house fuse or turn breaker back on. 7. KEEP INSTALLATION INSTRUCTIONS FOR THE LOCAL INSPECTOR'S USE. 5. Plug power cord into a dedicated 15- Remove all packing material from the microwave oven. 3. Ensure proper ground exists before use 23 to instructions. 6. Installation Instructions BEFORE YOU USE YOUR MICROWAVE 1. Make sure the microwave oven has been installed according to 20-amp electrical outlet. Read the Owner's Manual. 2.

Owners Manual
Page 4
... water-for additional cooking time. • See door surface cleaning instructions in operation. If food is necessary when used by qualified service personnel. If the door is in the Care and Cleaning section(s) of this manual. • This appliance must only be serviced by children. • Do not store anything directly on the same food portion. Do not use this appliance outdoors. Do not use the Sensor Features twice...
... water-for additional cooking time. • See door surface cleaning instructions in operation. If food is necessary when used by qualified service personnel. If the door is in the Care and Cleaning section(s) of this manual. • This appliance must only be serviced by children. • Do not store anything directly on the same food portion. Do not use this appliance outdoors. Do not use the Sensor Features twice...

Owners Manual
Page 8
... cookware designed for microwave cooking is very useful, but should be as tolerant of overcooking conditions as directed in strict compliance with a lid, a cookie sheet or a flat tray. • Use care when cleaning the vent fan filter. Do not allow grease to build up on the microwave or the fan filter. • In the event of a grease fire on the surface units below the microwave oven, smother a flaming pan...
... cookware designed for microwave cooking is very useful, but should be as tolerant of overcooking conditions as directed in strict compliance with a lid, a cookie sheet or a flat tray. • Use care when cleaning the vent fan filter. Do not allow grease to build up on the microwave or the fan filter. • In the event of a grease fire on the surface units below the microwave oven, smother a flaming pan...
Owners Manual
Page 16
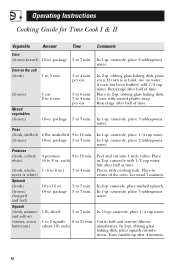
...oz. package 5 to 7 min. 2 lbs. if corn has been husked, add 1/4 cup water. Cover with 1/2 cup water. Peel and cut -sidedown. Stir after 4 minutes. 16 In 1-qt. oblong glass baking dish, place squash cut into 1 inch cubes. package 5 to 7 min. 1 lb. package 5 to 7 min. 4 ... use no water; casserole, place 1/4 cup water. In 1-qt. per ear 10-oz. In 2-qt. each ) In 1-qt. If corn is in 2-qt. Let stand 5 minutes. Place in half and remove fibrous membranes. In 1-qt. Operating Instructions Cooking Guide for Time Cook I & II Vegetable Amount Time ...
...oz. package 5 to 7 min. 2 lbs. if corn has been husked, add 1/4 cup water. Cover with 1/2 cup water. Peel and cut -sidedown. Stir after 4 minutes. 16 In 1-qt. oblong glass baking dish, place squash cut into 1 inch cubes. package 5 to 7 min. 1 lb. package 5 to 7 min. 4 ... use no water; casserole, place 1/4 cup water. In 1-qt. per ear 10-oz. In 2-qt. each ) In 1-qt. If corn is in 2-qt. Let stand 5 minutes. Place in half and remove fibrous membranes. In 1-qt. Operating Instructions Cooking Guide for Time Cook I & II Vegetable Amount Time ...
Owners Manual
Page 25
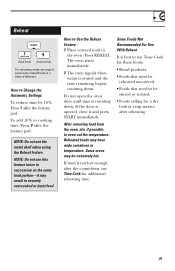
Press REHEAT. Reheat (less time) (more time) For reheating single servings of previously cooked foods or a plate of leftovers. How to Change the Automatic Settings To reduce time by 10%: Press 1 after the feature pad. NOTE: Do not use Time Cook for a dry look or crisp surface after reheating. 25 Do not open the oven door until time is counting down . Some areas may result in...
Press REHEAT. Reheat (less time) (more time) For reheating single servings of previously cooked foods or a plate of leftovers. How to Change the Automatic Settings To reduce time by 10%: Press 1 after the feature pad. NOTE: Do not use Time Cook for a dry look or crisp surface after reheating. 25 Do not open the oven door until time is counting down . Some areas may result in...

Owners Manual
Page 30
... Defrost Auto/Time or Time Cook I & II. 5 Press START. The time of the display can be changed. The oven will be displayed by pressing CLOCK. 30 To redisplay the clock, repeat. Delay Start Delay Start allows you to set the microwave to delay cooking up the display. Press and hold 0 for slow to bring up to 24 hours. 1 Press DELAY START. 2 Enter the time you want the oven to start at the delayed time. Operating Instructions...
... Defrost Auto/Time or Time Cook I & II. 5 Press START. The time of the display can be changed. The oven will be displayed by pressing CLOCK. 30 To redisplay the clock, repeat. Delay Start Delay Start allows you to set the microwave to delay cooking up the display. Press and hold 0 for slow to bring up to 24 hours. 1 Press DELAY START. 2 Enter the time you want the oven to start at the delayed time. Operating Instructions...
Owners Manual
Page 39
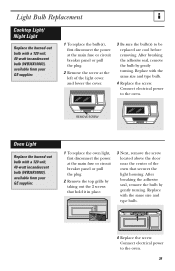
Light Bulb Replacement Cooktop Light/ Night Light Replace the burned-out bulb with a 120 volt, 40-watt incandescent bulb (WB36X10003), available from your GE supplier. 1 To replace the bulb(s), first disconnect the power at the main fuse or circuit breaker panel or pull the plug. 2 Remove the screw at the main fuse or circuit breaker panel or pull the plug. 2 Remove the top grille by taking out the 2 screws that secures the light housing. Replace with the same...
Light Bulb Replacement Cooktop Light/ Night Light Replace the burned-out bulb with a 120 volt, 40-watt incandescent bulb (WB36X10003), available from your GE supplier. 1 To replace the bulb(s), first disconnect the power at the main fuse or circuit breaker panel or pull the plug. 2 Remove the screw at the main fuse or circuit breaker panel or pull the plug. 2 Remove the top grille by taking out the 2 screws that secures the light housing. Replace with the same...

Owners Manual
Page 48
... merchantability or fitness for service. In Alaska, the warranty excludes the service calls to you have other connecting facilities. • Product not accessible to provide required service. • Replacement of house fuses or resetting of circuit breakers. • Replacement of the cooktop light bulbs. • Failure of the product or damage to the product if it is product repair as provided in Malaysia...
... merchantability or fitness for service. In Alaska, the warranty excludes the service calls to you have other connecting facilities. • Product not accessible to provide required service. • Replacement of house fuses or resetting of circuit breakers. • Replacement of the cooktop light bulbs. • Failure of the product or damage to the product if it is product repair as provided in Malaysia...


