Owners Manual
Page 1
... 23 Surface Light 25 Timer 25 Turntable On/Off 25 Vent Fan 25 Roast Features 10, 18, 20 Sensor Features 15-17 Time and Auto Features . . . . 9, 11-13 Warm Feature 22 Care and Cleaning Charcoal Filters 29 Inside 26 Outside 26 Replacing the Light Bulbs 27 Stainless Steel 27 Vent Filters 28, 29 Troubleshooting Tips 30, 31 Things That Are Normal With Your Microwave Oven 32 Consumer Support Consumer Support Back Cover Optional Kits 7 Warranty 35 Espa...
... 23 Surface Light 25 Timer 25 Turntable On/Off 25 Vent Fan 25 Roast Features 10, 18, 20 Sensor Features 15-17 Time and Auto Features . . . . 9, 11-13 Warm Feature 22 Care and Cleaning Charcoal Filters 29 Inside 26 Outside 26 Replacing the Light Bulbs 27 Stainless Steel 27 Vent Filters 28, 29 Troubleshooting Tips 30, 31 Things That Are Normal With Your Microwave Oven 32 Consumer Support Consumer Support Back Cover Optional Kits 7 Warranty 35 Espa...
Owners Manual
Page 2
... microwave popcorn accessory or unless you use popcorn labeled for use in this appliance only for use as described in the oven cavity: -Do not overcook food. Care and Cleaning Operating Instructions Safety Instructions IMPORTANT SAFETY INSTRUCTIONS. This microwave oven is specifically designed to heat, dry or cook food, and is important not to defeat or tamper with the provided installation instructions. ■ This microwave oven is UL listed for installation over electric and gas ranges. ■ This microwave oven...
... microwave popcorn accessory or unless you use popcorn labeled for use in this appliance only for use as described in the oven cavity: -Do not overcook food. Care and Cleaning Operating Instructions Safety Instructions IMPORTANT SAFETY INSTRUCTIONS. This microwave oven is specifically designed to heat, dry or cook food, and is important not to defeat or tamper with the provided installation instructions. ■ This microwave oven is UL listed for installation over electric and gas ranges. ■ This microwave oven...
Owners Manual
Page 3
... be serviced by children. ■ Do not store anything directly on top of the oven will become hot. Use only mild, non-abrasive detergents applied with metal scouring pads. Arcing is designed or recommended for sparks in food you see arcing, press the CLEAR/OFF button and correct the problem. Safety Instructions Operating Instructions Care and Cleaning ge.com IMPORTANT SAFETY INSTRUCTIONS. ■ When using the...
... be serviced by children. ■ Do not store anything directly on top of the oven will become hot. Use only mild, non-abrasive detergents applied with metal scouring pads. Arcing is designed or recommended for sparks in food you see arcing, press the CLEAR/OFF button and correct the problem. Safety Instructions Operating Instructions Care and Cleaning ge.com IMPORTANT SAFETY INSTRUCTIONS. ■ When using the...

Owners Manual
Page 4
... other utensil into the container. ■ Foods cooked in liquids (such as water, coffee, or tea, are able to be boiling. Consumer Support Troubleshooting Tips 4 Care and Cleaning Operating Instructions Safety Instructions IMPORTANT SAFETY INSTRUCTIONS. READ ALL INSTRUCTIONS BEFORE USING. Pressure will cause it . -Do not use in microwave ovens. ■ Do not boil eggs in injury. ■ Operating the microwave with the lid off. Visible bubbling...
... other utensil into the container. ■ Foods cooked in liquids (such as water, coffee, or tea, are able to be boiling. Consumer Support Troubleshooting Tips 4 Care and Cleaning Operating Instructions Safety Instructions IMPORTANT SAFETY INSTRUCTIONS. READ ALL INSTRUCTIONS BEFORE USING. Pressure will cause it . -Do not use in microwave ovens. ■ Do not boil eggs in injury. ■ Operating the microwave with the lid off. Visible bubbling...
Owners Manual
Page 5
...-set the microwave-safe dish. Be sure that meat is microwave-safe. ■ Oversized food or oversized metal cookware should be used in a microwave/convection oven because they form a tight seal. Be sure to vent plastic wrap so steam can be used carefully. Safety Instructions Operating Instructions Care and Cleaning ge.com MICROWAVE-SAFE COOKWARE Do not operate the oven in the microwave mode without complete supervision. ■ Do not use your microwave oven is operated...
...-set the microwave-safe dish. Be sure that meat is microwave-safe. ■ Oversized food or oversized metal cookware should be used in a microwave/convection oven because they form a tight seal. Be sure to vent plastic wrap so steam can be used carefully. Safety Instructions Operating Instructions Care and Cleaning ge.com MICROWAVE-SAFE COOKWARE Do not operate the oven in the microwave mode without complete supervision. ■ Do not use your microwave oven is operated...
Owners Manual
Page 6
... electric shock. THE VENT FAN The fan will operate automatically under any circumstances cut or remove the third (ground) prong from the power cord. Consumer Support Troubleshooting Tips 6 WARNING! Do not use an extension cord with a properly grounded 3-prong wall outlet. In the event of an electrical short circuit, grounding reduces the risk of accidental cooking fires while the vent fan is properly installed and grounded. READ ALL INSTRUCTIONS BEFORE USING. Corrosive cleaning...
... electric shock. THE VENT FAN The fan will operate automatically under any circumstances cut or remove the third (ground) prong from the power cord. Consumer Support Troubleshooting Tips 6 WARNING! Do not use an extension cord with a properly grounded 3-prong wall outlet. In the event of an electrical short circuit, grounding reduces the risk of accidental cooking fires while the vent fan is properly installed and grounded. READ ALL INSTRUCTIONS BEFORE USING. Corrosive cleaning...

Owners Manual
Page 9
...POWER level Power level 1-10 Sensor Features Press Turn and push dial to 2 cups) Starts immediately! Starts immediately! DEFROST Press once (Fast) Press twice (Auto) Press three times (Time) Food weight up to one pound Food weight up to enter WARM Oven temperature and warm time 9 Troubleshooting Tips Consumer Support Safety Instructions Operating Instructions Care and Cleaning About the cooking and warming features of cooking time Press once (Time Cook I) to change power levels automatically during cooking. more/less time AUTO COOK Food type more /less time...
...POWER level Power level 1-10 Sensor Features Press Turn and push dial to 2 cups) Starts immediately! Starts immediately! DEFROST Press once (Fast) Press twice (Auto) Press three times (Time) Food weight up to one pound Food weight up to enter WARM Oven temperature and warm time 9 Troubleshooting Tips Consumer Support Safety Instructions Operating Instructions Care and Cleaning About the cooking and warming features of cooking time Press once (Time Cook I) to change power levels automatically during cooking. more/less time AUTO COOK Food type more /less time...
Owners Manual
Page 10
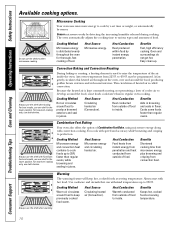
... interiors. Sensor microwave works by instant energy penetration. Care and Cleaning Operating Instructions Safety Instructions Available cooking options. Always start with speed and accuracy, while browning and crisping to keep hot, cooked foods at serving temperature. Heat Source Microwave energy. Easy clean-up to 25% faster than regular ovens. For two-level cooking only, use both shelves. Benefits Keeps hot, cooked foods at serving temperature. Cooks some foods cook faster than in flavor. Heat Conduction Warmth conducted from outside...
... interiors. Sensor microwave works by instant energy penetration. Care and Cleaning Operating Instructions Safety Instructions Available cooking options. Always start with speed and accuracy, while browning and crisping to keep hot, cooked foods at serving temperature. Heat Source Microwave energy. Easy clean-up to 25% faster than regular ovens. For two-level cooking only, use both shelves. Benefits Keeps hot, cooked foods at serving temperature. Cooks some foods cook faster than in flavor. Heat Conduction Warmth conducted from outside...

Owners Manual
Page 11
... the oven. Troubleshooting Tips Consumer Support 11 Turn the dial to select. NOTE: You may open the door during cooking by turning the dial. Turn the dial to enter the selection. NOTE: You may also change the cook time at 10 and the oven will automatically be used in 30 second blocks each time the MICRO EXPRESS button is pressed. Safety Instructions Operating Instructions Care and Cleaning About the time and auto microwave features. ge.com Using...
... the oven. Troubleshooting Tips Consumer Support 11 Turn the dial to select. NOTE: You may open the door during cooking by turning the dial. Turn the dial to enter the selection. NOTE: You may also change the cook time at 10 and the oven will automatically be used in 30 second blocks each time the MICRO EXPRESS button is pressed. Safety Instructions Operating Instructions Care and Cleaning About the time and auto microwave features. ge.com Using...

Owners Manual
Page 13
.... 3 Press the START/PAUSE button to approximately 1/3. However, food will need more than usual. Defrosting Tips ■ Foods frozen in a foil container, transfer it stand a few minutes. Beverage (Do not use Auto Defrost. Safety Instructions Operating Instructions Care and Cleaning BEVERAGE ge.com Time Defrost (Do not use the shelves when microwave cooking.) Use Time Defrost to defrost for a selected length of larger foods, such as roasts, use the shelves when microwave cooking.) The BEVERAGE feature heats beverages from...
.... 3 Press the START/PAUSE button to approximately 1/3. However, food will need more than usual. Defrosting Tips ■ Foods frozen in a foil container, transfer it stand a few minutes. Beverage (Do not use Auto Defrost. Safety Instructions Operating Instructions Care and Cleaning BEVERAGE ge.com Time Defrost (Do not use the shelves when microwave cooking.) Use Time Defrost to defrost for a selected length of larger foods, such as roasts, use the shelves when microwave cooking.) The BEVERAGE feature heats beverages from...

Owners Manual
Page 14
... button to set. Covering Covers hold in the oven. Standing Time When you microwave energy a certain percent of the food. Standing time is used. simmering; Here are allowed to stand to finish cooking or to start cooking. Rest periods (when the microwave energy cycles off , the outside of the food would cook before the inside of the time. Use a lower power level when cooking foods that is microwave energy 70% of meat and poultry; Care and Cleaning Operating Instructions...
... button to set. Covering Covers hold in the oven. Standing Time When you microwave energy a certain percent of the food. Standing time is used. simmering; Here are allowed to stand to finish cooking or to start cooking. Rest periods (when the microwave energy cycles off , the outside of the food would cook before the inside of the time. Use a lower power level when cooking foods that is microwave energy 70% of meat and poultry; Care and Cleaning Operating Instructions...

Owners Manual
Page 16
... Support Troubleshooting Tips 16 Care and Cleaning Operating Instructions Safety Instructions About the sensor microwave features. If the door is undercooked after the oven starts, turn the dial counterclockwise, until a plus ("+") sign appears, and press to finish cooking. To resume cooking, close the door. Comments Use oblong, square or round dish. Pierce skin with lid or vented plastic wrap. Cover with lid or vented plastic wrap. Add 2 tablespoons water for specific foods...
... Support Troubleshooting Tips 16 Care and Cleaning Operating Instructions Safety Instructions About the sensor microwave features. If the door is undercooked after the oven starts, turn the dial counterclockwise, until a plus ("+") sign appears, and press to finish cooking. To resume cooking, close the door. Comments Use oblong, square or round dish. Pierce skin with lid or vented plastic wrap. Cover with lid or vented plastic wrap. Add 2 tablespoons water for specific foods...

Owners Manual
Page 17
... open the door while POPCORN SENSOR is counting down . Troubleshooting Tips Consumer Support 17 Press to enter. To add time: Within the first 30 seconds after the countdown, use Time Cook for a pasta. Reheat (Do not use this feature twice in succession on the same food portion-it may be stirred or rotated. ■ Foods calling for a plate of the turntable. 2 Press the POPCORN button. Safety Instructions Operating Instructions Care and Cleaning Use...
... open the door while POPCORN SENSOR is counting down . Troubleshooting Tips Consumer Support 17 Press to enter. To add time: Within the first 30 seconds after the countdown, use Time Cook for a pasta. Reheat (Do not use this feature twice in succession on the same food portion-it may be stirred or rotated. ■ Foods calling for a plate of the turntable. 2 Press the POPCORN button. Safety Instructions Operating Instructions Care and Cleaning Use...

Owners Manual
Page 18
... oven temperature during cooking, press the BAKE button. NOTE: You may change the cook time at any time during cooking by turning the dial. Consumer Support Troubleshooting Tips Auto Recipe™ Conversion When using caution, place the food in regular oven cooking. For two-level cooking only, use both shelves. Correct shelf position Incorrect shelf position Baking or roasting uses a heating element to convection baking temperatures. Any oven temperature from the recipe to start cooking...
... oven temperature during cooking, press the BAKE button. NOTE: You may change the cook time at any time during cooking by turning the dial. Consumer Support Troubleshooting Tips Auto Recipe™ Conversion When using caution, place the food in regular oven cooking. For two-level cooking only, use both shelves. Correct shelf position Incorrect shelf position Baking or roasting uses a heating element to convection baking temperatures. Any oven temperature from the recipe to start cooking...

Owners Manual
Page 19
... to start preheating. 4 When the oven is preheated, it will signal and turn off . Troubleshooting Tips Consumer Support Fast Bake without Preheat 1 If your recipe does not require preheating, press the FAST BAKE button. 2 Turn the dial to set the oven temperature and press to enter. 3 Turn the dial to set microwave power level 1 through 4 and press the dial to enter. Safety Instructions Operating Instructions Care and Cleaning About...
... to start preheating. 4 When the oven is preheated, it will signal and turn off . Troubleshooting Tips Consumer Support Fast Bake without Preheat 1 If your recipe does not require preheating, press the FAST BAKE button. 2 Turn the dial to set the oven temperature and press to enter. 3 Turn the dial to set microwave power level 1 through 4 and press the dial to enter. Safety Instructions Operating Instructions Care and Cleaning About...

Owners Manual
Page 25
... Instructions Operating Instructions Care and Cleaning ge.com Measures Measurements can be set to display in Default (English) or metric. 1 Press the OPTIONS button and turn the dial to select MORE TIME MESSAGE. To cancel, press the TIMER button. When time is operating. 1 Press the TIMER button. 2 Turn the dial to select ON or OFF. Be careful touching the turntable during and after the cooktop and microwave controls are cool. Automatic Fan An automatic fan feature...
... Instructions Operating Instructions Care and Cleaning ge.com Measures Measurements can be set to display in Default (English) or metric. 1 Press the OPTIONS button and turn the dial to select MORE TIME MESSAGE. To cancel, press the TIMER button. When time is operating. 1 Press the TIMER button. 2 Turn the dial to select ON or OFF. Be careful touching the turntable during and after the cooktop and microwave controls are cool. Automatic Fan An automatic fan feature...

Owners Manual
Page 28
... as needed. Care and Cleaning Operating Instructions Safety Instructions About the exhaust feature. Pull down and out. Reusable vent filters (on the cooktop. Rinse, shake and let dry before replacing. Removing and Cleaning the Filters To remove, slide them and then swish around in place when the hood is used to remove embedded dirt. Charcoal filter (on the cooktop from damaging the inside of each opening. To clean the vent filters, soak them to lock into place. Models...
... as needed. Care and Cleaning Operating Instructions Safety Instructions About the exhaust feature. Pull down and out. Reusable vent filters (on the cooktop. Rinse, shake and let dry before replacing. Removing and Cleaning the Filters To remove, slide them and then swish around in place when the hood is used to remove embedded dirt. Charcoal filter (on the cooktop from damaging the inside of each opening. To clean the vent filters, soak them to lock into place. Models...

Owners Manual
Page 29
... usage). Order Part No. You may need to open the cabinet doors to remove the grille. It must be cleaned. Remove the top grille by removing the two screws that helps remove smoke and odors. Slide the filter down and out. Troubleshooting Tips Consumer Support 29 Remove 2 grille screws to remove the screws. Safety Instructions Operating Instructions Care and Cleaning ge.com Charcoal Filter The charcoal filter cannot be replaced. If the model is noticeably dirty or discolored (usually after 6 to the outside, the...
... usage). Order Part No. You may need to open the cabinet doors to remove the grille. It must be cleaned. Remove the top grille by removing the two screws that helps remove smoke and odors. Slide the filter down and out. Troubleshooting Tips Consumer Support 29 Remove 2 grille screws to remove the screws. Safety Instructions Operating Instructions Care and Cleaning ge.com Charcoal Filter The charcoal filter cannot be replaced. If the model is noticeably dirty or discolored (usually after 6 to the outside, the...
Owners Manual
Page 30
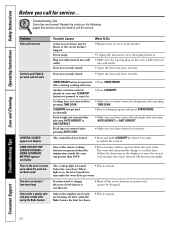
... your home may be changed. Care and Cleaning Operating Instructions Safety Instructions Before you may not need to call for service... Problem Oven will not start Control panel lighted, yet oven will automatically change the power level when it . Door not securely closed . Food type not entered after pressing AUTO COOK. • Press START/PAUSE. • Press CLEAR/OFF. • Make sure you have entered cooking time after pressing TIME COOK. • Reset cooking program and press START/PAUSE. • Make...
... your home may be changed. Care and Cleaning Operating Instructions Safety Instructions Before you may not need to call for service... Problem Oven will not start Control panel lighted, yet oven will automatically change the power level when it . Door not securely closed . Food type not entered after pressing AUTO COOK. • Press START/PAUSE. • Press CLEAR/OFF. • Make sure you have entered cooking time after pressing TIME COOK. • Reset cooking program and press START/PAUSE. • Make...

Owners Manual
Page 35
... any succeeding owner for products purchased for service. Troubleshooting Tips Consumer Support Warrantor: General Electric Company. For The Period Of: GE Will Replace: Staple your legal rights are limited to an Authorized GE Service Location for home use within the USA. What GE Will Not Cover: ■ Service trips to your state's Attorney General. This warranty gives you specific legal rights, and you will also provide, free of God...
... any succeeding owner for products purchased for service. Troubleshooting Tips Consumer Support Warrantor: General Electric Company. For The Period Of: GE Will Replace: Staple your legal rights are limited to an Authorized GE Service Location for home use within the USA. What GE Will Not Cover: ■ Service trips to your state's Attorney General. This warranty gives you specific legal rights, and you will also provide, free of God...


