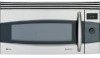

Owners Manual
Page 2
... TO EXCESSIVE MICROWAVE ENERGY section above... described in a special microwave popcorn accessory or unless ... to excessive microwave energy: PRECAUTIONS TO AVOID POSSIBLE EXPOSURE TO EXCESSIVE MICROWAVE ENERGY (a)...Do not pop popcorn in your microwave oven unless in this oven ...microwave oven is UL listed for installation over electric and gas ranges. ■ This microwave...-Do not overcook food. This microwave oven is specifically designed to heat...and follow the specific precautions in microwave ovens. -If materials inside the... or cleaner residue to microwave energy. Carefully attend appliance...
... TO EXCESSIVE MICROWAVE ENERGY section above... described in a special microwave popcorn accessory or unless ... to excessive microwave energy: PRECAUTIONS TO AVOID POSSIBLE EXPOSURE TO EXCESSIVE MICROWAVE ENERGY (a)...Do not pop popcorn in your microwave oven unless in this oven ...microwave oven is UL listed for installation over electric and gas ranges. ■ This microwave...-Do not overcook food. This microwave oven is specifically designed to heat...and follow the specific precautions in microwave ovens. -If materials inside the... or cleaner residue to microwave energy. Carefully attend appliance...

Owners Manual
Page 6
...high heat on . ■ Never leave surface units beneath your personal responsibility and obligation to prevent flickering of lights, blowing of fuse or tripping of electric shock. WARNING! Ensure proper ground exists before use . ■ Clean the underside of electric shock by ...prevent the starting and spreading of accidental cooking fires while the vent fan is properly installed and grounded. This appliance is your microwave oven unattended at high heat settings. READ ALL INSTRUCTIONS BEFORE USING. Boilovers cause smoking and greasy spillovers that is in a ...
...high heat on . ■ Never leave surface units beneath your personal responsibility and obligation to prevent flickering of lights, blowing of fuse or tripping of electric shock. WARNING! Ensure proper ground exists before use . ■ Clean the underside of electric shock by ...prevent the starting and spreading of accidental cooking fires while the vent fan is properly installed and grounded. This appliance is your microwave oven unattended at high heat settings. READ ALL INSTRUCTIONS BEFORE USING. Boilovers cause smoking and greasy spillovers that is in a ...

Owners Manual
Page 27
Order WB08X10051 from your GE supplier. 1 To replace the cooktop light/nite light, first disconnect the power at the main fuse or circuit breaker panel, or pull the plug. 2 Remove the screw from the side of warm water and detergent. Use only mild, non-abrasive ... a 120 volt, 40 watt (max.) halogen bulb. Rinse well. Remove screw. Connect electrical power to keep the area clean where the door seals against the microwave. Plastic Color Panels Use a clean, soft, lightly dampened cloth, then dry thoroughly. Break the adhesive seal by gently unscrewing the bulb. 4 Screw in the...
Order WB08X10051 from your GE supplier. 1 To replace the cooktop light/nite light, first disconnect the power at the main fuse or circuit breaker panel, or pull the plug. 2 Remove the screw from the side of warm water and detergent. Use only mild, non-abrasive ... a 120 volt, 40 watt (max.) halogen bulb. Rinse well. Remove screw. Connect electrical power to keep the area clean where the door seals against the microwave. Plastic Color Panels Use a clean, soft, lightly dampened cloth, then dry thoroughly. Break the adhesive seal by gently unscrewing the bulb. 4 Screw in the...

Owners Manual
Page 29
...Kits," page 7, for more information. Push the bottom of the filter in place behind the tabs. Safety Instructions Operating Instructions Care and Cleaning ge.com Charcoal Filter The charcoal filter cannot be replaced. Order Part No. It must be cleaned. Slide the filter down and out. WB02X10943... from the new filter. Lift the filter at the main fuse or circuit breaker, or pull the plug. To Install the Charcoal Filter To install a new charcoal filter, remove plastic and other outer ...
...Kits," page 7, for more information. Push the bottom of the filter in place behind the tabs. Safety Instructions Operating Instructions Care and Cleaning ge.com Charcoal Filter The charcoal filter cannot be replaced. Order Part No. It must be cleaned. Slide the filter down and out. WB02X10943... from the new filter. Lift the filter at the main fuse or circuit breaker, or pull the plug. To Install the Charcoal Filter To install a new charcoal filter, remove plastic and other outer ...

Owners Manual
Page 30
...follow the directions in oven and CLEAR/OFF button not pressed to unlock the control. What To Do • Replace fuse or reset circuit breaker. • Unplug the microwave oven, then plug it produces may be changed. Food weight not entered after entering cooking selection. Troubleshooting Tips Save time... • Reset cooking program and press START/PAUSE. • Make sure you have entered food weight after using the Bake feature Possible Causes A fuse in . • Make sure the 3-prong plug on , the heat it back in your home may make the oven floor get warm. Door...
...follow the directions in oven and CLEAR/OFF button not pressed to unlock the control. What To Do • Replace fuse or reset circuit breaker. • Unplug the microwave oven, then plug it produces may be changed. Food weight not entered after entering cooking selection. Troubleshooting Tips Save time... • Reset cooking program and press START/PAUSE. • Make sure you have entered food weight after using the Bake feature Possible Causes A fuse in . • Make sure the 3-prong plug on , the heat it back in your home may make the oven floor get warm. Door...
Owners Manual
Page 35
... calls to the original purchaser and any labor or in an area where service by a GE Authorized Servicer is product repair as provided in materials or workmanship. Safety Instructions Operating Instructions Care and Cleaning GE Microwave Oven Warranty. Five Years From the date of charge, all labor and related service to ...date is abused, misused (for other than the intended purpose or used commercially. ■ Replacement of the cooktop light bulbs. ■ Replacement of house fuses or resetting of circuit breakers. ■ Damage to replace the defective part. For The Period Of...
... calls to the original purchaser and any labor or in an area where service by a GE Authorized Servicer is product repair as provided in materials or workmanship. Safety Instructions Operating Instructions Care and Cleaning GE Microwave Oven Warranty. Five Years From the date of charge, all labor and related service to ...date is abused, misused (for other than the intended purpose or used commercially. ■ Replacement of the cooktop light bulbs. ■ Replacement of house fuses or resetting of circuit breakers. ■ Damage to replace the defective part. For The Period Of...

Service Manual
Page 4
...Microwave oven only) 1650W (Convection only) Microwave Output 1000W (IEC60705) Adjustable 100W through 1000W, 10 steps Frequency 2450 MHz ± 50 MHz Power Supply 120 VAC, 60 Hz Rated Current 13.5 Amp. (Microwave...System Safety Devices Magnetron Thermal Fuse: Open at 150°C ± 6°C Oven Cavity Thermostat: Open at 145°C ± 6°C Fuse(20A) Primary Interlock Switch Secondary... 2915/16"(W)x167/16"(H)x153/8"(D) Effective Capacity of Oven Cavity 1.7 Cu.ft. Accessories Owner's Manual & Cooking Guide, Installation Manual, Exhaust Adapter, Exhaust Damper, Mounting Kit and ...
...Microwave oven only) 1650W (Convection only) Microwave Output 1000W (IEC60705) Adjustable 100W through 1000W, 10 steps Frequency 2450 MHz ± 50 MHz Power Supply 120 VAC, 60 Hz Rated Current 13.5 Amp. (Microwave...System Safety Devices Magnetron Thermal Fuse: Open at 150°C ± 6°C Oven Cavity Thermostat: Open at 145°C ± 6°C Fuse(20A) Primary Interlock Switch Secondary... 2915/16"(W)x167/16"(H)x153/8"(D) Effective Capacity of Oven Cavity 1.7 Cu.ft. Accessories Owner's Manual & Cooking Guide, Installation Manual, Exhaust Adapter, Exhaust Damper, Mounting Kit and ...

Service Manual
Page 15
..., CN6, CN8) and wire leads (Relay2, Relay11) from the control bracket carefully. I.E. REMOVING POWER AND CONTROL CIRCUIT BOARD (Figures 1, 2 and 3) (1) Disconnect power at the main fuse or circuit breaken, or pull the plug. Control Bracket Power Transformer (CN3) (CN6) (Relay 11) (Relay 2) (CN8) (CN5) Figure 1 (CN2) (CN1) FPC Connector(S1) Circuit...
..., CN6, CN8) and wire leads (Relay2, Relay11) from the control bracket carefully. I.E. REMOVING POWER AND CONTROL CIRCUIT BOARD (Figures 1, 2 and 3) (1) Disconnect power at the main fuse or circuit breaken, or pull the plug. Control Bracket Power Transformer (CN3) (CN6) (Relay 11) (Relay 2) (CN8) (CN5) Figure 1 (CN2) (CN1) FPC Connector(S1) Circuit...

Service Manual
Page 24
... the latch board until the switches operate in Steps 5 and 6, tighten the latch board screws at that point. TEST THE MICROWAVE ENERGY LEAKAGE Make sure the microwave energy leakage is below the limit of the switches in the following sequence: - Release Rod and Lever on the Primary and ...water load) and 5mW/cm2 (with a 275 ml water load without the cabinet) when measured with the door open, the Monitor Switch will blow the fuse. (7) When you achieve the proper sequence of the switches in the following sequence: - See Steps 3 and 4. (6) Close the oven door slowly and...
... the latch board until the switches operate in Steps 5 and 6, tighten the latch board screws at that point. TEST THE MICROWAVE ENERGY LEAKAGE Make sure the microwave energy leakage is below the limit of the switches in the following sequence: - Release Rod and Lever on the Primary and ...water load) and 5mW/cm2 (with a 275 ml water load without the cabinet) when measured with the door open, the Monitor Switch will blow the fuse. (7) When you achieve the proper sequence of the switches in the following sequence: - See Steps 3 and 4. (6) Close the oven door slowly and...

Service Manual
Page 30
...sec 20 sec 22 sec 18 sec 16 sec 14 sec 12 sec 10 sec 8 sec 6 sec 4 sec 2 sec 0 Convection OFF Cooking Start NOTES: • A MICROWAVE ENERGY TEST MUST ALWAYS BE PERFORMED WHEN THE UNIT IS SERVICED FOR ANY REASON. • MAKE SURE THE WIRE LEADS ARE IN...Ass'y and the fuse at Convection Cooking. Measure continuity. (ohm meter scale: Rx1) 2. Fuse blows immediately after the door is blown by an improper switch operation, replace the all Interlock switches, PCB Ass'y,Fuse with new ones, make sure that they are correctly connected. • Check for microwave energy leakage according ...
...sec 20 sec 22 sec 18 sec 16 sec 14 sec 12 sec 10 sec 8 sec 6 sec 4 sec 2 sec 0 Convection OFF Cooking Start NOTES: • A MICROWAVE ENERGY TEST MUST ALWAYS BE PERFORMED WHEN THE UNIT IS SERVICED FOR ANY REASON. • MAKE SURE THE WIRE LEADS ARE IN...Ass'y and the fuse at Convection Cooking. Measure continuity. (ohm meter scale: Rx1) 2. Fuse blows immediately after the door is blown by an improper switch operation, replace the all Interlock switches, PCB Ass'y,Fuse with new ones, make sure that they are correctly connected. • Check for microwave energy leakage according ...

Service Manual
Page 35
POWER SUPPLY 2. TROUBLE SHOOTING Before following this troubleshooting read TRIAL OPERATION on page 7- 18) 3. FUSE (See CHECKOUT PROCEDURES FOR FUSE BLOWING: on page 6- 1. • DISPLAY Problems, A thru C • HELP UP Problems, D thru E • BUZZER Problems, F PROBLEM - OVEN CAVITY THERMOSTAT BK/BL RD 0 120 120V Replace ...
POWER SUPPLY 2. TROUBLE SHOOTING Before following this troubleshooting read TRIAL OPERATION on page 7- 18) 3. FUSE (See CHECKOUT PROCEDURES FOR FUSE BLOWING: on page 6- 1. • DISPLAY Problems, A thru C • HELP UP Problems, D thru E • BUZZER Problems, F PROBLEM - OVEN CAVITY THERMOSTAT BK/BL RD 0 120 120V Replace ...

Service Manual
Page 39
... oven thermostat Check the contact of magnetron thermal Poor contact Correct seating Normal contact Runs fuse and oven thermostat Contact OK Check contact of connector (see page 7-4) Contact OK Replace Normal Runs circuit board circuit board 7-28 Check the contact of ...
... oven thermostat Check the contact of magnetron thermal Poor contact Correct seating Normal contact Runs fuse and oven thermostat Contact OK Check contact of connector (see page 7-4) Contact OK Replace Normal Runs circuit board circuit board 7-28 Check the contact of ...

Installation Instructions
Page 3
... and frequency. Wire size must be installed by a qualified electrician to a supply circuit of this appliance is properly grounded. CAUTION: For personal safety, remove house fuse or open circuit breaker before beginning installation to have the wall receptacle and circuit checked by a qualified electrician and conform to BOTH a top cabinet AND...
... and frequency. Wire size must be installed by a qualified electrician to a supply circuit of this appliance is properly grounded. CAUTION: For personal safety, remove house fuse or open circuit breaker before beginning installation to have the wall receptacle and circuit checked by a qualified electrician and conform to BOTH a top cabinet AND...

Installation Instructions
Page 23
Install turntable and wheeled ring in cavity. 4. Read the Owner's Manual. 2. Insure proper ground exists before use 23 Replace house fuse or turn breaker back on. 7. Remove all packing material from the oven. 3. KEEP INSTALLATION INSTRUCTIONS FOR THE LOCAL INSPECTOR'S USE. 5. Plug power cord into a dedicated 15 to instructions. 6. Installation Instructions BEFORE YOU USE YOUR OVEN 1. Make sure the oven has been installed according to 20 amp electrical outlet.
Install turntable and wheeled ring in cavity. 4. Read the Owner's Manual. 2. Insure proper ground exists before use 23 Replace house fuse or turn breaker back on. 7. Remove all packing material from the oven. 3. KEEP INSTALLATION INSTRUCTIONS FOR THE LOCAL INSPECTOR'S USE. 5. Plug power cord into a dedicated 15 to instructions. 6. Installation Instructions BEFORE YOU USE YOUR OVEN 1. Make sure the oven has been installed according to 20 amp electrical outlet.


