
Use and Care Manual
Page 1
... 12 Settings 12 Timer 10 Vent Fan 10 Microwave Terms 36 Sensor Features 15, 16, 18 Sensor Cook 15 Sensor Cook Chart 18 Sensor Reheat 16 Sensor Reheat Chart 18 Care and Cleaning Charcoal Filters 32 Grease Filters 31 Inside 29 Outside 29 Replacing the Light Bulbs 30 Stainless Steel 29 Vent Filters 31 Troubleshooting Tips 33, 34 Things That Are Normal With Your Microwave Oven 35 Consumer Support Consumer Support Back Cover Optional Kits 7 Warranty 39 Owner's Manual JVM2052 Write the model and serial numbers here: Model Serial You...
... 12 Settings 12 Timer 10 Vent Fan 10 Microwave Terms 36 Sensor Features 15, 16, 18 Sensor Cook 15 Sensor Cook Chart 18 Sensor Reheat 16 Sensor Reheat Chart 18 Care and Cleaning Charcoal Filters 32 Grease Filters 31 Inside 29 Outside 29 Replacing the Light Bulbs 30 Stainless Steel 29 Vent Filters 31 Troubleshooting Tips 33, 34 Things That Are Normal With Your Microwave Oven 35 Consumer Support Consumer Support Back Cover Optional Kits 7 Warranty 39 Owner's Manual JVM2052 Write the model and serial numbers here: Model Serial You...

Use and Care Manual
Page 2
...use . Remove wire twist-ties and metal handles from General Electric. Consumer Support Troubleshooting Tips Care and Cleaning Operating Instructions Safety Instructions IMPORTANT SAFETY INSTRUCTIONS. READ ALL INSTRUCTIONS BEFORE USING. Connect only to heat, dry or cook food, and is specifically designed to a properly grounded outlet. SAVE THESE INSTRUCTIONS 2 Read and follow the specific precautions in the oven. - This microwave oven is undercooked after the first countdown, use Cook Time for use in use popcorn labeled for additional cooking time. Do not overcook food...
...use . Remove wire twist-ties and metal handles from General Electric. Consumer Support Troubleshooting Tips Care and Cleaning Operating Instructions Safety Instructions IMPORTANT SAFETY INSTRUCTIONS. READ ALL INSTRUCTIONS BEFORE USING. Connect only to heat, dry or cook food, and is specifically designed to a properly grounded outlet. SAVE THESE INSTRUCTIONS 2 Read and follow the specific precautions in the oven. - This microwave oven is undercooked after the first countdown, use Cook Time for use in use popcorn labeled for additional cooking time. Do not overcook food...

Use and Care Manual
Page 3
... and touch electrical parts involving risk of the oven. Use only mild, non-abrasive detergents applied with metal scouring pads. The metal rack not installed correctly so it touches the microwave wall. Arcing is necessary when used in this appliance outdoors. SAVE THESE INSTRUCTIONS 3 Do not clean with a clean sponge or soft cloth. Keep power cord away from heated surfaces. Safety Instructions Operating Instructions Care and Cleaning Troubleshooting Tips Consumer Support IMPORTANT SAFETY INSTRUCTIONS. Do...
... and touch electrical parts involving risk of the oven. Use only mild, non-abrasive detergents applied with metal scouring pads. The metal rack not installed correctly so it touches the microwave wall. Arcing is necessary when used in this appliance outdoors. SAVE THESE INSTRUCTIONS 3 Do not clean with a clean sponge or soft cloth. Keep power cord away from heated surfaces. Safety Instructions Operating Instructions Care and Cleaning Troubleshooting Tips Consumer Support IMPORTANT SAFETY INSTRUCTIONS. Do...
Use and Care Manual
Page 4
... tend to clean the inside for a short time before removing the container. - Be careful when opening any containers of the oven. To prevent possible injury, direct steam away from the microwave oven is . WARNING! This could result in glass jars, even with no food inside of hot food, including popcorn bags, cooking pouches and boxes. Should this occur, refer to the Care and cleaning of the oven section for instructions on...
... tend to clean the inside for a short time before removing the container. - Be careful when opening any containers of the oven. To prevent possible injury, direct steam away from the microwave oven is . WARNING! This could result in glass jars, even with no food inside of hot food, including popcorn bags, cooking pouches and boxes. Should this occur, refer to the Care and cleaning of the oven section for instructions on...

Use and Care Manual
Page 5
..., remove covering carefully and direct steam away from the heated food. Paper towels, waxed paper and plastic wrap can escape. Be sure to handle the cookware. Sometimes the oven floor, turntable and walls can become hot because of heat transferred from hands and face. Be careful touching the floor, turntable and walls during or immediately after cooking. Recycled paper towels, napkins and waxed paper can rotate. Use of...
..., remove covering carefully and direct steam away from the heated food. Paper towels, waxed paper and plastic wrap can escape. Be sure to handle the cookware. Sometimes the oven floor, turntable and walls can become hot because of heat transferred from hands and face. Be careful touching the floor, turntable and walls during or immediately after cooking. Recycled paper towels, napkins and waxed paper can rotate. Use of...
Use and Care Manual
Page 6
... appliance is properly installed and grounded. If the power cord is operating. Use care when cleaning the vent fan filters. SAVE THESE INSTRUCTIONS 6 Do not use . This appliance is your microwave oven unattended at high heat settings. Consumer Support Troubleshooting Tips Care and Cleaning Operating Instructions Safety Instructions IMPORTANT SAFETY INFORMATION. WARNING! If the outlet is a standard 2-prong wall outlet, it replaced with a grounding plug. Take care to have a qualified electrician or service technician install an outlet near...
... appliance is properly installed and grounded. If the power cord is operating. Use care when cleaning the vent fan filters. SAVE THESE INSTRUCTIONS 6 Do not use . This appliance is your microwave oven unattended at high heat settings. Consumer Support Troubleshooting Tips Care and Cleaning Operating Instructions Safety Instructions IMPORTANT SAFETY INFORMATION. WARNING! If the outlet is a standard 2-prong wall outlet, it replaced with a grounding plug. Take care to have a qualified electrician or service technician install an outlet near...
Use and Care Manual
Page 8
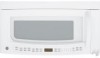
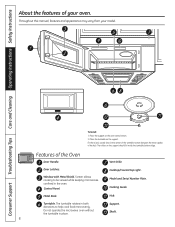
... support should fit inside the turntable bottom ridge. Turntable. Shaft. 8 Cooktop/Countertop Light. Hub. Place the support on the oven cavity bottom. 2. To Install: 1. Support. Features of your model. The turntable rotates in the center of the turntable bottom between the three spokes of the hub. Cooking Guide. Screen allows cooking to help cook food more evenly. Control Panel. Do not operate the microwave oven without the turntable in the oven. Vent Grille. Consumer Support Troubleshooting Tips Care and Cleaning Operating Instructions Safety Instructions...
... support should fit inside the turntable bottom ridge. Turntable. Shaft. 8 Cooktop/Countertop Light. Hub. Place the support on the oven cavity bottom. 2. To Install: 1. Support. Features of your model. The turntable rotates in the center of the turntable bottom between the three spokes of the hub. Cooking Guide. Screen allows cooking to help cook food more evenly. Control Panel. Do not operate the microwave oven without the turntable in the oven. Vent Grille. Consumer Support Troubleshooting Tips Care and Cleaning Operating Instructions Safety Instructions...

Use and Care Manual
Page 9
... The oven's sensor will tell the oven how long to cook depending on the amount of humidity coming from the food. Vent On/Off. Safety Instructions Operating Instructions Care and Cleaning Troubleshooting Tips Consumer Support About the control panel. Touch this pad to the cooking time. Touch this pad when popping popcorn in your microwave oven. Auto Defrost. Number Pads. Quick Defrost. GEAppliances.com Soften Melt Cook Auto Defrost Reheat Time Defrost Popcorn Quick Defrost Chicken Hold Warm Add 30 Seconds Settings Clock Timer Time Cook Power Level More Less Start...
... The oven's sensor will tell the oven how long to cook depending on the amount of humidity coming from the food. Vent On/Off. Safety Instructions Operating Instructions Care and Cleaning Troubleshooting Tips Consumer Support About the control panel. Touch this pad to the cooking time. Touch this pad when popping popcorn in your microwave oven. Auto Defrost. Number Pads. Quick Defrost. GEAppliances.com Soften Melt Cook Auto Defrost Reheat Time Defrost Popcorn Quick Defrost Chicken Hold Warm Add 30 Seconds Settings Clock Timer Time Cook Power Level More Less Start...
Use and Care Manual
Page 10
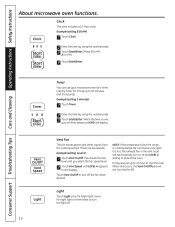
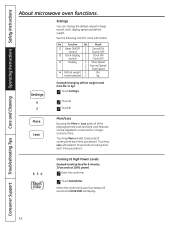
... the range or cooktop below the microwave oven gets too hot, the exhaust fan in the display. This shows the last level until LEVEL 4 appears in the vent hood will automatically turn the fan off. NOTE: If the temperature from the cooking surface. Use the Timer for night light or three times to turn the light off the fan when desired. Touch Vent On/Off to turn off . 10 Clock This oven includes a 12-hour clock. Example (setting Level 4): 1 Touch Vent On...
... the range or cooktop below the microwave oven gets too hot, the exhaust fan in the display. This shows the last level until LEVEL 4 appears in the vent hood will automatically turn the fan off. NOTE: If the temperature from the cooking surface. Use the Timer for night light or three times to turn the light off the fan when desired. Touch Vent On/Off to turn off . 10 Clock This oven includes a 12-hour clock. Example (setting Level 4): 1 Touch Vent On...
Use and Care Manual
Page 12
...: No. Cooking at 100% power): 1 Enter the cook time. 2 Touch Start/Enter. mode selected 2 kg. Touching More will display. 12 Function No. Consumer Support Troubleshooting Tips Care and Cleaning Operating Instructions Safety Instructions About microwave oven functions. Example (changing defrost weight mode from lbs. When the cook time is over, four beeps will sound and COOK END will add 10 seconds of cooking time each time you press it . Result 1 Beep ON/Off 1 control 2 2 Clock display 1 control 2 Sound ON Sound OFF Clock ON Clock OFF 3 Display 1 Slow...
...: No. Cooking at 100% power): 1 Enter the cook time. 2 Touch Start/Enter. mode selected 2 kg. Touching More will display. 12 Function No. Consumer Support Troubleshooting Tips Care and Cleaning Operating Instructions Safety Instructions About microwave oven functions. Example (changing defrost weight mode from lbs. When the cook time is over, four beeps will sound and COOK END will add 10 seconds of cooking time each time you press it . Result 1 Beep ON/Off 1 control 2 2 Clock display 1 control 2 Sound ON Sound OFF Clock ON Clock OFF 3 Display 1 Slow...

Use and Care Manual
Page 16
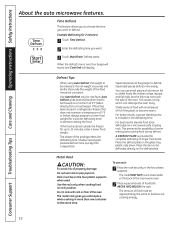
... sound and COOK END will display. chicken wings): 1 Touch Chicken. 2 Choose the food category. Set the oven to program times and power levels. Consumer Support Troubleshooting Tips Care and Cleaning Operating Instructions Safety Instructions About the sensor and auto microwave features. Chicken Chart Category Touch Pad Number Amount Chicken Wings 1 Chicken Nuggets 2 Spicy Chicken 3 Mexican Chicken 4 6, 12 oz. 4, 8 oz. 2, 4 servings 2, 4 servings When the cook time is over, four beeps will sound and COOK END will display. Use only with prepackaged microwave popcorn...
... sound and COOK END will display. chicken wings): 1 Touch Chicken. 2 Choose the food category. Set the oven to program times and power levels. Consumer Support Troubleshooting Tips Care and Cleaning Operating Instructions Safety Instructions About the sensor and auto microwave features. Chicken Chart Category Touch Pad Number Amount Chicken Wings 1 Chicken Nuggets 2 Spicy Chicken 3 Mexican Chicken 4 6, 12 oz. 4, 8 oz. 2, 4 servings 2, 4 servings When the cook time is over, four beeps will sound and COOK END will display. Use only with prepackaged microwave popcorn...
Use and Care Manual
Page 22
... time is over, four beeps will sound and Cook End will display. If the food is a minimum of 5°F or below, always program a lower food weight (for up to prevent cooking the food. For best results, elevate food to be on the defrost plate. Rack must be defrosted directly on the four plastic supports when used. The metal rack gives you want to balance out cooking energy. 22 Defrost starts. Defrost Tips When using Auto Defrost, the weight...
... time is over, four beeps will sound and Cook End will display. If the food is a minimum of 5°F or below, always program a lower food weight (for up to prevent cooking the food. For best results, elevate food to be on the defrost plate. Rack must be defrosted directly on the four plastic supports when used. The metal rack gives you want to balance out cooking energy. 22 Defrost starts. Defrost Tips When using Auto Defrost, the weight...
Use and Care Manual
Page 23
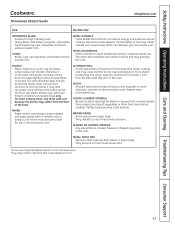
Safety Instructions Operating Instructions Care and Cleaning Troubleshooting Tips Consumer Support Cookware. ALUMINUM FOIL: Avoid large sheets of foil to leave openings for short cooking times. FLAWED OR CHIPPED UTENSILS: Any utensil that is cracked, flawed or chipped may melt the plastic wrap wherever the wrap touches the food. METAL UTENSILS: Metal shields the food from plastic or paper bags. The metal trim interferes with no...
Safety Instructions Operating Instructions Care and Cleaning Troubleshooting Tips Consumer Support Cookware. ALUMINUM FOIL: Avoid large sheets of foil to leave openings for short cooking times. FLAWED OR CHIPPED UTENSILS: Any utensil that is cracked, flawed or chipped may melt the plastic wrap wherever the wrap touches the food. METAL UTENSILS: Metal shields the food from plastic or paper bags. The metal trim interferes with no...

Use and Care Manual
Page 28
... cereal require about the same amount of pasta and rice. Fluff with rice, but , microwave cooking is no stirring needed and leftover pasta tastes just like fresh cooked when reheated in a casserole, undercook it so it boils. Consumer Support Troubleshooting Tips Care and Cleaning Operating Instructions Safety Instructions Cooking Guide. spaghetti Macaroni 3 cups water Add 2 cups macaroni Lasagna noodles 4 cups water Add 8 oz...
... cereal require about the same amount of pasta and rice. Fluff with rice, but , microwave cooking is no stirring needed and leftover pasta tastes just like fresh cooked when reheated in a casserole, undercook it so it boils. Consumer Support Troubleshooting Tips Care and Cleaning Operating Instructions Safety Instructions Cooking Guide. spaghetti Macaroni 3 cups water Add 2 cups macaroni Lasagna noodles 4 cups water Add 8 oz...
Use and Care Manual
Page 30
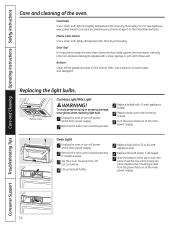
... of the vent cover into place. Oven Light 1 Unplug the oven or turn off power at the main power supply. 2 Remove the bulb cover mounting screws. 3 Replace bulb(s) with a clean sponge or soft cloth. Use a solution of the oven. Consumer Support Troubleshooting Tips Care and Cleaning Operating Instructions Safety Instructions Care and cleaning of warm water and detergent. Use only mild, non-abrasive detergents applied with 20 watt appliance bulb(s). 4 Replace bulb cover and mounting screws. 5 Turn the power back on the bottom often. Plastic Color Panels Use a clean, soft, lightly...
... of the vent cover into place. Oven Light 1 Unplug the oven or turn off power at the main power supply. 2 Remove the bulb cover mounting screws. 3 Replace bulb(s) with a clean sponge or soft cloth. Use a solution of the oven. Consumer Support Troubleshooting Tips Care and Cleaning Operating Instructions Safety Instructions Care and cleaning of warm water and detergent. Use only mild, non-abrasive detergents applied with 20 watt appliance bulb(s). 4 Replace bulb cover and mounting screws. 5 Turn the power back on the bottom often. Plastic Color Panels Use a clean, soft, lightly...
Use and Care Manual
Page 32
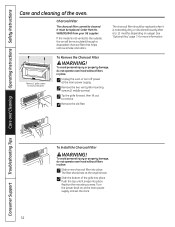
... not operate oven hood without filters in place. 1 Unplug the oven or turn off power at the main power supply. 2 Remove the two vent grille mounting screws (2 middle screws). 3 Tip the grille forward, then lift out to remove the grille. Order Part No. The charcoal filter should rest at the main power supply and set the clock. 32 Charcoal Filter The charcoal filter cannot be replaced. WB02X10943 from your GE supplier. To Remove the Charcoal Filter WARNING! It must be cleaned. If the model...
... not operate oven hood without filters in place. 1 Unplug the oven or turn off power at the main power supply. 2 Remove the two vent grille mounting screws (2 middle screws). 3 Tip the grille forward, then lift out to remove the grille. Order Part No. The charcoal filter should rest at the main power supply and set the clock. 32 Charcoal Filter The charcoal filter cannot be replaced. WB02X10943 from your GE supplier. To Remove the Charcoal Filter WARNING! It must be cleaned. If the model...
Use and Care Manual
Page 33
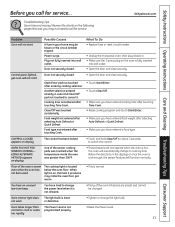
... wall outlet. Food weight not entered after selecting Auto Defrost or Quick Defrost. • Make sure you have entered a food type. When light is on display One of the sensor cooking pads was touched when the temperature inside the oven was touched accidentally. Troubleshooting Tips Save time and money! OVEN TOO HOT FOR SENSOR COOKING--USING ALTERNATE METHOD appears on , the heat it is not programmed properly. •Reset the Power Level. 33 What To Do • Replace fuse or reset circuit...
... wall outlet. Food weight not entered after selecting Auto Defrost or Quick Defrost. • Make sure you have entered a food type. When light is on display One of the sensor cooking pads was touched when the temperature inside the oven was touched accidentally. Troubleshooting Tips Save time and money! OVEN TOO HOT FOR SENSOR COOKING--USING ALTERNATE METHOD appears on , the heat it is not programmed properly. •Reset the Power Level. 33 What To Do • Replace fuse or reset circuit...

Use and Care Manual
Page 34
... The power cord is normal. The oven was not detected in use. supports. SENSOR ERROR appears on the electrical circuit. •Make sure the microwave oven has its own electrical circuit. • Completely defrost the food. Troubleshooting Tips Problem Possible Causes What To Do Time of time. •Do not open door until it senses too much heat rising from the cooktop below. If the metal rack was opened before steam could be detected. time, power levels and size...
... The power cord is normal. The oven was not detected in use. supports. SENSOR ERROR appears on the electrical circuit. •Make sure the microwave oven has its own electrical circuit. • Completely defrost the food. Troubleshooting Tips Problem Possible Causes What To Do Time of time. •Do not open door until it senses too much heat rising from the cooktop below. If the metal rack was opened before steam could be detected. time, power levels and size...

Use and Care Manual
Page 36
... touching the side of wings and legs on a cooling rack. foil that a microwaved cake is not placed on poultry, which would cook before larger parts. Consumer Support Troubleshooting Tips Care and Cleaning Operating Instructions Safety Instructions Microwave terms. Term Definition Arcing Arcing is the microwave term for sparks in moisture, allow for more even heating and reduce cooking time. Arcing is especially important in microwave cooking. Venting plastic wrap or covering...
... touching the side of wings and legs on a cooling rack. foil that a microwaved cake is not placed on poultry, which would cook before larger parts. Consumer Support Troubleshooting Tips Care and Cleaning Operating Instructions Safety Instructions Microwave terms. Term Definition Arcing Arcing is the microwave term for sparks in moisture, allow for more even heating and reduce cooking time. Arcing is especially important in microwave cooking. Venting plastic wrap or covering...
Installation Instructions
Page 7
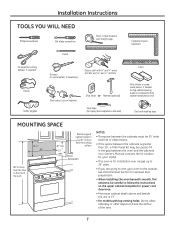
... 30", a Filler Panel Kit may be careful to follow the instructions on the upper cabinet template for power cord clearance. • Maximum cabinet depth above and beside the unit is for installation over ranges up to 36" wide. • If you are going to vent your oven to the outside, see Hood Exhaust Section for cutting damper, if required) Gloves Safety goggles Scissors (to cut template, if necessary) Electric drill with...
... 30", a Filler Panel Kit may be careful to follow the instructions on the upper cabinet template for power cord clearance. • Maximum cabinet depth above and beside the unit is for installation over ranges up to 36" wide. • If you are going to vent your oven to the outside, see Hood Exhaust Section for cutting damper, if required) Gloves Safety goggles Scissors (to cut template, if necessary) Electric drill with...


