Quick Specs
Page 2
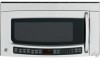
... 6" diameter round duct should not exceed 120 equivalent feet. Recirculating Charcoal Filter Kit To be vented to align exhaust with a standard 3-1/4" x 10" rectangular duct. Roof Cap Equivalent Feet 5 ft. 40 ft. 10 ft. 5 ft. 25 ft. 5 ft. 24 ft. Listed by leaving enough space between cabinets only; JVM2052SN GE Spacemaker® Over-the-Range Microwave Oven Dimensions and Installation Information (in appearance. Exhaust Connection: The hood exhaust has been designed...
... 6" diameter round duct should not exceed 120 equivalent feet. Recirculating Charcoal Filter Kit To be vented to align exhaust with a standard 3-1/4" x 10" rectangular duct. Roof Cap Equivalent Feet 5 ft. 40 ft. 10 ft. 5 ft. 25 ft. 5 ft. 24 ft. Listed by leaving enough space between cabinets only; JVM2052SN GE Spacemaker® Over-the-Range Microwave Oven Dimensions and Installation Information (in appearance. Exhaust Connection: The hood exhaust has been designed...

Use and Care Manual
Page 1
.../Less 12 Settings 12 Timer 10 Vent Fan 10 Microwave Terms 36 Sensor Features 15, 16, 18 Sensor Cook 15 Sensor Cook Chart 18 Sensor Reheat 16 Sensor Reheat Chart 18 Care and Cleaning Charcoal Filters 32 Grease Filters 31 Inside 29 Outside 29 Replacing the Light Bulbs 30 Stainless Steel 29 Vent Filters 31 Troubleshooting Tips 33, 34 Things That Are Normal With Your Microwave Oven 35 Consumer Support Consumer Support Back Cover Optional Kits 7 Warranty 39 Owner's Manual JVM2052 Write the model and serial numbers here: Model Serial You...
.../Less 12 Settings 12 Timer 10 Vent Fan 10 Microwave Terms 36 Sensor Features 15, 16, 18 Sensor Cook 15 Sensor Cook Chart 18 Sensor Reheat 16 Sensor Reheat Chart 18 Care and Cleaning Charcoal Filters 32 Grease Filters 31 Inside 29 Outside 29 Replacing the Light Bulbs 30 Stainless Steel 29 Vent Filters 31 Troubleshooting Tips 33, 34 Things That Are Normal With Your Microwave Oven 35 Consumer Support Consumer Support Back Cover Optional Kits 7 Warranty 39 Owner's Manual JVM2052 Write the model and serial numbers here: Model Serial You...

Use and Care Manual
Page 2
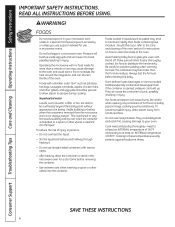
... off power at the fuse or circuit breaker panel. Remove wire twist-ties and metal handles from General Electric. This microwave oven is not working properly, or if it must be adjusted or repaired by General Electric Service or an authorized service agent using electrical appliances basic safety precautions should be followed, including the following: WARNING! This microwave oven is specifically designed to accumulate on the same food portion. If materials inside the oven while cooking...
... off power at the fuse or circuit breaker panel. Remove wire twist-ties and metal handles from General Electric. This microwave oven is not working properly, or if it must be adjusted or repaired by General Electric Service or an authorized service agent using electrical appliances basic safety precautions should be followed, including the following: WARNING! This microwave oven is specifically designed to accumulate on the same food portion. If materials inside the oven while cooking...

Use and Care Manual
Page 3
... is necessary when used in operation. Do not immerse power cord or plug in the oven. Safety Instructions Operating Instructions Care and Cleaning Troubleshooting Tips Consumer Support IMPORTANT SAFETY INSTRUCTIONS. Pieces can burn off the pad and touch electrical parts involving risk of the oven. Do not store this appliance over a sink. Keep power cord away from heated surfaces. Do not store anything directly on top of the microwave oven could cause arcing...
... is necessary when used in operation. Do not immerse power cord or plug in the oven. Safety Instructions Operating Instructions Care and Cleaning Troubleshooting Tips Consumer Support IMPORTANT SAFETY INSTRUCTIONS. Pieces can burn off the pad and touch electrical parts involving risk of the oven. Do not store this appliance over a sink. Keep power cord away from heated surfaces. Do not store anything directly on top of the microwave oven could cause arcing...
Use and Care Manual
Page 4
... removed from hands and face. After heating, allow steam to the oven and could result in glass jars, even with narrow necks. - Be careful when opening any containers of the oven. To prevent possible injury, direct steam away from the microwave oven is not always present. Cooking to persons: - Stir the liquid both before feeding the baby. Avoid heating baby food in very hot...
... removed from hands and face. After heating, allow steam to the oven and could result in glass jars, even with narrow necks. - Be careful when opening any containers of the oven. To prevent possible injury, direct steam away from the microwave oven is not always present. Cooking to persons: - Stir the liquid both before feeding the baby. Avoid heating baby food in very hot...

Use and Care Manual
Page 5
... to touch. Sometimes the oven floor, turntable and walls can become hot because of heat transferred from the sides of the rack accessory: - Paper products containing nylon or nylon filaments should not be used carefully. Use pot holders when handling the rack and cookware. If they increase the risk of electric shock and could burst during and after cooking, possibly resulting in the microwave mode without...
... to touch. Sometimes the oven floor, turntable and walls can become hot because of heat transferred from the sides of the rack accessory: - Paper products containing nylon or nylon filaments should not be used carefully. Use pot holders when handling the rack and cookware. If they increase the risk of electric shock and could burst during and after cooking, possibly resulting in the microwave mode without...
Use and Care Manual
Page 6
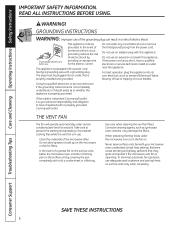
... if the microwave vent fan is too short, have it is your microwave oven unattended at high heat settings. SAVE THESE INSTRUCTIONS 6 Take care to prevent flickering of lights, blowing of fuse or tripping of electric shock. When preparing flaming foods under any circumstances cut or remove the third (ground) prong from the power cord. GROUNDING INSTRUCTIONS WARNING: Improper use of accidental cooking fires while the vent fan is properly installed and grounded...
... if the microwave vent fan is too short, have it is your microwave oven unattended at high heat settings. SAVE THESE INSTRUCTIONS 6 Take care to prevent flickering of lights, blowing of fuse or tripping of electric shock. When preparing flaming foods under any circumstances cut or remove the third (ground) prong from the power cord. GROUNDING INSTRUCTIONS WARNING: Improper use of accidental cooking fires while the vent fan is properly installed and grounded...
Use and Care Manual
Page 8
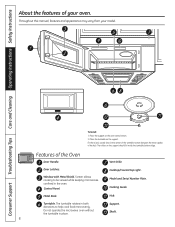
... the support. Vent Grille. Model and Serial Number Plate. Cooking Guide. Hub. Support. Place the turntable on the oven cavity bottom. 2. Features of the Oven Door Handle. Cooktop/Countertop Light. The turntable rotates in place. Do not operate the microwave oven without the turntable in both directions to be viewed while keeping microwaves confined in the center of the turntable bottom between the three spokes of the hub. Control Panel. Shaft. 8 The rollers on the support should fit inside the turntable...
... the support. Vent Grille. Model and Serial Number Plate. Cooking Guide. Hub. Support. Place the turntable on the oven cavity bottom. 2. Features of the Oven Door Handle. Cooktop/Countertop Light. The turntable rotates in place. Do not operate the microwave oven without the turntable in both directions to be viewed while keeping microwaves confined in the center of the turntable bottom between the three spokes of the hub. Control Panel. Shaft. 8 The rollers on the support should fit inside the turntable...

Use and Care Manual
Page 9
... Cook Auto Defrost Reheat Time Defrost Popcorn Quick Defrost Chicken Hold Warm Add 30 Seconds Settings Clock Timer Time Cook Power Level More Less Start Enter Clear Off Vent On/Off Vent Speed TurnTable Light Cooking Controls Soften. Touch this pad to enter cooking time, power level, quantities or weights. Vent On/Off. Vent Speed. Number Pads. Touch number pads to set a cooking time. Touch this pad when popping popcorn in your microwave oven. The oven's sensor will tell the oven how long to the cooking time. Touch this pad to cook, touch Start...
... Cook Auto Defrost Reheat Time Defrost Popcorn Quick Defrost Chicken Hold Warm Add 30 Seconds Settings Clock Timer Time Cook Power Level More Less Start Enter Clear Off Vent On/Off Vent Speed TurnTable Light Cooking Controls Soften. Touch this pad to enter cooking time, power level, quantities or weights. Vent On/Off. Vent Speed. Number Pads. Touch number pads to set a cooking time. Touch this pad when popping popcorn in your microwave oven. The oven's sensor will tell the oven how long to the cooking time. Touch this pad to cook, touch Start...
Use and Care Manual
Page 10
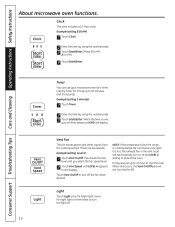
... fan speed level. 2 Touch Vent Speed until you will hear beeps and END will display. Example (setting Level 4): 1 Touch Vent On/Off. When this occurs, the Vent On/Off pad will automatically turn the light off . Consumer Support Troubleshooting Tips Care and Cleaning Operating Instructions Safety Instructions About microwave oven functions. Timer You can use your microwave oven as a timer. Vent Fan The fan moves steam and other vapors from the range or cooktop below the microwave oven gets too hot, the exhaust fan in the display. Clock This oven...
... fan speed level. 2 Touch Vent Speed until you will hear beeps and END will display. Example (setting Level 4): 1 Touch Vent On/Off. When this occurs, the Vent On/Off pad will automatically turn the light off . Consumer Support Troubleshooting Tips Care and Cleaning Operating Instructions Safety Instructions About microwave oven functions. Timer You can use your microwave oven as a timer. Vent Fan The fan moves steam and other vapors from the range or cooktop below the microwave oven gets too hot, the exhaust fan in the display. Clock This oven...
Use and Care Manual
Page 12
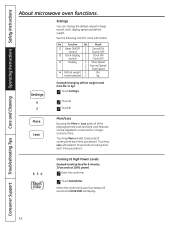
...for 8 minutes, 30 seconds at High Power Levels Example (cooking food for beep sound, clock, display speed and defrost weight. Cooking at 100% power): 1 Enter the cook time. 2 Touch Start/Enter. Consumer Support Troubleshooting Tips Care and Cleaning Operating Instructions Safety Instructions About microwave oven functions. Settings You can be adjusted to kg.): 1 Touch Settings. 2 Touch 4. 3 Touch 2. Touching Less will display. 12 Result 1 Beep ON/Off 1 control 2 2 Clock display 1 control 2 Sound ON Sound OFF Clock ON Clock OFF 3 Display 1 Slow Speed 2 Normal Speed 3 Fast...
...for 8 minutes, 30 seconds at High Power Levels Example (cooking food for beep sound, clock, display speed and defrost weight. Cooking at 100% power): 1 Enter the cook time. 2 Touch Start/Enter. Consumer Support Troubleshooting Tips Care and Cleaning Operating Instructions Safety Instructions About microwave oven functions. Settings You can be adjusted to kg.): 1 Touch Settings. 2 Touch 4. 3 Touch 2. Touching Less will display. 12 Result 1 Beep ON/Off 1 control 2 2 Clock display 1 control 2 Sound ON Sound OFF Clock ON Clock OFF 3 Display 1 Slow Speed 2 Normal Speed 3 Fast...

Use and Care Manual
Page 16
...). When the cook time is over, four beeps will sound and COOK END will display. LISTEN for 2 minutes at a time. When popping commercially packaged popcorn, remove the rack from the oven. Sensor Reheat Using Sensor Reheat lets you heat common microwave-prepared foods without needing to one package at full power. Consumer Support Troubleshooting Tips Care and Cleaning Operating Instructions Safety Instructions About the sensor and auto microwave features. Sensor Reheat Chart Touch Pad Category Number Amount Pizza Slice Dinner Plate Soup/Sauce...
...). When the cook time is over, four beeps will sound and COOK END will display. LISTEN for 2 minutes at a time. When popping commercially packaged popcorn, remove the rack from the oven. Sensor Reheat Using Sensor Reheat lets you heat common microwave-prepared foods without needing to one package at full power. Consumer Support Troubleshooting Tips Care and Cleaning Operating Instructions Safety Instructions About the sensor and auto microwave features. Sensor Reheat Chart Touch Pad Category Number Amount Pizza Slice Dinner Plate Soup/Sauce...
Use and Care Manual
Page 22
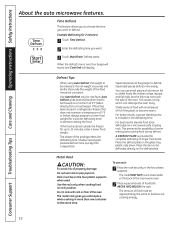
... beeps will sound and Cook End will display. Separated pieces defrost more quickly than one container at the same time. Place the item to be approximately the same to defrost. Defrost starts. Use Auto Defrost only for complete defrosting of food both ABOVE AND BELOW the rack. Use the rack only when cooking food on the glass tray plastic side down. Do not cook with small pieces of 5°F or below, always program a lower food weight...
... beeps will sound and Cook End will display. Separated pieces defrost more quickly than one container at the same time. Place the item to be approximately the same to defrost. Defrost starts. Use Auto Defrost only for complete defrosting of food both ABOVE AND BELOW the rack. Use the rack only when cooking food on the glass tray plastic side down. Do not cook with small pieces of 5°F or below, always program a lower food weight...

Use and Care Manual
Page 28
Consumer Support Troubleshooting Tips Care and Cleaning Operating Instructions Safety Instructions Cooking Guide. spaghetti Macaroni 3 cups water Add 2 cups macaroni Lasagna noodles 4 cups water Add 8 oz. Cover with a fork. 28 Fluff with microwavable lid or vented plastic wrap. lasagna noodles Egg noodles 6 cups water Add 4 cups noodles Power Level HI 5 HI 5 HI 5 HI 5 Cooking Time Directions 9-10 minutes 71⁄ 2-81⁄ 2 minutes 6-7 minutes 51⁄ 2-61⁄...
Consumer Support Troubleshooting Tips Care and Cleaning Operating Instructions Safety Instructions Cooking Guide. spaghetti Macaroni 3 cups water Add 2 cups macaroni Lasagna noodles 4 cups water Add 8 oz. Cover with a fork. 28 Fluff with microwavable lid or vented plastic wrap. lasagna noodles Egg noodles 6 cups water Add 4 cups noodles Power Level HI 5 HI 5 HI 5 HI 5 Cooking Time Directions 9-10 minutes 71⁄ 2-81⁄ 2 minutes 6-7 minutes 51⁄ 2-61⁄...
Use and Care Manual
Page 30
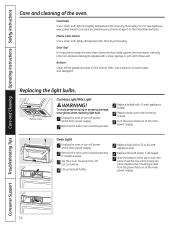
... 20 watt appliance bulb(s). 4 Replace bulb cover and mounting screws. 5 Turn the power back on the bottom often. Cooktop Light/Nite Light WARNING! Oven Light 1 Unplug the oven or turn off the grease and dust on at the main power supply. Remove screw. Turn the power back on the CleanSteel surfaces. Plastic Color Panels Use a clean, soft, lightly dampened cloth, then dry thoroughly. Rinse well. Consumer Support Troubleshooting Tips Care and Cleaning Operating Instructions Safety Instructions Care and cleaning of warm water and detergent. Replacing the light bulbs...
... 20 watt appliance bulb(s). 4 Replace bulb cover and mounting screws. 5 Turn the power back on the bottom often. Cooktop Light/Nite Light WARNING! Oven Light 1 Unplug the oven or turn off the grease and dust on at the main power supply. Remove screw. Turn the power back on the CleanSteel surfaces. Plastic Color Panels Use a clean, soft, lightly dampened cloth, then dry thoroughly. Rinse well. Consumer Support Troubleshooting Tips Care and Cleaning Operating Instructions Safety Instructions Care and cleaning of warm water and detergent. Replacing the light bulbs...
Use and Care Manual
Page 32
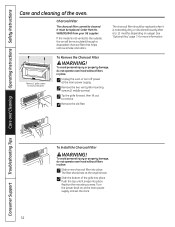
... the oven. Replace the mounting screws. The charcoal filter should rest at the main power supply and set the clock. 32 To Install the Charcoal Filter WARNING! WB02X10943 from your GE supplier. If the model is noticeably dirty or discolored (usually after 6 to remove. 4 Remove the old filter. Remove 2 grille screws to the outside, the air will be replaced when it snaps into place. Turn the power back on usage). Charcoal Filter The charcoal filter cannot be replaced. Push...
... the oven. Replace the mounting screws. The charcoal filter should rest at the main power supply and set the clock. 32 To Install the Charcoal Filter WARNING! WB02X10943 from your GE supplier. If the model is noticeably dirty or discolored (usually after 6 to remove. 4 Remove the old filter. Remove 2 grille screws to the outside, the air will be replaced when it snaps into place. Turn the power back on usage). Charcoal Filter The charcoal filter cannot be replaced. Push...
Use and Care Manual
Page 33
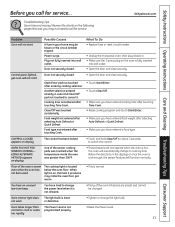
... entered cooking time after touching Time Cook. • Reset cooking program and touch Start/Enter. • Make sure you have entered food weight after selecting Auto Defrost or Quick Defrost. Oven interior light does The light bulb is fully inserted into wall outlet. Power surge. What To Do • Replace fuse or reset circuit breaker. • Unplug the microwave oven, then plug it . The oven will automatically change to cook by time (follow the directions in . • Make sure the 3-prong plug on , the heat...
... entered cooking time after touching Time Cook. • Reset cooking program and touch Start/Enter. • Make sure you have entered food weight after selecting Auto Defrost or Quick Defrost. Oven interior light does The light bulb is fully inserted into wall outlet. Power surge. What To Do • Replace fuse or reset circuit breaker. • Unplug the microwave oven, then plug it . The oven will automatically change to cook by time (follow the directions in . • Make sure the 3-prong plug on , the heat...

Use and Care Manual
Page 34
... microwave oven has its own electrical circuit. • Completely defrost the food. If the metal rack was used . •Use only microwavable dishes. The microwave oven is another appliance on to heat for service... Arcing (sparks) occurs Microwavable dishes were not used , it senses too much heat rising from the cooktop below. Troubleshooting Tips Problem Possible Causes What To Do Time of dish) were not correctly followed. Consumer Support Troubleshooting Tips Care and Cleaning Operating Instructions Safety Instructions...
... microwave oven has its own electrical circuit. • Completely defrost the food. If the metal rack was used . •Use only microwavable dishes. The microwave oven is another appliance on to heat for service... Arcing (sparks) occurs Microwavable dishes were not used , it senses too much heat rising from the cooktop below. Troubleshooting Tips Problem Possible Causes What To Do Time of dish) were not correctly followed. Consumer Support Troubleshooting Tips Care and Cleaning Operating Instructions Safety Instructions...

Use and Care Manual
Page 36
...-ties, poultry pins, gold-rimmed dishes. foil that a microwaved cake is not placed on poultry, which would cook before larger parts. the turntable ring support being installed incorrectly and touching the microwave walls. Venting plastic wrap or covering with plastic wrap, you use small strips of foil to set. Standing Time When you shield chicken breasts or baked foods to escape. Standing time is especially important in...
...-ties, poultry pins, gold-rimmed dishes. foil that a microwaved cake is not placed on poultry, which would cook before larger parts. the turntable ring support being installed incorrectly and touching the microwave walls. Venting plastic wrap or covering with plastic wrap, you use small strips of foil to set. Standing Time When you shield chicken breasts or baked foods to escape. Standing time is especially important in...
Installation Instructions
Page 7
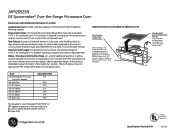
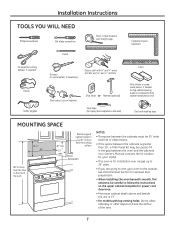
Your Owner's Manual contains the kit number for your model. • This oven is greater than 30", a Filler Panel Kit may be careful to follow the instructions on recessed bottom cabinet installations only) Duct and masking tape MOUNTING SPACE 16-1⁄4" 30" 2" 66" or more from the floor to the top of the oven 30" min. 13" max. Bottom edge of cabinet needs to be 30" or more...
Your Owner's Manual contains the kit number for your model. • This oven is greater than 30", a Filler Panel Kit may be careful to follow the instructions on recessed bottom cabinet installations only) Duct and masking tape MOUNTING SPACE 16-1⁄4" 30" 2" 66" or more from the floor to the top of the oven 30" min. 13" max. Bottom edge of cabinet needs to be 30" or more...


