
Use and Care Manual
Page 1
... 22 Popcorn 16 Quick Defrost 21 Soften 17 Soften Chart 20 Time Defrost 22 Control Panel 9 Cooking Guide 24-28 Cookware 23 Features of Your Oven 8 Microwave Oven Functions 10-14 Child Lock 11 Clock 10 Cooking at High Power Levels . . . . . .12 Cooking at Lower Power Levels . . ... 29 Outside 29 Replacing the Light Bulbs 30 Stainless Steel 29 Vent Filters 31 Troubleshooting Tips 33, 34 Things That Are Normal With Your Microwave Oven 35 Consumer Support Consumer Support Back Cover Optional Kits 7 Warranty 39 Owner's Manual JVM2052 Write the model and serial numbers here:...
... 22 Popcorn 16 Quick Defrost 21 Soften 17 Soften Chart 20 Time Defrost 22 Control Panel 9 Cooking Guide 24-28 Cookware 23 Features of Your Oven 8 Microwave Oven Functions 10-14 Child Lock 11 Clock 10 Cooking at High Power Levels . . . . . .12 Cooking at Lower Power Levels . . ... 29 Outside 29 Replacing the Light Bulbs 30 Stainless Steel 29 Vent Filters 31 Troubleshooting Tips 33, 34 Things That Are Normal With Your Microwave Oven 35 Consumer Support Consumer Support Back Cover Optional Kits 7 Warranty 39 Owner's Manual JVM2052 Write the model and serial numbers here:...
Use and Care Manual
Page 40
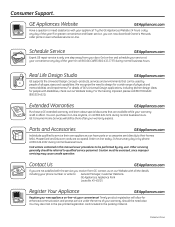
... For greater convenience and faster service, you can have parts or accessories sent directly to service their own appliances can now download Owner's Manuals, order parts or even schedule service on -line-at 800.626.2002 during normal business hours. Contact Us GEAppliances.com If ..., should be used by people of physical and mental abilities and impairments. You can be referred to : General Manager, Customer Relations GE Appliances, Appliance Park Louisville, KY 40225 Register Your Appliance GEAppliances.com Register your new appliance on -line. Order on our Website with...
... For greater convenience and faster service, you can have parts or accessories sent directly to service their own appliances can now download Owner's Manuals, order parts or even schedule service on -line-at 800.626.2002 during normal business hours. Contact Us GEAppliances.com If ..., should be used by people of physical and mental abilities and impairments. You can be referred to : General Manager, Customer Relations GE Appliances, Appliance Park Louisville, KY 40225 Register Your Appliance GEAppliances.com Register your new appliance on -line. Order on our Website with...
Installation Instructions
Page 7
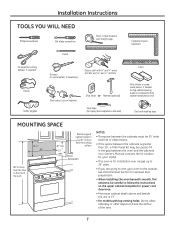
...space between the cabinets must be 30" wide and free of obstructions. • If the space between the oven and the cabinets. Your Owner's Manual contains the kit number for your model. • This oven is for installation over ranges up to 36" wide. • If you are going to vent your... oven to the outside, see Hood Exhaust Section for exhaust duct preparation. • When installing the oven beneath smooth, flat...
...space between the cabinets must be 30" wide and free of obstructions. • If the space between the oven and the cabinets. Your Owner's Manual contains the kit number for your model. • This oven is for installation over ranges up to 36" wide. • If you are going to vent your... oven to the outside, see Hood Exhaust Section for exhaust duct preparation. • When installing the oven beneath smooth, flat...
Installation Instructions
Page 11
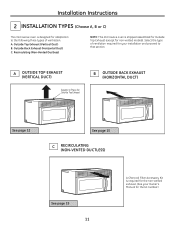
Outside Back Exhaust (Horizontal Duct) C. Recirculating (Non-Vented Ductless) NOTE: This microwave oven is shipped assembled for Outside Top Exhaust (except for your Owner's Manual for adaptation to that section. Select the type of ventilation: A. Installation Instructions 2 INSTALLATION TYPES (Choose A, B or C) This microwave oven is designed for the kit number.) A OUTSIDE TOP EXHAUST (VERTICAL DUCT) Adaptor in...
Outside Back Exhaust (Horizontal Duct) C. Recirculating (Non-Vented Ductless) NOTE: This microwave oven is shipped assembled for Outside Top Exhaust (except for your Owner's Manual for adaptation to that section. Select the type of ventilation: A. Installation Instructions 2 INSTALLATION TYPES (Choose A, B or C) This microwave oven is designed for the kit number.) A OUTSIDE TOP EXHAUST (VERTICAL DUCT) Adaptor in...

Installation Instructions
Page 14
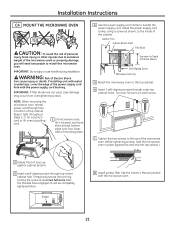
...Microwave Oven Top 5 Attach the microwave oven to Depth of the microwave oven. (While tightening screws, hold the microwave oven in place against the wall and the top cabinet.) 8 Install grease filter. Install the power supply cord clamp, using a screw as shown, to bundle the power supply cord. See the Owner's Manual packed with the microwave oven.... 14 Installation Instructions A4 MOUNT THE MICROWAVE OVEN (cont .) Damper 4 Use the power supply cord clamp to the inside of the...
...Microwave Oven Top 5 Attach the microwave oven to Depth of the microwave oven. (While tightening screws, hold the microwave oven in place against the wall and the top cabinet.) 8 Install grease filter. Install the power supply cord clamp, using a screw as shown, to bundle the power supply cord. See the Owner's Manual packed with the microwave oven.... 14 Installation Instructions A4 MOUNT THE MICROWAVE OVEN (cont .) Damper 4 Use the power supply cord clamp to the inside of the...

Installation Instructions
Page 18
... supply cord hole with the power supply cord bushing. See the Owner's Manual packed with metal countertops, cover the edge of the cabinet. Can cause injury or death: If installing unit with the microwave oven. 18 IMPORTANT: Do not grip or use handle during installation. NOTE...onto four lower tabs of mounting plate. 4 Use the power supply cord clamp to install this microwave oven. WARNING: Risk of Cabinet Recess Self-Aligning Screw Microwave Oven Top 5 Attach the microwave oven to Depth of Electric Shock. Cabinet Front Cabinet Bottom Shelf Filler Block Equivalent to the top cabinet....
... supply cord hole with the power supply cord bushing. See the Owner's Manual packed with metal countertops, cover the edge of the cabinet. Can cause injury or death: If installing unit with the microwave oven. 18 IMPORTANT: Do not grip or use handle during installation. NOTE...onto four lower tabs of mounting plate. 4 Use the power supply cord clamp to install this microwave oven. WARNING: Risk of Cabinet Recess Self-Aligning Screw Microwave Oven Top 5 Attach the microwave oven to Depth of Electric Shock. Cabinet Front Cabinet Bottom Shelf Filler Block Equivalent to the top cabinet....
Installation Instructions
Page 21
... injury or death: If installing unit with metal countertops, cover the edge of the power supply cord hole with the microwave oven. 21 See the Owner's Manual packed with the power supply cord bushing. Cabinet Front Cabinet Bottom Shelf Filler Block Equivalent to Depth of the cabinet. ...IMPORTANT: Do not grip or use handle during installation. WARNING: Risk of oven up against cabinet bottom. 3 Insert a self-aligning ...
... injury or death: If installing unit with metal countertops, cover the edge of the power supply cord hole with the microwave oven. 21 See the Owner's Manual packed with the power supply cord bushing. Cabinet Front Cabinet Bottom Shelf Filler Block Equivalent to Depth of the cabinet. ...IMPORTANT: Do not grip or use handle during installation. WARNING: Risk of oven up against cabinet bottom. 3 Insert a self-aligning ...
Installation Instructions
Page 23
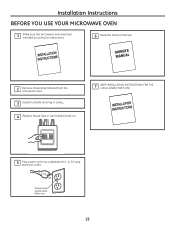
Ensure proper ground exists before use 23 Installation Instructions BEFORE YOU USE YOUR MICROWAVE OVEN 1 Make sure the microwave oven has been installed according to 20-amp electrical outlet. to instructions. 6 Read the Owner's Manual. 2 Remove all packing material from the microwave oven. 3 Install turntable and ring in cavity. 4 Replace house fuse or turn breaker back on. 7 KEEP INSTALLATION INSTRUCTIONS FOR THE LOCAL INSPECTOR'S USE. 5 Plug power cord into a dedicated 15-
Ensure proper ground exists before use 23 Installation Instructions BEFORE YOU USE YOUR MICROWAVE OVEN 1 Make sure the microwave oven has been installed according to 20-amp electrical outlet. to instructions. 6 Read the Owner's Manual. 2 Remove all packing material from the microwave oven. 3 Install turntable and ring in cavity. 4 Replace house fuse or turn breaker back on. 7 KEEP INSTALLATION INSTRUCTIONS FOR THE LOCAL INSPECTOR'S USE. 5 Plug power cord into a dedicated 15-


