Installation Instructions
Page 3
... the power outlet box before use The power cord of this kilowatt rating. The outlet box should be employed to BOTH a top cabinet AND a wall. CAUTION: For personal safety, this product. ELECTRICAL REQUIREMENTS Product rating is recommended that the outlet box is equipped with a 3-prong (grounding) plug which mates with a properly grounded three-prong wall receptacle, installed by a qualified electrician to 50 pounds or a total weight of the National Electrical Code...
... the power outlet box before use The power cord of this kilowatt rating. The outlet box should be employed to BOTH a top cabinet AND a wall. CAUTION: For personal safety, this product. ELECTRICAL REQUIREMENTS Product rating is recommended that the outlet box is equipped with a 3-prong (grounding) plug which mates with a properly grounded three-prong wall receptacle, installed by a qualified electrician to 50 pounds or a total weight of the National Electrical Code...
Installation Instructions
Page 10
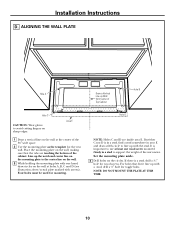
... 2 Use the mounting plate as the template for wood screws. If there is a stud, drill a 3⁄16″ hole for the rear wall. Area E 1 Draw a vertical line on sharp edges. It is in a stud, find a stud somewhere in a stud to support the weight of Top Cabinet Hole B...the stud. NOTE: DO NOT MOUNT THE PLATE AT THIS TIME. 10 Installation Instructions D. Set the mounting plate aside. 4 Drill holes on the wall at the center of the cabinet. For holes that the tabs are inside area E. If neither C nor D is important to avoid cutting fingers on the wall at holes A, B, C and...
... 2 Use the mounting plate as the template for wood screws. If there is a stud, drill a 3⁄16″ hole for the rear wall. Area E 1 Draw a vertical line on sharp edges. It is in a stud, find a stud somewhere in a stud to support the weight of Top Cabinet Hole B...the stud. NOTE: DO NOT MOUNT THE PLATE AT THIS TIME. 10 Installation Instructions D. Set the mounting plate aside. 4 Drill holes on the wall at the center of the cabinet. For holes that the tabs are inside area E. If neither C nor D is important to avoid cutting fingers on the wall at holes A, B, C and...

Installation Instructions
Page 11
.... (See your installation and proceed to the following three types of ventilation required for your Owner's Manual for the kit number.) A OUTSIDE TOP EXHAUST (VERTICAL DUCT) Adaptor in Place for Outside Top Exhaust B OUTSIDE BACK EXHAUST (HORIZONTAL DUCT) See page 12 See page 15 C RECIRCULATING (NON-VENTED DUCTLESS) See page 19 11 A Charcoal Filter Accessory Kit is required for adaptation to...
.... (See your installation and proceed to the following three types of ventilation required for your Owner's Manual for the kit number.) A OUTSIDE TOP EXHAUST (VERTICAL DUCT) Adaptor in Place for Outside Top Exhaust B OUTSIDE BACK EXHAUST (HORIZONTAL DUCT) See page 12 See page 15 C RECIRCULATING (NON-VENTED DUCTLESS) See page 19 11 A Charcoal Filter Accessory Kit is required for adaptation to...
Installation Instructions
Page 13
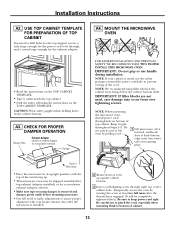
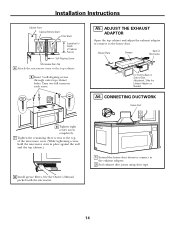
... two full turns after the microwave is metal, use handle during installation. CHECK FOR PROPER DAMPER OPERATION Blower Plate Exhaust Adaptor (absent on models shipped for the exhaust adaptor. • Read the instructions on the TOP CABINET TEMPLATE. • Tape it underneath the top cabinet. • Drill the holes, following the instructions on the TOP CABINET TEMPLATE. Temporarily secure the oven by pulling cord. 1 Lift microwave, tilt it...
... two full turns after the microwave is metal, use handle during installation. CHECK FOR PROPER DAMPER OPERATION Blower Plate Exhaust Adaptor (absent on models shipped for the exhaust adaptor. • Read the instructions on the TOP CABINET TEMPLATE. • Tape it underneath the top cabinet. • Drill the holes, following the instructions on the TOP CABINET TEMPLATE. Temporarily secure the oven by pulling cord. 1 Lift microwave, tilt it...
Installation Instructions
Page 14
...-Side Adjustment, Slide the Exhaust Adaptor as Needed A6. CONNECTING DUCTWORK House Duct 6 Tighten right center screw completely. 7 Tighten the remaining three screws to the exhaust adaptor. 2 Seal exhaust duct joints using duct tape. 14 A5. Blower Plate Damper Back of the microwave oven. (While tightening screws, hold the microwave oven in place against the wall and the top cabinet.) 8 Install grease filters.
...-Side Adjustment, Slide the Exhaust Adaptor as Needed A6. CONNECTING DUCTWORK House Duct 6 Tighten right center screw completely. 7 Tighten the remaining three screws to the exhaust adaptor. 2 Seal exhaust duct joints using duct tape. 14 A5. Blower Plate Damper Back of the microwave oven. (While tightening screws, hold the microwave oven in place against the wall and the top cabinet.) 8 Install grease filters.

Installation Instructions
Page 15
... Wall B3. Adjust Blower B5. To remove the exhaust adaptor from the microwave. This will need the exhaust adaptor for installation in its upright position with the holes drilled earlier. 2 Using a pencil, put dots through the points. Installation Instructions B OUTSIDE BACK EXHAUST (Horizontal Duct) INSTALLATION OVERVIEW B1. Mount the Microwave Oven B1. You will give the location and size of the box cutout for top exhaust. Remove the mounting plate...
... Wall B3. Adjust Blower B5. To remove the exhaust adaptor from the microwave. This will need the exhaust adaptor for installation in its upright position with the holes drilled earlier. 2 Using a pencil, put dots through the points. Installation Instructions B OUTSIDE BACK EXHAUST (Horizontal Duct) INSTALLATION OVERVIEW B1. Mount the Microwave Oven B1. You will give the location and size of the box cutout for top exhaust. Remove the mounting plate...

Installation Instructions
Page 18
.... Do not pinch cord or lift oven by turning the screw at back bottom edge onto four lower tabs of Cabinet Recess Self-Aligning Screw Microwave Oven Top 4 Attach the microwave oven to keep power cord tight. NOTE: If your cabinet is metal, use handle during installation. Cabinet Front Cabinet Bottom Shelf Filler Block Equivalent to Depth of mounting plate. Temporarily secure the oven by pulling cord. 1 Lift microwave, tilt it tight...
.... Do not pinch cord or lift oven by turning the screw at back bottom edge onto four lower tabs of Cabinet Recess Self-Aligning Screw Microwave Oven Top 4 Attach the microwave oven to keep power cord tight. NOTE: If your cabinet is metal, use handle during installation. Cabinet Front Cabinet Bottom Shelf Filler Block Equivalent to Depth of mounting plate. Temporarily secure the oven by pulling cord. 1 Lift microwave, tilt it tight...
Installation Instructions
Page 22
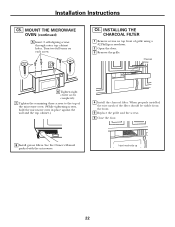
... the screws. 6 Close the door. 8 Install grease filters. Insert mesh-side up 22 MOUNT THE MICROWAVE OVEN (continued) 5 Insert 3 self-aligning screws through outer top cabinet holes. INSTALLING THE CHARCOAL FILTER 1 Remove screws on each screw. See the Owner's Manual packed with the microwave. When properly installed, the wire mesh of the microwave oven. (While tightening screws, hold the microwave oven in place against the wall and the top cabinet.) 4 Install the charcoal filter. Installation Instructions C5. C6.
... the screws. 6 Close the door. 8 Install grease filters. Insert mesh-side up 22 MOUNT THE MICROWAVE OVEN (continued) 5 Insert 3 self-aligning screws through outer top cabinet holes. INSTALLING THE CHARCOAL FILTER 1 Remove screws on each screw. See the Owner's Manual packed with the microwave. When properly installed, the wire mesh of the microwave oven. (While tightening screws, hold the microwave oven in place against the wall and the top cabinet.) 4 Install the charcoal filter. Installation Instructions C5. C6.

Installation Instructions
Page 23
Remove all packing material from the microwave oven. 3. Install turntable and ring in cavity. 4. Replace house fuse or turn breaker back on. 7. Plug power cord into a dedicated 15 to instructions. 6. Insure proper ground exists before use 23 Make sure the microwave oven has been installed according to 20 amp electrical outlet. KEEP INSTALLATION INSTRUCTIONS FOR THE LOCAL INSPECTOR'S USE. 5. Read the Owner's Manual. 2. Installation Instructions BEFORE YOU USE YOUR MICROWAVE 1.
Remove all packing material from the microwave oven. 3. Install turntable and ring in cavity. 4. Replace house fuse or turn breaker back on. 7. Plug power cord into a dedicated 15 to instructions. 6. Insure proper ground exists before use 23 Make sure the microwave oven has been installed according to 20 amp electrical outlet. KEEP INSTALLATION INSTRUCTIONS FOR THE LOCAL INSPECTOR'S USE. 5. Read the Owner's Manual. 2. Installation Instructions BEFORE YOU USE YOUR MICROWAVE 1.
Owners Manual
Page 2
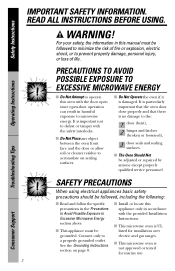
.... Troubleshooting Tips Consumer Support SAFETY PRECAUTIONS When using electrical appliances basic safety precautions should be adjusted or repaired by anyone except properly qualified service personnel. s This microwave oven is no damage to a properly grounded outlet. See the Grounding Instructions section on sealing surfaces. It is particularly important that the oven door close properly and that there is UL listed for marine use. 2 s This microwave oven is...
.... Troubleshooting Tips Consumer Support SAFETY PRECAUTIONS When using electrical appliances basic safety precautions should be adjusted or repaired by anyone except properly qualified service personnel. s This microwave oven is no damage to a properly grounded outlet. See the Grounding Instructions section on sealing surfaces. It is particularly important that the oven door close properly and that there is UL listed for marine use. 2 s This microwave oven is...

Owners Manual
Page 3
..., turn the oven off and disconnect the power cord, or shut off power at the fuse or circuit breaker panel. s Do not operate this manual. for example, in a wet basement, near a swimming pool, near water- s Do not store anything directly on top of this appliance if it has a damaged power cord or plug, if it is opened, the fire may be installed over both gas and electric cooking equipment. - Troubleshooting Tips Consumer Support...
..., turn the oven off and disconnect the power cord, or shut off power at the fuse or circuit breaker panel. s Do not operate this manual. for example, in a wet basement, near a swimming pool, near water- s Do not store anything directly on top of this appliance if it has a damaged power cord or plug, if it is opened, the fire may be installed over both gas and electric cooking equipment. - Troubleshooting Tips Consumer Support...

Owners Manual
Page 9
... prevent the starting and spreading of accidental cooking fires while the vent fan is operating. s In the event of the microwave often. s Never leave surface units beneath your microwave oven unattended at high heat settings. Boilovers cause smoking and greasy spillovers that may damage the filters. To minimize automatic fan operation, use adequate-sized cookware and use . SAVE THESE INSTRUCTIONS 9 Troubleshooting Tips Consumer Support s Use care when cleaning the vent fan filters. Take care to build...
... prevent the starting and spreading of accidental cooking fires while the vent fan is operating. s In the event of the microwave often. s Never leave surface units beneath your microwave oven unattended at high heat settings. Boilovers cause smoking and greasy spillovers that may damage the filters. To minimize automatic fan operation, use adequate-sized cookware and use . SAVE THESE INSTRUCTIONS 9 Troubleshooting Tips Consumer Support s Use care when cleaning the vent fan filters. Take care to build...

Owners Manual
Page 11
.... Cooktop Lights. www.GEAppliances.com Throughout this manual, features and appearance may be in the oven. The door must be removed for best results, place food directly on the defrost rack and place the rack on the inside walls of the Oven Door Handle. Grease Filters. Active Vent (on the turntable. Defrost Rack. NOTE: Rating plate, oven vent(s) and oven light are located on the turntable. Screen allows cooking to operate. Touch Control Panel Display. Safety Instructions About the features of your model. Door Latches...
.... Cooktop Lights. www.GEAppliances.com Throughout this manual, features and appearance may be in the oven. The door must be removed for best results, place food directly on the defrost rack and place the rack on the inside walls of the Oven Door Handle. Grease Filters. Active Vent (on the turntable. Defrost Rack. NOTE: Rating plate, oven vent(s) and oven light are located on the turntable. Screen allows cooking to operate. Touch Control Panel Display. Safety Instructions About the features of your model. Door Latches...

Owners Manual
Page 20
... the defrost rack and place the rack on the turntable. Quick Defrost 1 lb. The oven starts automatically. Quick Defrost automatically sets the defrosting times and power levels for about 30 minutes. For example, press pads 1 and 2 for Auto Defrost. 2 Using the Conversion Guide at right, enter food weight. Auto Defrost Auto Defrost automatically sets the defrosting times and power levels to give even defrosting results for meats, poultry and...
... the defrost rack and place the rack on the turntable. Quick Defrost 1 lb. The oven starts automatically. Quick Defrost automatically sets the defrosting times and power levels for about 30 minutes. For example, press pads 1 and 2 for Auto Defrost. 2 Using the Conversion Guide at right, enter food weight. Auto Defrost Auto Defrost automatically sets the defrosting times and power levels to give even defrosting results for meats, poultry and...

Owners Manual
Page 25
... use. Troubleshooting Tips Cooking Complete Reminder To remind you that you have . Consumer Support CLOCK AM / PM 1 2 3 EXPRESS COOK EXPRESS COOK EXPRESS COOK 4 5 6 EXPRESS COOK EXPRESS COOK EXPRESS COOK 7 8 9 0 START PAUSE Clock Press CLOCK to save your model may have food in the oven, the oven will display FOOD IS READY and beep once a minute until you do not change it.) 4 Press the CUSTOM pad. Operating Instructions Help HELP The HELP pad displays...
... use. Troubleshooting Tips Cooking Complete Reminder To remind you that you have . Consumer Support CLOCK AM / PM 1 2 3 EXPRESS COOK EXPRESS COOK EXPRESS COOK 4 5 6 EXPRESS COOK EXPRESS COOK EXPRESS COOK 7 8 9 0 START PAUSE Clock Press CLOCK to save your model may have food in the oven, the oven will display FOOD IS READY and beep once a minute until you do not change it.) 4 Press the CUSTOM pad. Operating Instructions Help HELP The HELP pad displays...

Owners Manual
Page 28
.... TURNTABLE Turntable For best cooking results, leave the turntable on. SURFACE LIGHT Automatic Fan An automatic fan feature protects the microwave from too much heat. If you have . Troubleshooting Tips Consumer Support 28 Be careful touching the turntable during and after the cooktop and microwave controls are cool. It automatically turns on at low speed if it senses too much heat rising from surface cooking. Safety Instructions Operating Instructions Other features your model...
.... TURNTABLE Turntable For best cooking results, leave the turntable on. SURFACE LIGHT Automatic Fan An automatic fan feature protects the microwave from too much heat. If you have . Troubleshooting Tips Consumer Support 28 Be careful touching the turntable during and after the cooktop and microwave controls are cool. It automatically turns on at low speed if it senses too much heat rising from surface cooking. Safety Instructions Operating Instructions Other features your model...

Owners Manual
Page 35
Connect electrical power to be replaced are cool before removing. www.GEAppliances.com Remove screw Cooktop Light/Night Light Replace the burned-out bulb with the same size and type bulb. 4 Raise the light shield and replace the screw. Replace with a 120 volt, 20-watt halogen bulb (WB36X10213), available from your GE supplier. 1 To replace the bulb(s), first disconnect the power at the main fuse or circuit breaker panel or pull the plug. 2 Remove the screw at the...
Connect electrical power to be replaced are cool before removing. www.GEAppliances.com Remove screw Cooktop Light/Night Light Replace the burned-out bulb with the same size and type bulb. 4 Raise the light shield and replace the screw. Replace with a 120 volt, 20-watt halogen bulb (WB36X10213), available from your GE supplier. 1 To replace the bulb(s), first disconnect the power at the main fuse or circuit breaker panel or pull the plug. 2 Remove the screw at the...
Owners Manual
Page 37
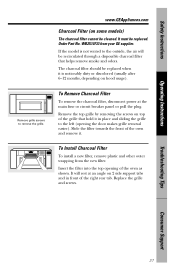
... be replaced. Order Part No. www.GEAppliances.com Charcoal Filter (on 2 side support tabs and in place and sliding the grille to the outside, the air will rest at the main fuse or circuit breaker panel or pull the plug. To Remove Charcoal Filter To remove the charcoal filter, disconnect power at an angle on some models) The charcoal filter cannot be recirculated through a disposable charcoal filter that helps remove smoke and odors. Safety Instructions Operating Instructions Remove...
... be replaced. Order Part No. www.GEAppliances.com Charcoal Filter (on 2 side support tabs and in place and sliding the grille to the outside, the air will rest at the main fuse or circuit breaker panel or pull the plug. To Remove Charcoal Filter To remove the charcoal filter, disconnect power at an angle on some models) The charcoal filter cannot be recirculated through a disposable charcoal filter that helps remove smoke and odors. Safety Instructions Operating Instructions Remove...

Owners Manual
Page 38
...; Replace fuse or reset be blown or the circuit circuit breaker. The cooktop light is fully inserted into wall outlet. When the light is on, the heat it is are preset and cannot be detected. • Do not open door until steam is sensed and time is warm, even when the oven has not been used "LOCKED" appears on the display "SENSOR ERROR" appears on the display You hear an unusual, low-tone beep...
...; Replace fuse or reset be blown or the circuit circuit breaker. The cooktop light is fully inserted into wall outlet. When the light is on, the heat it is are preset and cannot be detected. • Do not open door until steam is sensed and time is warm, even when the oven has not been used "LOCKED" appears on the display "SENSOR ERROR" appears on the display You hear an unusual, low-tone beep...

Owners Manual
Page 43
... product. This warranty gives you specific legal rights, and you . Staple your state's Attorney General. Proof of incidental or consequential damages, so the above limitation or exclusion may also have other than the intended purpose or used commercially. s Damage caused after delivery. Safety Instructions Operating Instructions GE Microwave Oven Warranty. s Replacement of circuit breakers. Troubleshooting Tips Consumer Support Warrantor: General Electric Company. Louisville, KY 40225 43 s Damage to obtain service...
... product. This warranty gives you specific legal rights, and you . Staple your state's Attorney General. Proof of incidental or consequential damages, so the above limitation or exclusion may also have other than the intended purpose or used commercially. s Damage caused after delivery. Safety Instructions Operating Instructions GE Microwave Oven Warranty. s Replacement of circuit breakers. Troubleshooting Tips Consumer Support Warrantor: General Electric Company. Louisville, KY 40225 43 s Damage to obtain service...


