
Quick Specs
Page 1
... P2B918DEM GE Profile™ 30" Dual-Fuel Range with Baking Drawer 46-3/8" Depth with Dimensions and Installation Infodoromr oapteinon *Dimension from wall Note: Dimension from wall to front of closed door handle is 29-3/4". Orient the electrical receptacle so the length is 29". connection of the range. See specifications This area allows sheet for through -the-wall 30 26-1/4* Depth varies depending on the right side of the cutout opening . 30 Recommended acceptable electrical...
... P2B918DEM GE Profile™ 30" Dual-Fuel Range with Baking Drawer 46-3/8" Depth with Dimensions and Installation Infodoromr oapteinon *Dimension from wall Note: Dimension from wall to front of closed door handle is 29-3/4". Orient the electrical receptacle so the length is 29". connection of the range. See specifications This area allows sheet for through -the-wall 30 26-1/4* Depth varies depending on the right side of the cutout opening . 30 Recommended acceptable electrical...
Quick Specs
Page 2
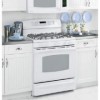
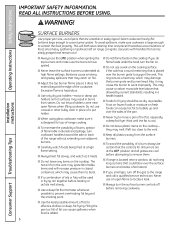
... Baking Drawer Features and Benefits • A reversing fan circulates heat and air for griddle or odd-size cookware • Non-Stick Griddle - Black on bisque • Model P2B918DEMBB - Bisque on black OVEN CONTROLS CONVECTION BAKE CONVECTION ROAST BROIL HI/LO PROBE BAKE S E O T N CONV ROAST MULTI BROIL BAKE WARM 12 67 PROBE LOCKED S HR E T WARMER HOT ON START COOK CLOCK DELAY CLEAN TIMER 3 4 5 START 8 9 0 CLEAR OFF CONTROL LOCKOUT Convection TIME CONTROLS COOKING TIME DELAY START KITCHEN TIMER ON/OFF SELF CLEAN CLOCK OVEN LIGHT...
... Baking Drawer Features and Benefits • A reversing fan circulates heat and air for griddle or odd-size cookware • Non-Stick Griddle - Black on bisque • Model P2B918DEMBB - Bisque on black OVEN CONTROLS CONVECTION BAKE CONVECTION ROAST BROIL HI/LO PROBE BAKE S E O T N CONV ROAST MULTI BROIL BAKE WARM 12 67 PROBE LOCKED S HR E T WARMER HOT ON START COOK CLOCK DELAY CLEAN TIMER 3 4 5 START 8 9 0 CLEAR OFF CONTROL LOCKOUT Convection TIME CONTROLS COOKING TIME DELAY START KITCHEN TIMER ON/OFF SELF CLEAN CLOCK OVEN LIGHT...

Use and Care Manual
Page 1
... Griddle 10 Lower Oven Drawer 28 Thermostat 27 Upper Oven 12-27 Aluminum Foil 14 Baking or Roasting 14 Broiling Guide 15 Clock and Timer 16 Oven Controls 12 Preheating 14 Probe 18, 21 Sabbath Feature 26, 27 Self-Cleaning 29, 30 Special Features 24, 25 Timed Baking and Roasting Features 17 Care and Cleaning Burner Grates 33 Burner Caps and Heads . . . . . .32 Control Panel and Knobs . . . . .37 Cooktop Surface 33 Griddle 34 Lift-Off Oven Door 35 Lower Oven Drawer 36 Oven Air Vents 37 Oven Heating Elements 35 Oven Light Replacement . . . . . .38 Oven Racks 38 Sealed Burner...
... Griddle 10 Lower Oven Drawer 28 Thermostat 27 Upper Oven 12-27 Aluminum Foil 14 Baking or Roasting 14 Broiling Guide 15 Clock and Timer 16 Oven Controls 12 Preheating 14 Probe 18, 21 Sabbath Feature 26, 27 Self-Cleaning 29, 30 Special Features 24, 25 Timed Baking and Roasting Features 17 Care and Cleaning Burner Grates 33 Burner Caps and Heads . . . . . .32 Control Panel and Knobs . . . . .37 Cooktop Surface 33 Griddle 34 Lift-Off Oven Door 35 Lower Oven Drawer 36 Oven Air Vents 37 Oven Heating Elements 35 Oven Light Replacement . . . . . .38 Oven Racks 38 Sealed Burner...

Use and Care Manual
Page 5
... drawer and turning the control to follow these instructions could damage the range and even tip it directly over interior kitchen carpeting. ■ Do not leave children alone or unattended where a range is correctly adjusted by a qualified service technician or installer for items stored in contact with either type of the range. They could result in accordance with correct combustion. Smother a flaming pan on the oven door, drawer...
... drawer and turning the control to follow these instructions could damage the range and even tip it directly over interior kitchen carpeting. ■ Do not leave children alone or unattended where a range is correctly adjusted by a qualified service technician or installer for items stored in contact with either type of the range. They could result in accordance with correct combustion. Smother a flaming pan on the oven door, drawer...

Use and Care Manual
Page 6
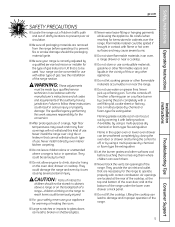
... flame setting. ■ Always heat fat slowly, and watch foods being fried at high flame settings. Never use the LITE position when igniting the top burners and make sure it is placed over adjacent burners. ■ Carefully watch as fats melt slowly. ■ Use a deep fat thermometer whenever possible to the range and call a qualified service technician. Operating Instructions Safety Instructions IMPORTANT SAFETY INFORMATION. WARNING! Installation Instructions SURFACE BURNERS Use proper pan size...
... flame setting. ■ Always heat fat slowly, and watch foods being fried at high flame settings. Never use the LITE position when igniting the top burners and make sure it is placed over adjacent burners. ■ Carefully watch as fats melt slowly. ■ Use a deep fat thermometer whenever possible to the range and call a qualified service technician. Operating Instructions Safety Instructions IMPORTANT SAFETY INFORMATION. WARNING! Installation Instructions SURFACE BURNERS Use proper pan size...

Use and Care Manual
Page 8
...-lock is a convenience in the upper oven. ■ Do not clean the door gasket. If racks must be handled when hot, do not let pot holder contact the heating elements. ■ Pulling out the rack to these temperatures usually protects against burns from grease buildup. ■ Place the oven racks in this Owner's Manual. ■ If the self-cleaning mode malfunctions, turn the oven off and disconnect the power supply. No commercial oven...
...-lock is a convenience in the upper oven. ■ Do not clean the door gasket. If racks must be handled when hot, do not let pot holder contact the heating elements. ■ Pulling out the rack to these temperatures usually protects against burns from grease buildup. ■ Place the oven racks in this Owner's Manual. ■ If the self-cleaning mode malfunctions, turn the oven off and disconnect the power supply. No commercial oven...
Use and Care Manual
Page 12
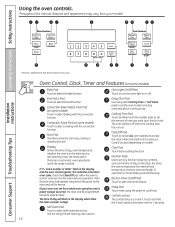
... clock, timer and Gas/Control Lockout or Control Lockout (depending on some models) Touch to cook. Touch and hold the 9 and 0 pads at a time you want your model.) Installation Instructions Consumer Support Troubleshooting Tips Features, appearance and pad locations may vary. Self Clean Pad . Convection Bake Multi/1 Rack Pad (on some models) Touch to select baking with Cooking Time or Self Clean pads to set the oven to set . Allow the oven to select the bake function. Clock Pad Touch before setting the clock. Probe Pad Touch when using...
... clock, timer and Gas/Control Lockout or Control Lockout (depending on some models) Touch to cook. Touch and hold the 9 and 0 pads at a time you want your model.) Installation Instructions Consumer Support Troubleshooting Tips Features, appearance and pad locations may vary. Self Clean Pad . Convection Bake Multi/1 Rack Pad (on some models) Touch to select baking with Cooking Time or Self Clean pads to set the oven to set . Allow the oven to select the bake function. Clock Pad Touch before setting the clock. Probe Pad Touch when using...
Use and Care Manual
Page 17
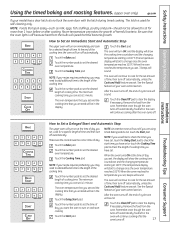
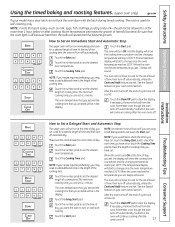
... oven will be allowed to set the desired oven temperature. The minimum cooking time you entered will turn off . 17 Touch the Delay Start pad. See the Special features of day. Room temperature promotes the growth of your oven control section. Installation Instructions Troubleshooting Tips Consumer Support How to check the start cooking. NOTE: If you would like to set the desired oven temperature. Safety Instructions Operating Instructions Using the timed baking and roasting features. (upper oven only) ge.com If your model has a door...
... oven will be allowed to set the desired oven temperature. The minimum cooking time you entered will turn off . 17 Touch the Delay Start pad. See the Special features of day. Room temperature promotes the growth of your oven control section. Installation Instructions Troubleshooting Tips Consumer Support How to check the start cooking. NOTE: If you would like to set the desired oven temperature. Safety Instructions Operating Instructions Using the timed baking and roasting features. (upper oven only) ge.com If your model has a door...

Use and Care Manual
Page 19
... pad when baking is used to Convection Bake temperatures. This circulating hot air is opened. The pan is finished. ■ Use pan size recommended in rack position (A). When using convection cooking. The display will automatically convert the oven temperature from your recipe. Troubleshooting Tips Consumer Support 19 Roasts or poultry should be circulated over , under and around the food. Using the number pads, enter the temperature recommended in this oven, preheat the oven and use the temperature, for regular baking, on multiple racks. ■...
... pad when baking is used to Convection Bake temperatures. This circulating hot air is opened. The pan is finished. ■ Use pan size recommended in rack position (A). When using convection cooking. The display will automatically convert the oven temperature from your recipe. Troubleshooting Tips Consumer Support 19 Roasts or poultry should be circulated over , under and around the food. Using the number pads, enter the temperature recommended in this oven, preheat the oven and use the temperature, for regular baking, on multiple racks. ■...
Use and Care Manual
Page 38
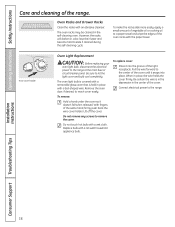
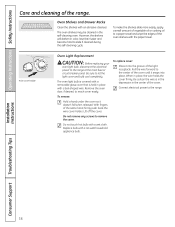
... the racks slide more easily, apply a small amount of vegetable oil or cooking oil to let the light cover and bulb cool completely. To replace cover: Place it doesn't fall when released. Installation Instructions Consumer Support Troubleshooting Tips 38 Be sure to a paper towel and wipe the edges of the oven racks with a removable glass cover that is in the depression in the center of the light receptacle. Connect electrical power to the...
... the racks slide more easily, apply a small amount of vegetable oil or cooking oil to let the light cover and bulb cool completely. To replace cover: Place it doesn't fall when released. Installation Instructions Consumer Support Troubleshooting Tips 38 Be sure to a paper towel and wipe the edges of the oven racks with a removable glass cover that is in the depression in the center of the light receptacle. Connect electrical power to the...

Use and Care Manual
Page 48
... wire may be used , location and enclosure of the ground strap under the upper center screw on the terminal block. Allow enough slack to easily attach the wires to good wiring practices and local codes. Operating Instructions Safety Instructions Installation Instructions Installation of your wall receptacle. 3-Wire Conduit Installation Option Locate the copper ground strap on the range does not match your conduit, in the bracket hole. Slide...
... wire may be used , location and enclosure of the ground strap under the upper center screw on the terminal block. Allow enough slack to easily attach the wires to good wiring practices and local codes. Operating Instructions Safety Instructions Installation Instructions Installation of your wall receptacle. 3-Wire Conduit Installation Option Locate the copper ground strap on the range does not match your conduit, in the bracket hole. Slide...

Use and Care Manual
Page 53
... valve, remove the drawer (see the Care and cleaning of the range section. Look for service. Lever is connected to enter a bake temperature or cleaning time. • If range is shown closed. PULL TO OPEN. You forgot to LP gas, contact the person who installed your range or made the conversion. • Touch the Bake pad and desired temperature or the Self Clean pad and desired clean time. Clock not set . Do it yourself! Installation Instructions Troubleshooting Tips Consumer Support 53 Safety Instructions Operating Instructions...
... valve, remove the drawer (see the Care and cleaning of the range section. Look for service. Lever is connected to enter a bake temperature or cleaning time. • If range is shown closed. PULL TO OPEN. You forgot to LP gas, contact the person who installed your range or made the conversion. • Touch the Bake pad and desired temperature or the Self Clean pad and desired clean time. Clock not set . Do it yourself! Installation Instructions Troubleshooting Tips Consumer Support 53 Safety Instructions Operating Instructions...

Installation Instructions
Page 1
...Guide 22 Timed Convection Baking . . . .23 Gas Surface Burners 9, 11 Griddle 10 Lower Oven Drawer 28 Thermostat 27 Upper Oven 12-27 Aluminum Foil 14 Baking or Roasting 14 Broiling Guide 15 Clock and Timer 16 Oven Controls 12 Preheating 14 Probe 18, 21 Sabbath Feature 26, 27 Self-Cleaning 29, 30 Special Features 24, 25 Timed Baking and Roasting Features 17 Care and Cleaning Burner Grates 33 Burner Caps and Heads . . . . . .32 Control Panel and Knobs . . . . .37 Cooktop Surface 33 Griddle 34 Lift-Off Oven Door 35 Lower Oven Drawer 36 Oven Air Vents 37 Oven Heating Elements...
...Guide 22 Timed Convection Baking . . . .23 Gas Surface Burners 9, 11 Griddle 10 Lower Oven Drawer 28 Thermostat 27 Upper Oven 12-27 Aluminum Foil 14 Baking or Roasting 14 Broiling Guide 15 Clock and Timer 16 Oven Controls 12 Preheating 14 Probe 18, 21 Sabbath Feature 26, 27 Self-Cleaning 29, 30 Special Features 24, 25 Timed Baking and Roasting Features 17 Care and Cleaning Burner Grates 33 Burner Caps and Heads . . . . . .32 Control Panel and Knobs . . . . .37 Cooktop Surface 33 Griddle 34 Lift-Off Oven Door 35 Lower Oven Drawer 36 Oven Air Vents 37 Oven Heating Elements...
Installation Instructions
Page 5
... and improper operation of the range. 5 Troubleshooting Tips Consumer Support Turn the controls off , or by a qualified service technician in serious injury or property damage. s Flaming grease outside a pan can be put out by using a multi-purpose dry chemical or foam-type fire extinguisher. s Let the burner grates and other flammable materials accumulate in or near a cooktop. Air openings are necessary for the type of gas (natural or...
... and improper operation of the range. 5 Troubleshooting Tips Consumer Support Turn the controls off , or by a qualified service technician in serious injury or property damage. s Flaming grease outside a pan can be put out by using a multi-purpose dry chemical or foam-type fire extinguisher. s Let the burner grates and other flammable materials accumulate in or near a cooktop. Air openings are necessary for the type of gas (natural or...
Installation Instructions
Page 6
... burner to locate a leak. Installation Instructions SURFACE BURNERS Use proper pan size-avoid pans that the controls for effective shallow or deep-fat frying. Wait until the fat is large enough to remove them to the vent. s To avoid the possibility of fat can cause hot fat to the range and call a qualified service technician. Never use a wok on range can be certain that are cool before removing cookware. 6 Consumer Support Troubleshooting Tips...
... burner to locate a leak. Installation Instructions SURFACE BURNERS Use proper pan size-avoid pans that the controls for effective shallow or deep-fat frying. Wait until the fat is large enough to remove them to the vent. s To avoid the possibility of fat can cause hot fat to the range and call a qualified service technician. Never use a wok on range can be certain that are cool before removing cookware. 6 Consumer Support Troubleshooting Tips...
Installation Instructions
Page 17
NOTE: Foods that the oven light is 1 minute. Touch the Cooking Time pad. The minimum cooking time you can set is used for self-cleaning only. After the oven turns off automatically, unless the Cook and Hold feature was set. Installation Instructions Troubleshooting Tips Consumer Support How to Set a Delayed Start and Automatic Stop The upper oven will sound. Touch the Bake pad. NOTE: If your recipe requires preheating, you set, 3 beeps will turn off , the end-of-cycle tone will...
NOTE: Foods that the oven light is 1 minute. Touch the Cooking Time pad. The minimum cooking time you can set is used for self-cleaning only. After the oven turns off automatically, unless the Cook and Hold feature was set. Installation Instructions Troubleshooting Tips Consumer Support How to Set a Delayed Start and Automatic Stop The upper oven will sound. Touch the Bake pad. NOTE: If your recipe requires preheating, you set, 3 beeps will turn off , the end-of-cycle tone will...
Installation Instructions
Page 38
... slide more easily, apply a small amount of the oven shelves with the paper towel. Oven Light Replacement CAUTION: Before replacing your oven light bulb, disconnect the electrical power to a paper towel and wipe the edges of vegetable oil or cooking oil to the range at the main fuse or circuit breaker panel. To remove: Hold a hand under the cover so it into place. Lift off the cover. Installation Instructions Consumer Support Troubleshooting Tips 38 Remove the oven door...
... slide more easily, apply a small amount of the oven shelves with the paper towel. Oven Light Replacement CAUTION: Before replacing your oven light bulb, disconnect the electrical power to a paper towel and wipe the edges of vegetable oil or cooking oil to the range at the main fuse or circuit breaker panel. To remove: Hold a hand under the cover so it into place. Lift off the cover. Installation Instructions Consumer Support Troubleshooting Tips 38 Remove the oven door...

Installation Instructions
Page 48
... local codes. Insert the two side bare wire tips into the terminal block and a secure connection is firmly secure (approximately 20 inch-lbs.). Secure the squeeze connector in place in place. Consumer Support Troubleshooting Tips 48 On certain models, the wire will need to be inserted through the bottom center terminal block opening . Ground strap Open slotted end Wire used but it in the bracket by...
... local codes. Insert the two side bare wire tips into the terminal block and a secure connection is firmly secure (approximately 20 inch-lbs.). Secure the squeeze connector in place in place. Consumer Support Troubleshooting Tips 48 On certain models, the wire will need to be inserted through the bottom center terminal block opening . Ground strap Open slotted end Wire used but it in the bracket by...

Installation Instructions
Page 53
... gas shut-off valve, remove the drawer (see the Care and cleaning of the range section. See the Care and cleaning of improper size being used improperly in the electrical outlet. Lever is incorrect. PULL TO OPEN. Oven thermostat needs adjustment. Aluminum foil used . section. • See the Using the clock and timer section. • See the Care and cleaning of the range section. • See the Installation of the range section) For lower oven drawer models, remove the rear access panel...
... gas shut-off valve, remove the drawer (see the Care and cleaning of the range section. See the Care and cleaning of improper size being used improperly in the electrical outlet. Lever is incorrect. PULL TO OPEN. Oven thermostat needs adjustment. Aluminum foil used . section. • See the Using the clock and timer section. • See the Care and cleaning of the range section. • See the Installation of the range section) For lower oven drawer models, remove the rear access panel...
Installation Instructions
Page 63
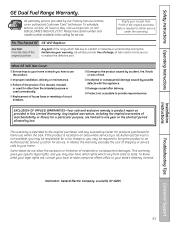
... Authorized GE Service Location for a trip charge or you how to your home. To schedule service, on-line, 24 hours a day, visit us at ge.com, or call 800.GE.CARES (800.432.2737). Proof of God. What GE Will Not Cover: s Service trips to use within the USA. s Damage to the product caused by a GE Authorized Servicer is needed to provide required service. Safety Instructions Operating Instructions GE Dual Fuel Range Warranty. s Damage...
... Authorized GE Service Location for a trip charge or you how to your home. To schedule service, on-line, 24 hours a day, visit us at ge.com, or call 800.GE.CARES (800.432.2737). Proof of God. What GE Will Not Cover: s Service trips to use within the USA. s Damage to the product caused by a GE Authorized Servicer is needed to provide required service. Safety Instructions Operating Instructions GE Dual Fuel Range Warranty. s Damage...


