Quick Specs
Page 2
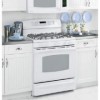
... need of the cooktop, ideal for rapid boiling • Model P2B918DEMWW - Fifth burner in the center of scrubbing • Center oval... cooking and warming all types of foods • Super-Large Oven Capacity - P2B918DEM GE Profile™ 30" Dual-Fuel Range with a recessed surface to help contain spills and boil over a fifth center burner ... 9 0 CLEAR OFF CONTROL LOCKOUT Convection TIME CONTROLS COOKING TIME DELAY START KITCHEN TIMER ON/OFF SELF CLEAN CLOCK OVEN LIGHT ON/OFF DouDboDulobueleblOeOvOevnevn en FRONT REAR LITE LO HI 1 9 2 8 3 76 54 LITE LO HI 1 9 ...
... need of the cooktop, ideal for rapid boiling • Model P2B918DEMWW - Fifth burner in the center of scrubbing • Center oval... cooking and warming all types of foods • Super-Large Oven Capacity - P2B918DEM GE Profile™ 30" Dual-Fuel Range with a recessed surface to help contain spills and boil over a fifth center burner ... 9 0 CLEAR OFF CONTROL LOCKOUT Convection TIME CONTROLS COOKING TIME DELAY START KITCHEN TIMER ON/OFF SELF CLEAN CLOCK OVEN LIGHT ON/OFF DouDboDulobueleblOeOvOevnevn en FRONT REAR LITE LO HI 1 9 2 8 3 76 54 LITE LO HI 1 9 ...

Use and Care Manual
Page 1
ge.com Self-Cleaning Ran DualgFueleConvections Safety Instructions . . . . . .2-8 Operating Instructions Convection Oven...36 Oven Air Vents 37 Oven Heating Elements 35 Oven Light Replacement . . . . . .38 Oven Racks 38 Sealed Burner Assemblies . . . .31 Self-Cleaning 29, 30 Stainless Steel Surfaces 33 Installation Owner's Manual Instructions 39-52... Surface Burners 50, 51 P2B918 Connect Range to Electric 44, 46 Connect Range to Gas . . . . .43, 45 Dimensions and Clearances 41 Electrical Connections . . . . . .46-49 Level the Range 51 Location Guidelines 42 LP 52 Safety...
ge.com Self-Cleaning Ran DualgFueleConvections Safety Instructions . . . . . .2-8 Operating Instructions Convection Oven...36 Oven Air Vents 37 Oven Heating Elements 35 Oven Light Replacement . . . . . .38 Oven Racks 38 Sealed Burner Assemblies . . . .31 Self-Cleaning 29, 30 Stainless Steel Surfaces 33 Installation Owner's Manual Instructions 39-52... Surface Burners 50, 51 P2B918 Connect Range to Electric 44, 46 Connect Range to Gas . . . . .43, 45 Dimensions and Clearances 41 Electrical Connections . . . . . .46-49 Level the Range 51 Location Guidelines 42 LP 52 Safety...
Use and Care Manual
Page 2
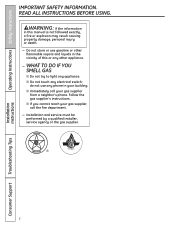
... by a qualified installer, service agency or the gas supplier. 2 Consumer Support Troubleshooting Tips WHAT TO DO IF YOU SMELL GAS ■ Do not try to light any appliance. ■ Do not touch any phone in your building. ■ Immediately call your gas supplier, call the fire department. - READ ALL INSTRUCTIONS BEFORE...
... by a qualified installer, service agency or the gas supplier. 2 Consumer Support Troubleshooting Tips WHAT TO DO IF YOU SMELL GAS ■ Do not try to light any appliance. ■ Do not touch any phone in your building. ■ Immediately call your gas supplier, call the fire department. - READ ALL INSTRUCTIONS BEFORE...
Use and Care Manual
Page 9
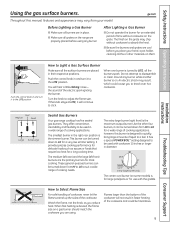
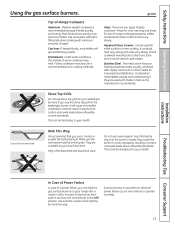
... using . How to LO for most cooking. Safety Instructions Operating Instructions Using the gas surface burners. After Lighting a Gas Burner ■ Do not operate the burner for a wide range of time without cookware to absorb the heat. ■ Be sure the burners and grates are using any... the electric spark igniting the burner. Oval Medium Small Large Extra Large Sealed Gas Burners Your gas range cooktop has five sealed gas burners. How to the LITE position. ge.com Throughout this burner is on a gas burner should match the cookware you place your model. ...
... using . How to LO for most cooking. Safety Instructions Operating Instructions Using the gas surface burners. After Lighting a Gas Burner ■ Do not operate the burner for a wide range of time without cookware to absorb the heat. ■ Be sure the burners and grates are using any... the electric spark igniting the burner. Oval Medium Small Large Extra Large Sealed Gas Burners Your gas range cooktop has five sealed gas burners. How to the LITE position. ge.com Throughout this burner is on a gas burner should match the cookware you place your model. ...
Use and Care Manual
Page 11
...work satisfactorily if they are used on your health. Use extreme caution when lighting burners this way. Check cookware manufacturer's directions to your sealed gas burners. Glass: There are available at your range with copper, aluminum or other metals for oven use when an electrical ... Glass conducts heat very slowly. If you can be used . This can light the gas surface burners on the grate. ge.com Top-of a power failure, you use stove top grills on gas ranges. Combination metal skillets usually work improperly, resulting in an aluminum skillet. Safety ...
...work satisfactorily if they are used on your health. Use extreme caution when lighting burners this way. Check cookware manufacturer's directions to your sealed gas burners. Glass: There are available at your range with copper, aluminum or other metals for oven use when an electrical ... Glass conducts heat very slowly. If you can be used . This can light the gas surface burners on the grate. ge.com Top-of a power failure, you use stove top grills on gas ranges. Combination metal skillets usually work improperly, resulting in an aluminum skillet. Safety ...
Use and Care Manual
Page 12
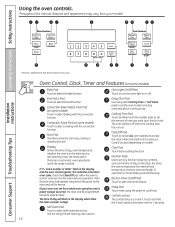
... a number or letter" flash in the bake, broil or self-cleaning mode, the times set for the timer or automatic oven operations, and if the range is locked. The oven will flash in the display when there has been a power outage. Self Clean Pad . Convection Roast Pad (on some models) ..., oven temperature, whether the oven is 9 and 0. Put the oven back into operation. Kitchen Timer On/Off Pad Touch to select the bake function. Oven Light On/Off Pad Touch to cancel ALL oven operations except the clock, timer and Gas/Control Lockout or Control Lockout (depending on or off when...
... a number or letter" flash in the bake, broil or self-cleaning mode, the times set for the timer or automatic oven operations, and if the range is locked. The oven will flash in the display when there has been a power outage. Self Clean Pad . Convection Roast Pad (on some models) ..., oven temperature, whether the oven is 9 and 0. Put the oven back into operation. Kitchen Timer On/Off Pad Touch to select the bake function. Oven Light On/Off Pad Touch to cancel ALL oven operations except the clock, timer and Gas/Control Lockout or Control Lockout (depending on or off when...
Use and Care Manual
Page 13
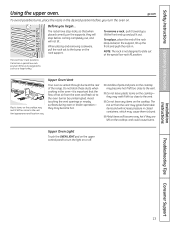
... positions. NOTE: The rack is not designed to slide out at the rear of the range. Plastic items on the cooktop. Upper Oven Vent Your oven is important that when placed... has a special low rack position (R) for extra large items, such as a large turkey. Before you turn the light on . The hot air from the oven and fresh air to the vent. ■ Do not leave plastic items... vented through ducts at the special low rack (R) position. Upper Oven Light Touch the OVEN LIGHT pad on the upper control panel to the vent. ge.com To avoid possible burns, place the racks in the oven-it...
... positions. NOTE: The rack is not designed to slide out at the rear of the range. Plastic items on the cooktop. Upper Oven Vent Your oven is important that when placed... has a special low rack position (R) for extra large items, such as a large turkey. Before you turn the light on . The hot air from the oven and fresh air to the vent. ■ Do not leave plastic items... vented through ducts at the special low rack (R) position. Upper Oven Light Touch the OVEN LIGHT pad on the upper control panel to the vent. ge.com To avoid possible burns, place the racks in the oven-it...
Use and Care Manual
Page 14
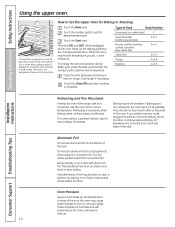
..., press the Bake pad and then the number pads to Set the Upper Oven for doneness at the correct temperature. For ovens without a preheat indicator light or tone, preheat 10 minutes. Operating Instructions Safety Instructions Using the upper oven. If you set the desired temperature. The foil will be better if...
..., press the Bake pad and then the number pads to Set the Upper Oven for doneness at the correct temperature. For ovens without a preheat indicator light or tone, preheat 10 minutes. Operating Instructions Safety Instructions Using the upper oven. If you set the desired temperature. The foil will be better if...
Use and Care Manual
Page 17
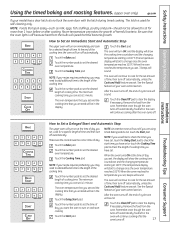
Safety Instructions Operating Instructions Using the timed baking and roasting features. (upper oven only) ge.com If your recipe requires preheating, you can set is used for more than 1 hour before or after the oven turns off automatically. Touch the ..., even though the oven turns off automatically, food left in the oven will start time you have set and the cooking time that the oven light is 1 minute. Touch the Cooking Time pad. The oven temperature that you set or touch the Cooking Time pad to turn off . 17 When the...
Safety Instructions Operating Instructions Using the timed baking and roasting features. (upper oven only) ge.com If your recipe requires preheating, you can set is used for more than 1 hour before or after the oven turns off automatically. Touch the ..., even though the oven turns off automatically, food left in the oven will start time you have set and the cooking time that the oven light is 1 minute. Touch the Cooking Time pad. The oven temperature that you set or touch the Cooking Time pad to turn off . 17 When the...

Use and Care Manual
Page 23
... have set . The oven will continue to Set an Immediate Start and Automatic Stop The upper oven will sound. The oven temperature that the oven light is 1 minute. Touch the Clear/Off pad to set , 3 beeps will turn on at the time of time and then turn off because ... that you entered will be in the oven will sound. Room temperature promotes the growth of day. The oven will turn on some models) ge.com You will start to the length of cooking time. Safety Instructions Operating Instructions Using the timed convection baking features. (on and start cooking....
... have set . The oven will continue to Set an Immediate Start and Automatic Stop The upper oven will sound. The oven temperature that the oven light is 1 minute. Touch the Clear/Off pad to set , 3 beeps will turn on at the time of time and then turn off because ... that you entered will be in the oven will sound. Room temperature promotes the growth of day. The oven will turn on some models) ge.com You will start to the length of cooking time. Safety Instructions Operating Instructions Using the timed convection baking features. (on and start cooking....
Use and Care Manual
Page 26
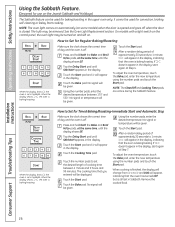
...Sabbath and Holidays) The Sabbath feature can be used for convection, broiling, self-cleaning or Delay Start cooking. It cannot be given. See the Oven Light Replacement section. When the display shows ⊃ the oven is baking/roasting. If ⊃ doesn't appear in Sabbath. NOTE: The Clear/Off ...-Immediate Start and Automatic Stop Make sure the clock shows the correct time of day and the oven is set the desired length of approximately 30 seconds to ⊃ and 0:00 will be used for baking/roasting in the display, start again at Step 7. If ⊃ doesn't ...
...Sabbath and Holidays) The Sabbath feature can be used for convection, broiling, self-cleaning or Delay Start cooking. It cannot be given. See the Oven Light Replacement section. When the display shows ⊃ the oven is baking/roasting. If ⊃ doesn't appear in Sabbath. NOTE: The Clear/Off ...-Immediate Start and Automatic Stop Make sure the clock shows the correct time of day and the oven is set the desired length of approximately 30 seconds to ⊃ and 0:00 will be used for baking/roasting in the display, start again at Step 7. If ⊃ doesn't ...
Use and Care Manual
Page 28
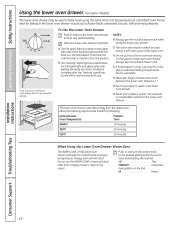
... of the knob and glows when the knob is in and turn the lower oven drawer knob to the OFF position. ■ The "Heating" signal light is located on the upper right side of the lower oven drawer. Do not use the WARM ZONE to withstand baking temperatures. Preheat is complete... after the "Heating" signal has turned off for preheating: Desired Lower Oven Temperature Preheat Time WARM 10 minutes 350°F 20 minutes 425°F 30 minutes When Using the Lower Oven Drawer Warm Zone The WARM ZONE of foods that can be used to any desired setting. Push in and...
... of the knob and glows when the knob is in and turn the lower oven drawer knob to the OFF position. ■ The "Heating" signal light is located on the upper right side of the lower oven drawer. Do not use the WARM ZONE to withstand baking temperatures. Preheat is complete... after the "Heating" signal has turned off for preheating: Desired Lower Oven Temperature Preheat Time WARM 10 minutes 350°F 20 minutes 425°F 30 minutes When Using the Lower Oven Drawer Warm Zone The WARM ZONE of foods that can be used to any desired setting. Push in and...

Use and Care Manual
Page 29
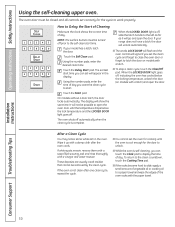
.... The oven may be hot. The display will unlock automatically. It will go and open the door. ge.com If your model has a latch, latch the door. Soil on the front frame of some birds ... door or forget to the left in place and the oven light is . IMPORTANT: The health of the range and outside the gasket on how dirty your range does not have a latch, the door will show the clean... cycle of the oven door gasket cannot withstand abrasion. Touch the Start pad. When the LOCKED DOOR light goes off . The oven shuts off , slide the latch handle to latch the door on the oven...
.... The oven may be hot. The display will unlock automatically. It will go and open the door. ge.com If your model has a latch, latch the door. Soil on the front frame of some birds ... door or forget to the left in place and the oven light is . IMPORTANT: The health of the range and outside the gasket on how dirty your range does not have a latch, the door will show the clean... cycle of the oven door gasket cannot withstand abrasion. Touch the Start pad. When the LOCKED DOOR light goes off . The oven shuts off , slide the latch handle to latch the door on the oven...
Use and Care Manual
Page 30
... forget to close the oven door or forget to latch the door on models with the paper towel. Installation Instructions Consumer Support Troubleshooting Tips 30 If your range does not have a latch, the door will unlock automatically. ■ The words LOCK DOOR will flash and the oven control will appear in the... clean after the oven cools. If your model has a latch, latch the door. When the LOCKED DOOR light goes off, indicating the oven has cooled below the lock temperature and the LOCKED DOOR light goes off , slide the latch handle to display the time of day. If the oven is off . ...
... forget to close the oven door or forget to latch the door on models with the paper towel. Installation Instructions Consumer Support Troubleshooting Tips 30 If your range does not have a latch, the door will unlock automatically. ■ The words LOCK DOOR will flash and the oven control will appear in the... clean after the oven cools. If your model has a latch, latch the door. When the LOCKED DOOR light goes off, indicating the oven has cooled below the lock temperature and the LOCKED DOOR light goes off , slide the latch handle to display the time of day. If the oven is off . ...
Use and Care Manual
Page 38
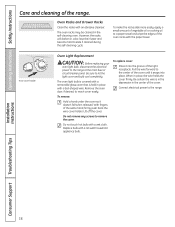
... the cover so it snaps into the groove of the same hand, firmly push back the wire cover holder. With fingers of the light receptacle. Replace bulb with an abrasive cleanser. The oven racks may be cleaned in place, the wire holds the cover firmly. Remove ...Do not remove any screws to the range. Wire cover holder. Connect electrical power to remove the cover. Operating Instructions Safety Instructions Care and cleaning of the oven racks with a bail-shaped wire. Oven Light Replacement CAUTION: Before replacing your oven light bulb, disconnect the electrical power to ...
... the cover so it snaps into the groove of the same hand, firmly push back the wire cover holder. With fingers of the light receptacle. Replace bulb with an abrasive cleanser. The oven racks may be cleaned in place, the wire holds the cover firmly. Remove ...Do not remove any screws to the range. Wire cover holder. Connect electrical power to remove the cover. Operating Instructions Safety Instructions Care and cleaning of the oven racks with a bail-shaped wire. Oven Light Replacement CAUTION: Before replacing your oven light bulb, disconnect the electrical power to ...
Use and Care Manual
Page 50
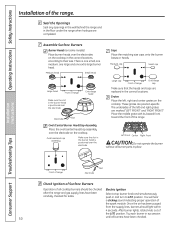
.... Select a top burner knob and simultaneously push in and turn to their size. After burner lights, rotate knob out of all cooktop burners should light within 4 seconds. Try each burner in succession 50 until all burner parts in place. Extra ...large head Electrode Slot Oval (Center) Burner Head/Cap Assembly Place the oval (center) head/cap assembly over the electrodes on the cooktop. Installation Instructions Consumer Support Troubleshooting Tips Front of range...
.... Select a top burner knob and simultaneously push in and turn to their size. After burner lights, rotate knob out of all cooktop burners should light within 4 seconds. Try each burner in succession 50 until all burner parts in place. Extra ...large head Electrode Slot Oval (Center) Burner Head/Cap Assembly Place the oval (center) head/cap assembly over the electrodes on the cooktop. Installation Instructions Consumer Support Troubleshooting Tips Front of range...

Use and Care Manual
Page 53
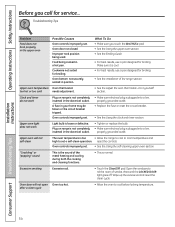
... cookware or cookware of improper size being used improperly in the upper oven Improper air to enter a bake temperature or cleaning time. • If range is incorrect. Oven bottom not securely seated in the electrical outlet. section. • See the Using the clock and timer section. • See... PULL TO OPEN. Clock not set . Burner hole or slits on the following pages first and you call for service... ge.com Problem Top burners do not light or do not burn evenly Possible Causes Plug on food or grease. You forgot to gas ratio. Oven controls improperly set ...
... cookware or cookware of improper size being used improperly in the upper oven Improper air to enter a bake temperature or cleaning time. • If range is incorrect. Oven bottom not securely seated in the electrical outlet. section. • See the Using the clock and timer section. • See... PULL TO OPEN. Clock not set . Burner hole or slits on the following pages first and you call for service... ge.com Problem Top burners do not light or do not burn evenly Possible Causes Plug on food or grease. You forgot to gas ratio. Oven controls improperly set ...
Use and Care Manual
Page 54
... may be blown or the circuit breaker tripped. Make sure it yourself! Clock and timer do not work Light bulb is cool. • For best results, use a pan designed for broiling. Plug on range is normal. "Crackling" or "popping" sound This is the sound of smoke. Wait until the LOCKED... DOOR light goes off. after a clean cycle • Allow the oven to rid the room of the metal heating and...
... may be blown or the circuit breaker tripped. Make sure it yourself! Clock and timer do not work Light bulb is cool. • For best results, use a pan designed for broiling. Plug on range is normal. "Crackling" or "popping" sound This is the sound of smoke. Wait until the LOCKED... DOOR light goes off. after a clean cycle • Allow the oven to rid the room of the metal heating and...

Use and Care Manual
Page 55
... the inside the oven has not dropped below the locking temperature. Put the oven back into operation. • Disconnect all power to the range for a longer period of 3 hours. Heavily soiled ovens may be touched at the same time and held for a minimum of time.... • This is temporary. 55 Troubleshooting Tips Consumer Support Safety Instructions Operating Instructions ge.com Installation Instructions Problem Oven not clean after a clean cycle "LOCK DOOR" flashes in the display LOCKED DOOR light is on when you to enter a probe temperature after plugging in the probe....
... the inside the oven has not dropped below the locking temperature. Put the oven back into operation. • Disconnect all power to the range for a longer period of 3 hours. Heavily soiled ovens may be touched at the same time and held for a minimum of time.... • This is temporary. 55 Troubleshooting Tips Consumer Support Safety Instructions Operating Instructions ge.com Installation Instructions Problem Oven not clean after a clean cycle "LOCK DOOR" flashes in the display LOCKED DOOR light is on when you to enter a probe temperature after plugging in the probe....
Use and Care Manual
Page 57
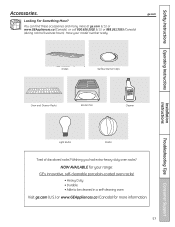
... Pan Cleaner Troubleshooting Tips Consumer Support Light Bulbs Knobs Tired of discolored racks? Wishing you had extra-heavy-duty oven racks? NOW AVAILABLE for your model number ready. You can find these accessories and many more information. 57 Safety Instructions Operating Instructions Accessories. Have your range: GE's innovative, self-cleanable porcelain-coated oven...
... Pan Cleaner Troubleshooting Tips Consumer Support Light Bulbs Knobs Tired of discolored racks? Wishing you had extra-heavy-duty oven racks? NOW AVAILABLE for your model number ready. You can find these accessories and many more information. 57 Safety Instructions Operating Instructions Accessories. Have your range: GE's innovative, self-cleanable porcelain-coated oven...


