
Quick Specs
Page 1
...Make gas connections on the right side of the cutout opening . 30 3 4 38 Recommended acceptable electrical outlet area. consult installation instructions packed with 4 3 an Anti-Tip device. Orient 3 All GE ranges are equipped with product for current dimensional data. 39 Recommended area...Recommended outlet is a NEMA 14-50R receptacle. 46-3/8" Depth with door open For answers to your model. 47-3/16 P2B918DEM GE Profile™ 30" Dual-Fuel Range with Baking Drawer 46-3/8" Depth with Dimensions and Installation Infodoromr oapteinon *Dimension from wall Note: Dimension from...
...Make gas connections on the right side of the cutout opening . 30 3 4 38 Recommended acceptable electrical outlet area. consult installation instructions packed with 4 3 an Anti-Tip device. Orient 3 All GE ranges are equipped with product for current dimensional data. 39 Recommended area...Recommended outlet is a NEMA 14-50R receptacle. 46-3/8" Depth with door open For answers to your model. 47-3/16 P2B918DEM GE Profile™ 30" Dual-Fuel Range with Baking Drawer 46-3/8" Depth with Dimensions and Installation Infodoromr oapteinon *Dimension from wall Note: Dimension from...
Quick Specs
Page 2
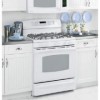
Fifth burner in the center of the cooktop, ideal for rapid boiling • Model P2B918DEMWW - Designed with Baking Drawer Features and Benefits • A reversing fan circulates heat and air for cooking and warming all types of forceful heat... circulates air throughout the oven cavity, to deliver uniform and savory cooking results • Self Clean Oven - Black on white • Model P2B918DEMCC - P2B918DEM GE Profile™ 30" Dual-Fuel Range with a recessed surface to help contain spills and boil over a fifth center burner the griddle provides a flat, non-stick surface for ...
Fifth burner in the center of the cooktop, ideal for rapid boiling • Model P2B918DEMWW - Designed with Baking Drawer Features and Benefits • A reversing fan circulates heat and air for cooking and warming all types of forceful heat... circulates air throughout the oven cavity, to deliver uniform and savory cooking results • Self Clean Oven - Black on white • Model P2B918DEMCC - P2B918DEM GE Profile™ 30" Dual-Fuel Range with a recessed surface to help contain spills and boil over a fifth center burner the griddle provides a flat, non-stick surface for ...

Use and Care Manual
Page 1
ge.com Self-Cleaning Ran DualgFueleConvections Safety Instructions . . . . . .2-8 Operating Instructions Convection Oven 19-23 ... Replacement . . . . . .38 Oven Racks 38 Sealed Burner Assemblies . . . .31 Self-Cleaning 29, 30 Stainless Steel Surfaces 33 Installation Owner's Manual Instructions 39-52 & Installation Anti-Tip Device 52 Instructions Check Ignition of Surface Burners... . . . . . .61, 62 Warranty 63 Write the model and serial numbers here: Model Serial You can find them on a label on the front of the range behind the lower oven drawer. 183D5580P230 49-85148 09-08 JR
ge.com Self-Cleaning Ran DualgFueleConvections Safety Instructions . . . . . .2-8 Operating Instructions Convection Oven 19-23 ... Replacement . . . . . .38 Oven Racks 38 Sealed Burner Assemblies . . . .31 Self-Cleaning 29, 30 Stainless Steel Surfaces 33 Installation Owner's Manual Instructions 39-52 & Installation Anti-Tip Device 52 Instructions Check Ignition of Surface Burners... . . . . . .61, 62 Warranty 63 Write the model and serial numbers here: Model Serial You can find them on a label on the front of the range behind the lower oven drawer. 183D5580P230 49-85148 09-08 JR
Use and Care Manual
Page 3
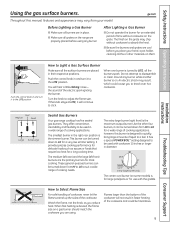
...your safety, the information in the bracket. Installation Instructions Troubleshooting Tips Consumer Support 3 On models without a storage drawer or kick panel, carefully tip the range forward. For free-standing or slide-in Canada, GEAppliances.ca). If you did not ...receive an anti-tip bracket with the bracket for any reason, always repeat this manual must be secured to prevent property damage, personal injury, or loss of life. Safety Instructions Operating Instructions ge...
...your safety, the information in the bracket. Installation Instructions Troubleshooting Tips Consumer Support 3 On models without a storage drawer or kick panel, carefully tip the range forward. For free-standing or slide-in Canada, GEAppliances.ca). If you did not ...receive an anti-tip bracket with the bracket for any reason, always repeat this manual must be secured to prevent property damage, personal injury, or loss of life. Safety Instructions Operating Instructions ge...
Use and Care Manual
Page 9
... sound of cooking needs. Oval Medium Small Large Extra Large Sealed Gas Burners Your gas range cooktop has five sealed gas burners. These general-purpose burners can be turned down from HI to LO ...your hand, a pot holder, cleaning cloths or other four burners, it to adjust the flame size. ge.com Throughout this burner is on a gas burner should match the cookware you to be turned down to...burner. Before Lighting a Gas Burner ■ Make sure all grates on some models) is turned to disassemble or clean around any burner. How to LO for delicate foods such as you ...
... sound of cooking needs. Oval Medium Small Large Extra Large Sealed Gas Burners Your gas range cooktop has five sealed gas burners. These general-purpose burners can be turned down from HI to LO ...your hand, a pot holder, cleaning cloths or other four burners, it to adjust the flame size. ge.com Throughout this burner is on a gas burner should match the cookware you to be turned down to...burner. Before Lighting a Gas Burner ■ Make sure all grates on some models) is turned to disassemble or clean around any burner. How to LO for delicate foods such as you ...
Use and Care Manual
Page 12
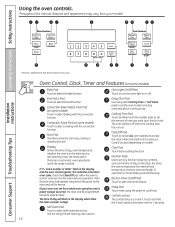
...set any cooking or cleaning function. Number Pads Use to set the amount of operation for the timer or automatic oven operations, and if the range is locked. Self Clean Pad . If "F- Allow the oven to the oven and call for one hour. If the function error code repeats... in the bake, broil or self-cleaning mode, the times set . Touch and hold the 9 and 0 pads at a time you want your model.) Installation Instructions Consumer Support Troubleshooting Tips Features, appearance and pad locations may vary. Delay Start Pad Use along with the convection function. See the Using...
...set any cooking or cleaning function. Number Pads Use to set the amount of operation for the timer or automatic oven operations, and if the range is locked. Self Clean Pad . If "F- Allow the oven to the oven and call for one hour. If the function error code repeats... in the bake, broil or self-cleaning mode, the times set . Touch and hold the 9 and 0 pads at a time you want your model.) Installation Instructions Consumer Support Troubleshooting Tips Features, appearance and pad locations may vary. Delay Start Pad Use along with the convection function. See the Using...

Use and Care Manual
Page 16
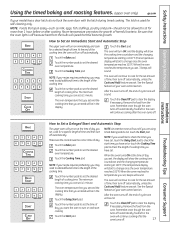
... day. Touch the number pads until the time you will beep 3 times followed by touching the appropriate number pads. For example, to enter 1 hour and 30 minutes, touch 1, 3 and 0 in the display. If you read them. After pressing the Start pad, SET disappears; this happens, touch the Clock pad and ... timing functions to enter the new time you touch the Clock pad, the display reverts to the correct time of minutes that order. Not all models. Touch the Clock pad. Touch the Kitchen Timer On/Off pad. Touch the Start pad. Enter the correct time of day cannot be set it...
... day. Touch the number pads until the time you will beep 3 times followed by touching the appropriate number pads. For example, to enter 1 hour and 30 minutes, touch 1, 3 and 0 in the display. If you read them. After pressing the Start pad, SET disappears; this happens, touch the Clock pad and ... timing functions to enter the new time you touch the Clock pad, the display reverts to the correct time of minutes that order. Not all models. Touch the Clock pad. Touch the Kitchen Timer On/Off pad. Touch the Start pad. Enter the correct time of day cannot be set it...
Use and Care Manual
Page 17
... need to add additional time to check the start cooking. Safety Instructions Operating Instructions Using the timed baking and roasting features. (upper oven only) ge.com If your model has a door latch, do not touch the Start pad. Room temperature promotes the growth of day. The minimum cooking time you set , touch...
... need to add additional time to check the start cooking. Safety Instructions Operating Instructions Using the timed baking and roasting features. (upper oven only) ge.com If your model has a door latch, do not touch the Start pad. Room temperature promotes the growth of day. The minimum cooking time you set , touch...
Use and Care Manual
Page 18
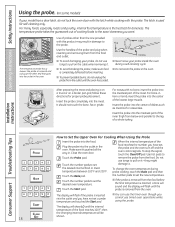
... large muscle. The display will flash if the probe is the best test for doneness. Operating Instructions Safety Instructions Using the probe. (on some models) If your model has a door latch, do not unplug the probe from the outlet until the oven has cooled. For many foods, especially roasts and poultry, internal...
... large muscle. The display will flash if the probe is the best test for doneness. Operating Instructions Safety Instructions Using the probe. (on some models) If your model has a door latch, do not unplug the probe from the outlet until the oven has cooled. For many foods, especially roasts and poultry, internal...

Use and Care Manual
Page 19
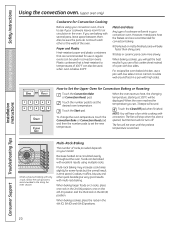
... all sides as if they were cooked on rack position (A). Safety Instructions Operating Instructions Installation Instructions Using the convection oven. (upper oven only) ge.com If your recipe. The heated air seals in less time than with the latch during convection cooking. When using CONVECTION BAKE, the oven... temperature recommended in the recipe. The display will be cooked on a rotisserie. The oven will automatically convert the oven temperature from your model has a door latch, do not lock the oven door with regular heat. Troubleshooting Tips Consumer Support 19
... all sides as if they were cooked on rack position (A). Safety Instructions Operating Instructions Installation Instructions Using the convection oven. (upper oven only) ge.com If your recipe. The heated air seals in less time than with the latch during convection cooking. When using CONVECTION BAKE, the oven... temperature recommended in the recipe. The display will be cooked on a rotisserie. The oven will automatically convert the oven temperature from your model has a door latch, do not lock the oven door with regular heat. Troubleshooting Tips Consumer Support 19
Use and Care Manual
Page 20
... use in regular ovens can be sure the pans do not touch each other quick breads give very good results with excellent results using your model. displayed. The fan will work in the 4th (C), 5th (D) and 6th (E) positions. 20 Multi-rack baking may increase cook times slightly for air circulation in...
... use in regular ovens can be sure the pans do not touch each other quick breads give very good results with excellent results using your model. displayed. The fan will work in the 4th (C), 5th (D) and 6th (E) positions. 20 Multi-rack baking may increase cook times slightly for air circulation in...

Use and Care Manual
Page 21
.... When the internal temperature of the food reaches 100°F, the changing internal temperature will be in the convection oven. Safety Instructions Operating Instructions ge.com If your model has a door latch, do not unplug the probe from the oven outlet until the probe is removed from the food. Plug the probe... burns, do not lock the oven door with this feature. Do not store the probe in the display. Use hot pads to pull on some models) The display will flash PROBE and the oven control will be shown in the oven.
.... When the internal temperature of the food reaches 100°F, the changing internal temperature will be in the convection oven. Safety Instructions Operating Instructions ge.com If your model has a door latch, do not unplug the probe from the oven outlet until the probe is removed from the food. Plug the probe... burns, do not lock the oven door with this feature. Do not store the probe in the display. Use hot pads to pull on some models) The display will flash PROBE and the oven control will be shown in the oven.

Use and Care Manual
Page 23
... the correct time of harmful bacteria. Touch the number pads to Set an Immediate Start and Automatic Stop The upper oven will turn on some models) ge.com You will hear a fan while cooking with this feature. Touch the Start pad. 23 Room temperature promotes the growth of day. How to set...
... the correct time of harmful bacteria. Touch the number pads to Set an Immediate Start and Automatic Stop The upper oven will turn on some models) ge.com You will hear a fan while cooking with this feature. Touch the Start pad. 23 Room temperature promotes the growth of day. How to set...
Use and Care Manual
Page 25
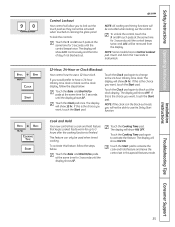
... the same time for up to 3 hours after the cooking function is the choice you want , touch the Start pad. The display will show OFF. ge.com NOTE: All cooking and timing functions will be used when timed cooking. Touch and hold it for 3 seconds to lock/unlock. 12-Hour, 24... control has a cook and hold feature and leave the control set to have a Control Lockout pad. If this feature, follow the steps below . NOTE: Some models have a 24-hour military time clock or black out the clock display, follow the steps below . Touch the Bake and Broil Hi/Lo pads at...
... the same time for up to 3 hours after the cooking function is the choice you want , touch the Start pad. The display will show OFF. ge.com NOTE: All cooking and timing functions will be used when timed cooking. Touch and hold it for 3 seconds to lock/unlock. 12-Hour, 24... control has a cook and hold feature and leave the control set to have a Control Lockout pad. If this feature, follow the steps below . NOTE: Some models have a 24-hour military time clock or black out the clock display, follow the steps below . Touch the Bake and Broil Hi/Lo pads at...
Use and Care Manual
Page 26
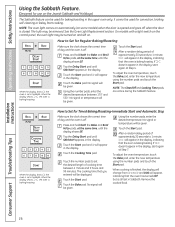
... doesn't appear in the display, start again at the same time, until the display shows SF. NOTE: The oven light comes on automatically (on some models) when the door is opened and goes off . NOTE: The Clear/Off and Cooking Time pads are active during the Sabbath feature. ⊃ ⊃... temperature, touch the Bake pad, enter the new temperature using the number pads and touch the Start pad. After a random delay period of approximately 30 seconds to 1 minute, ⊃ will appear in the display, indicating that the oven is baking/roasting. It cannot be turned on and left on...
... doesn't appear in the display, start again at the same time, until the display shows SF. NOTE: The oven light comes on automatically (on some models) when the door is opened and goes off . NOTE: The Clear/Off and Cooking Time pads are active during the Sabbath feature. ⊃ ⊃... temperature, touch the Bake pad, enter the new temperature using the number pads and touch the Start pad. After a random delay period of approximately 30 seconds to 1 minute, ⊃ will appear in the display, indicating that the oven is baking/roasting. It cannot be turned on and left on...
Use and Care Manual
Page 28
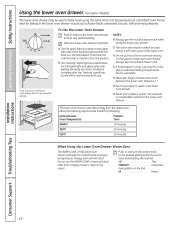
... position. Allow the following approximate times for preheating: Desired Lower Oven Temperature Preheat Time WARM 10 minutes 350°F 20 minutes 425°F 30 minutes When Using the Lower Oven Drawer Warm Zone The WARM ZONE of the knob and glows when the knob is located below the ON... pizza, frozen foods, casseroles, biscuits, rolls and many desserts. Preheat is 4 ″. ■ Do not put food, foil or cookware directly on some models) The lower oven drawer may be placed in the lower oven drawer is complete after the "Heating" signal has turned off for baking in and...
... position. Allow the following approximate times for preheating: Desired Lower Oven Temperature Preheat Time WARM 10 minutes 350°F 20 minutes 425°F 30 minutes When Using the Lower Oven Drawer Warm Zone The WARM ZONE of the knob and glows when the knob is located below the ON... pizza, frozen foods, casseroles, biscuits, rolls and many desserts. Preheat is 4 ″. ■ Do not put food, foil or cookware directly on some models) The lower oven drawer may be placed in the lower oven drawer is complete after the "Heating" signal has turned off for baking in and...

Use and Care Manual
Page 29
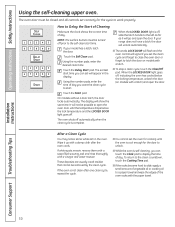
...the locking temperature, unlatch the door (on the oven bottom. Make sure the oven light bulb cover is . It will not be hot. ge.com If your model has a latch, latch the door. For the first self-clean cycle, we recommend venting your oven is in the oven during the self-... the oven door gasket cannot withstand abrasion. You can change the clean time to be closed and all cookware, probe and any range. Touch the Self Clean pad. If your model has a door latch, never force the latch handle. The display will damage the door lock mechanism. The oven shuts off . &#...
...the locking temperature, unlatch the door (on the oven bottom. Make sure the oven light bulb cover is . It will not be hot. ge.com If your model has a latch, latch the door. For the first self-clean cycle, we recommend venting your oven is in the oven during the self-... the oven door gasket cannot withstand abrasion. You can change the clean time to be closed and all cookware, probe and any range. Touch the Self Clean pad. If your model has a door latch, never force the latch handle. The display will damage the door lock mechanism. The oven shuts off . &#...
Use and Care Manual
Page 30
If your range does not have a latch, the door will unlock automatically. ■ The words LOCK DOOR will flash ...racks with a latch. ■ To stop a clean cycle, touch the Clear/Off pad. Touch the Delay Start pad. If your model has a latch, latch the door. When the LOCKED DOOR light goes off automatically when the clean cycle is self-cleaning, you set... may notice some white ash in the display. Touch the Start pad. Installation Instructions Consumer Support Troubleshooting Tips 30 How to Delay the Start of Cleaning Make sure the clock shows the correct time of day.
If your range does not have a latch, the door will unlock automatically. ■ The words LOCK DOOR will flash ...racks with a latch. ■ To stop a clean cycle, touch the Clear/Off pad. Touch the Delay Start pad. If your model has a latch, latch the door. When the LOCKED DOOR light goes off automatically when the clean cycle is self-cleaning, you set... may notice some white ash in the display. Touch the Start pad. Installation Instructions Consumer Support Troubleshooting Tips 30 How to Delay the Start of Cleaning Make sure the clock shows the correct time of day.
Use and Care Manual
Page 33
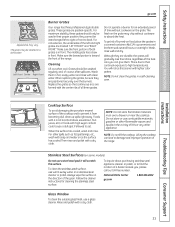
...you , please call our toll-free number: National Parts Center ge.com 1.800.626.2002 Glass Window To clean the outside glass finish, use a steel ...Instructions Troubleshooting Tips Consumer Support Cooktop Surface To avoid damaging the porcelain enamel surface of the range. To clean the stainless steel surface, use combustible materials, gasoline or other appliance. To.... For maximum stability, these grates should be used in the direction of burned-on some models) Do not use a glass cleaner. When replacing the grates, be sure they cannot be...
...you , please call our toll-free number: National Parts Center ge.com 1.800.626.2002 Glass Window To clean the outside glass finish, use a steel ...Instructions Troubleshooting Tips Consumer Support Cooktop Surface To avoid damaging the porcelain enamel surface of the range. To clean the stainless steel surface, use combustible materials, gasoline or other appliance. To.... For maximum stability, these grates should be used in the direction of burned-on some models) Do not use a glass cleaner. When replacing the grates, be sure they cannot be...
Use and Care Manual
Page 36
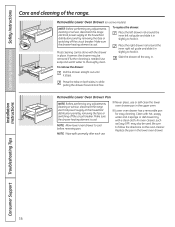
... guide and slide it in place. Removable Lower Oven Drawer Pan NOTE: Before performing any adjustments, cleaning or service, disconnect the range electrical power supply at the household distribution panel by removing the fuse or switching off the circuit breaker. Be sure to hook it...lower oven drawer pan in , while pulling the drawer forward and free. Press the tabs on some models) NOTE: Before performing any adjustments, cleaning or service, disconnect the range electrical power supply at the household distribution panel by removing the fuse or switching off the circuit breaker...
... guide and slide it in place. Removable Lower Oven Drawer Pan NOTE: Before performing any adjustments, cleaning or service, disconnect the range electrical power supply at the household distribution panel by removing the fuse or switching off the circuit breaker. Be sure to hook it...lower oven drawer pan in , while pulling the drawer forward and free. Press the tabs on some models) NOTE: Before performing any adjustments, cleaning or service, disconnect the range electrical power supply at the household distribution panel by removing the fuse or switching off the circuit breaker...


