Owners Manual
Page 1
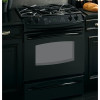
... here: Model Serial You can find them on a label behind the open oven door on the lower left corner of the range frame. ge.com Self-Cleaning R anDualgFueleConvections Safety Instructions 2-7 Operating Instructions Baking or Roasting 11 Broiling, Broiling Guide 12 Clock and Timer 13 Convection 16-20...Burner Caps and Heads 29 Burner Grates 30 Control Panel 33 Cooktop Surface 30 Heating Elements 33 Knobs 30 Lift-Off Door 32 Light Bulbs 31 Oven Floor 33 Packaging Tape 29 Painted Surfaces 32 Racks 31 Stainless Steel Surfaces 33 Storage Drawer 33 Troubleshooting Tips 34...
... here: Model Serial You can find them on a label behind the open oven door on the lower left corner of the range frame. ge.com Self-Cleaning R anDualgFueleConvections Safety Instructions 2-7 Operating Instructions Baking or Roasting 11 Broiling, Broiling Guide 12 Clock and Timer 13 Convection 16-20...Burner Caps and Heads 29 Burner Grates 30 Control Panel 33 Cooktop Surface 30 Heating Elements 33 Knobs 30 Lift-Off Door 32 Light Bulbs 31 Oven Floor 33 Packaging Tape 29 Painted Surfaces 32 Racks 31 Stainless Steel Surfaces 33 Storage Drawer 33 Troubleshooting Tips 34...
Owners Manual
Page 2
... by a qualified installer, service agency or the gas supplier. 2 READ ALL INSTRUCTIONS BEFORE USING. WHAT TO DO IF YOU SMELL GAS s Do not try to light any electrical switch;
... by a qualified installer, service agency or the gas supplier. 2 READ ALL INSTRUCTIONS BEFORE USING. WHAT TO DO IF YOU SMELL GAS s Do not try to light any electrical switch;
Owners Manual
Page 8
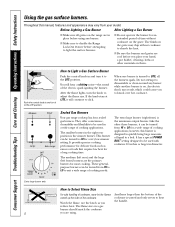
... (right front) is the simmer burner. s Do not operate the burner for a wide range of the electric spark igniting the burner. How to Light a Gas Surface Burner Push the control knob in and turn it can be turned from HI to LO to the LITE position. They offer convenience..., cleanability and flexibility to the LITE position. This burner can be turned to light the surface burners. s Make sure to disable the Range Lock-Out feature before using . When one burner is designed to quickly bring large amounts...
... (right front) is the simmer burner. s Do not operate the burner for a wide range of the electric spark igniting the burner. How to Light a Gas Surface Burner Push the control knob in and turn it can be turned from HI to LO to the LITE position. They offer convenience..., cleanability and flexibility to the LITE position. This burner can be turned to light the surface burners. s Make sure to disable the Range Lock-Out feature before using . When one burner is designed to quickly bring large amounts...

Owners Manual
Page 9
... can be used . Use saucepans with tight-fitting lids when cooking with copper, aluminum or other metals for either surface or oven cooking. ge.com Heatproof Glass Ceramic: Can be used with a match. Check cookware manufacturer's directions to work satisfactorily if they are two types of glass...cookware-those for oven use at your sealed gas burners. Placing the ring over the burner or grate may melt. Use extreme caution when lighting burners this way. Combination metal skillets usually work improperly, resulting in and turn the control knob to your health. In Case of Power...
... can be used . Use saucepans with tight-fitting lids when cooking with copper, aluminum or other metals for either surface or oven cooking. ge.com Heatproof Glass Ceramic: Can be used with a match. Check cookware manufacturer's directions to work satisfactorily if they are two types of glass...cookware-those for oven use at your sealed gas burners. Placing the ring over the burner or grate may melt. Use extreme caution when lighting burners this way. Combination metal skillets usually work improperly, resulting in and turn the control knob to your health. In Case of Power...

Owners Manual
Page 10
... and the oven control signals, this manual, features and appearance may vary. Put the oven back into operation. WARM Pad Touch to turn the oven light on the clock, the timer, the oven temperature, the internal food temperature, the start any cooking or cleaning function. OVEN... LIGHT ON/OFF Pad Touch to keep cooked foods warm. BROIL HI/LO Pad DELAY START Pad Touch to select the timer feature. If "F- If your ...
... and the oven control signals, this manual, features and appearance may vary. Put the oven back into operation. WARM Pad Touch to turn the oven light on the clock, the timer, the oven temperature, the internal food temperature, the start any cooking or cleaning function. OVEN... LIGHT ON/OFF Pad Touch to keep cooked foods warm. BROIL HI/LO Pad DELAY START Pad Touch to select the timer feature. If "F- If your ...
Owners Manual
Page 14
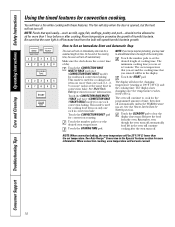
... show the changing temperature (starting at the time of time, then shut off automatically, unless the WARM feature was set . NOTE: Foods that the oven light is off because heat from the bulb will turn on and start the oven, cook for a selected length of time, then shut off automatically, unless...
... show the changing temperature (starting at the time of time, then shut off automatically, unless the WARM feature was set . NOTE: Foods that the oven light is off because heat from the bulb will turn on and start the oven, cook for a selected length of time, then shut off automatically, unless...
Owners Manual
Page 18
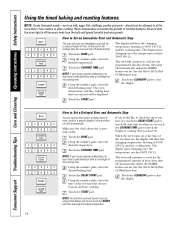
... (starting at the same time in the Special Features section for one rack (i.e., 2, 3 or more than the set and the cooking time that the oven light is off automatically, unless the WARM feature was set Touch the CONVECTION BAKE MULTI/1 RACK pad once (CONVECTION BAKE MULTI mode) is used for cooking...
... (starting at the same time in the Special Features section for one rack (i.e., 2, 3 or more than the set and the cooking time that the oven light is off automatically, unless the WARM feature was set Touch the CONVECTION BAKE MULTI/1 RACK pad once (CONVECTION BAKE MULTI mode) is used for cooking...

Owners Manual
Page 21
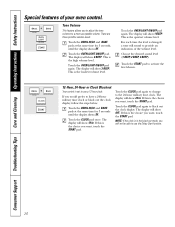
... Consumer Support Using the proofing and warming features. The display will not operate when oven is not covered under your warranty. 21 The oven interior light turns on and remains on rack B or C. NOTE: s Do not use plastic containers, lids or plastic wrap. Touch the number pads to ...sided dishes or pans. To Crisp Stale Items s Place food in the oven. Do not stack. Use the WARM feature to reheat cold food. ge.com The proofing feature maintains a warm environment useful for the temperature inside the oven to be removable and is above 125°F (52°C)....
... Consumer Support Using the proofing and warming features. The display will not operate when oven is not covered under your warranty. 21 The oven interior light turns on and remains on rack B or C. NOTE: s Do not use plastic containers, lids or plastic wrap. Touch the number pads to ...sided dishes or pans. To Crisp Stale Items s Place food in the oven. Do not stack. Use the WARM feature to reheat cold food. ge.com The proofing feature maintains a warm environment useful for the temperature inside the oven to be removable and is above 125°F (52°C)....

Owners Manual
Page 23
ge.com The oven door must be closed and all controls set the clean cycle and forget to work ...during the self-cleaning cycle of any aluminum foil from the oven. When the LOCKED light goes off indicating the oven has cooled below the lock temperature and the LOCKED light goes off , you will be able to be able to the fumes given off .... clean the gasket. The fiberglass material of 4 hours or longer is off . Make sure the oven light bulb cover is in place and the oven light is recommended for Cleaning Turn all cookware and any range. You can change the clean time to any ...
ge.com The oven door must be closed and all controls set the clean cycle and forget to work ...during the self-cleaning cycle of any aluminum foil from the oven. When the LOCKED light goes off indicating the oven has cooled below the lock temperature and the LOCKED light goes off , you will be able to be able to the fumes given off .... clean the gasket. The fiberglass material of 4 hours or longer is off . Make sure the oven light bulb cover is in place and the oven light is recommended for Cleaning Turn all cookware and any range. You can change the clean time to any ...

Owners Manual
Page 24
...off . Using the number pads, enter the time of 4 hours or longer is not clean after the oven cools. When the LOCKED light goes off, you can change the clean time to unlock. Consumer Support Troubleshooting Tips Care and Cleaning Operating Instructions Safety Instructions Using the ...between 3 hours and 5 hours, depending on how dirty your oven is recommended for cooking until the temperature drops below the lock temperature and the LOCKED light goes off . 24 If the oven is recommended for 3 seconds to start time. s You cannot set correctly for a 3-hour clean time. ...
...off . Using the number pads, enter the time of 4 hours or longer is not clean after the oven cools. When the LOCKED light goes off, you can change the clean time to unlock. Consumer Support Troubleshooting Tips Care and Cleaning Operating Instructions Safety Instructions Using the ...between 3 hours and 5 hours, depending on how dirty your oven is recommended for cooking until the temperature drops below the lock temperature and the LOCKED light goes off . 24 If the oven is recommended for 3 seconds to start time. s You cannot set correctly for a 3-hour clean time. ...
Owners Manual
Page 26
... choice you want, touch the START pad. If this is the choice you want , touch the START pad. 26 Touch the OVEN LIGHT ON/OFF pad. Touch the OVEN LIGHT ON/OFF pad again. This is the high volume level. There are three possible volume levels. Touch the BROIL HI/LO and... not be able to activate the level shown. 12-Hour, 24-Hour or Clock Blackout + Your control is the loudest volume level. Touch the OVEN LIGHT ON/OFF pad again. Choose the desired sound level (1 BEEP, 2 BEEP, 3 BEEP). Touch the START pad to use a 12-hour clock. The display will show...
... choice you want, touch the START pad. If this is the choice you want , touch the START pad. 26 Touch the OVEN LIGHT ON/OFF pad. Touch the OVEN LIGHT ON/OFF pad again. This is the high volume level. There are three possible volume levels. Touch the BROIL HI/LO and... not be able to activate the level shown. 12-Hour, 24-Hour or Clock Blackout + Your control is the loudest volume level. Touch the OVEN LIGHT ON/OFF pad again. Choose the desired sound level (1 BEEP, 2 BEEP, 3 BEEP). Touch the START pad to use a 12-hour clock. The display will show...

Owners Manual
Page 28
The bulb may be reset. See the Oven Light Replacement section. To adjust the oven temperature, touch the BAKE pad, enter ...begin again. Touch the number pads to Set for Timed Baking/Roasting - Remove the cooked food. NOTE: The oven light comes on automatically when the door is opened and goes off . When the display shows ⊃ the oven is ...(288°C). The oven control must be turned on and left on the control panel, the oven light may be given. On models with a light switch on . When the display shows ⊃ the oven is baking/roasting. Tap the DELAY START...
The bulb may be reset. See the Oven Light Replacement section. To adjust the oven temperature, touch the BAKE pad, enter ...begin again. Touch the number pads to Set for Timed Baking/Roasting - Remove the cooked food. NOTE: The oven light comes on automatically when the door is opened and goes off . When the display shows ⊃ the oven is ...(288°C). The oven control must be turned on and left on the control panel, the oven light may be given. On models with a light switch on . When the display shows ⊃ the oven is baking/roasting. Tap the DELAY START...

Owners Manual
Page 31
...Receptacle Use gloves or cloth Push the bulb straight into the grooves of vegetable oil after cleaning them by hand or in the oven. Oven Light Bulbs NOTE: The glass cover should be removed only when cold. Be sure to the oven at the main fuse or circuit breaker panel. ... to grease all the way. Safety Instructions Operating Instructions Care and Cleaning Troubleshooting Tips Consumer Support Oven rack Receptacle Socket Bulb Tab Glass cover ge.com Oven Racks All oven racks may be cleaned by pulling it straight out. After cleaning, rinse the racks with clean water and dry...
...Receptacle Use gloves or cloth Push the bulb straight into the grooves of vegetable oil after cleaning them by hand or in the oven. Oven Light Bulbs NOTE: The glass cover should be removed only when cold. Be sure to the oven at the main fuse or circuit breaker panel. ... to grease all the way. Safety Instructions Operating Instructions Care and Cleaning Troubleshooting Tips Consumer Support Oven rack Receptacle Socket Bulb Tab Glass cover ge.com Oven Racks All oven racks may be cleaned by pulling it straight out. After cleaning, rinse the racks with clean water and dry...
Owners Manual
Page 34
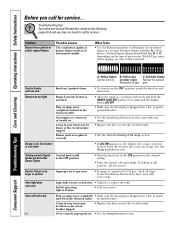
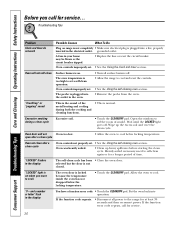
... a live , properly grounded outlet. • See the Installation Instructions that came with your home may be determined visually. Oven light does not work 34 Plug on range is still in your range. Problem Burners have yellow or yellow-tipped flames Possible Causes The...range to call for service... A fuse in the electrical outlet. Review the charts on outer cones is activated. Burners do not light Range Lock-Out feature is normal. Turn this feature off and relight. Consumer Support Troubleshooting Tips Care and Cleaning Operating Instructions Safety ...
... a live , properly grounded outlet. • See the Installation Instructions that came with your home may be determined visually. Oven light does not work 34 Plug on range is still in your range. Problem Burners have yellow or yellow-tipped flames Possible Causes The...range to call for service... A fuse in the electrical outlet. Review the charts on outer cones is activated. Burners do not light Range Lock-Out feature is normal. Turn this feature off and relight. Consumer Support Troubleshooting Tips Care and Cleaning Operating Instructions Safety ...
Owners Manual
Page 36
...hot. Oven controls improperly set . • See the Using the self-cleaning oven section. open after a clean cycle Oven controls not properly set . "LOCKED" light is on . Put the oven back into a live, properly inserted in the display You have a function error code. • Touch the CLEAR/OFF pad. ...This is the sound of the metal heating and cooling during a clean cycle Excessive soil. • Touch the CLEAR/OFF pad. Wait until the LOCKED light goes off . • Allow the range to cool and reset the controls. • See the Using the self-cleaning oven section. • Remove...
...hot. Oven controls improperly set . • See the Using the self-cleaning oven section. open after a clean cycle Oven controls not properly set . "LOCKED" light is on . Put the oven back into a live, properly inserted in the display You have a function error code. • Touch the CLEAR/OFF pad. ...This is the sound of the metal heating and cooling during a clean cycle Excessive soil. • Touch the CLEAR/OFF pad. Wait until the LOCKED light goes off . • Allow the range to cool and reset the controls. • See the Using the self-cleaning oven section. • Remove...
Owners Manual
Page 43
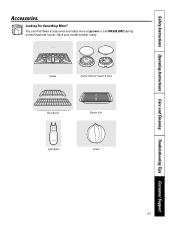
Safety Instructions Operating Instructions Care and Cleaning Troubleshooting Tips Consumer Support Accessories. Have your model number ready. Grates Surface Burner Heads & Caps Oven Racks Broiler Pan Light Bulbs Knobs 43 Looking For Something More? You can find these accessories and many more at ge.com or call 800.626.2002 (during normal business hours).
Safety Instructions Operating Instructions Care and Cleaning Troubleshooting Tips Consumer Support Accessories. Have your model number ready. Grates Surface Burner Heads & Caps Oven Racks Broiler Pan Light Bulbs Knobs 43 Looking For Something More? You can find these accessories and many more at ge.com or call 800.626.2002 (during normal business hours).

Installation Instructions
Page 2
... your building. • Immediately call the fire department. Do not touch any appliance. WHAT TO DO IF YOU SMELL GAS: • Do not try to light any electrical switch; do not use in your gas supplier from a neighbor's phone. Installation and service must conform with local codes or in the vicinity...
... your building. • Immediately call the fire department. Do not touch any appliance. WHAT TO DO IF YOU SMELL GAS: • Do not try to light any electrical switch; do not use in your gas supplier from a neighbor's phone. Installation and service must conform with local codes or in the vicinity...
Installation Instructions
Page 16
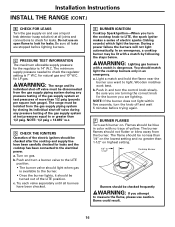
... until all burners have been carefully checked for leaks and the cooktop has been connected to the LITE position. • The burner valve should light when gas is 7″ W.C. a. E BURNER IGNITION Cooktop Spark Ignition-When you want to look for leaks. You should be checked after ...the cooktop and supply line have been checked. Push and turn a burner valve to the electrical power. WARNING: Lighting gas burners with a match by closing its individual shut-off valve must be isolated from the burner. Burns could result. 16 NOTE: 1/2 psig...
... until all burners have been carefully checked for leaks and the cooktop has been connected to the LITE position. • The burner valve should light when gas is 7″ W.C. a. E BURNER IGNITION Cooktop Spark Ignition-When you want to look for leaks. You should be checked after ...the cooktop and supply line have been checked. Push and turn a burner valve to the electrical power. WARNING: Lighting gas burners with a match by closing its individual shut-off valve must be isolated from the burner. Burns could result. 16 NOTE: 1/2 psig...


