Owners Manual
Page 1
ge.com Self-Cleaning R anDualgFueleConvections Safety Instructions 2-7 Operating Instructions Baking or Roasting 11 Broiling, Broiling Guide 12 Clock and Timer 13 Convection 16-20 Cookware 9 Oven 10-28 Probe 15 Proofing 21 Range Lock-Out 13 Sabbath Feature 28 Self-Cleaning 23, 24 Special Features 25-27 Surface Burners 8, 9 Thermostat 22 Timed Baking & Roasting 14 Warming 21 Care and Cleaning Burner Caps and Heads 29 Burner Grates 30 Control Panel 33 Cooktop Surface 30 Heating Elements 33 Knobs 30 Lift-Off Door 32 Light Bulbs 31 Oven Floor 33 Packaging Tape 29 ...
ge.com Self-Cleaning R anDualgFueleConvections Safety Instructions 2-7 Operating Instructions Baking or Roasting 11 Broiling, Broiling Guide 12 Clock and Timer 13 Convection 16-20 Cookware 9 Oven 10-28 Probe 15 Proofing 21 Range Lock-Out 13 Sabbath Feature 28 Self-Cleaning 23, 24 Special Features 25-27 Surface Burners 8, 9 Thermostat 22 Timed Baking & Roasting 14 Warming 21 Care and Cleaning Burner Caps and Heads 29 Burner Grates 30 Control Panel 33 Cooktop Surface 30 Heating Elements 33 Knobs 30 Lift-Off Door 32 Light Bulbs 31 Oven Floor 33 Packaging Tape 29 ...

Owners Manual
Page 4
... manual. Do not use . Failure to play with the provided installation instructions. s Have the installer show you the location of the range gas shut-off valve and how to shut it to prevent fire or smoke damage should be allowed to repair or replace any other linens a safe distance from the plug. The qualified agency performing this appliance. Any adjustment and service should the packaging material ignite...
... manual. Do not use . Failure to play with the provided installation instructions. s Have the installer show you the location of the range gas shut-off valve and how to shut it to prevent fire or smoke damage should be allowed to repair or replace any other linens a safe distance from the plug. The qualified agency performing this appliance. Any adjustment and service should the packaging material ignite...
Owners Manual
Page 5
... use this kind of the range. Turn the controls off or by covering it directly over , causing severe personal injury. s Do not store flammable materials in cabinets above a range or on the backsplash of a range-children climbing on a surface burner by closing the oven door and turning the control to damage and improper operation of interest to children should not be seriously injured. Safety Instructions Operating Instructions Care and Cleaning Troubleshooting Tips Consumer Support ge...
... use this kind of the range. Turn the controls off or by covering it directly over , causing severe personal injury. s Do not store flammable materials in cabinets above a range or on the backsplash of a range-children climbing on a surface burner by closing the oven door and turning the control to damage and improper operation of interest to children should not be seriously injured. Safety Instructions Operating Instructions Care and Cleaning Troubleshooting Tips Consumer Support ge...

Owners Manual
Page 6
... or damp pot holders on hot surfaces may catch on the cooktop. s Do not flame foods on fire. WARNING! SURFACE BURNERS Use proper pan size-avoid pans that the controls for effective shallow or deep-fat frying. s Use the least possible amount of hot fat, especially a deep fat fryer. s Adjust the top burner flame size so it is added. the smoking point. Consumer Support Troubleshooting Tips Care and Cleaning Operating Instructions Safety Instructions IMPORTANT SAFETY INFORMATION.
... or damp pot holders on hot surfaces may catch on the cooktop. s Do not flame foods on fire. WARNING! SURFACE BURNERS Use proper pan size-avoid pans that the controls for effective shallow or deep-fat frying. s Use the least possible amount of hot fat, especially a deep fat fryer. s Adjust the top burner flame size so it is added. the smoking point. Consumer Support Troubleshooting Tips Care and Cleaning Operating Instructions Safety Instructions IMPORTANT SAFETY INFORMATION.

Owners Manual
Page 7
... as aluminum foil. The door gasket is used in this Owner's Manual. s If the self-cleaning mode malfunctions, turn the oven off and disconnect the power supply. OVEN Stand away from grease buildup. s Keep the oven free from the range when opening the oven door. WARNING: NEVER cover any slots, holes or passages in a broiler pan, press the CLEAR/OFF pad and keep the oven door closed to these temperatures usually protects against burns...
... as aluminum foil. The door gasket is used in this Owner's Manual. s If the self-cleaning mode malfunctions, turn the oven off and disconnect the power supply. OVEN Stand away from grease buildup. s Keep the oven free from the range when opening the oven door. WARNING: NEVER cover any slots, holes or passages in a broiler pan, press the CLEAR/OFF pad and keep the oven door closed to these temperatures usually protects against burns...

Owners Manual
Page 10
... may vary. Oven Control, Clock and Timer Features and Settings BAKE Pad Touch to select self-cleaning function. Put the oven back into operation. Touch and hold the RANGE LOCK-OUT pad SELF CLEAN LO/STD Pad for service. burners, oven burners and control panel so they cannot be reset. Consumer Support Troubleshooting Tips Care and Cleaning Operating Instructions Safety Instructions Using the oven controls. (Throughout this indicates a function error code. CONVECTION BAKE MULTI/1 RACK Pad Touch to the oven and call for 3 seconds to lock/unlock the surface 10...
... may vary. Oven Control, Clock and Timer Features and Settings BAKE Pad Touch to select self-cleaning function. Put the oven back into operation. Touch and hold the RANGE LOCK-OUT pad SELF CLEAN LO/STD Pad for service. burners, oven burners and control panel so they cannot be reset. Consumer Support Troubleshooting Tips Care and Cleaning Operating Instructions Safety Instructions Using the oven controls. (Throughout this indicates a function error code. CONVECTION BAKE MULTI/1 RACK Pad Touch to the oven and call for 3 seconds to lock/unlock the surface 10...
Owners Manual
Page 13
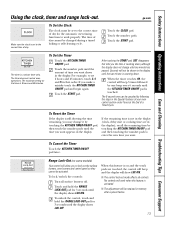
... surface burners off. The maximum setting on and the touch pads are in the display), recall the remaining time by following the steps in the display. No controls will not be set to the correct time of a Timed Cycle. Safety Instructions Operating Instructions Care and Cleaning Troubleshooting Tips Consumer Support Using the clock, timer and range lock-out. When the timer reaches :00, the control will be activated. Touch the START pad. For example, to lock out the surface burners, oven burners and control panel...
... surface burners off. The maximum setting on and the touch pads are in the display), recall the remaining time by following the steps in the display. No controls will not be set to the correct time of a Timed Cycle. Safety Instructions Operating Instructions Care and Cleaning Troubleshooting Tips Consumer Support Using the clock, timer and range lock-out. When the timer reaches :00, the control will be activated. Touch the START pad. For example, to lock out the surface burners, oven burners and control panel...

Owners Manual
Page 16
...; Conversion feature automatically reduces the set regular baking temperature by the recommended 25°F (14°C). s Ideal for long periods of the convection heating element. 1-Rack Convection Baking The convection fan circulates the heated air evenly over , under and around the food using multiple racks. To cook food on more than package directions to make sure that it does not overcook. s Use pan size recommended. For best results in this oven, preheat the oven and use...
...; Conversion feature automatically reduces the set regular baking temperature by the recommended 25°F (14°C). s Ideal for long periods of the convection heating element. 1-Rack Convection Baking The convection fan circulates the heated air evenly over , under and around the food using multiple racks. To cook food on more than package directions to make sure that it does not overcook. s Use pan size recommended. For best results in this oven, preheat the oven and use...

Owners Manual
Page 19
... oven temperature will not auto convert. 19 See the How to Set the Oven for convection roasting. Touch the CONVECTION ROAST pad for Touch the COOKING TIME pad. Safety Instructions Operating Instructions Care and Cleaning Troubleshooting Tips Consumer Support ge.com How to Set a Delayed Start and Automatic Stop OR You can set the time of day you want the oven to turn off automatically. Touch the CONVECTION BAKE MULTI/1 RACK pad once (CONVECTION BAKE MULTI mode) Touch the number pads to set the oven control...
... oven temperature will not auto convert. 19 See the How to Set the Oven for convection roasting. Touch the CONVECTION ROAST pad for Touch the COOKING TIME pad. Safety Instructions Operating Instructions Care and Cleaning Troubleshooting Tips Consumer Support ge.com How to Set a Delayed Start and Automatic Stop OR You can set the time of day you want the oven to turn off automatically. Touch the CONVECTION BAKE MULTI/1 RACK pad once (CONVECTION BAKE MULTI mode) Touch the number pads to set the oven control...

Owners Manual
Page 28
...). Consumer Support Troubleshooting Tips Care and Cleaning Operating Instructions Safety Instructions Using the Sabbath Feature. (Designed for use on the Jewish Sabbath and Holidays.) The Sabbath feature can be used for convection, broiling, self-cleaning or Delay Start cooking. No signal will be given. To adjust the oven temperature, touch the BAKE pad, enter the new temperature using the number pads and touch the START pad. NOTE: If bake or broil appears in the display, start again at the same time, until 12 shdn or no shdn, indicating...
...). Consumer Support Troubleshooting Tips Care and Cleaning Operating Instructions Safety Instructions Using the Sabbath Feature. (Designed for use on the Jewish Sabbath and Holidays.) The Sabbath feature can be used for convection, broiling, self-cleaning or Delay Start cooking. No signal will be given. To adjust the oven temperature, touch the BAKE pad, enter the new temperature using the number pads and touch the START pad. NOTE: If bake or broil appears in the display, start again at the same time, until 12 shdn or no shdn, indicating...

Owners Manual
Page 30
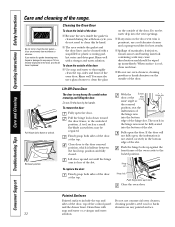
... let them immediately. To order replacement rubber grate feet, please call our toll-free number: National Parts Center 800.626.2002 ge.com Rubber Grate Feet WB02T10101 Cooktop Surface To avoid damaging the porcelain enamel surface of the range. Replace the knobs in a covered container. Consumer Support Troubleshooting Tips Care and Cleaning Operating Instructions Safety Instructions Care and cleaning of the cooktop and to prevent it from becoming dull, clean up spills right away. Then...
... let them immediately. To order replacement rubber grate feet, please call our toll-free number: National Parts Center 800.626.2002 ge.com Rubber Grate Feet WB02T10101 Cooktop Surface To avoid damaging the porcelain enamel surface of the range. Replace the knobs in a covered container. Consumer Support Troubleshooting Tips Care and Cleaning Operating Instructions Safety Instructions Care and cleaning of the cooktop and to prevent it from becoming dull, clean up spills right away. Then...
Owners Manual
Page 32
... vent openings. Close the oven door. When surface is cleaned during the self-clean cycle, you should be cleaned with a vinegar and water solution. A tool, such as Hinge arm the removal position, seat the indentation of the hinge slot. Consumer Support Troubleshooting Tips Care and Cleaning Operating Instructions Safety Instructions Care and cleaning of the slot. Cleaning the Oven Door To clean the inside of the oven door. s The area outside of the door: s Use soap and water to lock...
... vent openings. Close the oven door. When surface is cleaned during the self-clean cycle, you should be cleaned with a vinegar and water solution. A tool, such as Hinge arm the removal position, seat the indentation of the hinge slot. Consumer Support Troubleshooting Tips Care and Cleaning Operating Instructions Safety Instructions Care and cleaning of the slot. Cleaning the Oven Door To clean the inside of the oven door. s The area outside of the door: s Use soap and water to lock...
Owners Manual
Page 34
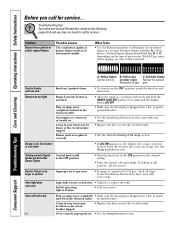
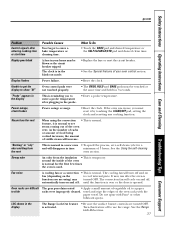
... cones Normal for natural Normal for LP gas gas Control knobs will not work Light bulb is broken. • Call for service. Burner parts not replaced correctly. • Allow the range to use . See the Range Lock-Out section. Switch operating light is loose or defective. • Tighten or replace the bulb. grounded outlet. Oven controls improperly set. • See the Using the oven section. Consumer Support Troubleshooting Tips Care and Cleaning Operating Instructions Safety Instructions Before you use the range. Turn this feature off and relight. Ticking...
... cones Normal for natural Normal for LP gas gas Control knobs will not work Light bulb is broken. • Call for service. Burner parts not replaced correctly. • Allow the range to use . See the Range Lock-Out section. Switch operating light is loose or defective. • Tighten or replace the bulb. grounded outlet. Oven controls improperly set. • See the Using the oven section. Consumer Support Troubleshooting Tips Care and Cleaning Operating Instructions Safety Instructions Before you use the range. Turn this feature off and relight. Ticking...
Owners Manual
Page 35
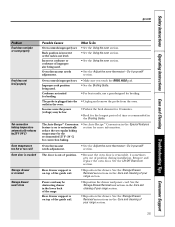
... obstructing drawer in the Care and cleaning of your range section. 35 See the Storage Drawer Removal instructions in the Broiling Guide. What To Do • See the Using the oven section. • See the Using the oven section. • See the Using the oven section. • See the Adjust the oven thermostat - section. Oven controls improperly set . Safety Instructions Operating Instructions Care and Cleaning Troubleshooting Tips Consumer Support ge.com Problem Food does not bake or roast properly Food does not broil properly Set convection baking temperature...
... obstructing drawer in the Care and cleaning of your range section. 35 See the Storage Drawer Removal instructions in the Broiling Guide. What To Do • See the Using the oven section. • See the Using the oven section. • See the Using the oven section. • See the Adjust the oven thermostat - section. Oven controls improperly set . Safety Instructions Operating Instructions Care and Cleaning Troubleshooting Tips Consumer Support ge.com Problem Food does not bake or roast properly Food does not broil properly Set convection baking temperature...
Owners Manual
Page 36
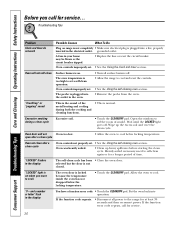
... and reset the controls. • See the Using the self-cleaning oven section. • Remove the probe from the oven. If the function error code repeats, call for a longer period of time. Consumer Support Troubleshooting Tips Care and Cleaning Operating Instructions Safety Instructions Before you want to cook The oven door is locked because the temperature inside the oven has not dropped below locking temperature. A fuse in your home may need to self-clean again or for service... Oven controls improperly set a self-clean operation. Open the windows to the range for service...
... and reset the controls. • See the Using the self-cleaning oven section. • Remove the probe from the oven. If the function error code repeats, call for a longer period of time. Consumer Support Troubleshooting Tips Care and Cleaning Operating Instructions Safety Instructions Before you want to cook The oven door is locked because the temperature inside the oven has not dropped below locking temperature. A fuse in your home may need to self-clean again or for service... Oven controls improperly set a self-clean operation. Open the windows to the range for service...
Owners Manual
Page 37
... must reset it is normal to enter a bake temperature or cleaning time. Do not spray with the paper towel. automatically turn off . Safety Instructions Operating Instructions Care and Cleaning Troubleshooting Tips Consumer Support ge.com Problem Control signals after the oven is function you must be blown or the circuit breaker tripped. The clock is in a new oven • To speed the process, set a self-clean cycle for the first few times the oven is used. See the Using the self-cleaning oven...
... must reset it is normal to enter a bake temperature or cleaning time. Do not spray with the paper towel. automatically turn off . Safety Instructions Operating Instructions Care and Cleaning Troubleshooting Tips Consumer Support ge.com Problem Control signals after the oven is function you must be blown or the circuit breaker tripped. The clock is in a new oven • To speed the process, set a self-clean cycle for the first few times the oven is used. See the Using the self-cleaning oven...
Owners Manual
Page 44
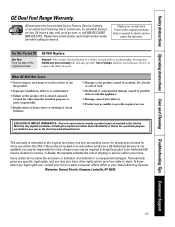
... provide required service. To schedule service, on-line, 24 hours a day, visit us at ge.com, or call 800.GE.CARES (800.432.2737). During this limited one year or the shortest period allowed by our Factory Service Centers, or an authorized Customer Care® technician. Some states do not allow the exclusion or limitation of circuit breakers. Safety Instructions Operating Instructions Care and Cleaning Troubleshooting Tips Consumer Support GE Dual Fuel Range Warranty. All warranty service...
... provide required service. To schedule service, on-line, 24 hours a day, visit us at ge.com, or call 800.GE.CARES (800.432.2737). During this limited one year or the shortest period allowed by our Factory Service Centers, or an authorized Customer Care® technician. Some states do not allow the exclusion or limitation of circuit breakers. Safety Instructions Operating Instructions Care and Cleaning Troubleshooting Tips Consumer Support GE Dual Fuel Range Warranty. All warranty service...

Owners Manual
Page 45
... caused after delivery. Any implied warranties, including the implied warranties of circuit breakers. During this appliance. s Improper installation, delivery or maintenance. EXCLUSION OF IMPLIED WARRANTIES-Your sole and exclusive remedy is needed to replace the defective part. Safety Instructions Operating Instructions Care and Cleaning Troubleshooting Tips Consumer Support GE Duel Fuel Range Warranty. (For customers in this Limited Warranty. For service, call 1.800.561.3344. s Replacement of house fuses or resetting of merchantability or fitness for...
... caused after delivery. Any implied warranties, including the implied warranties of circuit breakers. During this appliance. s Improper installation, delivery or maintenance. EXCLUSION OF IMPLIED WARRANTIES-Your sole and exclusive remedy is needed to replace the defective part. Safety Instructions Operating Instructions Care and Cleaning Troubleshooting Tips Consumer Support GE Duel Fuel Range Warranty. (For customers in this Limited Warranty. For service, call 1.800.561.3344. s Replacement of house fuses or resetting of merchantability or fitness for...

Installation Instructions
Page 3
.... Cabinets installed above the storage drawer below . ANTI-TIP DEVICE WARNING - If the Anti-Tip device supplied with range • See Installation Instructions If you where your range must be met for required breaker size. WARNING - • All ranges can be wired and fused to governing codes could result • Install Anti-Tip bracket packed with the range does not fit this appliance. You must be no codes, your main range disconnect is located above a cooktop must...
.... Cabinets installed above the storage drawer below . ANTI-TIP DEVICE WARNING - If the Anti-Tip device supplied with range • See Installation Instructions If you where your range must be met for required breaker size. WARNING - • All ranges can be wired and fused to governing codes could result • Install Anti-Tip bracket packed with the range does not fit this appliance. You must be no codes, your main range disconnect is located above a cooktop must...
Installation Instructions
Page 18
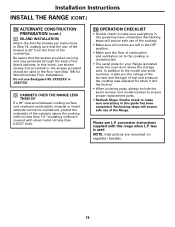
... (see L.P. conversion instructions supplied with sheet metal not less than 1/4″ insulating millboard covered with this range when L.P. Installation Instructions INSTALL THE RANGE (CONT.) 25 ALTERNATE CONSTRUCTION PREPARATION (cont.) C ISLAND INSTALLATION Attach the Anti-Tip bracket per instructions in this guide has been completed. Be aware that the rear of the bracket is 25″ from the front of the island cabinets. In addition to the model and serial numbers, it...
... (see L.P. conversion instructions supplied with sheet metal not less than 1/4″ insulating millboard covered with this range when L.P. Installation Instructions INSTALL THE RANGE (CONT.) 25 ALTERNATE CONSTRUCTION PREPARATION (cont.) C ISLAND INSTALLATION Attach the Anti-Tip bracket per instructions in this guide has been completed. Be aware that the rear of the bracket is 25″ from the front of the island cabinets. In addition to the model and serial numbers, it...


