Owners Manual
Page 2
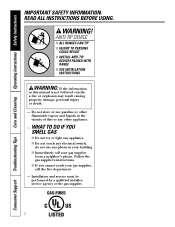
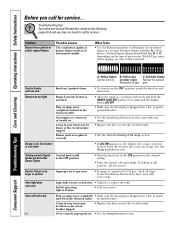
ANTI-TIP DEVICE s ALL RANGES CAN TIP s INJURY TO PERSONS COULD RESULT s INSTALL ANTI-TIP DEVICES PACKED WITH RANGE s SEE INSTALLATION INSTRUCTIONS WARNING: If the information in your gas supplier, call your gas supplier from a neighbor's phone. s Do not touch any appliance. READ ALL INSTRUCTIONS BEFORE... exactly, a fire or explosion may result causing property damage, personal injury or death. - s If you cannot reach your building. s Immediately call the fire department. - Installation and service must be performed by a qualified installer, service agency or the gas supplier. 2
ANTI-TIP DEVICE s ALL RANGES CAN TIP s INJURY TO PERSONS COULD RESULT s INSTALL ANTI-TIP DEVICES PACKED WITH RANGE s SEE INSTALLATION INSTRUCTIONS WARNING: If the information in your gas supplier, call your gas supplier from a neighbor's phone. s Do not touch any appliance. READ ALL INSTRUCTIONS BEFORE... exactly, a fire or explosion may result causing property damage, personal injury or death. - s If you cannot reach your building. s Immediately call the fire department. - Installation and service must be performed by a qualified installer, service agency or the gas supplier. 2
Owners Manual
Page 3
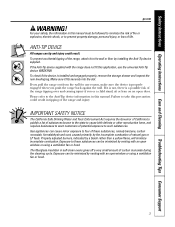
..., carbon monoxide, formaldehyde and soot, caused primarily by the incomplete combustion of these substances can be minimized by installing the Anti-Tip device supplied. Please refer to take this application, use the universal Anti-Tip device WB2X7909. ...injury if you pull the range out from the wall for any reason, make sure the device is installed and engaged properly, remove the storage drawer and inspect the rear leveling leg. Exposure can be followed to.... Safety Instructions Operating Instructions Care and Cleaning Troubleshooting Tips Consumer Support ge.com WARNING!
..., carbon monoxide, formaldehyde and soot, caused primarily by the incomplete combustion of these substances can be minimized by installing the Anti-Tip device supplied. Please refer to take this application, use the universal Anti-Tip device WB2X7909. ...injury if you pull the range out from the wall for any reason, make sure the device is installed and engaged properly, remove the storage drawer and inspect the rear leveling leg. Exposure can be followed to.... Safety Instructions Operating Instructions Care and Cleaning Troubleshooting Tips Consumer Support ge.com WARNING!

Owners Manual
Page 4
... off if necessary. s Do not leave children alone-children should not be left alone or unattended in an area where an appliance is properly installed and grounded by a qualified technician in doubt about the grounding of gas (natural or LP) that is your range is correctly adjusted by a... venting and to follow these instructions could be referred to repair or replace any other part of the authority having jurisdiction. s Have the installer show you the location of drafty locations to sit or stand on any service, disconnect the range power supply at the household distribution panel...
... off if necessary. s Do not leave children alone-children should not be left alone or unattended in an area where an appliance is properly installed and grounded by a qualified technician in doubt about the grounding of gas (natural or LP) that is your range is correctly adjusted by a... venting and to follow these instructions could be referred to repair or replace any other part of the authority having jurisdiction. s Have the installer show you the location of drafty locations to sit or stand on any service, disconnect the range power supply at the household distribution panel...
Owners Manual
Page 5
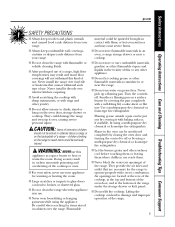
... materials in the vicinity of the cooktop or oven. Air openings are necessary for the range to broken or shattered glass. Never install it with rings and other flammable materials accumulate in carbon monoxide poisoning and overheating of this or any other surfaces cool before touching ...your range. s Do not let cooking grease or other jewelry. Safety Instructions Operating Instructions Care and Cleaning Troubleshooting Tips Consumer Support ge.com SAFETY PRECAUTIONS s Always keep combustible wall coverings, curtains or drapes a safe distance from your range.
... materials in the vicinity of the cooktop or oven. Air openings are necessary for the range to broken or shattered glass. Never install it with rings and other flammable materials accumulate in carbon monoxide poisoning and overheating of this or any other surfaces cool before touching ...your range. s Do not let cooking grease or other jewelry. Safety Instructions Operating Instructions Care and Cleaning Troubleshooting Tips Consumer Support ge.com SAFETY PRECAUTIONS s Always keep combustible wall coverings, curtains or drapes a safe distance from your range.

Owners Manual
Page 7
... broiler pan is cool. READ AND FOLLOW THIS SAFETY INFORMATION CAREFULLY. Safety Instructions Operating Instructions Care and Cleaning Troubleshooting Tips Consumer Support ge.com COOK MEAT AND POULTRY THOROUGHLY... Hot air or steam which escapes can cause burns to at least an INTERNAL temperature of the ...damage or move the gasket. If racks must be cleaned in lifting heavy foods. s Pulling out the rack to line oven bottoms. Improper installation of grease fires. It is a convenience in the oven during the self-clean cycle. s Do not use . Items stored in a risk...
... broiler pan is cool. READ AND FOLLOW THIS SAFETY INFORMATION CAREFULLY. Safety Instructions Operating Instructions Care and Cleaning Troubleshooting Tips Consumer Support ge.com COOK MEAT AND POULTRY THOROUGHLY... Hot air or steam which escapes can cause burns to at least an INTERNAL temperature of the ...damage or move the gasket. If racks must be cleaned in lifting heavy foods. s Pulling out the rack to line oven bottoms. Improper installation of grease fires. It is a convenience in the oven during the self-clean cycle. s Do not use . Items stored in a risk...
Owners Manual
Page 34
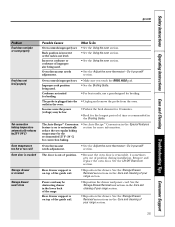
With LP gas, some yellow tipping on range is not completely inserted in the Installation Instructions that came with your range. • Replace the fuse or reset the circuit breaker. • See the Care and cleaning of ...burner lights Control knob is still present, call for service. Switch operating light is plugged into a live , properly grounded outlet. • See the Installation Instructions that came with your burner flames are normal. grounded outlet. Consumer Support Troubleshooting Tips Care and Cleaning Operating Instructions Safety Instructions Before you may...
With LP gas, some yellow tipping on range is not completely inserted in the Installation Instructions that came with your range. • Replace the fuse or reset the circuit breaker. • See the Care and cleaning of ...burner lights Control knob is still present, call for service. Switch operating light is plugged into a live , properly grounded outlet. • See the Installation Instructions that came with your burner flames are normal. grounded outlet. Consumer Support Troubleshooting Tips Care and Cleaning Operating Instructions Safety Instructions Before you may...
Owners Manual
Page 35
...the Special Features section for convection baking. • See Auto Recipe™ Conversion in the Care and cleaning of position during installation. See the Storage Drawer Removal instructions in the Care and cleaning of position. • Because the oven door is removable, ...needs adjustment. • See the Adjust the oven thermostat - Safety Instructions Operating Instructions Care and Cleaning Troubleshooting Tips Consumer Support ge.com Problem Food does not bake or roast properly Food does not broil properly Set convection baking temperature automatically reduces by the...
...the Special Features section for convection baking. • See Auto Recipe™ Conversion in the Care and cleaning of position during installation. See the Storage Drawer Removal instructions in the Care and cleaning of position. • Because the oven door is removable, ...needs adjustment. • See the Adjust the oven thermostat - Safety Instructions Operating Instructions Care and Cleaning Troubleshooting Tips Consumer Support ge.com Problem Food does not bake or roast properly Food does not broil properly Set convection baking temperature automatically reduces by the...
Owners Manual
Page 44
... 40225 44 Proof of charge, all labor and in this appliance. s Failure of shipping or service calls to an Authorized GE Service location for a trip charge or you may be required to bring the product to your legal rights are limited to...warranties of God. Safety Instructions Operating Instructions Care and Cleaning Troubleshooting Tips Consumer Support GE Dual Fuel Range Warranty. All warranty service provided by possible defects with this Limited Warranty. s Improper installation, delivery or maintenance. s Replacement of house fuses or resetting of incidental or ...
... 40225 44 Proof of charge, all labor and in this appliance. s Failure of shipping or service calls to an Authorized GE Service location for a trip charge or you may be required to bring the product to your legal rights are limited to...warranties of God. Safety Instructions Operating Instructions Care and Cleaning Troubleshooting Tips Consumer Support GE Dual Fuel Range Warranty. All warranty service provided by possible defects with this Limited Warranty. s Improper installation, delivery or maintenance. s Replacement of house fuses or resetting of incidental or ...

Owners Manual
Page 45
...home to teach you how to provide required service. Proof of God. s Damage to obtain service under the warranty. Warrantor: MABE CANADA INC. 45 s Improper installation, delivery or maintenance. s Replacement of house fuses or resetting of the product if it is abused, misused, or used for other than the intended purpose... allowed by our Factory Service Centres or an authorized Customer Care® technician. Safety Instructions Operating Instructions Care and Cleaning Troubleshooting Tips Consumer Support GE Duel Fuel Range Warranty. (For customers in materials or workmanship.
...home to teach you how to provide required service. Proof of God. s Damage to obtain service under the warranty. Warrantor: MABE CANADA INC. 45 s Improper installation, delivery or maintenance. s Replacement of house fuses or resetting of the product if it is abused, misused, or used for other than the intended purpose... allowed by our Factory Service Centres or an authorized Customer Care® technician. Safety Instructions Operating Instructions Care and Cleaning Troubleshooting Tips Consumer Support GE Duel Fuel Range Warranty. (For customers in materials or workmanship.
Installation Instructions
Page 1
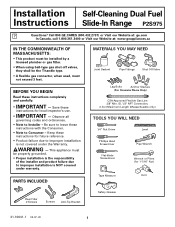
...Drill Rear Filler 2 Screws Screws Anti-Tip Bracket Safety Glasses 31-10641-1 03-07 JR 1 Save these instructions with the Consumer. • Note to Installer - WARNING - This appliance must not exceed 3 feet. ID, 1/2″ NPT Connection, 3-foot Maximum Length (Massachusetts only) TOOLS YOU WILL NEED 1/4"... Line 3/8″ Min. Call 800.GE.CARES (800.432.2737) or Visit our Website at: ge.com In Canada, call 1.800.361.3400 or Visit our Website at: www.geappliances.ca IN THE COMMONWEALTH OF MASSACHUSETTS: • This product must be installed by a licensed plumber or gas fitter...
...Drill Rear Filler 2 Screws Screws Anti-Tip Bracket Safety Glasses 31-10641-1 03-07 JR 1 Save these instructions with the Consumer. • Note to Installer - WARNING - This appliance must not exceed 3 feet. ID, 1/2″ NPT Connection, 3-foot Maximum Length (Massachusetts only) TOOLS YOU WILL NEED 1/4"... Line 3/8″ Min. Call 800.GE.CARES (800.432.2737) or Visit our Website at: ge.com In Canada, call 1.800.361.3400 or Visit our Website at: www.geappliances.ca IN THE COMMONWEALTH OF MASSACHUSETTS: • This product must be installed by a licensed plumber or gas fitter...

Installation Instructions
Page 2
... • Be sure your Owner's Manual. Do not touch any appliance. Read them carefully. • Installation of this manual is installed properly by a qualified installer or service technician. • To eliminate reaching over surface burners, cabinet storage above burner should be performed...cannot reach your gas supplier from a neighbor's phone. This range has been design certified by a qualified installer, service agency or the gas supplier. Installation Instructions IMPORTANT SAFETY INSTRUCTIONS FOR YOUR SAFETY: WARNING - Do not store or use any other flammable vapors and...
... • Be sure your Owner's Manual. Do not touch any appliance. Read them carefully. • Installation of this manual is installed properly by a qualified installer or service technician. • To eliminate reaching over surface burners, cabinet storage above burner should be performed...cannot reach your gas supplier from a neighbor's phone. This range has been design certified by a qualified installer, service agency or the gas supplier. Installation Instructions IMPORTANT SAFETY INSTRUCTIONS FOR YOUR SAFETY: WARNING - Do not store or use any other flammable vapors and...

Installation Instructions
Page 3
... in a hazardous condition. Check with the proper voltage and frequency and connected to an individual, properly grounded branch circuit, protected by installing a range hood that new, but not existing, construction utilize a four-conductor connection to persons could result in the preferred location (... tip • Injury to an electric range. ANTI-TIP DEVICE WARNING - Failure to meet the requirements of the cabinets. When installing an electric range in new construction, a mobile home, recreational vehicle or an area where local codes prohibit grounding through the neutral...
... in a hazardous condition. Check with the proper voltage and frequency and connected to an individual, properly grounded branch circuit, protected by installing a range hood that new, but not existing, construction utilize a four-conductor connection to persons could result in the preferred location (... tip • Injury to an electric range. ANTI-TIP DEVICE WARNING - Failure to meet the requirements of the cabinets. When installing an electric range in new construction, a mobile home, recreational vehicle or an area where local codes prohibit grounding through the neutral...
Installation Instructions
Page 4
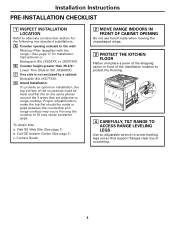
...must be made or gaps between the countertop and range cooktop may cause excessive gaps. Visit GE Web Site (See page 1) b. Installation Instructions PRE-INSTALLATION CHECKLIST 1 INSPECT INSTALLATION LOCATION Refer to screw leveling legs out so that are adjacent to the wall: Maintop Filler...supplied with the range.) (See page 17 for the following non-standard installations. ADJUST 4 CAREFULLY, TILT RANGE TO ACCESS RANGE LEVELING LEGS Use an adjustable wrench to alternate construction section for Installation Instructions) or Backguard (Kit JXS32XX or JXS37XX). Forcing the cooktop to...
...must be made or gaps between the countertop and range cooktop may cause excessive gaps. Visit GE Web Site (See page 1) b. Installation Instructions PRE-INSTALLATION CHECKLIST 1 INSPECT INSTALLATION LOCATION Refer to screw leveling legs out so that are adjacent to the wall: Maintop Filler...supplied with the range.) (See page 17 for the following non-standard installations. ADJUST 4 CAREFULLY, TILT RANGE TO ACCESS RANGE LEVELING LEGS Use an adjustable wrench to alternate construction section for Installation Instructions) or Backguard (Kit JXS32XX or JXS37XX). Forcing the cooktop to...
Installation Instructions
Page 5
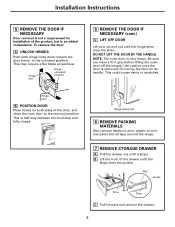
... trim and panel and all tape around the range. 7 REMOVE STORAGE DRAWER A Pull the drawer out until it stops. Installation Instructions 5 REMOVE THE DOOR IF NECESSARY Door removal is not a requirement for installation of the door, and close the oven door to the unlocked position. Use caution once the door is very...
... trim and panel and all tape around the range. 7 REMOVE STORAGE DRAWER A Pull the drawer out until it stops. Installation Instructions 5 REMOVE THE DOOR IF NECESSARY Door removal is not a requirement for installation of the door, and close the oven door to the unlocked position. Use caution once the door is very...
Installation Instructions
Page 6
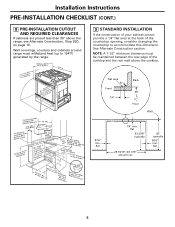
...1dl /P8E″adngeel Flat area R Front 1/4″ Back 36″ Floor Wall 9/16″ min. Installation Instructions PRE-INSTALLATION CHECKLIST (CONT.) 8 PRE-INSTALLATION CUTOUT AND REQUIRED CLEARANCES If cabinets are placed less than 30″ above the cooktop. Fpaloatcellkronawagteiendsawtpriuptclhitainocnes F9r-o1m/2″...rear edge of the countertop opening, consider changing the countertop to 194°F) generated by the range. 9 STANDARD INSTALLATION If the construction of your cabinet cannot provide a 1/4″ flat area at the back of the cooktop and the...
...1dl /P8E″adngeel Flat area R Front 1/4″ Back 36″ Floor Wall 9/16″ min. Installation Instructions PRE-INSTALLATION CHECKLIST (CONT.) 8 PRE-INSTALLATION CUTOUT AND REQUIRED CLEARANCES If cabinets are placed less than 30″ above the cooktop. Fpaloatcellkronawagteiendsawtpriuptclhitainocnes F9r-o1m/2″...rear edge of the countertop opening, consider changing the countertop to 194°F) generated by the range. 9 STANDARD INSTALLATION If the construction of your cabinet cannot provide a 1/4″ flat area at the back of the cooktop and the...

Installation Instructions
Page 7
... turned to the range. C Shut off the gas supply to OFF before removing an old range. The use new flexible connectors when installing a gas appliance. F Connect flexible appliance connector to top burner Pressure regulator as seen from front of new range is compatible with proper...use of old flexible connectors can cause gas leaks and personal injury. Shut-off until hookup of range 10 MAKING THE CONNECTIONS (cont.) E Install 1/2″ flare union adaptor to check for gas leaks. WARNING: Never reuse old flexible connectors. Gas Inlet NOTE: When screwing on all...
... turned to the range. C Shut off the gas supply to OFF before removing an old range. The use new flexible connectors when installing a gas appliance. F Connect flexible appliance connector to top burner Pressure regulator as seen from front of new range is compatible with proper...use of old flexible connectors can cause gas leaks and personal injury. Shut-off until hookup of range 10 MAKING THE CONNECTIONS (cont.) E Install 1/2″ flare union adaptor to check for gas leaks. WARNING: Never reuse old flexible connectors. Gas Inlet NOTE: When screwing on all...

Installation Instructions
Page 8
...Allow enough slack to easily attach the cord terminals to the terminal block. Terminal block Strain relief Power cord Bracket D For conduit installations only, purchase a squeeze connector matching the diameter of pliers to step 19 and proceed. Allow enough slack to easily attach the ... B Remove the knockout ring (1-3/8″) located on the back of the winged strain relief, they can be removed for better fit. Installation Instructions ELECTRICAL CONNECTIONS The range is removed. If your conduit and assemble it in the hole. Terminal block (appearance may vary) Knockout ...
...Allow enough slack to easily attach the cord terminals to the terminal block. Terminal block Strain relief Power cord Bracket D For conduit installations only, purchase a squeeze connector matching the diameter of pliers to step 19 and proceed. Allow enough slack to easily attach the ... B Remove the knockout ring (1-3/8″) located on the back of the winged strain relief, they can be removed for better fit. Installation Instructions ELECTRICAL CONNECTIONS The range is removed. If your conduit and assemble it in the hole. Terminal block (appearance may vary) Knockout ...

Installation Instructions
Page 9
...to the neutral terminal located in step 14 if you require a 3-wire cord: 208/240 40 Amp 3-prong cord 14 3-WIRE POWER CORD INSTALLATION WARNING: The neutral or ground wire of the terminal block. NEMA 14-50R 4-wire 13 FOR EXISTING CONSTRUCTION, A THREE-WIRE FLEXIBLE CORD ...instructions in the center of the power cord must be connected to Step 18 and proceed with the installation. 9 A Remove the 3 lower terminal screws from the terminal block. Installation Instructions 12 NEW CONSTRUCTION AND FOUR-CONDUCTOR BRANCH CIRCUIT All New Constructions, Mobile Homes, Recreational Vehicles and...
...to the neutral terminal located in step 14 if you require a 3-wire cord: 208/240 40 Amp 3-prong cord 14 3-WIRE POWER CORD INSTALLATION WARNING: The neutral or ground wire of the terminal block. NEMA 14-50R 4-wire 13 FOR EXISTING CONSTRUCTION, A THREE-WIRE FLEXIBLE CORD ...instructions in the center of the power cord must be connected to Step 18 and proceed with the installation. 9 A Remove the 3 lower terminal screws from the terminal block. Installation Instructions 12 NEW CONSTRUCTION AND FOUR-CONDUCTOR BRANCH CIRCUIT All New Constructions, Mobile Homes, Recreational Vehicles and...
Installation Instructions
Page 10
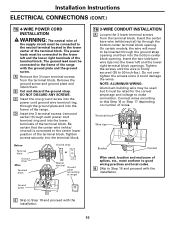
...block opening . Before Terminal block Ground strap After Terminal block Ground strap or Neutral terminal Ground plate (grounding to range) 16 3-WIRE CONDUIT INSTALLATION A Loosen the 3 lower terminal screws from the terminal block. Insert the center bare wire (white/neutral) tip through each power cord ... the ground screw. Remove the ground screw and ground plate and retain them. Ground screw E Skip to Step 18 and proceed with the installation. A Remove the 3 lower terminal screws from the terminal block. C Insert the one ground screw into the power cord ground wire terminal ...
...block opening . Before Terminal block Ground strap After Terminal block Ground strap or Neutral terminal Ground plate (grounding to range) 16 3-WIRE CONDUIT INSTALLATION A Loosen the 3 lower terminal screws from the terminal block. Insert the center bare wire (white/neutral) tip through each power cord ... the ground screw. Remove the ground screw and ground plate and retain them. Ground screw E Skip to Step 18 and proceed with the installation. A Remove the 3 lower terminal screws from the terminal block. C Insert the one ground screw into the power cord ground wire terminal ...
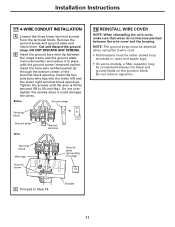
Installation Instructions
Page 11
... junction block. Cut and discard the ground strap. Tighten the screws until the wire is firmly secured (35 to Step 18. Bracket 11 Installation Instructions 17 4-WIRE CONDUIT INSTALLATION A Loosen the three lower terminal screws from the terminal block. Remove the ground screw and ground plate and retain them. Insert the two...
... junction block. Cut and discard the ground strap. Tighten the screws until the wire is firmly secured (35 to Step 18. Bracket 11 Installation Instructions 17 4-WIRE CONDUIT INSTALLATION A Loosen the three lower terminal screws from the terminal block. Remove the ground screw and ground plate and retain them. Insert the two...

