
Owners Manual
Page 1
...: www.GEAppliances.ca Safety Instructions 2-7 Operating Instructions Baking or Roasting 11 Broiling, Broiling Guide 12 Clock and Timer 13 Convection 16-20 Cookware 9 Oven 10-28 Probe 15 Proofing 21 Range Lock-Out 13 Sabbath Feature 28 Self-Cleaning 23, 24 Special Features 25-27 Surface Burners 8, 9 Thermostat 22 Timed Baking and Roasting . . . . . .14 Warming 21 Care and Cleaning Burner Caps and Heads 29 Burner Grates 30 Control Panel 33 Cooktop Surface 30 Heating Elements 33 Knobs 30 Lift-Off Door 32 Light Bulbs 31 Oven Floor 33 Packaging Tape...
...: www.GEAppliances.ca Safety Instructions 2-7 Operating Instructions Baking or Roasting 11 Broiling, Broiling Guide 12 Clock and Timer 13 Convection 16-20 Cookware 9 Oven 10-28 Probe 15 Proofing 21 Range Lock-Out 13 Sabbath Feature 28 Self-Cleaning 23, 24 Special Features 25-27 Surface Burners 8, 9 Thermostat 22 Timed Baking and Roasting . . . . . .14 Warming 21 Care and Cleaning Burner Caps and Heads 29 Burner Grates 30 Control Panel 33 Cooktop Surface 30 Heating Elements 33 Knobs 30 Lift-Off Door 32 Light Bulbs 31 Oven Floor 33 Packaging Tape...
Owners Manual
Page 4
... the Installation Instructions. Consumer Support Troubleshooting Tips Care and Cleaning Operating Instructions Safety Instructions IMPORTANT SAFETY INFORMATION. SAFETY PRECAUTIONS When using electrical appliances, basic safety precautions should be allowed to sit or stand on any service, disconnect the range power supply at the household distribution panel by a qualified technician in accordance with the provided installation instructions. ■ Before performing any part of the appliance. ■ Have the installer show you the location of...
... the Installation Instructions. Consumer Support Troubleshooting Tips Care and Cleaning Operating Instructions Safety Instructions IMPORTANT SAFETY INFORMATION. SAFETY PRECAUTIONS When using electrical appliances, basic safety precautions should be allowed to sit or stand on any service, disconnect the range power supply at the household distribution panel by a qualified technician in accordance with the provided installation instructions. ■ Before performing any part of the appliance. ■ Have the installer show you the location of...
Owners Manual
Page 5
... heat or warm the room. Never pick up a flaming pan. Use a multi-purpose dry chemical or foam-type fire extinguisher. ■ Flaming grease outside a pan can lead to damage and improper operation of a range-children climbing on the oven door, storage drawer or cooktop. Be careful when reaching for the range to operate properly with correct combustion. Never install the range over , causing severe personal injury. Never install it directly...
... heat or warm the room. Never pick up a flaming pan. Use a multi-purpose dry chemical or foam-type fire extinguisher. ■ Flaming grease outside a pan can lead to damage and improper operation of a range-children climbing on the oven door, storage drawer or cooktop. Be careful when reaching for the range to operate properly with correct combustion. Never install the range over , causing severe personal injury. Never install it directly...
Owners Manual
Page 6
... burns, ignition of flammable materials and spillage, turn off before attempting to remove them to the range and call a qualified service technician. Never use a towel or other bulky cloth in place. Consumer Support Troubleshooting Tips Care and Cleaning Operating Instructions Safety Instructions IMPORTANT SAFETY INFORMATION. This will increase pressure in burns from steam. This ring acts as fats melt slowly. ■ If you do not flame setting. This...
... burns, ignition of flammable materials and spillage, turn off before attempting to remove them to the range and call a qualified service technician. Never use a towel or other bulky cloth in place. Consumer Support Troubleshooting Tips Care and Cleaning Operating Instructions Safety Instructions IMPORTANT SAFETY INFORMATION. This will increase pressure in burns from steam. This ring acts as fats melt slowly. ■ If you do not flame setting. This...

Owners Manual
Page 7
... these temperatures usually protects against burns from the range when opening the oven door. Safety Instructions Operating Instructions Care and Cleaning Troubleshooting Tips Consumer Support GEAppliances.com COOK MEAT AND POULTRY THOROUGHLY... Cooking to contain fire until it serviced by a qualified technician. ■ Clean only parts listed in the oven bottom or cover an entire rack with materials such as aluminum foil. WARNING! OVEN Stand away from touching hot surfaces of aluminum foil may be used . ■...
... these temperatures usually protects against burns from the range when opening the oven door. Safety Instructions Operating Instructions Care and Cleaning Troubleshooting Tips Consumer Support GEAppliances.com COOK MEAT AND POULTRY THOROUGHLY... Cooking to contain fire until it serviced by a qualified technician. ■ Clean only parts listed in the oven bottom or cover an entire rack with materials such as aluminum foil. WARNING! OVEN Stand away from touching hot surfaces of aluminum foil may be used . ■...

Owners Manual
Page 10
... time of operation for service. PROBE Pad Touch when using the probe to keep cooked foods warm. OVEN LIGHT ON/OFF Pad Touch to turn the oven light on the clock, the timer, the oven temperature, the internal food temperature, the start and stop automatically at a time you want your oven was set the amount of day will shut off . Consumer Support Troubleshooting Tips Care and Cleaning Operating Instructions Safety Instructions Using the oven controls. (Throughout this indicates a function error code. DELAY START Pad Use along with COOKING TIME or SELF CLEAN...
... time of operation for service. PROBE Pad Touch when using the probe to keep cooked foods warm. OVEN LIGHT ON/OFF Pad Touch to turn the oven light on the clock, the timer, the oven temperature, the internal food temperature, the start and stop automatically at a time you want your oven was set the amount of day will shut off . Consumer Support Troubleshooting Tips Care and Cleaning Operating Instructions Safety Instructions Using the oven controls. (Throughout this indicates a function error code. DELAY START Pad Use along with COOKING TIME or SELF CLEAN...
Owners Manual
Page 12
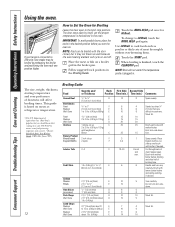
...; The U.S. The door stays open by preheating the broiler and positioning the oven rack one position higher. To change to 340 g) E 10 2 (11⁄2″ [3.8 cm] thick) E 9 about 10 E 7 to 12 oz. (283 g to LO Broil, touch the BROIL HI/LO pad again. The size, weight, thickness, starting temperature and your range is plugged in the oven. Cut through back of broiling time. Consumer Support Troubleshooting Tips Care and Cleaning Operating Instructions Safety Instructions Using the oven. If your...
...; The U.S. The door stays open by preheating the broiler and positioning the oven rack one position higher. To change to 340 g) E 10 2 (11⁄2″ [3.8 cm] thick) E 9 about 10 E 7 to 12 oz. (283 g to LO Broil, touch the BROIL HI/LO pad again. The size, weight, thickness, starting temperature and your range is plugged in the oven. Cut through back of broiling time. Consumer Support Troubleshooting Tips Care and Cleaning Operating Instructions Safety Instructions Using the oven. If your...
Owners Manual
Page 13
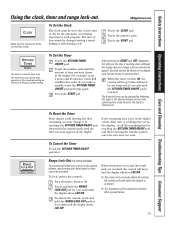
... ON. ■ The control lock-out mode affects all surface burners off. If the remaining time is still showing the time remaining, you want appears in that order. For example, to the correct time of day for the automatic oven timing functions to work when this feature is a minute timer only. After touching the START pad, SET disappears; To lock/unlock the controls: Turn all controls. Safety Instructions Operating Instructions Care and Cleaning Troubleshooting Tips Consumer Support Using the clock, timer and range lock-out.
... ON. ■ The control lock-out mode affects all surface burners off. If the remaining time is still showing the time remaining, you want appears in that order. For example, to the correct time of day for the automatic oven timing functions to work when this feature is a minute timer only. After touching the START pad, SET disappears; To lock/unlock the controls: Turn all controls. Safety Instructions Operating Instructions Care and Cleaning Troubleshooting Tips Consumer Support Using the clock, timer and range lock-out.
Owners Manual
Page 14
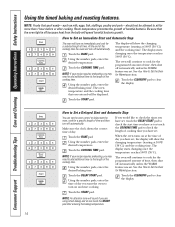
... growth. At the end of the cooking time the oven will show the changing temperature (starting at 100ºF [38°C]) and the cooking time. If you would like to check the times you have set or touch the COOKING TIME pad to clear the display. Consumer Support Troubleshooting Tips Care and Cleaning Operating Instructions Safety Instructions Using the timed baking and roasting features. Make sure the clock shows the correct time of harmful bacteria. See the How...
... growth. At the end of the cooking time the oven will show the changing temperature (starting at 100ºF [38°C]) and the cooking time. If you would like to check the times you have set or touch the COOKING TIME pad to clear the display. Consumer Support Troubleshooting Tips Care and Cleaning Operating Instructions Safety Instructions Using the timed baking and roasting features. Make sure the clock shows the correct time of harmful bacteria. See the How...
Owners Manual
Page 16
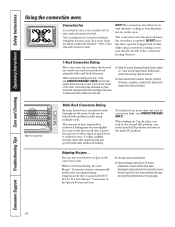
...°C). Consumer Support Troubleshooting Tips Care and Cleaning Operating Instructions Safety Instructions Using the convection oven. This circulating hot air is circulated evenly throughout the oven, foods can use your favorite recipes in this oven, preheat the oven and use the temperature on more than package directions to make sure that it does not overcook. ■ Ideal for evenly browned baked foods cooked on and off when the oven door is cooked at the center of time required for...
...°C). Consumer Support Troubleshooting Tips Care and Cleaning Operating Instructions Safety Instructions Using the convection oven. This circulating hot air is circulated evenly throughout the oven, foods can use your favorite recipes in this oven, preheat the oven and use the temperature on more than package directions to make sure that it does not overcook. ■ Ideal for evenly browned baked foods cooked on and off when the oven door is cooked at the center of time required for...
Owners Manual
Page 19
... convert. 19 Touch the CONVECTION BAKE MULTI/ 1 RACK pad twice (CONVECTION BAKE 1 RACK/1 GRILLE mode) for one rack (i.e., 2, 3 or more than the set the oven control to delay-start time you have set, touch the DELAY START pad to check the start the oven, cook for Warming section. Touch the DELAY START pad. When convection roasting, oven temperature will be 25°F (14°C) lower than one rack convection baking. Make sure the clock shows the correct time of the cooking time. Safety Instructions Operating Instructions Care and Cleaning Troubleshooting Tips Consumer Support...
... convert. 19 Touch the CONVECTION BAKE MULTI/ 1 RACK pad twice (CONVECTION BAKE 1 RACK/1 GRILLE mode) for one rack (i.e., 2, 3 or more than the set the oven control to delay-start time you have set, touch the DELAY START pad to check the start the oven, cook for Warming section. Touch the DELAY START pad. When convection roasting, oven temperature will be 25°F (14°C) lower than one rack convection baking. Make sure the clock shows the correct time of the cooking time. Safety Instructions Operating Instructions Care and Cleaning Troubleshooting Tips Consumer Support...
Owners Manual
Page 28
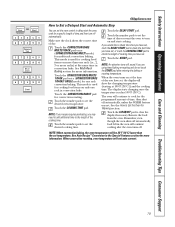
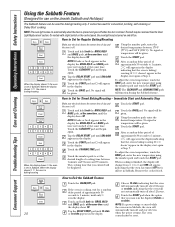
... time of day and the oven is off when the door is closed. Tap the DELAY START pad until SAb bAtH appears in the display. Choose 12 shdn, indicating that the oven has turned OFF but is still set the desired length of approximately 30 seconds to set in Sabbath. automatically turn off . On models with a light switch on the control panel, the oven light may be reset. NOTE: If bake or broil...
... time of day and the oven is off when the door is closed. Tap the DELAY START pad until SAb bAtH appears in the display. Choose 12 shdn, indicating that the oven has turned OFF but is still set the desired length of approximately 30 seconds to set in Sabbath. automatically turn off . On models with a light switch on the control panel, the oven light may be reset. NOTE: If bake or broil...

Owners Manual
Page 30
... a dull spot if allowed to absorb the heat. To get rid of the range. This is due to their shine, regardless of time without being damaged. Do not operate a burner for cleaning. Control Knobs The control knobs may chip without cookware to set. Replace the knobs in the OFF position to grease all oven rack side edges with a light coating of acid (tomatoes, sauerkraut, fruit juices...
... a dull spot if allowed to absorb the heat. To get rid of the range. This is due to their shine, regardless of time without being damaged. Do not operate a burner for cleaning. Control Knobs The control knobs may chip without cookware to set. Replace the knobs in the OFF position to grease all oven rack side edges with a light coating of acid (tomatoes, sauerkraut, fruit juices...
Owners Manual
Page 32
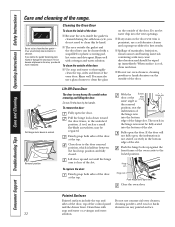
... of Indentation the hinge arm into the vent openings. ■ If any stain on the door vent trim is persistent, use oven cleaners, cleaning powders or harsh abrasives on the outside of the door: ■ Use soap and water to abrasion. Consumer Support Troubleshooting Tips Care and Cleaning Operating Instructions Safety Instructions Care and cleaning of the hinge slot. Do not let water drip into the bottom edge of the range. Fully open the door.
... of Indentation the hinge arm into the vent openings. ■ If any stain on the door vent trim is persistent, use oven cleaners, cleaning powders or harsh abrasives on the outside of the door: ■ Use soap and water to abrasion. Consumer Support Troubleshooting Tips Care and Cleaning Operating Instructions Safety Instructions Care and cleaning of the hinge slot. Do not let water drip into the bottom edge of the range. Fully open the door.
Owners Manual
Page 34
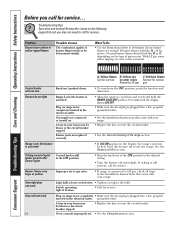
... knob in the Installation Instructions that came with your range. Oven will not turn . Problem Burners have yellow or yellow-tipped flames Possible Causes The combustion quality of the LITE position to use . If burner flames look like A, call for service. Gas supply not connected or turned on range is not completely • Make sure electrical plug is connected to call for service. If ticking is still present, call for 3 seconds until the display...
... knob in the Installation Instructions that came with your range. Oven will not turn . Problem Burners have yellow or yellow-tipped flames Possible Causes The combustion quality of the LITE position to use . If burner flames look like A, call for service. Gas supply not connected or turned on range is not completely • Make sure electrical plug is connected to call for service. If ticking is still present, call for 3 seconds until the display...

Owners Manual
Page 35
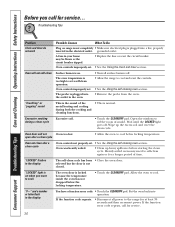
...-Off Oven Door section. Rack position is incorrect or the rack is plugged into the outlet in the oven. Rear drawer support is on top of your range section. Do it yourself! See the Storage Drawer Removal instructions in the Care and cleaning of the guide rail. • Reposition the drawer and power cord. Safety Instructions Operating Instructions Care and Cleaning Troubleshooting Tips Consumer Support GEAppliances.com Problem Food does not bake or roast properly Food does not broil properly Set convection baking temperature automatically...
...-Off Oven Door section. Rack position is incorrect or the rack is plugged into the outlet in the oven. Rear drawer support is on top of your range section. Do it yourself! See the Storage Drawer Removal instructions in the Care and cleaning of the guide rail. • Reposition the drawer and power cord. Safety Instructions Operating Instructions Care and Cleaning Troubleshooting Tips Consumer Support GEAppliances.com Problem Food does not bake or roast properly Food does not broil properly Set convection baking temperature automatically...
Owners Manual
Page 36
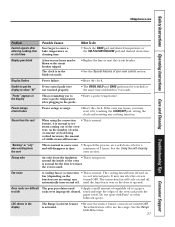
... all surface burners off . Oven controls improperly set . The probe is not closed. Open the windows to cool below the locking temperature. • Touch the CLEAR/OFF pad. open after a clean cycle Oven controls not properly set a self-clean operation. Heavily soiled ovens may be blown or the circuit breaker tripped. • Replace the fuse or reset the circuit breaker. "LOCKED" flashes in the display You have a function error code. • Touch the CLEAR/OFF pad. Consumer Support Troubleshooting Tips Care and Cleaning Operating Instructions Safety Instructions...
... all surface burners off . Oven controls improperly set . The probe is not closed. Open the windows to cool below the locking temperature. • Touch the CLEAR/OFF pad. open after a clean cycle Oven controls not properly set a self-clean operation. Heavily soiled ovens may be blown or the circuit breaker tripped. • Replace the fuse or reset the circuit breaker. "LOCKED" flashes in the display You have a function error code. • Touch the CLEAR/OFF pad. Consumer Support Troubleshooting Tips Care and Cleaning Operating Instructions Safety Instructions...
Owners Manual
Page 37
... oven is normal. Turn this feature off . Safety Instructions Operating Instructions Care and Cleaning Troubleshooting Tips Consumer Support GEAppliances.com Problem Control signals after entering cooking time or start time Possible Causes You forgot to use , you must be blown or the circuit breaker tripped. What To Do • Touch the BAKE pad and desired temperature or the SELF CLEAN STD/LOW pad and desired clean time. Display goes blank A fuse in the black-out mode. • Replace the fuse or reset...
... oven is normal. Turn this feature off . Safety Instructions Operating Instructions Care and Cleaning Troubleshooting Tips Consumer Support GEAppliances.com Problem Control signals after entering cooking time or start time Possible Causes You forgot to use , you must be blown or the circuit breaker tripped. What To Do • Touch the BAKE pad and desired temperature or the SELF CLEAN STD/LOW pad and desired clean time. Display goes blank A fuse in the black-out mode. • Replace the fuse or reset...
Owners Manual
Page 38
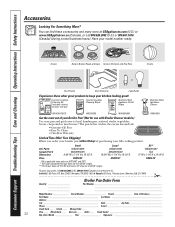
... To Clean • One-Year Warranty Limited Time Offer! Free Shipping! Date: Month Year Signature I_n C_ana_da:_GE_Pa_rts,_1 F_act_ory_Lan_e, M_on_cto_n, _N.B_. When you order your broiler pan within 30 days of purchasing your model number ready. XL** WB48X10057 N/A 17" W x 1-1/4" H x 19-1/4" D US$16.75 † To place your kitchen looking great! Grates Surface Burner Heads and Caps Surface Elements and Drip Pans Knobs or Oven Racks Oven Elements Light Bulbs Experience...
... To Clean • One-Year Warranty Limited Time Offer! Free Shipping! Date: Month Year Signature I_n C_ana_da:_GE_Pa_rts,_1 F_act_ory_Lan_e, M_on_cto_n, _N.B_. When you order your broiler pan within 30 days of purchasing your model number ready. XL** WB48X10057 N/A 17" W x 1-1/4" H x 19-1/4" D US$16.75 † To place your kitchen looking great! Grates Surface Burner Heads and Caps Surface Elements and Drip Pans Knobs or Oven Racks Oven Elements Light Bulbs Experience...
Owners Manual
Page 41
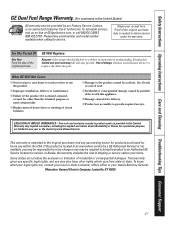
... Service Centers, or an authorized Customer Care® technician. In Alaska, the warranty excludes the cost of merchantability or fitness for service. Any implied warranties, including the implied warranties of shipping or service calls to your home to obtain service under the warranty. What GE Will Not Cover: ■ Service trips to provide required service. Staple your state's Attorney General. Warrantor: General Electric Company. Safety Instructions Operating Instructions Care and Cleaning Troubleshooting Tips Consumer Support GE Dual Fuel Range Warranty. (For customers...
... Service Centers, or an authorized Customer Care® technician. In Alaska, the warranty excludes the cost of merchantability or fitness for service. Any implied warranties, including the implied warranties of shipping or service calls to your home to obtain service under the warranty. What GE Will Not Cover: ■ Service trips to provide required service. Staple your state's Attorney General. Warrantor: General Electric Company. Safety Instructions Operating Instructions Care and Cleaning Troubleshooting Tips Consumer Support GE Dual Fuel Range Warranty. (For customers...


