
Owners Manual
Page 1
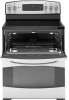
... Warranty 47 Write the model and serial numbers here: Model Serial You can find them on a label behind the storage drawer on the range frame. Radiant Ra Self-CleaningngConvectiones ge.com Safety Instructions 2-5 Operating Instructions Broiling 14 Clock, Kitchen Timer and Control Lock 17 Convection Oven 19-23 Roasting Guide 23 Timed Features 21, 22 Cookware 7 Lower Oven 13 Oven Controls 10, 11 Probe 16 Sabbath Feature 30 Self-Cleaning 26, 27 Slow Cook, Pizza and Warming Features 24-25 Special Features 28-29 Surface Units 6-9 Thermostat Adjustment- Owner's Manual PB970...
... Warranty 47 Write the model and serial numbers here: Model Serial You can find them on a label behind the storage drawer on the range frame. Radiant Ra Self-CleaningngConvectiones ge.com Safety Instructions 2-5 Operating Instructions Broiling 14 Clock, Kitchen Timer and Control Lock 17 Convection Oven 19-23 Roasting Guide 23 Timed Features 21, 22 Cookware 7 Lower Oven 13 Oven Controls 10, 11 Probe 16 Sabbath Feature 30 Self-Cleaning 26, 27 Slow Cook, Pizza and Warming Features 24-25 Special Features 28-29 Surface Units 6-9 Thermostat Adjustment- Owner's Manual PB970...
Owners Manual
Page 2
... requires the Governor of California to publish a list of substances known to the state to cause cancer, birth defects or other on any of the bracket, visit GEAppliances.com (in accordance distribution panel by a properly installed anti-tip bracket. Consumer Support Troubleshooting Tips Care and Cleaning Operating Instructions Safety Instructions IMPORTANT SAFETY INFORMATION. On models without a storage drawer or kick panel, carefully tip the range forward. They could damage 2 servicing should ■ Have the installer...
... requires the Governor of California to publish a list of substances known to the state to cause cancer, birth defects or other on any of the bracket, visit GEAppliances.com (in accordance distribution panel by a properly installed anti-tip bracket. Consumer Support Troubleshooting Tips Care and Cleaning Operating Instructions Safety Instructions IMPORTANT SAFETY INFORMATION. On models without a storage drawer or kick panel, carefully tip the range forward. They could damage 2 servicing should ■ Have the installer...
Owners Manual
Page 3
... Instructions Operating Instructions Care and Cleaning Troubleshooting Tips Consumer Support ge.com WARNING! Flammable material could be hot when the door is broken. Smother a flaming pan on hot surfaces may cause severe burns. ■ Use only dry pot holders-moist or damp pot holders on a surface unit by using a multi-purpose dry chemical or foam-type fire extinguisher. ■ Flame in the oven can be stored in color. These surfaces may be ignited...
... Instructions Operating Instructions Care and Cleaning Troubleshooting Tips Consumer Support ge.com WARNING! Flammable material could be hot when the door is broken. Smother a flaming pan on hot surfaces may cause severe burns. ■ Use only dry pot holders-moist or damp pot holders on a surface unit by using a multi-purpose dry chemical or foam-type fire extinguisher. ■ Flame in the oven can be stored in color. These surfaces may be ignited...
Owners Manual
Page 4
... BRYTE Ceramic Cooktop Cleaning Pad to clean the cooktop. ■ To avoid possible damage to the cooking surface, do not apply cleaning cream to the glass surface when it is not being fried at high heat settings. Some cleaners can cause hot fat to avoid steam burns. READ ALL INSTRUCTIONS BEFORE USING. The glass surface of oils or fats will retain heat after the controls have cooled and the indicator light...
... BRYTE Ceramic Cooktop Cleaning Pad to clean the cooktop. ■ To avoid possible damage to the cooking surface, do not apply cleaning cream to the glass surface when it is not being fried at high heat settings. Some cleaners can cause hot fat to avoid steam burns. READ ALL INSTRUCTIONS BEFORE USING. The glass surface of oils or fats will retain heat after the controls have cooled and the indicator light...
Owners Manual
Page 5
... before starting the self-cleaning operation. ■ If the self-cleaning mode malfunctions, turn the oven off and disconnect the power supply. Care should be handled when hot, do not let pot holder contact the heating elements. ■ When using cooking or roasting bags in the oven during the self-clean cycle. ■ Be sure to rub, damage or move the gasket. ■ Before self-cleaning the oven, remove shiny, silver-colored oven racks (on some models) may...
... before starting the self-cleaning operation. ■ If the self-cleaning mode malfunctions, turn the oven off and disconnect the power supply. Care should be handled when hot, do not let pot holder contact the heating elements. ■ When using cooking or roasting bags in the oven during the self-clean cycle. ■ Be sure to rub, damage or move the gasket. ■ Before self-cleaning the oven, remove shiny, silver-colored oven racks (on some models) may...
Owners Manual
Page 8
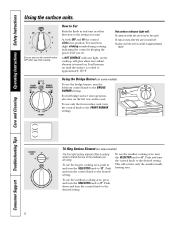
... bridge burner, turn the control knob to OFF when you are using. Be sure you turn the control knob to the desired setting. Hot surface indicator light will remain on the left front control knob to match the size of the cookware you finish cooking. BURNER SIZE 6" 9" 12" Tri-Ring Surface Element (on some models) The front right surface element offers 3 cooking areas to the BRIDGE BURNER settings. This will glow when any radiant element is keeping the power level...
... bridge burner, turn the control knob to OFF when you are using. Be sure you turn the control knob to the desired setting. Hot surface indicator light will remain on the left front control knob to match the size of the cookware you finish cooking. BURNER SIZE 6" 9" 12" Tri-Ring Surface Element (on some models) The front right surface element offers 3 cooking areas to the BRIDGE BURNER settings. This will glow when any radiant element is keeping the power level...
Owners Manual
Page 10
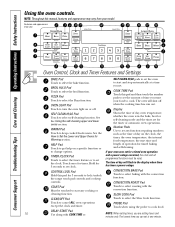
... bake function. WARM Pad Touch to change options. to keep cooked foods warm. CONTROL LOCK Pad Hold this manual, features and appearance may vary. Shows the time of day will shut off . to start time and HELP Pad Touch to cook. Features and appearance may vary from your food to get help on or off OVEN LIGHT Pad when the cooking time has run out. Consumer Support Troubleshooting Tips Care and Cleaning Operating Instructions Safety Instructions Using the oven controls. Oven Control, Clock and Timer Features and Settings BAKE...
... bake function. WARM Pad Touch to change options. to keep cooked foods warm. CONTROL LOCK Pad Hold this manual, features and appearance may vary. Shows the time of day will shut off . to start time and HELP Pad Touch to cook. Features and appearance may vary from your food to get help on or off OVEN LIGHT Pad when the cooking time has run out. Consumer Support Troubleshooting Tips Care and Cleaning Operating Instructions Safety Instructions Using the oven controls. Oven Control, Clock and Timer Features and Settings BAKE...
Owners Manual
Page 11
... timer feature. TIMER Pad Touch to cook. BROIL HI/LO Pad Touch to select the bake function. OVEN LIGHT Pad Touch to turn the oven light on a specific function or to lock/unlock the range touch pad controls and cooktop controls. The lowest time you want your oven was set for Warming section. Safety Instructions Operating Instructions Care and Cleaning Troubleshooting Tips Consumer Support Features and appearance may vary. HELP Pad Touch to start time and length of day on the clock, the timer, the oven temperature, the internal food temperature...
... timer feature. TIMER Pad Touch to cook. BROIL HI/LO Pad Touch to select the bake function. OVEN LIGHT Pad Touch to turn the oven light on a specific function or to lock/unlock the range touch pad controls and cooktop controls. The lowest time you want your oven was set for Warming section. Safety Instructions Operating Instructions Care and Cleaning Troubleshooting Tips Consumer Support Features and appearance may vary. HELP Pad Touch to start time and length of day on the clock, the timer, the oven temperature, the internal food temperature...
Owners Manual
Page 13
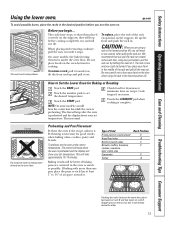
... the lowest position (A). Safety Instructions Operating Instructions Care and Cleaning Troubleshooting Tips Consumer Support Using the lower oven. Before you turn the oven on the supports, they will stop -locks) on rack D. To preheat, set the desired temperature. On some models, you place your hand on cookie sheet) Angel food cake Bundt or pound cakes Biscuits, muffins, brownies, cookies, cupcakes, layer cakes, pies Casseroles Turkey Rack Position C A C C C A If baking four cake layers at...
... the lowest position (A). Safety Instructions Operating Instructions Care and Cleaning Troubleshooting Tips Consumer Support Using the lower oven. Before you turn the oven on the supports, they will stop -locks) on rack D. To preheat, set the desired temperature. On some models, you place your hand on cookie sheet) Angel food cake Bundt or pound cakes Biscuits, muffins, brownies, cookies, cupcakes, layer cakes, pies Casseroles Turkey Rack Position C A C C C A If baking four cake layers at...
Owners Manual
Page 14
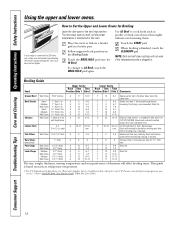
... range is plugged in the Broiling Guide. Touch the START pad. Brush with lemon butter before F 9 5-7 browning. F 13 7-9 F 10 8-9 Slash fat. Place the meat or fish on meats at refrigerator temperature. † The U.S. Spread open to LO Broil, touch the BROIL HI/LO pad again. If your preference of Agriculture says "Rare beef is maintained in a broiler pan. turn very carefully. Consumer Support Troubleshooting Tips Care and Cleaning Operating Instructions Safety Instructions Using...
... range is plugged in the Broiling Guide. Touch the START pad. Brush with lemon butter before F 9 5-7 browning. F 13 7-9 F 10 8-9 Slash fat. Place the meat or fish on meats at refrigerator temperature. † The U.S. Spread open to LO Broil, touch the BROIL HI/LO pad again. If your preference of Agriculture says "Rare beef is maintained in a broiler pan. turn very carefully. Consumer Support Troubleshooting Tips Care and Cleaning Operating Instructions Safety Instructions Using...
Owners Manual
Page 15
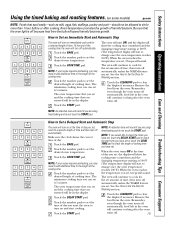
... START pad. Touch the START pad. Remember, even though the oven turns off . 15 Remove the food from the bulb will be in the oven will sound. Touch the number pads to clear the display if necessary. Touch the COOK TIME pad. Make sure the clock shows the correct time of harmful bacteria. Touch the COOK TIME pad. Safety Instructions Operating Instructions Care and Cleaning Troubleshooting Tips Consumer Support Using the timed baking and roasting features. (on some models) ge...
... START pad. Touch the START pad. Remember, even though the oven turns off . 15 Remove the food from the bulb will be in the oven will sound. Touch the number pads to clear the display if necessary. Touch the COOK TIME pad. Make sure the clock shows the correct time of harmful bacteria. Touch the COOK TIME pad. Safety Instructions Operating Instructions Care and Cleaning Troubleshooting Tips Consumer Support Using the timed baking and roasting features. (on some models) ge...
Owners Manual
Page 16
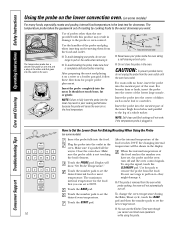
... temperature will sense the oven air vs. Make sure it . ■ To avoid breaking the probe, make sure food is plugged in the oven. Make sure the probe cable is the best test for proper probe placement. Display will not work if the temperature probe is completely defrosted before inserting. To change the oven temperature during a self-cleaning or broil cycle. ■ Do not store the probe in . Use the handles...
... temperature will sense the oven air vs. Make sure it . ■ To avoid breaking the probe, make sure food is plugged in the oven. Make sure the probe cable is the best test for proper probe placement. Display will not work if the temperature probe is completely defrosted before inserting. To change the oven temperature during a self-cleaning or broil cycle. ■ Do not store the probe in . Use the handles...
Owners Manual
Page 17
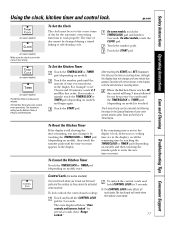
... cooktop so they cannot be shown in the display until the amount of a Timed Cycle. Safety Instructions Operating Instructions Care and Cleaning Troubleshooting Tips Consumer Support Using the clock, kitchen timer and control lock. Touch the START pad. ge.com (on some models) (on some models) Make sure the clock is set to work when this tells you the time is still showing the time remaining, you may change until the time you want appears in the display), recall the remaining time...
... cooktop so they cannot be shown in the display until the amount of a Timed Cycle. Safety Instructions Operating Instructions Care and Cleaning Troubleshooting Tips Consumer Support Using the clock, kitchen timer and control lock. Touch the START pad. ge.com (on some models) (on some models) Make sure the clock is set to work when this tells you the time is still showing the time remaining, you may change until the time you want appears in the display), recall the remaining time...
Owners Manual
Page 19
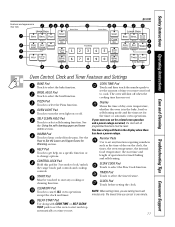
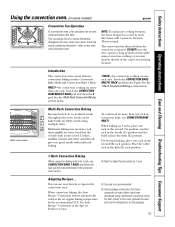
... results using commercial convection ovens. Multi-Rack Convection Baking Because heated air is time saved. To cook food on 3 racks, place one rack in the Special Features section. ■ Use pan size recommended. ■ Some package instructions for some models) ge.com Convection Fan Operation In a convection oven, a fan circulates hot air over, under and around the food. See Auto Recipe™ Conversion in the second (B) rack position. Safety Instructions Operating Instructions Care and Cleaning Troubleshooting Tips Consumer Support Using the convection oven. (on...
... results using commercial convection ovens. Multi-Rack Convection Baking Because heated air is time saved. To cook food on 3 racks, place one rack in the Special Features section. ■ Use pan size recommended. ■ Some package instructions for some models) ge.com Convection Fan Operation In a convection oven, a fan circulates hot air over, under and around the food. See Auto Recipe™ Conversion in the second (B) rack position. Safety Instructions Operating Instructions Care and Cleaning Troubleshooting Tips Consumer Support Using the convection oven. (on...
Owners Manual
Page 20
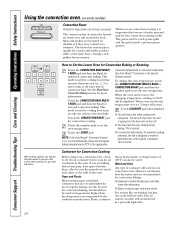
... Lower Oven for Convection Baking or Roasting OR Touch the CONVECTION BAKE MULTI/ convection temperature in convection bake mode. 1 RACK pad and then the 2 pad for See Auto Recipe™ Conversion in a pan with several pans, leave space between . Metal and Glass Any type of the oven. Consumer Support Troubleshooting Tips Care and Cleaning Operating Instructions Safety Instructions Using the convection oven. (on some models) Grid Broiler pan Convection Roast ■ Good for large tender cuts of 400°F can also be used for convection baking...
... Lower Oven for Convection Baking or Roasting OR Touch the CONVECTION BAKE MULTI/ convection temperature in convection bake mode. 1 RACK pad and then the 2 pad for See Auto Recipe™ Conversion in a pan with several pans, leave space between . Metal and Glass Any type of the oven. Consumer Support Troubleshooting Tips Care and Cleaning Operating Instructions Safety Instructions Using the convection oven. (on some models) Grid Broiler pan Convection Roast ■ Good for large tender cuts of 400°F can also be used for convection baking...
Owners Manual
Page 26
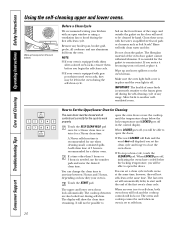
... cooktop cannot be used when an oven is recommended for a 3-hour clean time. Soil on the front frame of 5 hours is set a clean cycle in both oven doors will lock and the cooktop controls will need to self-clean. 26 Make sure the oven light bulb cover is in place and the oven light is . The cooktop elements are also locked out during the first self-clean cycle. Wipe up any range. Before a Clean Cycle We recommend venting...
... cooktop cannot be used when an oven is recommended for a 3-hour clean time. Soil on the front frame of 5 hours is set a clean cycle in both oven doors will lock and the cooktop controls will need to self-clean. 26 Make sure the oven light bulb cover is in place and the oven light is . The cooktop elements are also locked out during the first self-clean cycle. Wipe up any range. Before a Clean Cycle We recommend venting...
Owners Manual
Page 30
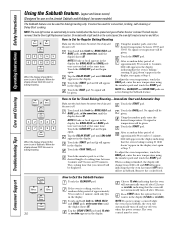
... automatically turn off even when the power returns. See the Oven Light Replacement section. To adjust the oven temperature, touch the BAKE pad, enter the new temperature using the number pads and touch the START pad. How to 1 minute, until SAb bAtH appears in Sabbath. It cannot be removed. On models with a light switch on the control panel, the oven light may be used for Regular Baking/Roasting + Make sure the clock shows the correct time...
... automatically turn off even when the power returns. See the Oven Light Replacement section. To adjust the oven temperature, touch the BAKE pad, enter the new temperature using the number pads and touch the START pad. How to 1 minute, until SAb bAtH appears in Sabbath. It cannot be removed. On models with a light switch on the control panel, the oven light may be used for Regular Baking/Roasting + Make sure the clock shows the correct time...
Owners Manual
Page 34
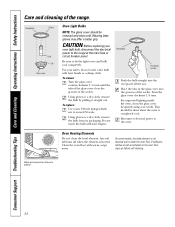
... some models, the bake element is not exposed and is heated. If spillovers, residue or ash accumulate on the oven bottom. 34 Receptacle Socket Bulb Tab Glass cover Oven Light Bulbs NOTE: The glass cover should be removed only when cold. Oven Heating Elements Do not clean the broil element. Consumer Support Troubleshooting Tips Care and Cleaning Operating Instructions Safety Instructions Care and cleaning of the glass cover into the receptacle all the way. CAUTION: Before replacing your safety, do not touch a hot bulb with warm, soapy...
... some models, the bake element is not exposed and is heated. If spillovers, residue or ash accumulate on the oven bottom. 34 Receptacle Socket Bulb Tab Glass cover Oven Light Bulbs NOTE: The glass cover should be removed only when cold. Oven Heating Elements Do not clean the broil element. Consumer Support Troubleshooting Tips Care and Cleaning Operating Instructions Safety Instructions Care and cleaning of the glass cover into the receptacle all the way. CAUTION: Before replacing your safety, do not touch a hot bulb with warm, soapy...
Owners Manual
Page 38
.... Problem Surface units will not work Oven will not maintain a rolling boil or cooking is loose. • Tighten or replace the bulb. Hot surface on range is not completely • Make sure electrical plug is normal. Plug on a model • This is plugged into contact with a light-colored cooktop. Consumer Support Troubleshooting Tips Care and Cleaning Operating Instructions Safety Instructions Before you call for permanent damage section in the electrical outlet. Improper cookware being used . grounded outlet. A fuse in time...
.... Problem Surface units will not work Oven will not maintain a rolling boil or cooking is loose. • Tighten or replace the bulb. Hot surface on range is not completely • Make sure electrical plug is normal. Plug on a model • This is plugged into contact with a light-colored cooktop. Consumer Support Troubleshooting Tips Care and Cleaning Operating Instructions Safety Instructions Before you call for permanent damage section in the electrical outlet. Improper cookware being used . grounded outlet. A fuse in time...
Owners Manual
Page 40
.... "LOCKED" is on range is not completely • Make sure electrical plug is too high to cool and reset the controls. • See the Using the self-cleaning oven section. • Remove the probe from the oven. Consumer Support Troubleshooting Tips Care and Cleaning Operating Instructions Safety Instructions Before you want to rid the room of smoke. Heavily soiled ovens may be blown or the circuit breaker tripped. • Replace the fuse or reset the circuit breaker. Oven controls improperly set a self-clean operation...
.... "LOCKED" is on range is not completely • Make sure electrical plug is too high to cool and reset the controls. • See the Using the self-cleaning oven section. • Remove the probe from the oven. Consumer Support Troubleshooting Tips Care and Cleaning Operating Instructions Safety Instructions Before you want to rid the room of smoke. Heavily soiled ovens may be blown or the circuit breaker tripped. • Replace the fuse or reset the circuit breaker. Oven controls improperly set a self-clean operation...


