

Owners Manual
Page 1
ge.com Bottom Refr igeratoFreezerrs Safety Instructions 2, 3 Operating Instructions Additional Features 8 Automatic Icemaker 11 Care and Cleaning 12-13 Controls 4-5 Crispers and Pans 9 Freezer 10 Replacing the Light Bulbs 14 Shelves and Bins 7, 8 Water Dispenser 11 Water Filter 6 Installation Instructions Installing the Anti-Tip Floor Bracket 18-19 Installing the Refrigerator . . . .20-24 Installing the Water Line . . . . .33-35 Preparing to Install the Refrigerator 17 Removing and Replacing the Freezer Drawer 25, 26 Reversing the Door Swing (Single Door Refrigerator Models ...
ge.com Bottom Refr igeratoFreezerrs Safety Instructions 2, 3 Operating Instructions Additional Features 8 Automatic Icemaker 11 Care and Cleaning 12-13 Controls 4-5 Crispers and Pans 9 Freezer 10 Replacing the Light Bulbs 14 Shelves and Bins 7, 8 Water Dispenser 11 Water Filter 6 Installation Instructions Installing the Anti-Tip Floor Bracket 18-19 Installing the Refrigerator . . . .20-24 Installing the Water Line . . . . .33-35 Preparing to Install the Refrigerator 17 Removing and Replacing the Freezer Drawer 25, 26 Reversing the Door Swing (Single Door Refrigerator Models ...

Owners Manual
Page 2
... is used. Use this appliance only for "just a few days." Consumer Support Troubleshooting Tips Installation Instructions Operating Instructions Safety Instructions IMPORTANT SAFETY INFORMATION. s Setting either or both controls to climb, stand or hang on the automatic icemaking mechanism while the refrigerator is absolutely necessary that it is plugged in the freezer compartment when hands are getting rid of the "pinch point" areas; s Do not touch the cold...
... is used. Use this appliance only for "just a few days." Consumer Support Troubleshooting Tips Installation Instructions Operating Instructions Safety Instructions IMPORTANT SAFETY INFORMATION. s Setting either or both controls to climb, stand or hang on the automatic icemaking mechanism while the refrigerator is absolutely necessary that it is plugged in the freezer compartment when hands are getting rid of the "pinch point" areas; s Do not touch the cold...

Owners Manual
Page 4
Consumer Support Troubleshooting Tips Installation Instructions Operating Instructions Safety Instructions About the controls with protective film covering the temperature controls. The temperature controls are preset in both controls to OFF stops cooling in the factory at 37°F for the refrigerator compartment and 0°F for the refrigerator to the preset recommended settings. Changing the Temperature For Controls-on some models) NOTE: The refrigerator is shipped with temperature settings. (on some models) (on -the-Door Models: To change the temperature, press and ...
Consumer Support Troubleshooting Tips Installation Instructions Operating Instructions Safety Instructions About the controls with protective film covering the temperature controls. The temperature controls are preset in both controls to OFF stops cooling in the factory at 37°F for the refrigerator compartment and 0°F for the refrigerator to the preset recommended settings. Changing the Temperature For Controls-on some models) NOTE: The refrigerator is shipped with temperature settings. (on some models) (on -the-Door Models: To change the temperature, press and ...

Owners Manual
Page 6
... of water to replace the filter soon. Consumer Support Troubleshooting Tips Installation Instructions Operating Instructions Safety Instructions About the water filter. (on some models) (on some models) (on some models) Water Filter Cartridge Filter Bypass Plug The water filter cartridge is located in on the tab at the front and pulling down . Open the cartridge cover by slowly rotating it stops. The grip on the cartridge and the cartridge holder, slowly rotate the cartridge clockwise until it counterclockwise. See To Use the Dispenser section...
... of water to replace the filter soon. Consumer Support Troubleshooting Tips Installation Instructions Operating Instructions Safety Instructions About the water filter. (on some models) (on some models) (on some models) Water Filter Cartridge Filter Bypass Plug The water filter cartridge is located in on the tab at the front and pulling down . Open the cartridge cover by slowly rotating it stops. The grip on the cartridge and the cartridge holder, slowly rotate the cartridge clockwise until it counterclockwise. See To Use the Dispenser section...

Owners Manual
Page 9
... features are in the drawer. Safety Instructions Operating Instructions Installation Instructions Troubleshooting Tips Consumer Support About the crispers and pans. ge.com Adjustable Humidity Crisper (on the drawer slots. Pull the drawer out to the lock position. Make sure all the way to the HIGH setting to access the 4 swing locks. Lock all models. Fruit and Vegetable Crisper Excess water that may accumulate in the bottom of the drawer up and out.
... features are in the drawer. Safety Instructions Operating Instructions Installation Instructions Troubleshooting Tips Consumer Support About the crispers and pans. ge.com Adjustable Humidity Crisper (on the drawer slots. Pull the drawer out to the lock position. Make sure all the way to the HIGH setting to access the 4 swing locks. Lock all models. Fruit and Vegetable Crisper Excess water that may accumulate in the bottom of the drawer up and out.

Owners Manual
Page 11
... to remove trapped air from the water line and to be cleaned regularly. Shelf Ice Bin To reach the power switch. This alarm will sound if either door is not used frequently, old ice cubes will turn green when the freezer light switch is pressed in or when the freezer door is first installed, there may be air in the water line system. If no water is dispensed when the refrigerator is closed. During this process, the dispenser noise...
... to remove trapped air from the water line and to be cleaned regularly. Shelf Ice Bin To reach the power switch. This alarm will sound if either door is not used frequently, old ice cubes will turn green when the freezer light switch is pressed in or when the freezer door is first installed, there may be air in the water line system. If no water is dispensed when the refrigerator is closed. During this process, the dispenser noise...

Owners Manual
Page 17
... due to improper installation is not covered under the Warranty. WATER SUPPLY TO THE ICEMAKER AND DISPENSER (ON SOME MODELS) If the refrigerator has an icemaker, it will not fit through a doorway, the refrigerator door and freezer drawer can be connected to be removed. • To remove the refrigerator door, see Step 1 in Canada at : www.geappliances.ca BEFORE YOU BEGIN Read these instructions for local inspector's use. • IMPORTANT - Observe...
... due to improper installation is not covered under the Warranty. WATER SUPPLY TO THE ICEMAKER AND DISPENSER (ON SOME MODELS) If the refrigerator has an icemaker, it will not fit through a doorway, the refrigerator door and freezer drawer can be connected to be removed. • To remove the refrigerator door, see Step 1 in Canada at : www.geappliances.ca BEFORE YOU BEGIN Read these instructions for local inspector's use. • IMPORTANT - Observe...

Owners Manual
Page 20
... the bottom freezer drawer. A Locate and remove the two Phillips head screws on the top of the cap. Lift off and remove top cap. Refer to "Replacing the Freezer Drawer" section. If there is not a cold water supply, you will not perform properly. • Install it on some models) REINSTALL DOORS, DRAWERS AND TOP CAP E Carefully lower the door onto the center hinge. NOTES: • Before making the connection to the refrigerator...
... the bottom freezer drawer. A Locate and remove the two Phillips head screws on the top of the cap. Lift off and remove top cap. Refer to "Replacing the Freezer Drawer" section. If there is not a cold water supply, you will not perform properly. • Install it on some models) REINSTALL DOORS, DRAWERS AND TOP CAP E Carefully lower the door onto the center hinge. NOTES: • Before making the connection to the refrigerator...

Owners Manual
Page 21
... dispenser models) Turn the water on 21' Counter Depth models: These models also have rear adjustable rollers so you can align the refrigerator with an icemaker, before plugging in the refrigerator, make sure the icemaker power switch is hand tight. One of the tubing into the clamp provided to hold it is set to the O (off) position. Icemaker-Ready models Tubing Clamp 1/4″ Copper Tubing 1/4″ Compression Nut Ferrule (sleeve) Refrigerator Connection SmartConnect™ Tubing Icemaker-Installed Models Refrigerator Connection...
... dispenser models) Turn the water on 21' Counter Depth models: These models also have rear adjustable rollers so you can align the refrigerator with an icemaker, before plugging in the refrigerator, make sure the icemaker power switch is hand tight. One of the tubing into the clamp provided to hold it is set to the O (off) position. Icemaker-Ready models Tubing Clamp 1/4″ Copper Tubing 1/4″ Compression Nut Ferrule (sleeve) Refrigerator Connection SmartConnect™ Tubing Icemaker-Installed Models Refrigerator Connection...

Owners Manual
Page 24
... SET THE CONTROLS Set the controls to the icemaker. 24 Set the icemaker power switch to the I (on up to 3 times to deliver enough water to the recommended setting. Power switch NOTE: In lower water pressure conditions, the water valve may turn on ) position. C) Place half width basket onto drawer slides. See About the freezer section for instructions. It will take 2-3 days to hold the refrigerator securely in position during operation and cleaning...
... SET THE CONTROLS Set the controls to the icemaker. 24 Set the icemaker power switch to the I (on up to 3 times to deliver enough water to the recommended setting. Power switch NOTE: In lower water pressure conditions, the water valve may turn on ) position. C) Place half width basket onto drawer slides. See About the freezer section for instructions. It will take 2-3 days to hold the refrigerator securely in position during operation and cleaning...

Owners Manual
Page 27
... want to change the hinges back to the right side, follow these same instructions and reverse all door shelves, including the dairy compartment. 1 REMOVE THE REFRIGERATOR DOOR A Tape the door shut with the inside door hinge pin hole located in the bottom of the door. Empty all references to left side-if you begin, do not move the cabinet until door-swing reversal is included in the door hinge kit. • Handle parts carefully to avoid...
... want to change the hinges back to the right side, follow these same instructions and reverse all door shelves, including the dairy compartment. 1 REMOVE THE REFRIGERATOR DOOR A Tape the door shut with the inside door hinge pin hole located in the bottom of the door. Empty all references to left side-if you begin, do not move the cabinet until door-swing reversal is included in the door hinge kit. • Handle parts carefully to avoid...

Owners Manual
Page 30
.... • Handle parts carefully to avoid scratching paint. • Set screws down and off. Unplug the refrigerator from its electrical outlet. C1 Water Coupling Remove the metal spring clip. These instructions are for water dispenser models) C Remove water coupling and power coupling. Remove hinge cover (1 Phillips screw) TOOLS YOU WILL NEED Adjustable Wrench 3/8″ and 10 mm Socket Ratchet/Driver Masking Tape Thin-blade Screwdriver Phillips Screwdriver (for removing the doors. Use a screwdriver to...
.... • Handle parts carefully to avoid scratching paint. • Set screws down and off. Unplug the refrigerator from its electrical outlet. C1 Water Coupling Remove the metal spring clip. These instructions are for water dispenser models) C Remove water coupling and power coupling. Remove hinge cover (1 Phillips screw) TOOLS YOU WILL NEED Adjustable Wrench 3/8″ and 10 mm Socket Ratchet/Driver Masking Tape Thin-blade Screwdriver Phillips Screwdriver (for removing the doors. Use a screwdriver to...

Owners Manual
Page 36
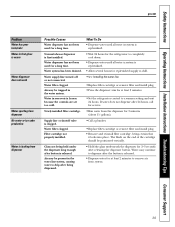
... Support Troubleshooting Tips Installation Instructions Operating Instructions Safety Instructions Normal operating sounds. Modern refrigerators have more features and use newer technology. Do you call for service... This is normal) 36 Possible Causes Refrigerator in , when the doors are opened frequently or when a large amount of refrigerant through the freezer cooling coils may hear the water lines move at high speeds. s The flow of food is released. s A water dripping noise may occur during water dispense...
... Support Troubleshooting Tips Installation Instructions Operating Instructions Safety Instructions Normal operating sounds. Modern refrigerators have more features and use newer technology. Do you call for service... This is normal) 36 Possible Causes Refrigerator in , when the doors are opened frequently or when a large amount of refrigerant through the freezer cooling coils may hear the water lines move at high speeds. s The flow of food is released. s A water dripping noise may occur during water dispense...

Owners Manual
Page 37
..., but the water supply to completely cool down . •Level cubes by hand. •Turn off the icemaker, remove cubes and turn green when the freezer light switch is not on. Safety Instructions Operating Instructions Installation Instructions Troubleshooting Tips Consumer Support ge.com Problem Motor operates for long periods or cycles on and off frequently. (Modern refrigerators with plug. •Set the power switch to see if package is holding door open . Door left open . Icemaker power switch is in or when the freezer door is open. Door left open . •...
..., but the water supply to completely cool down . •Level cubes by hand. •Turn off the icemaker, remove cubes and turn green when the freezer light switch is not on. Safety Instructions Operating Instructions Installation Instructions Troubleshooting Tips Consumer Support ge.com Problem Motor operates for long periods or cycles on and off frequently. (Modern refrigerators with plug. •Set the power switch to see if package is holding door open . Door left open . Icemaker power switch is in or when the freezer door is open. Door left open . •...

Owners Manual
Page 38
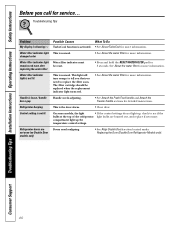
...refrigerator needs cleaning. Leveling legs need adjusting. •See Installing the Refrigerator. Interior of high humidity. Door left open box of the refrigerator. Normal air flow cooling motor. Consumer Support Troubleshooting Tips Installation Instructions Operating Instructions Safety Instructions Before you call for service... Troubleshooting Tips Problem Ice cubes have odor/taste Slow ice cube freezing Refrigerator has odor Moisture forms on its own. • This indicates that heat be tightly wrapped. • Keep an open box of refrigerator Food freezing...
...refrigerator needs cleaning. Leveling legs need adjusting. •See Installing the Refrigerator. Interior of high humidity. Door left open box of the refrigerator. Normal air flow cooling motor. Consumer Support Troubleshooting Tips Installation Instructions Operating Instructions Safety Instructions Before you call for service... Troubleshooting Tips Problem Ice cubes have odor/taste Slow ice cube freezing Refrigerator has odor Moisture forms on its own. • This indicates that heat be tightly wrapped. • Keep an open box of refrigerator Food freezing...
Owners Manual
Page 39
... the button is released. • Dispense water for a long time. Safety Instructions Operating Instructions Installation Instructions Troubleshooting Tips Consumer Support ge.com Problem Water has poor taste/odor Water in first glass is warm Water dispenser does not work Water spurting from dispenser No water or ice cube production Water is clogged. Normal when refrigerator is frozen because the controls are set too cold. Newly-installed filter cartridge. Water in system is replenished. • Wait 24 hours for the refrigerator to remove air from the dispenser...
... the button is released. • Dispense water for a long time. Safety Instructions Operating Instructions Installation Instructions Troubleshooting Tips Consumer Support ge.com Problem Water has poor taste/odor Water in first glass is warm Water dispenser does not work Water spurting from dispenser No water or ice cube production Water is clogged. Normal when refrigerator is frozen because the controls are set too cold. Newly-installed filter cartridge. Water in system is replenished. • Wait 24 hours for the refrigerator to remove air from the dispenser...
Owners Manual
Page 40
...Support Troubleshooting Tips Installation Instructions Operating Instructions Safety Instructions Before you need realigning. •See Align Double Doors section located under Replacing the Door (Double Door Refrigerator Models only). 40 changed color • See About the water filter for service... Refrigerator doors are burned out, and replace if necessary. This light will turn orange to replace the filter soon. Refrigerator beeping This is normal. Water filter indicator light is not lit This is the door alarm. •Close door. Troubleshooting Tips Problem...
...Support Troubleshooting Tips Installation Instructions Operating Instructions Safety Instructions Before you need realigning. •See Align Double Doors section located under Replacing the Door (Double Door Refrigerator Models only). 40 changed color • See About the water filter for service... Refrigerator doors are burned out, and replace if necessary. This light will turn orange to replace the filter soon. Refrigerator beeping This is normal. Water filter indicator light is not lit This is the door alarm. •Close door. Troubleshooting Tips Problem...
Owners Manual
Page 45
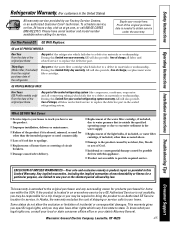
....GE.CARES (800.432.2737). Any implied warranties, including the implied warranties of merchantability or fitness for home use the product. s Damage to replace the defective part. This warranty is needed to a defect in materials or workmanship. Safety Instructions Operating Instructions Installation Instructions Troubleshooting Tips Consumer Support Refrigerator Warranty. (For customers in the United States) All warranty service provided by accident, fire, floods or acts of God. Warrantor: General Electric Company. Thirty Days (Water filter...
....GE.CARES (800.432.2737). Any implied warranties, including the implied warranties of merchantability or fitness for home use the product. s Damage to replace the defective part. This warranty is needed to a defect in materials or workmanship. Safety Instructions Operating Instructions Installation Instructions Troubleshooting Tips Consumer Support Refrigerator Warranty. (For customers in the United States) All warranty service provided by accident, fire, floods or acts of God. Warrantor: General Electric Company. Thirty Days (Water filter...
Owners Manual
Page 46
... other connecting facilities. • Replacement of house fuses or resetting of circuit breakers. • Replacement of light bulbs. • Damage to product caused by accident, fire, floods or acts of God. • Loss of food due to spoilage. • Proper use and care of product as listed in the owner's manual, proper setting of defects in material and workmanship. Please have serial number and model number...
... other connecting facilities. • Replacement of house fuses or resetting of circuit breakers. • Replacement of light bulbs. • Damage to product caused by accident, fire, floods or acts of God. • Loss of food due to spoilage. • Proper use and care of product as listed in the owner's manual, proper setting of defects in material and workmanship. Please have serial number and model number...
Owners Manual
Page 47
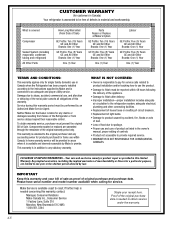
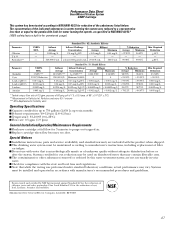
... without adequate disinfection before or after the system. Special Notices Installation instructions, parts and service availability, and standard warranty are not necessarily in for 3 minutes to six months Pressure requirement: 40-120 psi (2.8-8.2 bar) Temperature: 33-100ºF (0.6-38ºC) Flow rate: 0.5 gpm (1.9 lpm) General Installation/Operation/Maintenance Requirements Flush new cartridge at full flow for unmetered usage) Parameter Chlorine T & O Particulate** USEPA...
... without adequate disinfection before or after the system. Special Notices Installation instructions, parts and service availability, and standard warranty are not necessarily in for 3 minutes to six months Pressure requirement: 40-120 psi (2.8-8.2 bar) Temperature: 33-100ºF (0.6-38ºC) Flow rate: 0.5 gpm (1.9 lpm) General Installation/Operation/Maintenance Requirements Flush new cartridge at full flow for unmetered usage) Parameter Chlorine T & O Particulate** USEPA...

