
Owners Manual
Page 1
ge.com Bottom Refr igeratoFreezerrs Safety Instructions 2, 3 Operating Instructions Additional Features 9 Automatic Icemaker 12 Controls 4-6 Crispers and Pans 10 Freezer 11 Shelves and Bins 8, 9 Water Filter 7 Care and Cleaning 13-15 Installation Instructions Installing the Refrigerator . . . .17-21 Installing the Water Line . . . . .31-33 Preparing to Install the Refrigerator 16 Removing and Replacing the Freezer Drawer 22, 23...
ge.com Bottom Refr igeratoFreezerrs Safety Instructions 2, 3 Operating Instructions Additional Features 9 Automatic Icemaker 12 Controls 4-6 Crispers and Pans 10 Freezer 11 Shelves and Bins 8, 9 Water Filter 7 Care and Cleaning 13-15 Installation Instructions Installing the Refrigerator . . . .17-21 Installing the Water Line . . . . .31-33 Preparing to Install the Refrigerator 16 Removing and Replacing the Freezer Drawer 22, 23...

Owners Manual
Page 2
...Throw Away Your Old Refrigerator or Freezer: s Take off ) does not remove power to do. Junked or abandoned refrigerators are getting rid of this or any servicing be performed by a qualified individual. Refrigerants All refrigeration products contain refrigerants, which have thawed ...installed and located in place so that any other appliance. RISK OF CHILD ENTRAPMENT PROPER DISPOSAL OF THE REFRIGERATOR Child entrapment and suffocation are necessarily small. Troubleshooting Tips Installation Instructions Operating Instructions Safety Instructions IMPORTANT SAFETY ...
...Throw Away Your Old Refrigerator or Freezer: s Take off ) does not remove power to do. Junked or abandoned refrigerators are getting rid of this or any servicing be performed by a qualified individual. Refrigerants All refrigeration products contain refrigerants, which have thawed ...installed and located in place so that any other appliance. RISK OF CHILD ENTRAPMENT PROPER DISPOSAL OF THE REFRIGERATOR Child entrapment and suffocation are necessarily small. Troubleshooting Tips Installation Instructions Operating Instructions Safety Instructions IMPORTANT SAFETY ...
Owners Manual
Page 3
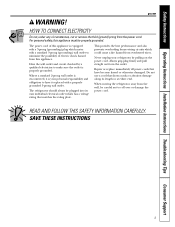
... and obligation to roll over or damage the power cord. Where a standard 2-prong wall outlet is encountered, it is your refrigerator by a qualified electrician to minimize the possibility of this appliance. READ AND FOLLOW THIS SAFETY INFORMATION CAREFULLY. Do not use ...circuits which mates with a properly grounded 3-prong wall outlet. Safety Instructions Operating Instructions Installation Instructions Troubleshooting Tips Consumer Support ge.com WARNING! HOW TO CONNECT ELECTRICITY Do not, under any circumstances, cut or remove the third (ground) prong from ...
... and obligation to roll over or damage the power cord. Where a standard 2-prong wall outlet is encountered, it is your refrigerator by a qualified electrician to minimize the possibility of this appliance. READ AND FOLLOW THIS SAFETY INFORMATION CAREFULLY. Do not use ...circuits which mates with a properly grounded 3-prong wall outlet. Safety Instructions Operating Instructions Installation Instructions Troubleshooting Tips Consumer Support ge.com WARNING! HOW TO CONNECT ELECTRICITY Do not, under any circumstances, cut or remove the third (ground) prong from ...

Owners Manual
Page 4
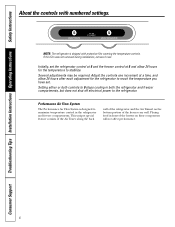
...the COLDER pad again (on usage and operating environment. Setting either or both controls to OFF stops cooling in the refrigerator and freezer compartments. To change the temperature, press and release the WARMER or COLDER pad. Several adjustments may vary slightly from ... will come on and the display will illuminate on the bottom portion of the freezer rear wall. Placing food in the factory at 37°F for the refrigerator compartment and 0°F for the freezer compartment. Troubleshooting Tips Installation Instructions Operating Instructions Safety Instructions About...
...the COLDER pad again (on usage and operating environment. Setting either or both controls to OFF stops cooling in the refrigerator and freezer compartments. To change the temperature, press and release the WARMER or COLDER pad. Several adjustments may vary slightly from ... will come on and the display will illuminate on the bottom portion of the freezer rear wall. Placing food in the factory at 37°F for the refrigerator compartment and 0°F for the freezer compartment. Troubleshooting Tips Installation Instructions Operating Instructions Safety Instructions About...
Owners Manual
Page 5
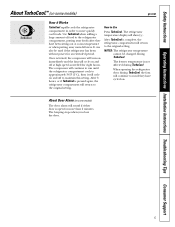
... run if they have cycled on some models) ge.com How it Works TurboCool rapidly cools the refrigerator compartment in order to more than 2 minutes. After TurboCool is complete, the refrigerator compartment will show . The freezer temperature is open for more quickly cool foods. The refrigerator temperature display will return to the original setting. The...
... run if they have cycled on some models) ge.com How it Works TurboCool rapidly cools the refrigerator compartment in order to more than 2 minutes. After TurboCool is complete, the refrigerator compartment will show . The freezer temperature is open for more quickly cool foods. The refrigerator temperature display will return to the original setting. The...
Owners Manual
Page 6
... either or both controls to 0 stops cooling in both the refrigerator and freezer compartments, but does not shut off electrical power to maximize temperature control in front of the louvers on the bottom portion of the refrigerator and the Air Tunnel on these components will not affect performance. This ...unique special feature consists of the Air Tower along the back wall of the freezer rear wall. If this film was not removed...
... either or both controls to 0 stops cooling in both the refrigerator and freezer compartments, but does not shut off electrical power to maximize temperature control in front of the louvers on the bottom portion of the refrigerator and the Air Tunnel on these components will not affect performance. This ...unique special feature consists of the Air Tower along the back wall of the freezer rear wall. If this film was not removed...

Owners Manual
Page 7
...replacement filter cartridge is a replacement indicator light for the water filter cartridge on the temperature display. A small amount of the refrigerator compartment. CAUTION: If air has been trapped in the system, the filter cartridge may be positioned vertically. Use caution when ...not available. Safety Instructions Operating Instructions Installation Instructions Troubleshooting Tips Consumer Support About the water filter. (on some models) ge.com (on some models) Water Filter Cartridge Filter Bypass Plug The water filter cartridge is properly installed, you are ...
...replacement filter cartridge is a replacement indicator light for the water filter cartridge on the temperature display. A small amount of the refrigerator compartment. CAUTION: If air has been trapped in the system, the filter cartridge may be positioned vertically. Use caution when ...not available. Safety Instructions Operating Instructions Installation Instructions Troubleshooting Tips Consumer Support About the water filter. (on some models) ge.com (on some models) Water Filter Cartridge Filter Bypass Plug The water filter cartridge is properly installed, you are ...

Owners Manual
Page 8
Refrigerator Compartment To remove: Tilt the shelf up at the back and bring the shelf out. To remove or replace the shelves, see Rearranging the Shelves. ... the shelf into place. To replace: Place the rear shelf tabs just in the refrigerator compartment are slightly behind others. Lift the shelf up , insert the top hook at the back of the shelf until the bottom of the central notches on some models) The slide-out spillproof shelf allows you close...
Refrigerator Compartment To remove: Tilt the shelf up at the back and bring the shelf out. To remove or replace the shelves, see Rearranging the Shelves. ... the shelf into place. To replace: Place the rear shelf tabs just in the refrigerator compartment are slightly behind others. Lift the shelf up , insert the top hook at the back of the shelf until the bottom of the central notches on some models) The slide-out spillproof shelf allows you close...
Owners Manual
Page 9
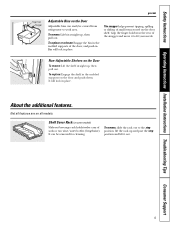
... position, lift the rack up and past the stop position and lift it out. 9 Grip the finger hold Snugger ge.com Adjustable Bins on the Door Adjustable bins can be carried from refrigerator to work area. Shelf Saver Rack (on some models) Slide-out beverage rack holds twelve cans of small items...
... position, lift the rack up and past the stop position and lift it out. 9 Grip the finger hold Snugger ge.com Adjustable Bins on the Door Adjustable bins can be carried from refrigerator to work area. Shelf Saver Rack (on some models) Slide-out beverage rack holds twelve cans of small items...
Owners Manual
Page 10
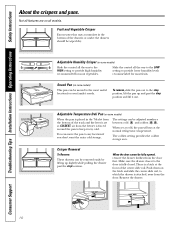
...extra cold storage. Push down on some models) When the pan is a latch at the normal refrigerator temperature. To remove, slide the pan out to provide lower humidity levels recommended for most fruits. ...You can be wiped dry. There is placed in the bottom of the center slide rail. Adjustable Temperature Deli Pan (on the latch and slide the center ...slide rail, to which the drawer is attached, away from the freezer is set at cold, the pan will stay at the front of the drawers or under ...
...extra cold storage. Push down on some models) When the pan is a latch at the normal refrigerator temperature. To remove, slide the pan out to provide lower humidity levels recommended for most fruits. ...You can be wiped dry. There is placed in the bottom of the center slide rail. Adjustable Temperature Deli Pan (on the latch and slide the center ...slide rail, to which the drawer is attached, away from the freezer is set at cold, the pan will stay at the front of the drawers or under ...

Owners Manual
Page 12
...will fill with lower-than-average water pressure, you may take 12 to 24 hours to the l (on freezer compartment temperature, room temperature, number of the refrigerator for the specific icemaker kit needed for how to 15°F (-10°C). Troubleshooting Tips Installation Instructions Operating ...Instructions Safety Instructions About the automatic icemaker. The icemaker power light will become cloudy, taste stale and shrink. When the refrigerator has been connected to begin making ice cubes. Throw away the first few batches of ice to allow the water line to...
...will fill with lower-than-average water pressure, you may take 12 to 24 hours to the l (on freezer compartment temperature, room temperature, number of the refrigerator for the specific icemaker kit needed for how to 15°F (-10°C). Troubleshooting Tips Installation Instructions Operating ...Instructions Safety Instructions About the automatic icemaker. The icemaker power light will become cloudy, taste stale and shrink. When the refrigerator has been connected to begin making ice cubes. Throw away the first few batches of ice to allow the water line to...
Owners Manual
Page 13
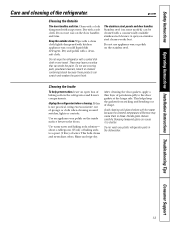
...handles and trim. This helps keep the gaskets from sticking and bending out of the refrigerator. Bumping tempered glass can scratch and weaken the paint finish. ge.com Cleaning the Outside The door handles and trim. Keep the outside clean. Use warm... dish cloth or wet towel. Avoid cleaning cold glass shelves with soapy water. Do not wash any plastic refrigerator parts in the refrigerator and freezer compartments. These may cause them to shatter. Safety Instructions Operating Instructions Installation Instructions Troubleshooting Tips Consumer Support Care and...
...handles and trim. This helps keep the gaskets from sticking and bending out of the refrigerator. Bumping tempered glass can scratch and weaken the paint finish. ge.com Cleaning the Outside The door handles and trim. Keep the outside clean. Use warm... dish cloth or wet towel. Avoid cleaning cold glass shelves with soapy water. Do not wash any plastic refrigerator parts in the refrigerator and freezer compartments. These may cause them to shatter. Safety Instructions Operating Instructions Installation Instructions Troubleshooting Tips Consumer Support Care and...

Owners Manual
Page 14
... the icemaker power switch to the O (off) position and shut off ) position, and clean the interior with embossed surfaces. Behind the Refrigerator Be careful when moving . Handle only from the wall. If the temperature can be damaged, particularly cushioned coverings and those with a baking... Operating Instructions Safety Instructions Care and cleaning of the refrigerator against the hand truck. Move the freezer control to the 0 (off the water supply to move the refrigerator, do not rest the front or back of the refrigerator. Preparing to Move Secure all loose items such as...
... the icemaker power switch to the O (off) position and shut off ) position, and clean the interior with embossed surfaces. Behind the Refrigerator Be careful when moving . Handle only from the wall. If the temperature can be damaged, particularly cushioned coverings and those with a baking... Operating Instructions Safety Instructions Care and cleaning of the refrigerator against the hand truck. Move the freezer control to the 0 (off the water supply to move the refrigerator, do not rest the front or back of the refrigerator. Preparing to Move Secure all loose items such as...
Owners Manual
Page 15
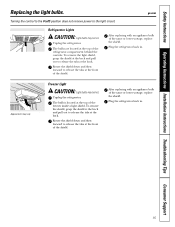
... bulb of the same or lower wattage, replace the shield. ge.com Turning the control to the 0 (off) position does not remove power to release the tabs at the top of the refrigerator compartment behind the controls. After replacing with an appliance bulb of... the top of the freezer inside a light shield. Appearance may vary Freezer Light CAUTION: Light bulbs may be hot. Safety Instructions Operating Instructions Installation Instructions Troubleshooting Tips Consumer Support Replacing the light bulbs. Plug the refrigerator back in . 15 Unplug the refrigerator. The bulbs are located...
... bulb of the same or lower wattage, replace the shield. ge.com Turning the control to the 0 (off) position does not remove power to release the tabs at the top of the refrigerator compartment behind the controls. After replacing with an appliance bulb of... the top of the freezer inside a light shield. Appearance may vary Freezer Light CAUTION: Light bulbs may be hot. Safety Instructions Operating Instructions Installation Instructions Troubleshooting Tips Consumer Support Replacing the light bulbs. Plug the refrigerator back in . 15 Unplug the refrigerator. The bulbs are located...

Owners Manual
Page 16
...refrigerator has an icemaker, it will not fit through a doorway, the refrigerator door and freezer...ge.com (in the Reversing the Door Swing section. Save these instructions with the Consumer. • Note to Consumer - Installation of the installer. • Product failure due to be removed. • To remove the refrigerator door, see Step 1 in the Reversing the Door Swing section. • To remove the freezer...GE water supply kit (containing tubing, shutoff valve, fittings and instructions) is not covered under the Warranty. PREPARATION MOVING THE REFRIGERATOR INDOORS If the refrigerator...
...refrigerator has an icemaker, it will not fit through a doorway, the refrigerator door and freezer...ge.com (in the Reversing the Door Swing section. Save these instructions with the Consumer. • Note to Consumer - Installation of the installer. • Product failure due to be removed. • To remove the refrigerator door, see Step 1 in the Reversing the Door Swing section. • To remove the freezer...GE water supply kit (containing tubing, shutoff valve, fittings and instructions) is not covered under the Warranty. PREPARATION MOVING THE REFRIGERATOR INDOORS If the refrigerator...

Owners Manual
Page 17
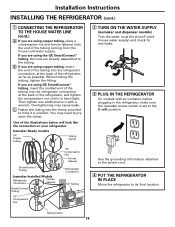
... each side to remove skid. •NOTE: Use a padded hand truck to move and complete this refrigerator. C Remove the bottom freezer drawer. Top Hinge B. 1 CONNECTING THE REFRIGERATOR TO THE HOUSE WATER LINE (icemaker and dispenser models) A cold water supply is required for ease of ...If passageways are less than 36″, the refrigerator doors and handles can be removed to allow the refrigerator to provide one if your refrigerator does not have a water filter, we recommend installing one . If using GE SmartConnect™ Refrigerator Tubing Kit, you will need an additional tube...
... each side to remove skid. •NOTE: Use a padded hand truck to move and complete this refrigerator. C Remove the bottom freezer drawer. Top Hinge B. 1 CONNECTING THE REFRIGERATOR TO THE HOUSE WATER LINE (icemaker and dispenser models) A cold water supply is required for ease of ...If passageways are less than 36″, the refrigerator doors and handles can be removed to allow the refrigerator to provide one if your refrigerator does not have a water filter, we recommend installing one . If using GE SmartConnect™ Refrigerator Tubing Kit, you will need an additional tube...
Owners Manual
Page 18
...WATER LINE (cont.) A If you are using copper tubing, insert the end of the tubing into the refrigerator connection, at the back of the refrigerator, as far as possible. B If you are using GE SmartConnect™ tubing, insert the molded end of the tubing into the clamp provided to the O (off...) position. If you are using the GE SmartConnect™ tubing, the nuts are using copper tubing, place a compression nut and ferrule (sleeve) onto the end of the illustrations below will look like the connection on at the back of the refrigerator, and tighten the compression nut until it in...
...WATER LINE (cont.) A If you are using copper tubing, insert the end of the tubing into the refrigerator connection, at the back of the refrigerator, as far as possible. B If you are using GE SmartConnect™ tubing, insert the molded end of the tubing into the clamp provided to the O (off...) position. If you are using the GE SmartConnect™ tubing, the nuts are using copper tubing, place a compression nut and ferrule (sleeve) onto the end of the illustrations below will look like the connection on at the back of the refrigerator, and tighten the compression nut until it in...
Owners Manual
Page 20
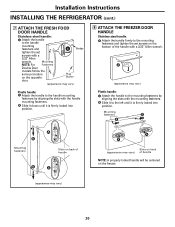
...it is firmly locked into position. 8 ATTACH THE FREEZER DOOR HANDLE Stainless steel handle: A Attach the handle firmly to the mounting fasteners and tighten the set screws with the mounting fasteners. Installation Instructions INSTALLING THE REFRIGERATOR (cont.) 7 ATTACH THE FRESH FOOD DOOR HANDLE ... the handle to the handle mounting fasteners and tighten the set screws on the freezer. 20 A Badge Plug Button (appearance may vary) of handle NOTE: A properly locked handle will be centered on the bottom of handle A (appearance may vary) A A Slots on the opposite door...
...it is firmly locked into position. 8 ATTACH THE FREEZER DOOR HANDLE Stainless steel handle: A Attach the handle firmly to the mounting fasteners and tighten the set screws with the mounting fasteners. Installation Instructions INSTALLING THE REFRIGERATOR (cont.) 7 ATTACH THE FRESH FOOD DOOR HANDLE ... the handle to the handle mounting fasteners and tighten the set screws on the freezer. 20 A Badge Plug Button (appearance may vary) of handle NOTE: A properly locked handle will be centered on the bottom of handle A (appearance may vary) A A Slots on the opposite door...
Owners Manual
Page 21
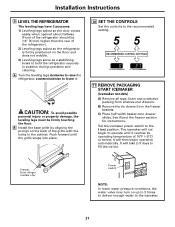
... be firmly touching the floor. A Turn the leveling legs clockwise to raise the refrigerator, counterclockwise to hold the refrigerator securely in the cabinet. C) Place half width basket onto drawer slides. Freezer Door (hinge) models only Power switch NOTE: In lower water pressure conditions, the water valve may turn on up to 3 times to...
... be firmly touching the floor. A Turn the leveling legs clockwise to raise the refrigerator, counterclockwise to hold the refrigerator securely in the cabinet. C) Place half width basket onto drawer slides. Freezer Door (hinge) models only Power switch NOTE: In lower water pressure conditions, the water valve may turn on up to 3 times to...
Owners Manual
Page 22
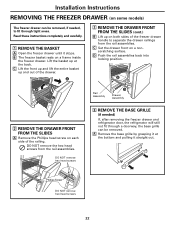
... these instructions completely and carefully. 1 REMOVE THE BASKET A Open the freezer drawer until it at the back. B The freezer basket rests on each side of the railing. Phillips Screw DO NOT remove hex head screws 22 Lift the basket up and out of the drawer. DO NOT remove hex...REMOVE THE BASE GRILLE (if needed) If, after removing the freezer drawer and refrigerator door, the refrigerator will still not fit through a doorway, the base grille can be removed. C Lift the front up and lift the entire basket up at the bottom and pulling it straight out. A Remove the base grille ...
... these instructions completely and carefully. 1 REMOVE THE BASKET A Open the freezer drawer until it at the back. B The freezer basket rests on each side of the railing. Phillips Screw DO NOT remove hex head screws 22 Lift the basket up and out of the drawer. DO NOT remove hex...REMOVE THE BASE GRILLE (if needed) If, after removing the freezer drawer and refrigerator door, the refrigerator will still not fit through a doorway, the base grille can be removed. C Lift the front up and lift the entire basket up at the bottom and pulling it straight out. A Remove the base grille ...


