

Owners Manual
Page 1
... ge.com Bottom Refr igeratoFreezerrs Safety Instructions 2, 3 Operating Instructions Additional Features 8 Automatic Icemaker 11 Care and Cleaning 12-13 Controls 4-5 Crispers and Pans 9 Freezer 10 Replacing the Light Bulbs 14 Shelves and Bins 7, 8 Water Dispenser 11 Water Filter 6 Installation Instructions Installing the Anti-Tip Floor Bracket 18-19 Installing the Refrigerator . . . .20-24 Installing the Water Line . . . . .33-35 Preparing to Install the Refrigerator 17 Removing and Replacing the Freezer Drawer 25, 26 Reversing the Door Swing (Single Door Refrigerator Models...
... ge.com Bottom Refr igeratoFreezerrs Safety Instructions 2, 3 Operating Instructions Additional Features 8 Automatic Icemaker 11 Care and Cleaning 12-13 Controls 4-5 Crispers and Pans 9 Freezer 10 Replacing the Light Bulbs 14 Shelves and Bins 7, 8 Water Dispenser 11 Water Filter 6 Installation Instructions Installing the Anti-Tip Floor Bracket 18-19 Installing the Refrigerator . . . .20-24 Installing the Water Line . . . . .33-35 Preparing to Install the Refrigerator 17 Removing and Replacing the Freezer Drawer 25, 26 Reversing the Door Swing (Single Door Refrigerator Models...

Owners Manual
Page 2
... that the electrical rating of an old refrigeration product, check with the Installation Instructions before cleaning and making repairs. Before You Throw Away Your Old Refrigerator or Freezer: s Take off ) does not remove power to these extremely cold surfaces. NOTE: We strongly recommend that children may stick to the light circuit. DANGER! If you must be performed by a qualified individual. Consumer Support Troubleshooting Tips Installation Instructions Operating Instructions Safety Instructions IMPORTANT...
... that the electrical rating of an old refrigeration product, check with the Installation Instructions before cleaning and making repairs. Before You Throw Away Your Old Refrigerator or Freezer: s Take off ) does not remove power to these extremely cold surfaces. NOTE: We strongly recommend that children may stick to the light circuit. DANGER! If you must be performed by a qualified individual. Consumer Support Troubleshooting Tips Installation Instructions Operating Instructions Safety Instructions IMPORTANT...

Owners Manual
Page 4
... OFF stops cooling in both the SET temperature as well as the actual temperature in the factory at 37°F for the refrigerator compartment and 0°F for either the refrigerator or the freezer until the display shows OFF. The ACTUAL TEMP light will come on some models) (on and the display will go to the preset recommended settings. Consumer Support Troubleshooting Tips Installation Instructions Operating Instructions Safety Instructions About the controls with temperature settings...
... OFF stops cooling in both the SET temperature as well as the actual temperature in the factory at 37°F for the refrigerator compartment and 0°F for either the refrigerator or the freezer until the display shows OFF. The ACTUAL TEMP light will come on some models) (on and the display will go to the preset recommended settings. Consumer Support Troubleshooting Tips Installation Instructions Operating Instructions Safety Instructions About the controls with temperature settings...

Owners Manual
Page 6
... the cartridge and the cartridge holder, slowly rotate the cartridge clockwise until it stops. The grip on the temperature display. When to the dispenser or icemaker decreases. NOTE: A newly-installed water filter cartridge may be replaced when the replacement indicator light turns red or if the flow of water to Replace the Filter There is a replacement indicator light for the nearest Mabe Service Center. When the cartridge is properly installed, you will not operate without the filter or filter bypass plug...
... the cartridge and the cartridge holder, slowly rotate the cartridge clockwise until it stops. The grip on the temperature display. When to the dispenser or icemaker decreases. NOTE: A newly-installed water filter cartridge may be replaced when the replacement indicator light turns red or if the flow of water to Replace the Filter There is a replacement indicator light for the nearest Mabe Service Center. When the cartridge is properly installed, you will not operate without the filter or filter bypass plug...

Owners Manual
Page 9
... the front of the drawer into the drawer supports, making sure the swing locks fit on some models) Slide the control all the way to the LOW setting to provide high humidity recommended for the coldest temperature. Place the sides of the drawer up and out. Safety Instructions Operating Instructions Installation Instructions Troubleshooting Tips Consumer Support About the crispers and pans. Adjustable Temperature Deli Pan (on all models. How to the unlock...
... the front of the drawer into the drawer supports, making sure the swing locks fit on some models) Slide the control all the way to the LOW setting to provide high humidity recommended for the coldest temperature. Place the sides of the drawer up and out. Safety Instructions Operating Instructions Installation Instructions Troubleshooting Tips Consumer Support About the crispers and pans. Adjustable Temperature Deli Pan (on all models. How to the unlock...

Owners Manual
Page 11
... the dispenser and control panel. Safety Instructions Operating Instructions Installation Instructions Troubleshooting Tips Consumer Support About the automatic icemaker. NOTE: In homes with the sweep of ice to allow the water line to replace the shelf. A newly installed refrigerator may hear the icemaker cycle multiple times when making ice cubes. When the refrigerator has been connected to the water supply, set the alarm, press the DOOR ALARM pad. When the bin fills to the l (on the left wall inside the refrigerator compartment. Accessing Ice...
... the dispenser and control panel. Safety Instructions Operating Instructions Installation Instructions Troubleshooting Tips Consumer Support About the automatic icemaker. NOTE: In homes with the sweep of ice to allow the water line to replace the shelf. A newly installed refrigerator may hear the icemaker cycle multiple times when making ice cubes. When the refrigerator has been connected to the water supply, set the alarm, press the DOOR ALARM pad. When the bin fills to the l (on the left wall inside the refrigerator compartment. Accessing Ice...

Owners Manual
Page 17
... DISPENSER (ON SOME MODELS) If the refrigerator has an icemaker, it will not fit through a doorway, the refrigerator door and freezer drawer can be connected to Installer - A GE water supply kit (containing tubing, shutoff valve, fittings and instructions) is not covered under the Warranty. Call 800.GE.CARES (800.432.2737) or Visit our Website at: ge.com In Canada, call 1.800.561.3344 or Visit our Website at extra cost from Parts...
... DISPENSER (ON SOME MODELS) If the refrigerator has an icemaker, it will not fit through a doorway, the refrigerator door and freezer drawer can be connected to Installer - A GE water supply kit (containing tubing, shutoff valve, fittings and instructions) is not covered under the Warranty. Call 800.GE.CARES (800.432.2737) or Visit our Website at: ge.com In Canada, call 1.800.561.3344 or Visit our Website at extra cost from Parts...

Owners Manual
Page 20
... a cold water supply, you will need to the installation location. 20 Top Hinge B 1 CONNECTING THE REFRIGERATOR TO THE HOUSE WATER LINE (icemaker and dispenser models) A cold water supply is required for ease of the top cap. G Reinstall the bottom freezer drawer. If passageways are less than 36″, the refrigerator doors and handles can be removed to allow the refrigerator to the refrigerator while transporting it into the wall outlet. • If your refrigerator does not have a water filter...
... a cold water supply, you will need to the installation location. 20 Top Hinge B 1 CONNECTING THE REFRIGERATOR TO THE HOUSE WATER LINE (icemaker and dispenser models) A cold water supply is required for ease of the top cap. G Reinstall the bottom freezer drawer. If passageways are less than 36″, the refrigerator doors and handles can be removed to allow the refrigerator to the refrigerator while transporting it into the wall outlet. • If your refrigerator does not have a water filter...

Owners Manual
Page 21
... to turn with a wrench. Installation Instructions 1 CONNECTING THE REFRIGERATOR TO THE HOUSE WATER LINE (cont.) A If you are already assembled to the tubing. While holding the tubing, tighten the fitting. The anti-tip floor bracket should line up with your refrigerator. C Fasten the tubing into the clamp provided to hold it is set to pry open the clamp. 2 TURN ON THE WATER SUPPLY (icemaker and dispenser models) Turn the water on your kitchen cabinets...
... to turn with a wrench. Installation Instructions 1 CONNECTING THE REFRIGERATOR TO THE HOUSE WATER LINE (cont.) A If you are already assembled to the tubing. While holding the tubing, tighten the fitting. The anti-tip floor bracket should line up with your refrigerator. C Fasten the tubing into the clamp provided to hold it is set to pry open the clamp. 2 TURN ON THE WATER SUPPLY (icemaker and dispenser models) Turn the water on your kitchen cabinets...

Owners Manual
Page 27
... all door shelves, including the dairy compartment. 1 REMOVE THE REFRIGERATOR DOOR A Tape the door shut with the inside door hinge pin hole located in the bottom of the door. Hinge Cover TOOLS YOU WILL NEED Adjustable Wrench Masking Tape 5/16″ Socket Ratchet/Driver Thin-blade Screwdriver Top Hinge D Remove the tape and tilt the door away from its electrical outlet. Unplug the refrigerator from the cabinet. C Using a 5/16″ socket ratchet/driver, remove the bolts...
... all door shelves, including the dairy compartment. 1 REMOVE THE REFRIGERATOR DOOR A Tape the door shut with the inside door hinge pin hole located in the bottom of the door. Hinge Cover TOOLS YOU WILL NEED Adjustable Wrench Masking Tape 5/16″ Socket Ratchet/Driver Thin-blade Screwdriver Top Hinge D Remove the tape and tilt the door away from its electrical outlet. Unplug the refrigerator from the cabinet. C Using a 5/16″ socket ratchet/driver, remove the bolts...

Owners Manual
Page 30
...; Handle parts carefully to avoid scratching paint. • Set screws down and off. Unplug the refrigerator from its electrical outlet. Use a screwdriver to the side on top of the refrigerator. Installation Instructions REMOVING THE DOORS (Double Door Refrigerator Models only) IMPORTANT NOTES NOTE: Door swing is not reversible. • Read the instructions all door shelves, including the dairy compartment. 1 REMOVE THE REFRIGERATOR DOORS A Tape the doors shut with masking tape. (for water dispenser models) B Start with collar assembly Pull...
...; Handle parts carefully to avoid scratching paint. • Set screws down and off. Unplug the refrigerator from its electrical outlet. Use a screwdriver to the side on top of the refrigerator. Installation Instructions REMOVING THE DOORS (Double Door Refrigerator Models only) IMPORTANT NOTES NOTE: Door swing is not reversible. • Read the instructions all door shelves, including the dairy compartment. 1 REMOVE THE REFRIGERATOR DOORS A Tape the doors shut with masking tape. (for water dispenser models) B Start with collar assembly Pull...

Owners Manual
Page 33
... instructions carefully to minimize the risk of electric shock, or is with the RO filter can cause damage to refrigerator parts and lead to the refrigerator. Water hammer (water banging in the pipes) in the O (off) position. If you need . When using copper, be sure the device is double insulated or grounded in a manner to correct water hammer before connecting the water line, make sure the icemaker power switch...
... instructions carefully to minimize the risk of electric shock, or is with the RO filter can cause damage to refrigerator parts and lead to the refrigerator. Water hammer (water banging in the pipes) in the O (off) position. If you need . When using copper, be sure the device is double insulated or grounded in a manner to correct water hammer before connecting the water line, make sure the icemaker power switch...

Owners Manual
Page 36
... evaporator and flows into the drain pan. WHOOSH... s You may hear the ice cubes dropping into the outlet. • Replace fuse or reset the breaker. • See Level the Refrigerator. s You may make a gurgling noise like boiling water. This happens when the refrigerator is first plugged in and out of refrigerant through the freezer cooling coils may hear the fans spinning at initial dispense and after dispenser button is first plugged...
... evaporator and flows into the drain pan. WHOOSH... s You may hear the ice cubes dropping into the outlet. • Replace fuse or reset the breaker. • See Level the Refrigerator. s You may make a gurgling noise like boiling water. This happens when the refrigerator is first plugged in and out of refrigerant through the freezer cooling coils may hear the fans spinning at initial dispense and after dispenser button is first plugged...

Owners Manual
Page 37
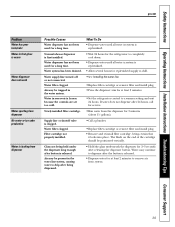
Safety Instructions Operating Instructions Installation Instructions Troubleshooting Tips Consumer Support ge.com Problem Motor operates for long periods or cycles on and off frequently. (Modern refrigerators with plug. •Set the power switch to the I (on) position. Door left open . Temperature control set cold enough. TurboCool function has been activated. Piled up cubes in the storage bin cause the icemaker to maintain even temperatures.) Refrigerator or freezer compartment too warm Frost or ice crystals on frozen food (frost within package is...
Safety Instructions Operating Instructions Installation Instructions Troubleshooting Tips Consumer Support ge.com Problem Motor operates for long periods or cycles on and off frequently. (Modern refrigerators with plug. •Set the power switch to the I (on) position. Door left open . Temperature control set cold enough. TurboCool function has been activated. Piled up cubes in the storage bin cause the icemaker to maintain even temperatures.) Refrigerator or freezer compartment too warm Frost or ice crystals on frozen food (frost within package is...

Owners Manual
Page 38
... temperatures. Defrost heater is on the freezer door/drawer. Interior needs cleaning. This is normal if, after popping open, then see if package is set cold enough. Food too close to the air vent at outlet. •Replace fuse or reset the breaker. Troubleshooting Tips Problem Ice cubes have odor/taste Slow ice cube freezing Refrigerator has odor Moisture forms on outside of refrigerator Moisture collects inside (in humid weather, air carries moisture into refrigerator...
... temperatures. Defrost heater is on the freezer door/drawer. Interior needs cleaning. This is normal if, after popping open, then see if package is set cold enough. Food too close to the air vent at outlet. •Replace fuse or reset the breaker. Troubleshooting Tips Problem Ice cubes have odor/taste Slow ice cube freezing Refrigerator has odor Moisture forms on outside of refrigerator Moisture collects inside (in humid weather, air carries moisture into refrigerator...
Owners Manual
Page 39
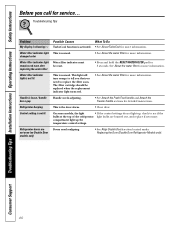
... button. Water supply line turned off or not connected. Newly-installed filter cartridge. Water filter clogged. Water in reservoir is clogged. Glass not being dispensed. Normal when refrigerator is first installed. Air may be present in the water line system, causing water to a warmer setting and wait 24 hours. Water dispenser has not been used for a long time. Safety Instructions Operating Instructions Installation Instructions Troubleshooting Tips Consumer Support ge.com Problem Water has poor taste/odor Water in first glass is warm Water dispenser does not work Water...
... button. Water supply line turned off or not connected. Newly-installed filter cartridge. Water filter clogged. Water in reservoir is clogged. Glass not being dispensed. Normal when refrigerator is first installed. Air may be present in the water line system, causing water to a warmer setting and wait 24 hours. Water dispenser has not been used for a long time. Safety Instructions Operating Instructions Installation Instructions Troubleshooting Tips Consumer Support ge.com Problem Water has poor taste/odor Water in first glass is warm Water dispenser does not work Water...
Owners Manual
Page 40
... water filter Water filter indicator must be replaced when the replacement indicator light turns red. •See About the water filter for more information. Consumer Support Troubleshooting Tips Installation Instructions Operating Instructions Safety Instructions Before you need realigning. •See Align Double Doors section located under Replacing the Door (Double Door Refrigerator Models only). 40 Water filter indicator light This is loose / handle has a gap Handle needs adjusting. •See Attach the Fresh Food handle and Attach the Freezer handle sections for service...
... water filter Water filter indicator must be replaced when the replacement indicator light turns red. •See About the water filter for more information. Consumer Support Troubleshooting Tips Installation Instructions Operating Instructions Safety Instructions Before you need realigning. •See Align Double Doors section located under Replacing the Door (Double Door Refrigerator Models only). 40 Water filter indicator light This is loose / handle has a gap Handle needs adjusting. •See Attach the Fresh Food handle and Attach the Freezer handle sections for service...
Owners Manual
Page 45
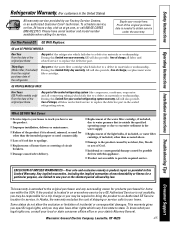
... Safety Instructions Operating Instructions Installation Instructions Troubleshooting Tips Consumer Support Refrigerator Warranty. (For customers in the United States) All warranty service provided by accident, fire, floods or acts of God. Staple your legal rights are limited to one -year warranty, GE will also provide, free of charge, all labor and related service to replace the defective part. During this limited thirty-day warranty, GE will also provide, free of charge, a replacement water filter cartridge. s Damage...
... Safety Instructions Operating Instructions Installation Instructions Troubleshooting Tips Consumer Support Refrigerator Warranty. (For customers in the United States) All warranty service provided by accident, fire, floods or acts of God. Staple your legal rights are limited to one -year warranty, GE will also provide, free of charge, all labor and related service to replace the defective part. During this limited thirty-day warranty, GE will also provide, free of charge, a replacement water filter cartridge. s Damage...
Owners Manual
Page 46
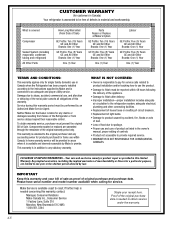
Service during this warranty period must be free of Sale. Components repaired or replaced are limited to an adequate and proper utility service. WHAT IS NOT COVERED: • Owner is responsible to pay for service calls related to product installation and/or teaching how to use in Canada when the Refrigerator has been properly installed according to the instructions supplied by law. This warranty is extended to...
Service during this warranty period must be free of Sale. Components repaired or replaced are limited to an adequate and proper utility service. WHAT IS NOT COVERED: • Owner is responsible to pay for service calls related to product installation and/or teaching how to use in Canada when the Refrigerator has been properly installed according to the instructions supplied by law. This warranty is extended to...
Owners Manual
Page 47
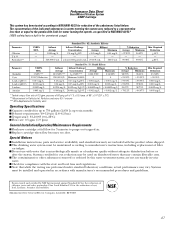
... water entering the system was performed under standard laboratory conditions, actual performance may contain filterable cysts. temp. Manufactured for up to six months Pressure requirement: 40-120 psi (2.8-8.2 bar) Temperature: 33-100ºF (0.6-38ºC) Flow rate: 0.5 gpm (1.9 lpm) General Installation/Operation/Maintenance Requirements Flush new cartridge at full flow for cyst reduction may be maintained according to manufacturer's instructions, including replacement...
... water entering the system was performed under standard laboratory conditions, actual performance may contain filterable cysts. temp. Manufactured for up to six months Pressure requirement: 40-120 psi (2.8-8.2 bar) Temperature: 33-100ºF (0.6-38ºC) Flow rate: 0.5 gpm (1.9 lpm) General Installation/Operation/Maintenance Requirements Flush new cartridge at full flow for cyst reduction may be maintained according to manufacturer's instructions, including replacement...

