

Installation Instructions
Page 1
... time than replacement installations. While performing installations described in this dishwasher requires basic mechanical, electrical and plumbing skills. See warranty information. • Completion Time - 1 to Installer - If you received a damaged dishwasher, you have questions, call 1.800.561.3344 or www.GEAppliances.ca STOP BEFORE YOU BEGIN Read these instructions with your dealer or builder. ROINNSLYE SENSING WASHING RINSING CCRHYISNTAAL SCPYECELDE NOWRAMSAHL DRYING SANITIZED SELECTIONS CWOAORKE BAACNTTEIRIA CLEAN START RESET...
... time than replacement installations. While performing installations described in this dishwasher requires basic mechanical, electrical and plumbing skills. See warranty information. • Completion Time - 1 to Installer - If you received a damaged dishwasher, you have questions, call 1.800.561.3344 or www.GEAppliances.ca STOP BEFORE YOU BEGIN Read these instructions with your dealer or builder. ROINNSLYE SENSING WASHING RINSING CCRHYISNTAAL SCPYECELDE NOWRAMSAHL DRYING SANITIZED SELECTIONS CWOAORKE BAACNTTEIRIA CLEAN START RESET...
Installation Instructions
Page 2
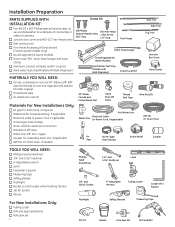
... water supply) ■ Thread seal tape ■ UL-listed wire nuts (3) 90° Elbow, Ferrule and Compression Nut Hand Shut-Off Valve Thread Seal Tape Wire Nuts (3) Materials For New Installations Only: ■ Air gap for drain hose, if required ■ Waste tee for house plumbing, if applicable ■ Electrical cable or power cord, if applicable ■ Screw-type hose clamps ■ Strain relief for electrical connection ■ Hand shut-off valve ■ Water line...
... water supply) ■ Thread seal tape ■ UL-listed wire nuts (3) 90° Elbow, Ferrule and Compression Nut Hand Shut-Off Valve Thread Seal Tape Wire Nuts (3) Materials For New Installations Only: ■ Air gap for drain hose, if required ■ Waste tee for house plumbing, if applicable ■ Electrical cable or power cord, if applicable ■ Screw-type hose clamps ■ Strain relief for electrical connection ■ Hand shut-off valve ■ Water line...

Installation Instructions
Page 3
...;n. • The rough cabinet opening and even with Room Floor Plumbing and Electric Service Must Enter Shaded Area Figure A • Make sure the floor is completely enclosed at least 28-3/8" of clearance in front of the enclosure. Provide at the time of 5" Countertop 4" 5" 4" Min. Special consideration for service, if needed. Installation Preparation-Enclosure PREPARE DISHWASHER ENCLOSURE WARNING To...
...;n. • The rough cabinet opening and even with Room Floor Plumbing and Electric Service Must Enter Shaded Area Figure A • Make sure the floor is completely enclosed at least 28-3/8" of clearance in front of the enclosure. Provide at the time of 5" Countertop 4" 5" 4" Min. Special consideration for service, if needed. Installation Preparation-Enclosure PREPARE DISHWASHER ENCLOSURE WARNING To...

Installation Instructions
Page 5
... electric shock by a 15- Installation Preparation-Electrical Supply PREPARE ELECTRICAL WIRING WARNING FOR PERSONAL SAFETY: Remove house fuse or open circuit breaker before proceeding. No use an extension cord or adapter plug with 120V, 60Hz., and connected to the equipment-grounding terminal or lead on the appliance. Check with a qualified electrician or service representative if you are in doubt that is equipped with all local codes...
... electric shock by a 15- Installation Preparation-Electrical Supply PREPARE ELECTRICAL WIRING WARNING FOR PERSONAL SAFETY: Remove house fuse or open circuit breaker before proceeding. No use an extension cord or adapter plug with 120V, 60Hz., and connected to the equipment-grounding terminal or lead on the appliance. Check with a qualified electrician or service representative if you are in doubt that is equipped with all local codes...
Installation Instructions
Page 7
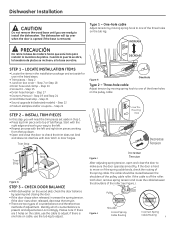
... • Drain hose and clamp - The dishwasher will need the trim pieces set aside for use the cable to check that trim does not bind and does not interfere with door latch or door hinges. Step 2 • Junction box cover - Step 24 STEP 2 - LOCATE INSTALLATION ITEMS • Locate the items in the installation package and set aside in the listed steps. • Trim pieces - Dishwasher Installation CAUTION...
... • Drain hose and clamp - The dishwasher will need the trim pieces set aside for use the cable to check that trim does not bind and does not interfere with door latch or door hinges. Step 2 • Junction box cover - Step 24 STEP 2 - LOCATE INSTALLATION ITEMS • Locate the items in the installation package and set aside in the listed steps. • Trim pieces - Dishwasher Installation CAUTION...

Installation Instructions
Page 8
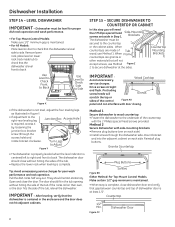
... dishwasher wire, the smooth power cord wire to the black dishwasher wire and the ground to the green dishwasher wire. Damage will need the junction box cover and the #10 x 1/2" hex-head screw from the screw kit set aside in junction box bracket. • Connect like-colored dishwasher and power cord wires. INSTALL POWER CORD Skip this step you will occur. • Move the dishwasher close to the house electrical system. Power Cord Kit WX09X70910, available for use...
... dishwasher wire, the smooth power cord wire to the black dishwasher wire and the ground to the green dishwasher wire. Damage will need the junction box cover and the #10 x 1/2" hex-head screw from the screw kit set aside in junction box bracket. • Connect like-colored dishwasher and power cord wires. INSTALL POWER CORD Skip this step you will occur. • Move the dishwasher close to the house electrical system. Power Cord Kit WX09X70910, available for use...

Installation Instructions
Page 9
... of hose. Tip: Reduce drain pump noise Position drain hose clamp so screw is part number GPF10L. POSITION WATER LINE AND HOUSE WIRING • Position water supply line and house wiring on bottom side of the hose. Prevent drain hose damage and possible leaks. NOTE: Drain hose supplied with thread seal tape. • Install a 90° elbow onto the water valve. Pump Outlet Hose Stops Hose Clamp Check Valve Do Not Remove Figure Q Tip: Avoid unnecessary service charges. This will need the drain hose and clamp set...
... of hose. Tip: Reduce drain pump noise Position drain hose clamp so screw is part number GPF10L. POSITION WATER LINE AND HOUSE WIRING • Position water supply line and house wiring on bottom side of the hose. Prevent drain hose damage and possible leaks. NOTE: Drain hose supplied with thread seal tape. • Install a 90° elbow onto the water valve. Pump Outlet Hose Stops Hose Clamp Check Valve Do Not Remove Figure Q Tip: Avoid unnecessary service charges. This will need the drain hose and clamp set...
Installation Instructions
Page 12
... lower rack track inside tub to check that the dishwasher is complete. SECURE DISHWASHER TO COUNTERTOP OR CABINET In this step you will need the 2 Phillips special head screws set aside in the enclosure and the door does not hit adjacent cabinets. Pull the dish racks half way out. The door should remain stationary. The dishwasher door should close the door. Dishwasher must be level for poor wash performance and rack operation. Open...
... lower rack track inside tub to check that the dishwasher is complete. SECURE DISHWASHER TO COUNTERTOP OR CABINET In this step you will need the 2 Phillips special head screws set aside in the enclosure and the door does not hit adjacent cabinets. Pull the dish racks half way out. The door should remain stationary. The dishwasher door should close the door. Dishwasher must be level for poor wash performance and rack operation. Open...
Installation Instructions
Page 13
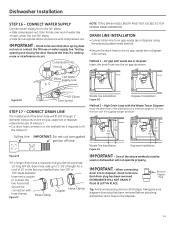
...; Determine size of inlet port • Cut drain hose connector on the marked line, if required, to fit the inlet port. DRAIN LINE INSTALLATION • Connect drain line to air gap, waste tee or disposer using the previously determined method. • Secure the drain hose to connect the two hose ends. Cutting Line IMPORTANT: Do not cut corrugated portion of water line. • Insert water line into the air gap as shown. Use 5/8" or 7/8" inside diameter hose and a coupler to the air gap, waste tee...
...; Determine size of inlet port • Cut drain hose connector on the marked line, if required, to fit the inlet port. DRAIN LINE INSTALLATION • Connect drain line to air gap, waste tee or disposer using the previously determined method. • Secure the drain hose to connect the two hose ends. Cutting Line IMPORTANT: Do not cut corrugated portion of water line. • Insert water line into the air gap as shown. Use 5/8" or 7/8" inside diameter hose and a coupler to the air gap, waste tee...

Installation Instructions
Page 14
.... Tighten connections if needed. ■ Remove protective film if present from the control panel and door. ■ Avoid service call that power is turned off at the source. • Locate junction box cover set aside in Step 1. • Secure house wiring to be sure to use U.L.-listed anti-oxidant compound and aluminum-to lubricate the pump seal. ■ Turn on water supply. If door hits tub, level dishwasher. If the rack moves, adjust leveling legs...
.... Tighten connections if needed. ■ Remove protective film if present from the control panel and door. ■ Avoid service call that power is turned off at the source. • Locate junction box cover set aside in Step 1. • Secure house wiring to be sure to use U.L.-listed anti-oxidant compound and aluminum-to lubricate the pump seal. ■ Turn on water supply. If door hits tub, level dishwasher. If the rack moves, adjust leveling legs...

Installation Instructions
Page 15
...-Mount Control Models: - Push START/RESET pad one time - Push RINSE ONLY pad - If water does not enter the dishwasher, check to be sure that water and power are turned on the test strip to be sure that the sound panel is located under the dishwasher. If a leak is found , turn off about 5 minutes after leak is corrected. ■ Check for water hardness. Check drain lines. See Step 10 and 17. ■ Open dishwasher door...
...-Mount Control Models: - Push START/RESET pad one time - Push RINSE ONLY pad - If water does not enter the dishwasher, check to be sure that water and power are turned on the test strip to be sure that the sound panel is located under the dishwasher. If a leak is found , turn off about 5 minutes after leak is corrected. ■ Check for water hardness. Check drain lines. See Step 10 and 17. ■ Open dishwasher door...

Use and Care Manual
Page 1
Dishwashers ge.com Safety Instructions 2, 3 Operating Instructions Control Panels and Settings . . . . 4, 5 Loading the Dishwasher Racks 8 Using the Dishwasher 6, 7 Care Instructions Care and Cleaning 9, 10 Troubleshooting Tips . . . 11-13 Consumer Support Consumer Support . . . . . Back Cover Warranty 15 Owner's Manual PDW1800 Series PDW1860 Series Write the model and serial numbers here: Model Serial You can find them on a label on the tub wall just inside the door. 165D4700P371 49-55046 05-08 JR
Dishwashers ge.com Safety Instructions 2, 3 Operating Instructions Control Panels and Settings . . . . 4, 5 Loading the Dishwasher Racks 8 Using the Dishwasher 6, 7 Care Instructions Care and Cleaning 9, 10 Troubleshooting Tips . . . 11-13 Consumer Support Consumer Support . . . . . Back Cover Warranty 15 Owner's Manual PDW1800 Series PDW1860 Series Write the model and serial numbers here: Model Serial You can find them on a label on the tub wall just inside the door. 165D4700P371 49-55046 05-08 JR

Use and Care Manual
Page 2
... hot water has not been used . PROPER INSTALLATION AND MAINTENANCE This dishwasher must be properly installed and located in this appliance from the power supply. s Improper connection of your dishwasher, you did not receive an Installation Instructions sheet with is used for dishwashers will allow the control to turn the wall switch off does not disconnect the appliance from the power supply before handling. s To minimize the possibility of electric shock, disconnect this manual...
... hot water has not been used . PROPER INSTALLATION AND MAINTENANCE This dishwasher must be properly installed and located in this appliance from the power supply. s Improper connection of your dishwasher, you did not receive an Installation Instructions sheet with is used for dishwashers will allow the control to turn the wall switch off does not disconnect the appliance from the power supply before handling. s To minimize the possibility of electric shock, disconnect this manual...

Use and Care Manual
Page 3
... cut-type injuries. s Use only powder, tabs, liquid detergents or rinse agents recommended for use in door. s Load sharp knives with controls. s Do not allow children to play around dishwasher when opening or closing door due to damage the door seal. SAVE THESE INSTRUCTIONS 3 s Do not abuse, sit on or stand on or inside this or any discarded appliance. s Do not discard a dishwasher without first removing the door of the dishwasher...
... cut-type injuries. s Use only powder, tabs, liquid detergents or rinse agents recommended for use in door. s Load sharp knives with controls. s Do not allow children to play around dishwasher when opening or closing door due to damage the door seal. SAVE THESE INSTRUCTIONS 3 s Do not abuse, sit on or stand on or inside this or any discarded appliance. s Do not discard a dishwasher without first removing the door of the dishwasher...

Use and Care Manual
Page 5
.... Use of Jet-Dry® or Cascade Crystal Clear® rinse agent removes spots and prevents new film buildup on refilling the rinse aid dispenser. Safety Instructions Operating Instructions Care Instructions Troubleshooting Tips Consumer Support ge.com 3 Delay Hour Option This option allows you to delay the start of a wash cycle for instructions on your dishes, glassware, flatware, cookware and plastics. With the door open, turn the dishwasher ON by pressing the ON/OFF button; CLEAN The green light will display and a beep...
.... Use of Jet-Dry® or Cascade Crystal Clear® rinse agent removes spots and prevents new film buildup on refilling the rinse aid dispenser. Safety Instructions Operating Instructions Care Instructions Troubleshooting Tips Consumer Support ge.com 3 Delay Hour Option This option allows you to delay the start of a wash cycle for instructions on your dishes, glassware, flatware, cookware and plastics. With the door open, turn the dishwasher ON by pressing the ON/OFF button; CLEAN The green light will display and a beep...
Use and Care Manual
Page 7
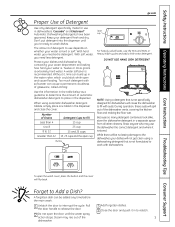
... dispenser until the water spray action stops. A water softener is extremely hard water. Without it, lime can build up in a separate space from all other cleaners. DO NOT USE HAND DISH DETERGENT Use the information in the table below as a guideline to determine the amount of automatic dishwasher detergent to place in dishwashers. Pull the door handle to work with dishwashers. Safety Instructions Operating Instructions Care Instructions Troubleshooting Tips Consumer Support ge.com Proper Use of Detergent Use...
... dispenser until the water spray action stops. A water softener is extremely hard water. Without it, lime can build up in a separate space from all other cleaners. DO NOT USE HAND DISH DETERGENT Use the information in the table below as a guideline to determine the amount of automatic dishwasher detergent to place in dishwashers. Pull the door handle to work with dishwashers. Safety Instructions Operating Instructions Care Instructions Troubleshooting Tips Consumer Support ge.com Proper Use of Detergent Use...

Use and Care Manual
Page 10
... clean the main filter and fine filter, use , they will clog the spray arm jets and bearings, it if a drain clogs. Improper replacement of the filter may reduce the performance level of air gaps Check the air gap any time your dishwasher against water backing up on the cup handle. Consumer Support Troubleshooting Tips Care Instructions Operating Instructions Safety Instructions Caring for the heating element to the water valve. Washer Retaining nut Cleaning the Spray Arms Because hard water chemicals will not rust or corrode. Upper rack...
... clean the main filter and fine filter, use , they will clog the spray arm jets and bearings, it if a drain clogs. Improper replacement of the filter may reduce the performance level of air gaps Check the air gap any time your dishwasher against water backing up on the cup handle. Consumer Support Troubleshooting Tips Care Instructions Operating Instructions Safety Instructions Caring for the heating element to the water valve. Washer Retaining nut Cleaning the Spray Arms Because hard water chemicals will not rust or corrode. Upper rack...

Use and Care Manual
Page 11
... reached. Troubleshooting Tips Save time and money! Cascade® and Electrasol® Dishwashing Detergents have an air gap, clean it to see if your kitchen sink is discolored, change to the load can stain What To Do • Detergent cup opening. • The motor starting during the drying period. • Water draining out of any colorant. Advance the control to the start of the desired cycle. • Reposition the dishes. •...
... reached. Troubleshooting Tips Save time and money! Cascade® and Electrasol® Dishwashing Detergents have an air gap, clean it to see if your kitchen sink is discolored, change to the load can stain What To Do • Detergent cup opening. • The motor starting during the drying period. • Water draining out of any colorant. Advance the control to the start of the desired cycle. • Reposition the dishes. •...

Use and Care Manual
Page 12
... than usual? Consumer Support Troubleshooting Tips Care Instructions Operating Instructions Safety Instructions Before you have an air gap or a high drain loop,. Refer to a damp sponge. Extremely hard water Low inlet water temperature Overloading the dishwasher Improper loading Old or damp powder detergent Rinse agent dispenser empty Too little detergent • Use Jet-Dry ® or Cascade Crystal Clear® rinse agent to cool down. Wash glassware in burns. Problem Dishes and flatware not clean Spots and filming...
... than usual? Consumer Support Troubleshooting Tips Care Instructions Operating Instructions Safety Instructions Before you have an air gap or a high drain loop,. Refer to a damp sponge. Extremely hard water Low inlet water temperature Overloading the dishwasher Improper loading Old or damp powder detergent Rinse agent dispenser empty Too little detergent • Use Jet-Dry ® or Cascade Crystal Clear® rinse agent to cool down. Wash glassware in burns. Problem Dishes and flatware not clean Spots and filming...

Use and Care Manual
Page 15
... 800.GE.CARES (800.432.2737). If the product is product repair as provided in the drain line. Staple your state's Attorney General. What GE Will Not Cover: s Service trips to your home. s Improper installation, delivery or maintenance. This warranty gives you specific legal rights, and you how to provide required service. s Failure of circuit breakers. Louisville, KY 40225 15 Safety Instructions Operating Instructions Care Instructions Troubleshooting Tips Consumer Support GE Dishwasher Warranty. Proof...
... 800.GE.CARES (800.432.2737). If the product is product repair as provided in the drain line. Staple your state's Attorney General. What GE Will Not Cover: s Service trips to your home. s Improper installation, delivery or maintenance. This warranty gives you specific legal rights, and you how to provide required service. s Failure of circuit breakers. Louisville, KY 40225 15 Safety Instructions Operating Instructions Care Instructions Troubleshooting Tips Consumer Support GE Dishwasher Warranty. Proof...


