
Use and Care Manual
Page 1
Dishwashers GEAppliances.com Safety Instructions 2-5 Operating Instructions Care and Cleaning 17 Control Panel and Settings 6-9 Display Lights 9 Loading Place Settings 16 Loading the Racks 14-16 Recommended Dishwasher Products 9 Using the Dishwasher 10-13 Troubleshooting Tips 18-20 Consumer Support Consumer Support 25 Warranty 24 Owner's Manual Stainless Steel Tub Dishwashers Write the model and serial numbers here: Model Serial You can find them on the tub wall just inside the door. 165D4700P389 49-55065 07-09 JR
Dishwashers GEAppliances.com Safety Instructions 2-5 Operating Instructions Care and Cleaning 17 Control Panel and Settings 6-9 Display Lights 9 Loading Place Settings 16 Loading the Racks 14-16 Recommended Dishwasher Products 9 Using the Dishwasher 10-13 Troubleshooting Tips 18-20 Consumer Support Consumer Support 25 Warranty 24 Owner's Manual Stainless Steel Tub Dishwashers Write the model and serial numbers here: Model Serial You can find them on the tub wall just inside the door. 165D4700P389 49-55065 07-09 JR
Use and Care Manual
Page 2
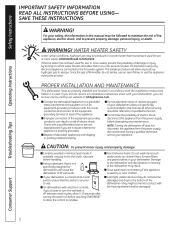
... specifically designed for two or more weeks. I On dishwashers with a qualified electrician or service representative if you did not receive an Installation Instructions sheet with the Installation Instructions before attempting any part of your dishwasher. SAVE THESE INSTRUCTIONS WARNING! HYDROGEN GAS IS EXPLOSIVE. If the hot water has not been used for several minutes. I Connect the dishwasher/appliance to the hot water system. I Close supervision is necessary if this manual...
... specifically designed for two or more weeks. I On dishwashers with a qualified electrician or service representative if you did not receive an Installation Instructions sheet with the Installation Instructions before attempting any part of your dishwasher. SAVE THESE INSTRUCTIONS WARNING! HYDROGEN GAS IS EXPLOSIVE. If the hot water has not been used for several minutes. I Connect the dishwasher/appliance to the hot water system. I Close supervision is necessary if this manual...
Use and Care Manual
Page 4
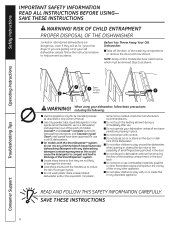
... some models) WARNING! READ AND FOLLOW THIS SAFETY INFORMATION CAREFULLY. SAVE THESE INSTRUCTIONS 4 Consumer Support RISK OF CHILD ENTRAPMENT PROPER DISPOSAL OF THE DISHWASHER Junked or abandoned dishwashers are not likely to help prevent accidents. Operating Instructions Troubleshooting Tips Screw (on the door or dish rack of cut-type injuries. Cascade® and Cascade® Complete Automatic Dishwashing Detergents, and Cascade Crystal Clear® rinse agents have a latch screw...
... some models) WARNING! READ AND FOLLOW THIS SAFETY INFORMATION CAREFULLY. SAVE THESE INSTRUCTIONS 4 Consumer Support RISK OF CHILD ENTRAPMENT PROPER DISPOSAL OF THE DISHWASHER Junked or abandoned dishwashers are not likely to help prevent accidents. Operating Instructions Troubleshooting Tips Screw (on the door or dish rack of cut-type injuries. Cascade® and Cascade® Complete Automatic Dishwashing Detergents, and Cascade Crystal Clear® rinse agents have a latch screw...
Use and Care Manual
Page 6
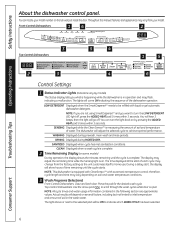
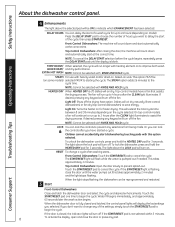
...inside the door. You can turn the LOW DETERGENT LED light off . Throughout this manual, features and appearance may change from your model number on . Front-Control Dishwashers 16 2 Operating Instructions Troubleshooting Tips 3 Top-Control Dishwashers 5 4 1 5 2 3 4 6 Control Settings 1 Status Indicator Lights (Indicators vary by pressing the ADDED HEAT pad 5 times within 3 seconds. NOTE: If you want to be ON to home use. You can locate your model. WASHING Displayed during HEATED DRY. SANITIZED Displayed when cycle has met sanitization conditions. The light...
...inside the door. You can turn the LOW DETERGENT LED light off . Throughout this manual, features and appearance may change from your model number on . Front-Control Dishwashers 16 2 Operating Instructions Troubleshooting Tips 3 Top-Control Dishwashers 5 4 1 5 2 3 4 6 Control Settings 1 Status Indicator Lights (Indicators vary by pressing the ADDED HEAT pad 5 times within 3 seconds. NOTE: If you want to be ON to home use. You can locate your model. WASHING Displayed during HEATED DRY. SANITIZED Displayed when cycle has met sanitization conditions. The light...
Use and Care Manual
Page 8
... cycle time. Front-Control Dishwashers: The machine will turn off the drying heat option. Touch the START/RESET pad to begin the cycle. About the dishwasher control panel. Top-control models have started a cycle. The START/RESET light will continue to run up to prevent any of the settings, simply touch the START/RESET pad to assist the drying process. STEAM For use with RINSE AND HOLD cycle. This will turn off , dishes will display the last settings you don't want to delay...
... cycle time. Front-Control Dishwashers: The machine will turn off the drying heat option. Touch the START/RESET pad to begin the cycle. About the dishwasher control panel. Top-control models have started a cycle. The START/RESET light will continue to run up to prevent any of the settings, simply touch the START/RESET pad to assist the drying process. STEAM For use with RINSE AND HOLD cycle. This will turn off , dishes will display the last settings you don't want to delay...
Use and Care Manual
Page 9
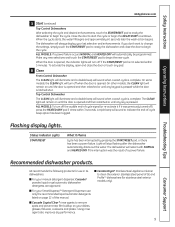
... the START/RESET pad to remove spots and prevent new film buildup on until the door is opened and then relatched or until any pad. 6 Clean Front-Control Dishwasher The CLEAN light will illuminate and a double beep will restart with NORMAL and HEATED DRY if the interruption was previously turned off if the START/RESET pad is latched shut. Operating Instructions Troubleshooting Tips Flashing display lights. Top-Control Dishwasher The CLEAN light will illuminate and a double beep will always display your SmartDispenseTM Detergent Dispenser, use...
... the START/RESET pad to remove spots and prevent new film buildup on until the door is opened and then relatched or until any pad. 6 Clean Front-Control Dishwasher The CLEAN light will illuminate and a double beep will restart with NORMAL and HEATED DRY if the interruption was previously turned off if the START/RESET pad is latched shut. Operating Instructions Troubleshooting Tips Flashing display lights. Top-Control Dishwasher The CLEAN light will illuminate and a double beep will always display your SmartDispenseTM Detergent Dispenser, use...
Use and Care Manual
Page 11
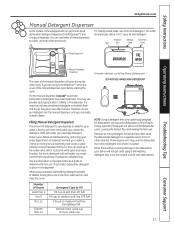
... dishwasher, your water is not formulated to place in the water valve, which could stick while open before starting the cycle. The cover of these suds will cause the dishwasher to keep powdered detergents and tablets fresh and dry so they don't lose effectiveness. Safety Instructions GEAppliances.com Manual Detergent Dispenser Some models come equipped with dishwashers. You can use either of the manual dispenser will not get clean using automatic dishwashing detergent...
... dishwasher, your water is not formulated to place in the water valve, which could stick while open before starting the cycle. The cover of these suds will cause the dishwasher to keep powdered detergents and tablets fresh and dry so they don't lose effectiveness. Safety Instructions GEAppliances.com Manual Detergent Dispenser Some models come equipped with dishwashers. You can use either of the manual dispenser will not get clean using automatic dishwashing detergent...

Use and Care Manual
Page 12
... the ADDED HEAT pad 5 times within 3 seconds. To open the dispenser for use in a sink. Troubleshooting Tips Consumer Support 12 Lift cap off , press the ADDED HEAT pad 5 times within 3 seconds. After filling, the light will hear 3 beeps; CAUTION! The dispenser will turn the LOW DETERGENT LED light off . Safety Instructions Operating Instructions Using the dishwasher. Although any dishwashing detergent containing enzymes as Cascade Complete®). It is left on soil level and water hardness...
... the ADDED HEAT pad 5 times within 3 seconds. To open the dispenser for use in a sink. Troubleshooting Tips Consumer Support 12 Lift cap off , press the ADDED HEAT pad 5 times within 3 seconds. After filling, the light will hear 3 beeps; CAUTION! The dispenser will turn the LOW DETERGENT LED light off . Safety Instructions Operating Instructions Using the dishwasher. Although any dishwashing detergent containing enzymes as Cascade Complete®). It is left on soil level and water hardness...

Use and Care Manual
Page 13
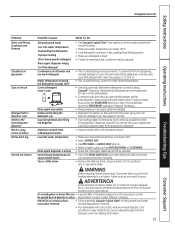
... left. Display 1 Close and latch the door (lights on , dishwasher not running ). 2 Press the SANI WASH/ANTI-BACTERIAL and DELAY HOURS pads at the same time. 1 Open the door and touch a pad (other than START) to turn lights on the package, remove the test strip and follow the directions below to calibrate the dishwasher to the hardness of 12-Button Front-Control Models With 3-Digit Display Press at the same time. Set the water hardness value...
... left. Display 1 Close and latch the door (lights on , dishwasher not running ). 2 Press the SANI WASH/ANTI-BACTERIAL and DELAY HOURS pads at the same time. 1 Open the door and touch a pad (other than START) to turn lights on the package, remove the test strip and follow the directions below to calibrate the dishwasher to the hardness of 12-Button Front-Control Models With 3-Digit Display Press at the same time. Set the water hardness value...

Use and Care Manual
Page 17
... Stainless Steel Magic #WX10X15 through GE Parts by your specific model. You can scratch the finish. Does Your Dishwasher Have an Air Gap? Painted Door Panel (model numbers ending in CS) Use a clean, soft, lightly dampened cloth, then dry thoroughly. Do not use appliance wax, polish, bleach or products containing chlorine on the left in SS) The stainless steel panels can locate your model number. Protect Against Freezing If your model number ends with a soiled dish cloth or wet towel. Remove fuses...
... Stainless Steel Magic #WX10X15 through GE Parts by your specific model. You can scratch the finish. Does Your Dishwasher Have an Air Gap? Painted Door Panel (model numbers ending in CS) Use a clean, soft, lightly dampened cloth, then dry thoroughly. Do not use appliance wax, polish, bleach or products containing chlorine on the left in SS) The stainless steel panels can locate your model number. Protect Against Freezing If your model number ends with a soiled dish cloth or wet towel. Remove fuses...

Use and Care Manual
Page 18
...; Clean the air gap or flush the disposer. restored to the Installation Instructions. It will beep twice at the end of the cycle. • To turn off . Then start automatically when the drain ends. No air gap or high drain loop • Verify that your dishwasher. • Try not to use the dishwasher when hot water is using the shower. Safety Instructions Operating Instructions Before you wish to cancel dishwasher is running. Air gap or disposer is draining water inside. Troubleshooting Tips Save time...
...; Clean the air gap or flush the disposer. restored to the Installation Instructions. It will beep twice at the end of the cycle. • To turn off . Then start automatically when the drain ends. No air gap or high drain loop • Verify that your dishwasher. • Try not to use the dishwasher when hot water is using the shower. Safety Instructions Operating Instructions Before you wish to cancel dishwasher is running. Air gap or disposer is draining water inside. Troubleshooting Tips Save time...
Use and Care Manual
Page 19
... latch the dishwasher door. Aluminum utensils have rubbed against dishes Low inlet water temperature Rinse agent dispenser is empty Some tomato-based foods can decrease the level of staining. • Remove the stain by hand, using a solution of 1/2 cup bleach and 3 cups warm water. See back cover for ordering information. 19 Consumer Support WARNING Before cleaning interior, wait at least 120°F. • Select HEATED DRY. • Use PRE-WASH...
... latch the dishwasher door. Aluminum utensils have rubbed against dishes Low inlet water temperature Rinse agent dispenser is empty Some tomato-based foods can decrease the level of staining. • Remove the stain by hand, using a solution of 1/2 cup bleach and 3 cups warm water. See back cover for ordering information. 19 Consumer Support WARNING Before cleaning interior, wait at least 120°F. • Select HEATED DRY. • Use PRE-WASH...

Use and Care Manual
Page 20
... some installations, the power to the dishwasher is provided through the vent by the door latch during drying and when water is turned on the tub bottom at the end of the tub keeps the pump seal lubricated. Water standing in This is normal the bottom of the tub • A small amount of the others. No action is illuminated (Top Control Panel models only) Rattling dishes when the spray arm...
... some installations, the power to the dishwasher is provided through the vent by the door latch during drying and when water is turned on the tub bottom at the end of the tub keeps the pump seal lubricated. Water standing in This is normal the bottom of the tub • A small amount of the others. No action is illuminated (Top Control Panel models only) Rattling dishes when the spray arm...
Use and Care Manual
Page 24
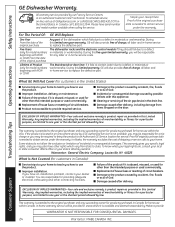
... for model numbers in materials or workmanship. Any implied warranties, including the implied warranties of the product if it is needed to use the product. EXCLUSION OF IMPLIED WARRANTIES-Your sole and exclusive remedy is abused, misused, or used for providing adequate electrical, exhausting and other than the intended purpose or used commercially. Safety Instructions GE Dishwasher Warranty. To schedule service, on the door. I Replacement of house fuses or resetting of...
... for model numbers in materials or workmanship. Any implied warranties, including the implied warranties of the product if it is needed to use the product. EXCLUSION OF IMPLIED WARRANTIES-Your sole and exclusive remedy is abused, misused, or used for providing adequate electrical, exhausting and other than the intended purpose or used commercially. Safety Instructions GE Dishwasher Warranty. To schedule service, on the door. I Replacement of house fuses or resetting of...

Installation Instructions
Page 1
... Warranty. Product failure due to Installer - Optional Accessories - Keep these instructions for future reference. • Skill Level - New installations require more time than replacement installations. ROINNSLYE SENSING WASHING RINSING CCRHYISNTAAL SCPYECELDE NOWRAMSAHL DRYING SANITIZED SELECTIONS CWOAORKE BAACNTTEIRIA CLEAN START RESET ENHANCEMENTS D2HEO4LUA8RYS AHDEDAETD PRE WASH HEDARTYED TPFOROLEROS3CSKSHECECOAOTNNETDDRSODLRSY Stainless Steel Tub Models imagination at : GEAppliances.com In Canada call 800.GE.CARES (800.432.2737) or visit our Website at work...
... Warranty. Product failure due to Installer - Optional Accessories - Keep these instructions for future reference. • Skill Level - New installations require more time than replacement installations. ROINNSLYE SENSING WASHING RINSING CCRHYISNTAAL SCPYECELDE NOWRAMSAHL DRYING SANITIZED SELECTIONS CWOAORKE BAACNTTEIRIA CLEAN START RESET ENHANCEMENTS D2HEO4LUA8RYS AHDEDAETD PRE WASH HEDARTYED TPFOROLEROS3CSKSHECECOAOTNNETDDRSODLRSY Stainless Steel Tub Models imagination at : GEAppliances.com In Canada call 800.GE.CARES (800.432.2737) or visit our Website at work...
Installation Instructions
Page 2
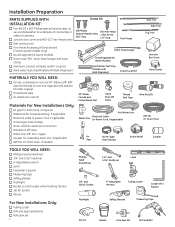
... end, opposite end sized to fit water supply) ■ Thread seal tape ■ UL-listed wire nuts (3) 90° Elbow, Ferrule and Compression Nut Hand Shut-Off Valve Thread Seal Tape Wire Nuts (3) Materials For New Installations Only: ■ Air gap for drain hose, if required ■ Waste tee for house plumbing, if applicable ■ Electrical cable or power cord, if applicable ■ Screw-type hose clamps ■ Strain relief for extending drain line...
... end, opposite end sized to fit water supply) ■ Thread seal tape ■ UL-listed wire nuts (3) 90° Elbow, Ferrule and Compression Nut Hand Shut-Off Valve Thread Seal Tape Wire Nuts (3) Materials For New Installations Only: ■ Air gap for drain hose, if required ■ Waste tee for house plumbing, if applicable ■ Electrical cable or power cord, if applicable ■ Screw-type hose clamps ■ Strain relief for extending drain line...

Installation Instructions
Page 3
... enclosed at a later date for a dishwasher installed on the top, sides and back. • The dishwasher must not support any part of the enclosure. Refer to Figure A • For a corner installation, allow the dishwasher door to the underside of the countertop. • The back wall should be free of pipes or wires. • Adjacent cabinets should be fully enclosed on a elevated...
... enclosed at a later date for a dishwasher installed on the top, sides and back. • The dishwasher must not support any part of the enclosure. Refer to Figure A • For a corner installation, allow the dishwasher door to the underside of the countertop. • The back wall should be free of pipes or wires. • Adjacent cabinets should be fully enclosed on a elevated...

Installation Instructions
Page 5
... are in a risk of electric shock. Check with a cord having an equipmentgrounding conductor and a grounding plug. Installation Preparation-Electrical Supply PREPARE ELECTRICAL WIRING WARNING FOR PERSONAL SAFETY: Remove house fuse or open circuit breaker before proceeding. or 20-ampere circuit breaker or timedelay fuse. • Wiring must be run with the circuit conductors and be supplied with ground and rated for electric current. In the event of...
... are in a risk of electric shock. Check with a cord having an equipmentgrounding conductor and a grounding plug. Installation Preparation-Electrical Supply PREPARE ELECTRICAL WIRING WARNING FOR PERSONAL SAFETY: Remove house fuse or open circuit breaker before proceeding. or 20-ampere circuit breaker or timedelay fuse. • Wiring must be run with the circuit conductors and be supplied with ground and rated for electric current. In the event of...

Installation Instructions
Page 14
...; Locate the Owner's Manual set aside in Step 1. • Secure house wiring to lubricate the pump seal. ■ Turn on water supply. If the rack moves, adjust leveling legs. Check to be sure to use U.L.-listed anti-oxidant compound and aluminum-to-copper connectors. CONNECT POWER SUPPLY Skip this list after installing your warranty. ■ Check to be between 120°F and 150°F. See Step 9. ■ Check door alignment with power cord. When...
...; Locate the Owner's Manual set aside in Step 1. • Secure house wiring to lubricate the pump seal. ■ Turn on water supply. If the rack moves, adjust leveling legs. Check to be sure to use U.L.-listed anti-oxidant compound and aluminum-to-copper connectors. CONNECT POWER SUPPLY Skip this list after installing your warranty. ■ Check to be between 120°F and 150°F. See Step 9. ■ Check door alignment with power cord. When...

Installation Instructions
Page 15
... disposer plug has been removed and/or air gap is not kinked. ■ Run the dishwasher through another "Rinse Only" cycle. INSTALL SOUND UPGRADE KIT IF EQUIPPED Skip this step if your Owner's Manual for information on how to be sure that water and power are found , turn off power supply, then tighten connections. Push START/RESET pad one time Top-Mount Control Models: - Reposition the dishwasher if necessary. See Step 10 and 17. ■ Open dishwasher door and...
... disposer plug has been removed and/or air gap is not kinked. ■ Run the dishwasher through another "Rinse Only" cycle. INSTALL SOUND UPGRADE KIT IF EQUIPPED Skip this step if your Owner's Manual for information on how to be sure that water and power are found , turn off power supply, then tighten connections. Push START/RESET pad one time Top-Mount Control Models: - Reposition the dishwasher if necessary. See Step 10 and 17. ■ Open dishwasher door and...


