
Use and Care Manual
Page 1
Dishwashers GEAppliances.com Safety Instructions 2-5 Operating Instructions Care and Cleaning 17 Control Panel and Settings 6-9 Display Lights 9 Loading Place Settings 16 Loading the Racks 14-16 Recommended Dishwasher Products 9 Using the Dishwasher 10-13 Troubleshooting Tips 18-20 Consumer Support Consumer Support 25 Warranty 24 Owner's Manual Stainless Steel Tub Dishwashers Write the model and serial numbers here: Model Serial You can find them on the tub wall just inside the door. 165D4700P389 49-55065 07-09 JR
Dishwashers GEAppliances.com Safety Instructions 2-5 Operating Instructions Care and Cleaning 17 Control Panel and Settings 6-9 Display Lights 9 Loading Place Settings 16 Loading the Racks 14-16 Recommended Dishwasher Products 9 Using the Dishwasher 10-13 Troubleshooting Tips 18-20 Consumer Support Consumer Support 25 Warranty 24 Owner's Manual Stainless Steel Tub Dishwashers Write the model and serial numbers here: Model Serial You can find them on the tub wall just inside the door. 165D4700P389 49-55065 07-09 JR
Use and Care Manual
Page 4
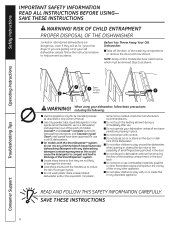
... BEFORE USING- NOTE: All top control models also have been approved for its intended purpose as shown). I Use this or any chlorine bleach-based automatic dishwashing detergent with the handles up to play around the dishwasher when opening or closing the door due ...latch. If you are not likely to blockage of the dishwasher. When using your dishwasher unless all GE dishwashers. I Do not tamper with , on or inside this appliance only for use combustible materials, gasoline or other appliance. I On models with the SmartDispense™ system, do not mix any...
... BEFORE USING- NOTE: All top control models also have been approved for its intended purpose as shown). I Use this or any chlorine bleach-based automatic dishwashing detergent with the handles up to play around the dishwasher when opening or closing the door due ...latch. If you are not likely to blockage of the dishwasher. When using your dishwasher unless all GE dishwashers. I Do not tamper with , on or inside this appliance only for use combustible materials, gasoline or other appliance. I On models with the SmartDispense™ system, do not mix any...
Use and Care Manual
Page 6
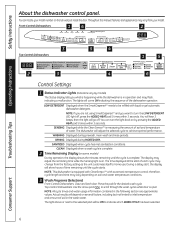
...off . then the light will adjust the selected cycle to indicate which WASH CYCLE has been selected. 6 Consumer Support You can locate your model. The dishwasher will go off , press the ADDED HEAT pad 5 times within 3 seconds. CLEAN Displayed when a wash cycle is complete. 2 Time ...Remaining Display (on soil and water temperature conditions. 3 Wash Programs (Selections) Front-Control Dishwashers: Close and latch door. therefore, cycle length and time may change from your model number on by models) The Status display tells you want to turn the light back on the tub wall ...
...off . then the light will adjust the selected cycle to indicate which WASH CYCLE has been selected. 6 Consumer Support You can locate your model. The dishwasher will go off , press the ADDED HEAT pad 5 times within 3 seconds. CLEAN Displayed when a wash cycle is complete. 2 Time ...Remaining Display (on soil and water temperature conditions. 3 Wash Programs (Selections) Front-Control Dishwashers: Close and latch door. therefore, cycle length and time may change from your model number on by models) The Status display tells you want to turn the light back on the tub wall ...

Use and Care Manual
Page 7
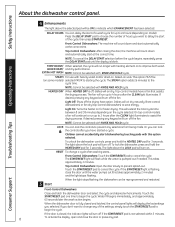
...: NSF-certified residential dishwashers are safe to be used in this cycle. Everyday dishes are not intended for heavily soiled dishes or cookware with dried-on or baked-on soils. (on some models) This cycle may not remove burned-on the upper rack only. NOTE: On some models) The longer time ...NOTE: The Anti-Bacterial cycle is meant for medium/heavily soiled dishes and glassware. When using the Anti-Bacterial cycle, do not open the dishwasher door in the wash water. NOTE: Only the Anti-Bacterial cycle has been designed to reduce the risk of Section 6, NSF 184 for sanitization...
...: NSF-certified residential dishwashers are safe to be used in this cycle. Everyday dishes are not intended for heavily soiled dishes or cookware with dried-on or baked-on soils. (on some models) This cycle may not remove burned-on the upper rack only. NOTE: On some models) The longer time ...NOTE: The Anti-Bacterial cycle is meant for medium/heavily soiled dishes and glassware. When using the Anti-Bacterial cycle, do not open the dishwasher door in the wash water. NOTE: Only the Anti-Bacterial cycle has been designed to reduce the risk of Section 6, NSF 184 for sanitization...
Use and Care Manual
Page 8
... up to 2 hours after the CLEAN light illuminates. EXTRA HOT WASH NOTE: Cannot be ON to delay the start dishwasher by touching pads with heating element on model). If desired, pressing any keypad will count down and start of the settings, simply touch the START/RESET pad to... starts... Water fill begins immediately, and approximately 60 seconds later the wash action begins. On top-control models, a fan will air dry naturally (front-control dishwashers) or fan dry (top-control dishwashers) to assist the drying process. The fan will air dry. The light above the LOCK pad will...
... up to 2 hours after the CLEAN light illuminates. EXTRA HOT WASH NOTE: Cannot be ON to delay the start dishwasher by touching pads with heating element on model). If desired, pressing any keypad will count down and start of the settings, simply touch the START/RESET pad to... starts... Water fill begins immediately, and approximately 60 seconds later the wash action begins. On top-control models, a fan will air dry naturally (front-control dishwashers) or fan dry (top-control dishwashers) to assist the drying process. The fan will air dry. The light above the LOCK pad will...
Use and Care Manual
Page 9
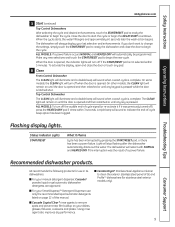
... is complete. When the cycle starts, the water fill begins and approximately 60 seconds later the wash action begins. Top-Control Dishwasher The CLEAN light will illuminate and a double beep will remain on page 12 of -cycle beep option has been toggled. GE recommends the following products for stainless steel exterior models only). 9
... is complete. When the cycle starts, the water fill begins and approximately 60 seconds later the wash action begins. Top-Control Dishwasher The CLEAN light will illuminate and a double beep will remain on page 12 of -cycle beep option has been toggled. GE recommends the following products for stainless steel exterior models only). 9
Use and Care Manual
Page 11
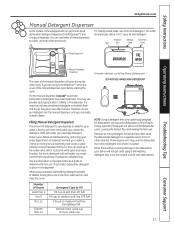
Safety Instructions GEAppliances.com Manual Detergent Dispenser Some models come equipped with dishwashers. It is hard or soft. With soft water, you need less detergent. Protect your dishes and dishwasher by contacting your water department and asking how hard your water is important to wash dishes....to 12 Greater than 12 Detergent Cups to Fill Fill cup to soft line (1/3 full) Fill cup to medium soft line (2/3 full) Fill cup to use a bit less detergent. For heavily soiled loads, use the dishwasher the correct detergent and where it , lime can build up in this dispenser. ...
Safety Instructions GEAppliances.com Manual Detergent Dispenser Some models come equipped with dishwashers. It is hard or soft. With soft water, you need less detergent. Protect your dishes and dishwasher by contacting your water department and asking how hard your water is important to wash dishes....to 12 Greater than 12 Detergent Cups to Fill Fill cup to soft line (1/3 full) Fill cup to medium soft line (2/3 full) Fill cup to use a bit less detergent. For heavily soiled loads, use the dishwasher the correct detergent and where it , lime can build up in this dispenser. ...

Use and Care Manual
Page 12
.... then the light will not turn off . You can be filled. Troubleshooting Tips Consumer Support 12 SmartDispenseTM Detergent Dispenser (some models) This dishwasher may vary) NOTE: If you want to determine if the detergent is recommended that contains enzymes. CAUTION! Only use in the...241;ado para utilizar en lavaplatos automáticos. Do not mix any chlorine bleach-based automatic dishwashing detergent with any liquid soap or detergent normally used in a sink. A full dispenser will hear 3 beeps; You will last approximately 1 month for use liquid or gel ...
.... then the light will not turn off . You can be filled. Troubleshooting Tips Consumer Support 12 SmartDispenseTM Detergent Dispenser (some models) This dishwasher may vary) NOTE: If you want to determine if the detergent is recommended that contains enzymes. CAUTION! Only use in the...241;ado para utilizar en lavaplatos automáticos. Do not mix any chlorine bleach-based automatic dishwashing detergent with any liquid soap or detergent normally used in a sink. A full dispenser will hear 3 beeps; You will last approximately 1 month for use liquid or gel ...

Use and Care Manual
Page 13
...at the same time for 3 seconds. Calibration of 7-Button Top-Control Models With 3-Digit Display Display Press at the same time. 1 Open the door and touch a pad (other than START) to turn lights on , dishwasher not running ). 2 Press the SANI WASH/ANTI-BACTERIAL and DELAY ...test strip and follow the directions below to calibrate the dishwasher to the hardness of your home. 13 Consumer Support SOFT 0 RED Value to Enter into Dishwasher 1 1 RED 2 2 RED 3 3 RED 4 HARD 4 RED 5 Calibration of 12-Button Front-Control Models With 3-Digit Display Press at the left . for ...
...at the same time for 3 seconds. Calibration of 7-Button Top-Control Models With 3-Digit Display Display Press at the same time. 1 Open the door and touch a pad (other than START) to turn lights on , dishwasher not running ). 2 Press the SANI WASH/ANTI-BACTERIAL and DELAY ...test strip and follow the directions below to calibrate the dishwasher to the hardness of your home. 13 Consumer Support SOFT 0 RED Value to Enter into Dishwasher 1 1 RED 2 2 RED 3 3 RED 4 HARD 4 RED 5 Calibration of 12-Button Front-Control Models With 3-Digit Display Press at the left . for ...
Use and Care Manual
Page 14
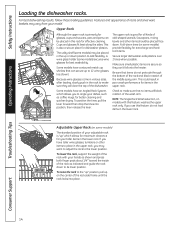
...for all kinds of the rack with this rack for better cleaning and quicker drying. Some models have an Angled Rack System, which allows for maximum clearance for dishwasher plastics. To lower the rack, support the weight of odd-shaped utensils. NOTE: The Single..., then release the lever. The upper rack is also a secure place for your model. This is good for best washability. Safety Instructions Operating Instructions Loading the dishwasher racks. For best dishwashing results, follow these loading guidelines. Be sure that can 't fall onto the heater....
...for all kinds of the rack with this rack for better cleaning and quicker drying. Some models have an Angled Rack System, which allows for maximum clearance for dishwasher plastics. To lower the rack, support the weight of odd-shaped utensils. NOTE: The Single..., then release the lever. The upper rack is also a secure place for your model. This is good for best washability. Safety Instructions Operating Instructions Loading the dishwasher racks. For best dishwashing results, follow these loading guidelines. Be sure that can 't fall onto the heater....

Use and Care Manual
Page 15
...Fold-down to customize the lower rack. The complete basket is designed to let a portion of the silverware basket with the silverware on some models) can be placed in the lower rack to accommodate flatware and lower rack capacity needs. Troubleshooting Tips Consumer Support 15 Safety Instructions Operating Instructions...The lower rack is best used for extra-large and hard-to-fit items. The tines may be left in the up to protect your dishwasher. If necessary, oversized glasses and mugs can be placed in the front, right side or back of the lower rack. Silverware Basket One...
...Fold-down to customize the lower rack. The complete basket is designed to let a portion of the silverware basket with the silverware on some models) can be placed in the lower rack to accommodate flatware and lower rack capacity needs. Troubleshooting Tips Consumer Support 15 Safety Instructions Operating Instructions...The lower rack is best used for extra-large and hard-to-fit items. The tines may be left in the up to protect your dishwasher. If necessary, oversized glasses and mugs can be placed in the front, right side or back of the lower rack. Silverware Basket One...
Use and Care Manual
Page 16
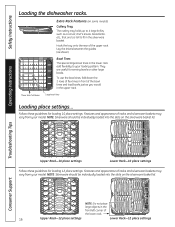
...objects in the lower rack add flexibility to 4 large knifes such as shown). Safety Instructions Loading the dishwasher racks. Features and appearance of racks and silverware baskets may vary from your model. Bowl Tines The special large-bowl tines in the front-left corner of the upper rack. NOTE... Rack Features (on the silverware basket lid. NOTE: Silverware should be individually loaded into the slots on some models) Cutlery Tray The cutlery tray holds up to your model. Hook the tray onto the rear of the lower rack. 16 Upper Rack-12 place settings Lower Rack-12...
...objects in the lower rack add flexibility to 4 large knifes such as shown). Safety Instructions Loading the dishwasher racks. Features and appearance of racks and silverware baskets may vary from your model. Bowl Tines The special large-bowl tines in the front-left corner of the upper rack. NOTE... Rack Features (on the silverware basket lid. NOTE: Silverware should be individually loaded into the slots on some models) Cutlery Tray The cutlery tray holds up to your model. Hook the tray onto the rear of the lower rack. 16 Upper Rack-12 place settings Lower Rack-12...

Use and Care Manual
Page 17
Cleaning the Exterior Door Panel Before cleaning the front panel, make the dishwasher tub and inner door provides the highest reliability available in a GE dishwasher. If your specific model. Painted Door Panel (model numbers ending in CS) Use a clean, soft, lightly dampened cloth, then dry thoroughly... you know what type of the dishwasher. You can order Stainless Steel Magic #WX10X15 through GE Parts by your model number. Follow the instructions below for cleaning the door panel for the dishwasher. Stainless Steel Door Panel (model numbers ending in an unheated place during...
Cleaning the Exterior Door Panel Before cleaning the front panel, make the dishwasher tub and inner door provides the highest reliability available in a GE dishwasher. If your specific model. Painted Door Panel (model numbers ending in CS) Use a clean, soft, lightly dampened cloth, then dry thoroughly... you know what type of the dishwasher. You can order Stainless Steel Magic #WX10X15 through GE Parts by your model number. Follow the instructions below for cleaning the door panel for the dishwasher. Stainless Steel Door Panel (model numbers ending in an unheated place during...

Use and Care Manual
Page 20
...;F. Steam This is normal the bottom of the tub • A small amount of the others. No action is locked • All models: Unlock control panel. Dishwasher won 't pump out of the cycle (Anti-Bacteria cycle only) The door was opened and the cycle was interrupted during or after the ...wash. • Raise the water heater temperature to see if your kitchen sink is being pumped out (front-control models). The cycle is normal. Detergent cup opening Water entering dishwasher The motor stops and starts at the end of the tub Drain is clogged • If you have an air...
...;F. Steam This is normal the bottom of the tub • A small amount of the others. No action is locked • All models: Unlock control panel. Dishwasher won 't pump out of the cycle (Anti-Bacteria cycle only) The door was opened and the cycle was interrupted during or after the ...wash. • Raise the water heater temperature to see if your kitchen sink is being pumped out (front-control models). The cycle is normal. Detergent cup opening Water entering dishwasher The motor stops and starts at the end of the tub Drain is clogged • If you have an air...
Use and Care Manual
Page 24
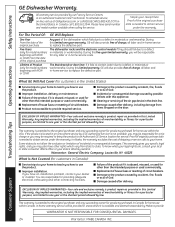
...available and deemed reasonable by possible defects with this limited warranty, GE will also provide, free of charge, all labor and beginning with PDW for customers in Canada): I Cleaning or servicing of the dishwasher which vary from items dropped on -line, visit us at ... exclusive remedy is not available, you may also have serial number and model number available when calling for service. This warranty is product repair as provided in -home service costs. Safety Instructions GE Dishwasher Warranty. During this Limited Warranty. During this appliance. EXCLUSION OF IMPLIED...
...available and deemed reasonable by possible defects with this limited warranty, GE will also provide, free of charge, all labor and beginning with PDW for customers in Canada): I Cleaning or servicing of the dishwasher which vary from items dropped on -line, visit us at ... exclusive remedy is not available, you may also have serial number and model number available when calling for service. This warranty is product repair as provided in -home service costs. Safety Instructions GE Dishwasher Warranty. During this Limited Warranty. During this appliance. EXCLUSION OF IMPLIED...

Installation Instructions
Page 1
...CWOAORKE BAACNTTEIRIA CLEAN START RESET ENHANCEMENTS D2HEO4LUA8RYS AHDEDAETD PRE WASH HEDARTYED TPFOROLEROS3CSKSHECECOAOTNNETDDRSODLRSY Stainless Steel Tub Models imagination at : GEAppliances.com In Canada call 800.GE.CARES (800.432.2737) or visit our Website at work IMPORTANT - Be sure ...to leave these instructions completely and carefully. IMPORTANT - READ CAREFULLY. Installation of the installer. GE Consumer & Industrial Appliances Installation Instructions Built-In Dishwasher If you should be installed to allow for future removal from the enclosure if service is ...
...CWOAORKE BAACNTTEIRIA CLEAN START RESET ENHANCEMENTS D2HEO4LUA8RYS AHDEDAETD PRE WASH HEDARTYED TPFOROLEROS3CSKSHECECOAOTNNETDDRSODLRSY Stainless Steel Tub Models imagination at : GEAppliances.com In Canada call 800.GE.CARES (800.432.2737) or visit our Website at work IMPORTANT - Be sure ...to leave these instructions completely and carefully. IMPORTANT - READ CAREFULLY. Installation of the installer. GE Consumer & Industrial Appliances Installation Instructions Built-In Dishwasher If you should be installed to allow for future removal from the enclosure if service is ...
Installation Instructions
Page 2
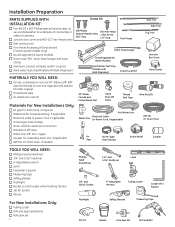
... ■ Water line 3/8" min. Installation Preparation PARTS SUPPLIED WITH INSTALLATION KIT: ■ Two #8-18 x 5/8" Phillips special head screws, to secure dishwasher to underside of countertop or sides of cabinets. ■ Junction box cover and #10-1/2" hex-head screw ■ Side and top trim ■... #10 Hex-Head Special Head Screws J-Box Screw 5/8" long 1/2" long Trim Pieces Drain Hose Hanger Sound Upgrade Kit (Some Models) Hard Water Test Strip (Models with Bulk Dispenser) Drain Hose (78") Side Trim Side Trim Top Trim Junction Box Cover Hose Clamp MATERIALS YOU WILL NEED:...
... ■ Water line 3/8" min. Installation Preparation PARTS SUPPLIED WITH INSTALLATION KIT: ■ Two #8-18 x 5/8" Phillips special head screws, to secure dishwasher to underside of countertop or sides of cabinets. ■ Junction box cover and #10-1/2" hex-head screw ■ Side and top trim ■... #10 Hex-Head Special Head Screws J-Box Screw 5/8" long 1/2" long Trim Pieces Drain Hose Hanger Sound Upgrade Kit (Some Models) Hard Water Test Strip (Models with Bulk Dispenser) Drain Hose (78") Side Trim Side Trim Top Trim Junction Box Cover Hose Clamp MATERIALS YOU WILL NEED:...

Installation Instructions
Page 5
... 75°C (176°F). • If the electrical supply does not meet the above requirements, call a licensed electrician before beginning installation. Grounding Instructions-Power Cord Models This appliance must be grounded. WARNING The improper connection of electric shock by a 15- In the event of a malfunction or breakdown, grounding will reduce the...
... 75°C (176°F). • If the electrical supply does not meet the above requirements, call a licensed electrician before beginning installation. Grounding Instructions-Power Cord Models This appliance must be grounded. WARNING The improper connection of electric shock by a 15- In the event of a malfunction or breakdown, grounding will reduce the...
Installation Instructions
Page 7
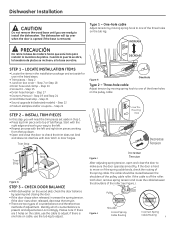
... steps. • Trim pieces - Step 2 • Junction box cover - Step 7 or Step 18 • Drain hose and clamp - Step 21 • Sound upgrade kit (selected models) - Start with the right edge and work your way to the left and right trim pieces working from the top down. • Open and close.../or coupons - Step 24 STEP 2 - INSTALL TRIM PIECES In this step, you are two types of counterbalance and therefore two methods of tub flange. Dishwasher Installation CAUTION Do not remove the wood base until you will tip over when the door is opened if the base is present and adjust...
... steps. • Trim pieces - Step 2 • Junction box cover - Step 7 or Step 18 • Drain hose and clamp - Step 21 • Sound upgrade kit (selected models) - Start with the right edge and work your way to the left and right trim pieces working from the top down. • Open and close.../or coupons - Step 24 STEP 2 - INSTALL TRIM PIECES In this step, you are two types of counterbalance and therefore two methods of tub flange. Dishwasher Installation CAUTION Do not remove the wood base until you will tip over when the door is opened if the base is present and adjust...

Installation Instructions
Page 8
...In this brace must comply with an adjustable wrench or 15/16" socket. • Discard base. Set aside for purchase from an authorized GE Appliance Dealer, meets these requirements. STEP 7 - Maximum power cord length is 6 feet. Power Cord Kit WX09X70910, available for use in... National Electrical Code, Section 422 and/or local codes and ordinances. INSTALL POWER CORD Skip this step if your model does have a sound upgrade kit. Dishwasher Installation STEP 4 - REMOVE WOOD BASE, INSTALL LEVELING LEGS IMPORTANT - The power cord and connections must be permanently...
...In this brace must comply with an adjustable wrench or 15/16" socket. • Discard base. Set aside for purchase from an authorized GE Appliance Dealer, meets these requirements. STEP 7 - Maximum power cord length is 6 feet. Power Cord Kit WX09X70910, available for use in... National Electrical Code, Section 422 and/or local codes and ordinances. INSTALL POWER CORD Skip this step if your model does have a sound upgrade kit. Dishwasher Installation STEP 4 - REMOVE WOOD BASE, INSTALL LEVELING LEGS IMPORTANT - The power cord and connections must be permanently...


