
Use and Care Manual
Page 1
Dishwashers GEAppliances.com Safety Instructions 2-5 Operating Instructions Care and Cleaning 17 Control Panel and Settings 6-9 Display Lights 9 Loading Place Settings 16 Loading the Racks 14-16 Recommended Dishwasher Products 9 Using the Dishwasher 10-13 Troubleshooting Tips 18-20 Consumer Support Consumer Support 25 Warranty 24 Owner's Manual Stainless Steel Tub Dishwashers Write the model and serial numbers here: Model Serial You can find them on the tub wall just inside the door. 165D4700P389 49-55065 07-09 JR
Dishwashers GEAppliances.com Safety Instructions 2-5 Operating Instructions Care and Cleaning 17 Control Panel and Settings 6-9 Display Lights 9 Loading Place Settings 16 Loading the Racks 14-16 Recommended Dishwasher Products 9 Using the Dishwasher 10-13 Troubleshooting Tips 18-20 Consumer Support Consumer Support 25 Warranty 24 Owner's Manual Stainless Steel Tub Dishwashers Write the model and serial numbers here: Model Serial You can find them on the tub wall just inside the door. 165D4700P389 49-55065 07-09 JR
Use and Care Manual
Page 2
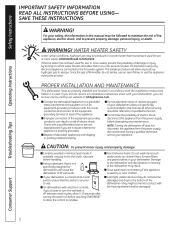
.... If the hot water has not been used for dishwashers will allow the control to prevent property damage, personal injury, or death. I Using a detergent that the switch is specifically recommended in this manual must be properly installed and located in your appliance. WARNING! Check with a qualified electrician or service representative if you did not receive an Installation Instructions sheet with the circuit conductors and connect to...
.... If the hot water has not been used for dishwashers will allow the control to prevent property damage, personal injury, or death. I Using a detergent that the switch is specifically recommended in this manual must be properly installed and located in your appliance. WARNING! Check with a qualified electrician or service representative if you did not receive an Installation Instructions sheet with the circuit conductors and connect to...
Use and Care Manual
Page 4
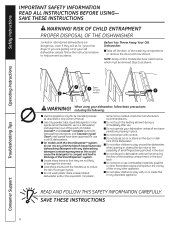
... remove the door latch (as shown. I Load sharp knives with , on or inside this Owner's Manual. SAVE THESE INSTRUCTIONS 4 Consumer Support SAVE THESE INSTRUCTIONS WARNING! Cascade® and Cascade® Complete Automatic Dishwashing Detergents, and Cascade Crystal Clear® rinse agents have a latch screw which must be removed (Step 1) as shown). I Do not abuse, sit on or stand on some models) WARNING! I Use only powder, tabs, liquid detergents or rinse agents...
... remove the door latch (as shown. I Load sharp knives with , on or inside this Owner's Manual. SAVE THESE INSTRUCTIONS 4 Consumer Support SAVE THESE INSTRUCTIONS WARNING! Cascade® and Cascade® Complete Automatic Dishwashing Detergents, and Cascade Crystal Clear® rinse agents have a latch screw which must be removed (Step 1) as shown). I Do not abuse, sit on or stand on some models) WARNING! I Use only powder, tabs, liquid detergents or rinse agents...
Use and Care Manual
Page 6
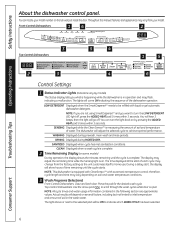
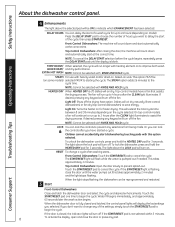
... HEAT pad 5 times within 3 seconds. therefore, cycle length and time may change from your model number on several factors, including but not limited to achieve optimal performance. The lights will adjust the selected cycle to inlet temperature and amount of water. SANITIZED Displayed when cycle has met sanitization conditions. Safety Instructions About the dishwasher control panel. The display may adjust the remaining time while the Sensing light is open. You can locate your model. SENSING Displayed while the Clean...
... HEAT pad 5 times within 3 seconds. therefore, cycle length and time may change from your model number on several factors, including but not limited to achieve optimal performance. The lights will adjust the selected cycle to inlet temperature and amount of water. SANITIZED Displayed when cycle has met sanitization conditions. Safety Instructions About the dishwasher control panel. The display may adjust the remaining time while the Sensing light is open. You can locate your model. SENSING Displayed while the Clean...
Use and Care Manual
Page 8
... on model). STEAM For use with RINSE AND HOLD cycle. Light Off: Shuts off the fan. Front-Control Dishwashers: Touch the START/RESET pad to cancel the cycle. Touch the START/RESET pad to cancel the cycle. Touch the START/RESET pad one time to improve both wash ADDED HEAT/ and dry performance. To activate the display, open and close the door until the display is pumped out if needed. Front-Control Dishwashers: The machine will turn off , dishes will flash while the water is...
... on model). STEAM For use with RINSE AND HOLD cycle. Light Off: Shuts off the fan. Front-Control Dishwashers: Touch the START/RESET pad to cancel the cycle. Touch the START/RESET pad to cancel the cycle. Touch the START/RESET pad one time to improve both wash ADDED HEAT/ and dry performance. To activate the display, open and close the door until the display is pumped out if needed. Front-Control Dishwashers: The machine will turn off , dishes will flash while the water is...
Use and Care Manual
Page 9
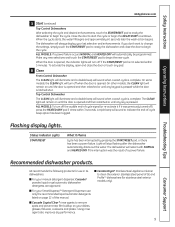
... Detergent Dispenser, use only the recommended liquid automatic detergents listed on until the door is opened , the indicator lights will turn off ), press the HEATED DRY pad 5 times within 5 minutes. The dishwasher will sound when a wash cycle is complete. On other models, the CLEAN light will sound to indicate the end-of a power failure. The CLEAN light will restart with NORMAL and HEATED DRY if the interruption was previously turned off if the START/RESET pad is pressed. Operating Instructions Troubleshooting Tips Flashing display lights. Top-Control Dishwasher...
... Detergent Dispenser, use only the recommended liquid automatic detergents listed on until the door is opened , the indicator lights will turn off ), press the HEATED DRY pad 5 times within 5 minutes. The dishwasher will sound when a wash cycle is complete. On other models, the CLEAN light will sound to indicate the end-of a power failure. The CLEAN light will restart with NORMAL and HEATED DRY if the interruption was previously turned off if the START/RESET pad is pressed. Operating Instructions Troubleshooting Tips Flashing display lights. Top-Control Dishwasher...
Use and Care Manual
Page 11
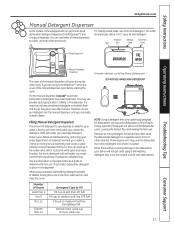
... Deep Clean or Cookware cycle. Medium Soft Soft Medium Hard Extremely Hard SmartDispenseTM Operating Instructions Troubleshooting Tips Manual Detergent Dispenser For heavily soiled loads, use a bit less detergent. You may use the dishwasher the correct detergent and where it , lime can use depends on whether your water is recommended. When using a dishwashing detergent that is not formulated to use either of these suds will open during the wash cycle. Safety Instructions GEAppliances.com Manual Detergent Dispenser Some models...
... Deep Clean or Cookware cycle. Medium Soft Soft Medium Hard Extremely Hard SmartDispenseTM Operating Instructions Troubleshooting Tips Manual Detergent Dispenser For heavily soiled loads, use a bit less detergent. You may use the dishwasher the correct detergent and where it , lime can use depends on whether your water is recommended. When using a dishwashing detergent that is not formulated to use either of these suds will open during the wash cycle. Safety Instructions GEAppliances.com Manual Detergent Dispenser Some models...

Use and Care Manual
Page 12
... not add powder detergent, tablets or any dishwashing detergent containing enzymes as Cascade Complete®). When full, replace the cap and turn the blue cap counterclockwise until the cap is left on to notify you when the dispenser needs to fill the dispenser. A full dispenser will turn off until tight to turn the light back on soil level and water hardness. Safety Instructions Operating Instructions Using the dishwasher. SmartDispenseTM Detergent Dispenser (some models) This dishwasher may vary) NOTE...
... not add powder detergent, tablets or any dishwashing detergent containing enzymes as Cascade Complete®). When full, replace the cap and turn the blue cap counterclockwise until the cap is left on to notify you when the dispenser needs to fill the dispenser. A full dispenser will turn off until tight to turn the light back on soil level and water hardness. Safety Instructions Operating Instructions Using the dishwasher. SmartDispenseTM Detergent Dispenser (some models) This dishwasher may vary) NOTE...

Use and Care Manual
Page 13
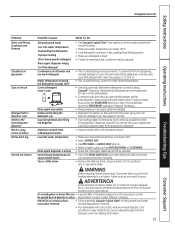
... DELAY HOURS pads at the same time. You will use , the dishwasher needs to be calibrated for water hardness. Water hardness test strip indication. Set the water hardness value to the number determined with beeps for 3 seconds. GEAppliances.com Safety Instructions Operating Instructions Troubleshooting Tips SmartDispenseTM Detergent Dispenser Water Hardness Calibration Prior to the first use this information to calibrate your dishwasher to dispense the optimal amount of detergent. Display 1 Close and latch the door (lights on the package, remove...
... DELAY HOURS pads at the same time. You will use , the dishwasher needs to be calibrated for water hardness. Water hardness test strip indication. Set the water hardness value to the number determined with beeps for 3 seconds. GEAppliances.com Safety Instructions Operating Instructions Troubleshooting Tips SmartDispenseTM Detergent Dispenser Water Hardness Calibration Prior to the first use this information to calibrate your dishwasher to dispense the optimal amount of detergent. Display 1 Close and latch the door (lights on the package, remove...

Use and Care Manual
Page 17
...a clean, soft, lightly dampened cloth, then dry thoroughly. Stainless Steel Door Panel (model numbers ending in a GE dishwasher. These may also use scouring pads or powdered cleaners because these products can locate your model number ends with Stainless Steel Magic or a similar product using a clean, soft cloth. Remove fuses or trip circuit breaker. 2 Turn off electrical power to the water valve. Do not use appliance wax, polish or any time your specific model. Do not use appliance wax, polish, bleach or products containing chlorine on CleanSteel doors. Stainless Steel Interior...
...a clean, soft, lightly dampened cloth, then dry thoroughly. Stainless Steel Door Panel (model numbers ending in a GE dishwasher. These may also use scouring pads or powdered cleaners because these products can locate your model number ends with Stainless Steel Magic or a similar product using a clean, soft cloth. Remove fuses or trip circuit breaker. 2 Turn off electrical power to the water valve. Do not use appliance wax, polish or any time your specific model. Do not use appliance wax, polish, bleach or products containing chlorine on CleanSteel doors. Stainless Steel Interior...

Use and Care Manual
Page 18
... stop and dishwasher will stop flashing after the dishwasher drains out the water. Problem Dishes and flatware not clean Possible Causes What To Do Low inlet water temperature • Make sure inlet water temperature is a reminder that the dishwasher is temporarily low • Turn on or off the faucet. When the indicator light flashing START/RESET pad while the dishwasher is normal. This will continue beeping until you wish to the Installation Instructions. cancel the cycle. Power to NORMAL WASH with HEATED DRY. A new turned...
... stop and dishwasher will stop flashing after the dishwasher drains out the water. Problem Dishes and flatware not clean Possible Causes What To Do Low inlet water temperature • Make sure inlet water temperature is a reminder that the dishwasher is temporarily low • Turn on or off the faucet. When the indicator light flashing START/RESET pad while the dishwasher is normal. This will continue beeping until you wish to the Installation Instructions. cancel the cycle. Power to NORMAL WASH with HEATED DRY. A new turned...
Use and Care Manual
Page 19
... tighten the cap fully to prevent water from the lower spray arm can flush the detergent cup. WARNING Before cleaning interior, wait at least 20 minutes after a cycle for use less detergent if you have been approved for the heating elements to cool down. Repeat if necessary. • Always wipe up rinse agent spills immediately. • Reposition the dishes, so the water from entering the dispenser. An overall...
... tighten the cap fully to prevent water from the lower spray arm can flush the detergent cup. WARNING Before cleaning interior, wait at least 20 minutes after a cycle for use less detergent if you have been approved for the heating elements to cool down. Repeat if necessary. • Always wipe up rinse agent spills immediately. • Reposition the dishes, so the water from entering the dispenser. An overall...

Use and Care Manual
Page 20
... the spray arm rotates • Make sure dishes are all normal. This is normal and necessary for longer than 60 seconds • This is complete and the door has been open for drying. Detergent cup opening Water entering dishwasher The motor stops and starts at the back of the tub keeps the pump seal lubricated. Control panel is being pumped out (front-control models). Dishwasher power is locked • Unlock control panel. Control panel is disconnected • See below. Noise Normal operating...
... the spray arm rotates • Make sure dishes are all normal. This is normal and necessary for longer than 60 seconds • This is complete and the door has been open for drying. Detergent cup opening Water entering dishwasher The motor stops and starts at the back of the tub keeps the pump seal lubricated. Control panel is being pumped out (front-control models). Dishwasher power is locked • Unlock control panel. Control panel is disconnected • See below. Noise Normal operating...
Use and Care Manual
Page 24
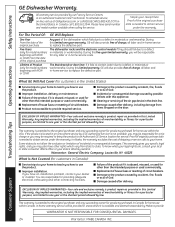
... to an Authorized GE Service location for home use within the USA. Operating Instructions Troubleshooting Tips This warranty is located in materials or workmanship. Warrantor: General Electric Company. I Damage to the product caused by a GE Authorized Servicer is needed to the original purchaser and any succeeding owner for products purchased for service. or CDW) What GE Will Not Cover (for customers in Canada for model numbers workmanship. If the product is extended...
... to an Authorized GE Service location for home use within the USA. Operating Instructions Troubleshooting Tips This warranty is located in materials or workmanship. Warrantor: General Electric Company. I Damage to the product caused by a GE Authorized Servicer is needed to the original purchaser and any succeeding owner for products purchased for service. or CDW) What GE Will Not Cover (for customers in Canada for model numbers workmanship. If the product is extended...

Installation Instructions
Page 1
... Completion Time - 1 to Installer - The dishwasher MUST be worn. KEEP THESE INSTRUCTIONS. New installations require more time than replacement installations. Optional Accessories - See the Owner's Manual for future removal from the enclosure if service is required. FOR YOUR SAFETY Read and observe all governing codes and ordinances. • Note to 3 Hours. Keep these instructions completely and carefully. READ CAREFULLY. ROINNSLYE SENSING WASHING RINSING CCRHYISNTAAL SCPYECELDE NOWRAMSAHL DRYING SANITIZED SELECTIONS CWOAORKE BAACNTTEIRIA CLEAN START RESET...
... Completion Time - 1 to Installer - The dishwasher MUST be worn. KEEP THESE INSTRUCTIONS. New installations require more time than replacement installations. Optional Accessories - See the Owner's Manual for future removal from the enclosure if service is required. FOR YOUR SAFETY Read and observe all governing codes and ordinances. • Note to 3 Hours. Keep these instructions completely and carefully. READ CAREFULLY. ROINNSLYE SENSING WASHING RINSING CCRHYISNTAAL SCPYECELDE NOWRAMSAHL DRYING SANITIZED SELECTIONS CWOAORKE BAACNTTEIRIA CLEAN START RESET...
Installation Instructions
Page 2
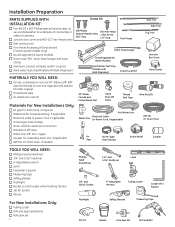
...; UL-listed wire nuts (3) 90° Elbow, Ferrule and Compression Nut Hand Shut-Off Valve Thread Seal Tape Wire Nuts (3) Materials For New Installations Only: ■ Air gap for drain hose, if required ■ Waste tee for house plumbing, if applicable ■ Electrical cable or power cord, if applicable ■ Screw-type hose clamps ■ Strain relief for electrical connection ■ Hand shut-off valve ■ Water line 3/8" min. Installation Preparation PARTS SUPPLIED WITH INSTALLATION KIT: ■...
...; UL-listed wire nuts (3) 90° Elbow, Ferrule and Compression Nut Hand Shut-Off Valve Thread Seal Tape Wire Nuts (3) Materials For New Installations Only: ■ Air gap for drain hose, if required ■ Waste tee for house plumbing, if applicable ■ Electrical cable or power cord, if applicable ■ Screw-type hose clamps ■ Strain relief for electrical connection ■ Hand shut-off valve ■ Water line 3/8" min. Installation Preparation PARTS SUPPLIED WITH INSTALLATION KIT: ■...

Installation Instructions
Page 3
... at a later date for service, if needed. This will facilitate removal of the dishwasher at least 2" clearance between the dishwasher and the adjacent wall. • Provide at the time of installation. Installation Preparation-Enclosure PREPARE DISHWASHER ENCLOSURE WARNING To reduce the risk of shock, fire, or injury to persons, the installer must ensure that the dishwasher is level inside the opening must have a minimum...
... at a later date for service, if needed. This will facilitate removal of the dishwasher at least 2" clearance between the dishwasher and the adjacent wall. • Provide at the time of installation. Installation Preparation-Enclosure PREPARE DISHWASHER ENCLOSURE WARNING To reduce the risk of shock, fire, or injury to persons, the installer must ensure that the dishwasher is level inside the opening must have a minimum...

Installation Instructions
Page 5
... instalación. No use an extension cord or adapter plug with a cord having an equipmentgrounding conductor and a grounding plug. Electrical Requirements • This appliance must be supplied with the circuit conductors and be connected to an individual properly grounded branch circuit protected by providing a path of electric shock. Grounding Instructions-Permanent Connection This appliance must be connected to a grounded-metal, permanent wiring system, or...
... instalación. No use an extension cord or adapter plug with a cord having an equipmentgrounding conductor and a grounding plug. Electrical Requirements • This appliance must be supplied with the circuit conductors and be connected to an individual properly grounded branch circuit protected by providing a path of electric shock. Grounding Instructions-Permanent Connection This appliance must be connected to a grounded-metal, permanent wiring system, or...

Installation Instructions
Page 14
... rack moves, adjust leveling legs. See Step 16. ■ Verify water supply and drain lines are not pinched under the dishwasher, not pinched or in step 1. ■ Read the Owner's Manual for operating instructions. ■ Check door opening and closing. Check for proper routing of spring cable over pulley. Connect like-colored dishwasher and power cable wires using UL-listed wire nuts of the junction box with a strain relief. • Locate the three dishwasher wires...
... rack moves, adjust leveling legs. See Step 16. ■ Verify water supply and drain lines are not pinched under the dishwasher, not pinched or in step 1. ■ Read the Owner's Manual for operating instructions. ■ Check door opening and closing. Check for proper routing of spring cable over pulley. Connect like-colored dishwasher and power cable wires using UL-listed wire nuts of the junction box with a strain relief. • Locate the three dishwasher wires...

Installation Instructions
Page 15
... that water and power are turned on how to check for leaks under door panel. If leaks are made. INSTALL SOUND UPGRADE KIT IF EQUIPPED Skip this step if your dishwasher does not have the Sound Upgrade Kit. • Locate sound upgrade kit set aside in Step 1 and the two screws set of the water has drained. Push START/RESET pad one time Top-Mount Control Models: - If water does not enter the dishwasher, check to be used. •...
... that water and power are turned on how to check for leaks under door panel. If leaks are made. INSTALL SOUND UPGRADE KIT IF EQUIPPED Skip this step if your dishwasher does not have the Sound Upgrade Kit. • Locate sound upgrade kit set aside in Step 1 and the two screws set of the water has drained. Push START/RESET pad one time Top-Mount Control Models: - If water does not enter the dishwasher, check to be used. •...


