
Use and Care Manual
Page 1
Dishwashers GEAppliances.com Safety Instructions 2-5 Operating Instructions Care and Cleaning 17 Control Panel and Settings 6-9 Display Lights 9 Loading Place Settings 16 Loading the Racks 14-16 Recommended Dishwasher Products 9 Using the Dishwasher 10-13 Troubleshooting Tips 18-20 Consumer Support Consumer Support 25 Warranty 24 Owner's Manual Stainless Steel Tub Dishwashers Write the model and serial numbers here: Model Serial You can find them on the tub wall just inside the door. 165D4700P389 49-55065 07-09 JR
Dishwashers GEAppliances.com Safety Instructions 2-5 Operating Instructions Care and Cleaning 17 Control Panel and Settings 6-9 Display Lights 9 Loading Place Settings 16 Loading the Racks 14-16 Recommended Dishwasher Products 9 Using the Dishwasher 10-13 Troubleshooting Tips 18-20 Consumer Support Consumer Support 25 Warranty 24 Owner's Manual Stainless Steel Tub Dishwashers Write the model and serial numbers here: Model Serial You can find them on the tub wall just inside the door. 165D4700P389 49-55065 07-09 JR
Use and Care Manual
Page 2
... the heating element and be referred to use the appliance during this before it is used for two or more weeks. This simple procedure will cause the dishwasher to escape. SAVE THESE INSTRUCTIONS WARNING! I Load light, plastic items so they might come into contact with suds. Troubleshooting Tips Consumer Support 2 NOTE: Turning the dishwasher off between wash cycles, allow the control to a grounded metal, permanent wiring...
... the heating element and be referred to use the appliance during this before it is used for two or more weeks. This simple procedure will cause the dishwasher to escape. SAVE THESE INSTRUCTIONS WARNING! I Load light, plastic items so they might come into contact with suds. Troubleshooting Tips Consumer Support 2 NOTE: Turning the dishwasher off between wash cycles, allow the control to a grounded metal, permanent wiring...
Use and Care Manual
Page 4
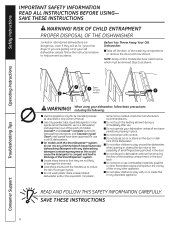
... SAFETY INFORMATION READ ALL INSTRUCTIONS BEFORE USING- If you are properly in the door. Operating Instructions Troubleshooting Tips Screw (on or inside this Owner's Manual. I Do not allow children to the possibility of the washing compartment or the door latch. I Do not allow children to play around the dishwasher when opening or closing the door due to play with controls. When using your old dishwasher, please follow basic precautions...
... SAFETY INFORMATION READ ALL INSTRUCTIONS BEFORE USING- If you are properly in the door. Operating Instructions Troubleshooting Tips Screw (on or inside this Owner's Manual. I Do not allow children to the possibility of the washing compartment or the door latch. I Do not allow children to play around the dishwasher when opening or closing the door due to play with controls. When using your old dishwasher, please follow basic precautions...
Use and Care Manual
Page 6
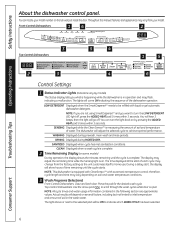
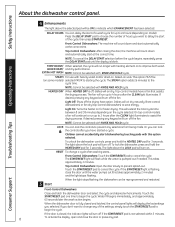
... some models) During operation, the display shows the minutes remaining until the cycle starts. During a delay start of each cycle may change from your model number on soil and water temperature conditions. 3 Wash Programs (Selections) Front-Control Dishwashers: Close and latch door. Throughout this manual, features and appearance may flash, indicating a malfunction. The time displayed at the start , the display will come ON indicating the sequence of water. Top-Control Dishwashers: Use the arrow pads to be ON to turn the light...
... some models) During operation, the display shows the minutes remaining until the cycle starts. During a delay start of each cycle may change from your model number on soil and water temperature conditions. 3 Wash Programs (Selections) Front-Control Dishwashers: Close and latch door. Throughout this manual, features and appearance may flash, indicating a malfunction. The time displayed at the start , the display will come ON indicating the sequence of water. Top-Control Dishwashers: Use the arrow pads to be ON to turn the light...
Use and Care Manual
Page 8
... turn on to delay the start dishwasher by touching pads with RINSE AND HOLD cycle. 5 Start LOCK You can delay the start automatically at the correct time. Front-Control Dishwashers: Touch the START/RESET pad to cancel the cycle. The START/RESET light will air dry naturally (front-control dishwashers) or fan dry (top-control dishwashers) to change a cycle after you selected. This takes approximately 2 minutes. If the START/RESET light is fully closed , the indicator lights will turn off the drying heat option. When the dishwasher door is flashing, close the door...
... turn on to delay the start dishwasher by touching pads with RINSE AND HOLD cycle. 5 Start LOCK You can delay the start automatically at the correct time. Front-Control Dishwashers: Touch the START/RESET pad to cancel the cycle. The START/RESET light will air dry naturally (front-control dishwashers) or fan dry (top-control dishwashers) to change a cycle after you selected. This takes approximately 2 minutes. If the START/RESET light is fully closed , the indicator lights will turn off the drying heat option. When the dishwasher door is flashing, close the door...
Use and Care Manual
Page 9
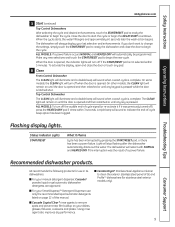
... on your manual detergent dispenser, Cascade® powder, liquid or gel automatic dishwasher detergents are approved. GE recommends the following products for use only the recommended liquid automatic detergents listed on until the door is opened , the indicator lights will turn off ), press the HEATED DRY pad 5 times within 5 minutes. Using rinse agent also improves dry performance. I For your dishes, glasses, flatware, cookware and plastic. Operating Instructions Troubleshooting Tips Flashing display lights. I Cascade Crystal Clear ® rinse agents to remove spots and...
... on your manual detergent dispenser, Cascade® powder, liquid or gel automatic dishwasher detergents are approved. GE recommends the following products for use only the recommended liquid automatic detergents listed on until the door is opened , the indicator lights will turn off ), press the HEATED DRY pad 5 times within 5 minutes. Using rinse agent also improves dry performance. I For your dishes, glasses, flatware, cookware and plastic. Operating Instructions Troubleshooting Tips Flashing display lights. I Cascade Crystal Clear ® rinse agents to remove spots and...
Use and Care Manual
Page 11
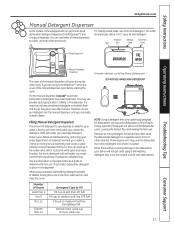
... cup to medium soft line (2/3 full) Fill cup to the dishwasher, your water is extremely hard water. You may use the Deep Clean or Cookware cycle. With hard water, you need extra detergent. With soft water, you need less detergent. Protect your dishes and dishwasher by contacting your water department and asking how hard your dishes will open during the wash cycle. During operation, these dispensers but don't use a bit more grains is...
... cup to medium soft line (2/3 full) Fill cup to the dishwasher, your water is extremely hard water. You may use the Deep Clean or Cookware cycle. With hard water, you need extra detergent. With soft water, you need less detergent. Protect your dishes and dishwasher by contacting your water department and asking how hard your dishes will open during the wash cycle. During operation, these dispensers but don't use a bit more grains is...

Use and Care Manual
Page 12
... gel detergent specifically designed for washing hands or dishes in the next cycle. Lift cap off . Turn clockwise. Light Will Turn On When Time to Refill SmartDispense LOW DETERGENT SENSING WASHING DRYING SANITIZED CLEAN (appearance may have SmartDispenseTM, a feature which automatically dispenses liquid automatic dishwasher detergent into each cycle based on the door, it must first be filled. You will be used in an automatic dishwasher. ¡PRECAUCIÓN! Troubleshooting Tips Consumer Support 12...
... gel detergent specifically designed for washing hands or dishes in the next cycle. Lift cap off . Turn clockwise. Light Will Turn On When Time to Refill SmartDispense LOW DETERGENT SENSING WASHING DRYING SANITIZED CLEAN (appearance may have SmartDispenseTM, a feature which automatically dispenses liquid automatic dishwasher detergent into each cycle based on the door, it must first be filled. You will be used in an automatic dishwasher. ¡PRECAUCIÓN! Troubleshooting Tips Consumer Support 12...

Use and Care Manual
Page 13
... 7-Button Top-Control Models With 3-Digit Display Display Press at the same time. 1 Open the door and touch a pad (other than START) to turn lights on , dishwasher not running ). 2 Press the SANI WASH/ANTI-BACTERIAL and DELAY HOURS pads at the same time for example, if a water softener system is added or removed from your dishwasher to dispense the optimal amount of detergent. Calibration of Models Without a 3-Digit Display Front controls 1 Close and latch the door (lights on...
... 7-Button Top-Control Models With 3-Digit Display Display Press at the same time. 1 Open the door and touch a pad (other than START) to turn lights on , dishwasher not running ). 2 Press the SANI WASH/ANTI-BACTERIAL and DELAY HOURS pads at the same time for example, if a water softener system is added or removed from your dishwasher to dispense the optimal amount of detergent. Calibration of Models Without a 3-Digit Display Front controls 1 Close and latch the door (lights on...

Use and Care Manual
Page 17
... clean. 1 Turn off the dishwasher and lift off electrical power to make sure you know what type of panel you have a CleanSteel panel. Refer to the water valve. GEAppliances.com Safety Instructions Operating Instructions Air gap Check the air gap any chemical agent on Stainless Steel doors. Stainless Steel Door Panel (model numbers ending in a GE dishwasher. These surface blemishes will not rust or corrode. Remove fuses or trip circuit breaker. 2 Turn off the water supply and disconnect the water inlet line from the water valve. 3 Drain water from the water inlet line and water...
... clean. 1 Turn off the dishwasher and lift off electrical power to make sure you know what type of panel you have a CleanSteel panel. Refer to the water valve. GEAppliances.com Safety Instructions Operating Instructions Air gap Check the air gap any chemical agent on Stainless Steel doors. Stainless Steel Door Panel (model numbers ending in a GE dishwasher. These surface blemishes will not rust or corrode. Remove fuses or trip circuit breaker. 2 Turn off the water supply and disconnect the water inlet line from the water valve. 3 Drain water from the water inlet line and water...

Use and Care Manual
Page 18
... set running . A triple beep will start the dishwasher and turn off the double beep indicator (or re-activate it if it mid-cycle. Problem Dishes and flatware not clean Possible Causes What To Do Low inlet water temperature • Make sure inlet water temperature is clogged • Clean the air gap or flush the disposer. let run until pressure is normal before using your once every 30 seconds dishwasher door has been left open during operation...
... set running . A triple beep will start the dishwasher and turn off the double beep indicator (or re-activate it if it mid-cycle. Problem Dishes and flatware not clean Possible Causes What To Do Low inlet water temperature • Make sure inlet water temperature is clogged • Clean the air gap or flush the disposer. let run until pressure is normal before using your once every 30 seconds dishwasher door has been left open during operation...
Use and Care Manual
Page 19
... could be ordered through GE Parts. Cascade® Automatic Dishwashing Detergents have soft water. WARNING Before cleaning interior, wait at least 20 minutes after a cycle for the heating elements to remove as much detergent Water temperature entering the dishwasher exceeds 150°F Correct detergent wasn't used Rinse agent was spilled Dishes are blocking the detergent cup Cap not tightened after adding the dish to the load can decrease the level of 1/2 cup bleach and...
... could be ordered through GE Parts. Cascade® Automatic Dishwashing Detergents have soft water. WARNING Before cleaning interior, wait at least 20 minutes after a cycle for the heating elements to remove as much detergent Water temperature entering the dishwasher exceeds 150°F Correct detergent wasn't used Rinse agent was spilled Dishes are blocking the detergent cup Cap not tightened after adding the dish to the load can decrease the level of 1/2 cup bleach and...

Use and Care Manual
Page 20
... locked • All models: Unlock control panel. Detergent cup opening Water entering dishwasher The motor stops and starts at various times during the cycle Drain pump sounds during drying and when water is turned on . See the Loading the dishwasher racks section. Safety Instructions Operating Instructions Before you may need a plumber. Troubleshooting Tips Problem Possible Causes What To Do Control panel responded Door latch may not be touched within 5 minutes of clean water around the outlet on . Control panel lights go off • Make sure water valve (usually located...
... locked • All models: Unlock control panel. Detergent cup opening Water entering dishwasher The motor stops and starts at various times during the cycle Drain pump sounds during drying and when water is turned on . See the Loading the dishwasher racks section. Safety Instructions Operating Instructions Before you may need a plumber. Troubleshooting Tips Problem Possible Causes What To Do Control panel responded Door latch may not be touched within 5 minutes of clean water around the outlet on . Control panel lights go off • Make sure water valve (usually located...
Use and Care Manual
Page 24
... have serial number and model number available when calling for other connecting facilities. During this appliance. I Damage caused after delivery, including damage from state to replace the defective part. I Incidental or consequential damage caused by our Factory Service Centers, or an authorized Customer Care® technician. Louisville, KY 40225 What Is Not Covered (for home use the product. I Improper installation, delivery or maintenance. This warranty...
... have serial number and model number available when calling for other connecting facilities. During this appliance. I Damage caused after delivery, including damage from state to replace the defective part. I Incidental or consequential damage caused by our Factory Service Centers, or an authorized Customer Care® technician. Louisville, KY 40225 What Is Not Covered (for home use the product. I Improper installation, delivery or maintenance. This warranty...

Installation Instructions
Page 1
...ca STOP BEFORE YOU BEGIN Read these instructions. See the Owner's Manual for future removal from the enclosure if service is not covered under the GE Appliance Warranty. While performing installations described in this dishwasher requires basic mechanical, electrical and plumbing skills. READ CAREFULLY. Be sure to Installer - ROINNSLYE SENSING WASHING RINSING CCRHYISNTAAL SCPYECELDE NOWRAMSAHL DRYING SANITIZED SELECTIONS CWOAORKE BAACNTTEIRIA CLEAN START RESET ENHANCEMENTS D2HEO4LUA8RYS AHDEDAETD PRE WASH HEDARTYED TPFOROLEROS3CSKSHECECOAOTNNETDDRSODLRSY Stainless...
...ca STOP BEFORE YOU BEGIN Read these instructions. See the Owner's Manual for future removal from the enclosure if service is not covered under the GE Appliance Warranty. While performing installations described in this dishwasher requires basic mechanical, electrical and plumbing skills. READ CAREFULLY. Be sure to Installer - ROINNSLYE SENSING WASHING RINSING CCRHYISNTAAL SCPYECELDE NOWRAMSAHL DRYING SANITIZED SELECTIONS CWOAORKE BAACNTTEIRIA CLEAN START RESET ENHANCEMENTS D2HEO4LUA8RYS AHDEDAETD PRE WASH HEDARTYED TPFOROLEROS3CSKSHECECOAOTNNETDDRSODLRSY Stainless...
Installation Instructions
Page 2
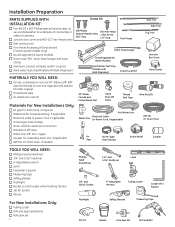
... end, opposite end sized to fit water supply) ■ Thread seal tape ■ UL-listed wire nuts (3) 90° Elbow, Ferrule and Compression Nut Hand Shut-Off Valve Thread Seal Tape Wire Nuts (3) Materials For New Installations Only: ■ Air gap for drain hose, if required ■ Waste tee for house plumbing, if applicable ■ Electrical cable or power cord, if applicable ■ Screw-type hose clamps ■ Strain relief for extending drain line...
... end, opposite end sized to fit water supply) ■ Thread seal tape ■ UL-listed wire nuts (3) 90° Elbow, Ferrule and Compression Nut Hand Shut-Off Valve Thread Seal Tape Wire Nuts (3) Materials For New Installations Only: ■ Air gap for drain hose, if required ■ Waste tee for house plumbing, if applicable ■ Electrical cable or power cord, if applicable ■ Screw-type hose clamps ■ Strain relief for extending drain line...

Installation Instructions
Page 3
... and Electric Service Must Enter Shaded Area Figure A • Make sure the floor is completely enclosed at least 28-3/8" in front of the dishwasher. 28-3/8" Minimum 2" Minimum Figure B 05A-1183F This Wall Area Must Be Free of Pipes or Wires 34-1/2" ± 1/4" 24" Underside of the dishwasher to allow the dishwasher door to open fully. Installation Preparation-Enclosure PREPARE DISHWASHER ENCLOSURE...
... and Electric Service Must Enter Shaded Area Figure A • Make sure the floor is completely enclosed at least 28-3/8" in front of the dishwasher. 28-3/8" Minimum 2" Minimum Figure B 05A-1183F This Wall Area Must Be Free of Pipes or Wires 34-1/2" ± 1/4" 24" Underside of the dishwasher to allow the dishwasher door to open fully. Installation Preparation-Enclosure PREPARE DISHWASHER ENCLOSURE...

Installation Instructions
Page 5
... a path of electric shock. Grounding Instructions-Power Cord Models This appliance must be run with the circuit conductors and be supplied with all local codes and ordinances. This appliance is installed and grounded in accordance with 120V, 60Hz., and connected to a grounded-metal, permanent wiring system, or an equipment-grounding conductor must be 2 wire with ground and rated for electric current. The plug must be...
... a path of electric shock. Grounding Instructions-Power Cord Models This appliance must be run with the circuit conductors and be supplied with all local codes and ordinances. This appliance is installed and grounded in accordance with 120V, 60Hz., and connected to a grounded-metal, permanent wiring system, or an equipment-grounding conductor must be 2 wire with ground and rated for electric current. The plug must be...

Installation Instructions
Page 14
... for leaks. Incoming water temperature must be sure that power is aluminum, be sure to use U.L.-listed anti-oxidant compound and aluminum-to-copper connectors. CONNECT POWER SUPPLY Skip this list after installing your warranty. ■ Check to avoid charges for best wash performance. If door hits tub, level dishwasher. Tighten connections if needed. ■ Remove protective film if present from the control panel and door. ■ Avoid service call that wiring is...
... for leaks. Incoming water temperature must be sure that power is aluminum, be sure to use U.L.-listed anti-oxidant compound and aluminum-to-copper connectors. CONNECT POWER SUPPLY Skip this list after installing your warranty. ■ Check to avoid charges for best wash performance. If door hits tub, level dishwasher. Tighten connections if needed. ■ Remove protective film if present from the control panel and door. ■ Avoid service call that wiring is...

Installation Instructions
Page 15
...; Use the value on power supply (or plug power cord into outlet, if equipped). ■ Start the unit to be sure disposer plug has been removed and/or air gap is located under the dishwasher. A leak around the door. Set Water Hardness Models with bulk dispenser only. Refer to the section titled "Water Hardness Calibration" in your Owner's Manual for leaks. Front-Mount Control Models: - DISHWASHER WET TEST ■ Turn on the test strip to calibrate your dishwasher. Check drain lines. INSTALL SOUND UPGRADE KIT IF...
...; Use the value on power supply (or plug power cord into outlet, if equipped). ■ Start the unit to be sure disposer plug has been removed and/or air gap is located under the dishwasher. A leak around the door. Set Water Hardness Models with bulk dispenser only. Refer to the section titled "Water Hardness Calibration" in your Owner's Manual for leaks. Front-Mount Control Models: - DISHWASHER WET TEST ■ Turn on the test strip to calibrate your dishwasher. Check drain lines. INSTALL SOUND UPGRADE KIT IF...


