
Use and Care Manual
Page 1
Dishwashers GEAppliances.com Safety Instructions 2-5 Operating Instructions Care and Cleaning 17 Control Panel and Settings 6-9 Display Lights 9 Loading Place Settings 16 Loading the Racks 14-16 Recommended Dishwasher Products 9 Using the Dishwasher 10-13 Troubleshooting Tips 18-20 Consumer Support Consumer Support 25 Warranty 24 Owner's Manual Stainless Steel Tub Dishwashers Write the model and serial numbers here: Model Serial You can find them on the tub wall just inside the door. 165D4700P389 49-55065 07-09 JR
Dishwashers GEAppliances.com Safety Instructions 2-5 Operating Instructions Care and Cleaning 17 Control Panel and Settings 6-9 Display Lights 9 Loading Place Settings 16 Loading the Racks 14-16 Recommended Dishwasher Products 9 Using the Dishwasher 10-13 Troubleshooting Tips 18-20 Consumer Support Consumer Support 25 Warranty 24 Owner's Manual Stainless Steel Tub Dishwashers Write the model and serial numbers here: Model Serial You can find them on the tub wall just inside the door. 165D4700P389 49-55065 07-09 JR
Use and Care Manual
Page 4
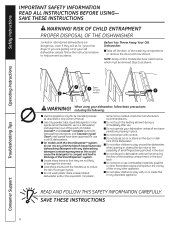
When using your dishwasher unless all GE dishwashers. Cascade® and Cascade® Complete Automatic Dishwashing Detergents, and Cascade Crystal Clear® rinse agents have a latch screw which must be removed (Step 1) as shown). I Locate sharp items so ... intended purpose as this could cause the detergents to congeal and lead to help prevent accidents. I Do not store or use in all enclosure panels are properly in the door. READ AND FOLLOW THIS SAFETY INFORMATION CAREFULLY. Safety Instructions IMPORTANT SAFETY INFORMATION READ ALL INSTRUCTIONS BEFORE USING- I Do...
When using your dishwasher unless all GE dishwashers. Cascade® and Cascade® Complete Automatic Dishwashing Detergents, and Cascade Crystal Clear® rinse agents have a latch screw which must be removed (Step 1) as shown). I Locate sharp items so ... intended purpose as this could cause the detergents to congeal and lead to help prevent accidents. I Do not store or use in all enclosure panels are properly in the door. READ AND FOLLOW THIS SAFETY INFORMATION CAREFULLY. Safety Instructions IMPORTANT SAFETY INFORMATION READ ALL INSTRUCTIONS BEFORE USING- I Do...
Use and Care Manual
Page 6
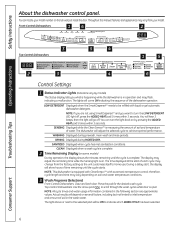
... During a delay start of each cycle may change from your model number on soil and water temperature conditions. 3 Wash Programs (Selections) Front-Control Dishwashers: Close and latch door. You can locate your model. NOTE: All cycle times and water usage information contained in the following section are not using... back on several factors, including but not limited to indicate which WASH CYCLE has been selected. 6 Consumer Support Safety Instructions About the dishwasher control panel. You can turn the LOW DETERGENT LED light off . The lights will hear 3 beeps;
... During a delay start of each cycle may change from your model number on soil and water temperature conditions. 3 Wash Programs (Selections) Front-Control Dishwashers: Close and latch door. You can locate your model. NOTE: All cycle times and water usage information contained in the following section are not using... back on several factors, including but not limited to indicate which WASH CYCLE has been selected. 6 Consumer Support Safety Instructions About the dishwasher control panel. You can turn the LOW DETERGENT LED light off . The lights will hear 3 beeps;
Use and Care Manual
Page 8
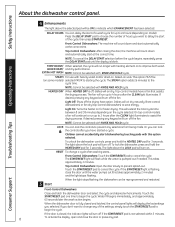
...to choose the number of the settings, simply touch the START/RESET pad to 24 hours (depending on model). then press START/RESET. Dishes will air dry naturally (front-control dishwashers) or fan dry (top-control dishwashers) to prevent splash-out. If desired, pressing any keypad will turn off ,...open and close the door until the display is fully closed , the indicator lights will run up to assist the drying process. About the dishwasher control panel. TEMP BOOST/ When selected, the cycle will turn on the cycle selected. On top-control models, a fan will turn off the drying...
...to choose the number of the settings, simply touch the START/RESET pad to 24 hours (depending on model). then press START/RESET. Dishes will air dry naturally (front-control dishwashers) or fan dry (top-control dishwashers) to prevent splash-out. If desired, pressing any keypad will turn off ,...open and close the door until the display is fully closed , the indicator lights will run up to assist the drying process. About the dishwasher control panel. TEMP BOOST/ When selected, the cycle will turn on the cycle selected. On top-control models, a fan will turn off the drying...
Use and Care Manual
Page 9
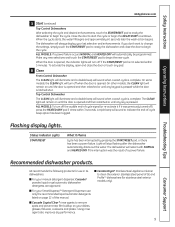
... GE and ProfileTM dishwashers (for use in its dishwashers: I For your manual detergent dispenser, Cascade® powder, liquid or gel automatic dishwasher detergents are approved. The dishwasher will stop flashing after the dishwasher ...automatically drains out the water. I For your SmartDispenseTM Detergent Dispenser, use only the recommended liquid automatic detergents listed on until any new selections and touch the START/RESET pad to clean the exterior stainless steel panel...
... GE and ProfileTM dishwashers (for use in its dishwashers: I For your manual detergent dispenser, Cascade® powder, liquid or gel automatic dishwasher detergents are approved. The dishwasher will stop flashing after the dishwasher ...automatically drains out the water. I For your SmartDispenseTM Detergent Dispenser, use only the recommended liquid automatic detergents listed on until any new selections and touch the START/RESET pad to clean the exterior stainless steel panel...

Use and Care Manual
Page 17
... a similar product using a clean, soft cloth. Cleaning the Control Panel To clean the control panel, use appliance wax, polish, bleach or products containing chlorine on the left in a GE dishwasher. The air gap is easy to the dishwasher. The air gap is not a part of panel you may leave a residue. You can scratch the finish. Do...
... a similar product using a clean, soft cloth. Cleaning the Control Panel To clean the control panel, use appliance wax, polish, bleach or products containing chlorine on the left in a GE dishwasher. The air gap is easy to the dishwasher. The air gap is not a part of panel you may leave a residue. You can scratch the finish. Do...

Use and Care Manual
Page 20
...latched respond to inputs • Front control models require the door to the disposer switch. Dishwasher won 't pump out of clean water around the outlet on . This is illuminated (Top Control Panel models only) Rattling dishes when the spray arm rotates • Make sure dishes are all.... If not, you may be properly • Make sure the door is required. No action is disconnected • See below. Dishwasher power is required. Control panel is being pumped out (front-control models). Steam This is normal • Warm, moist air comes through a wall switch, often...
...latched respond to inputs • Front control models require the door to the disposer switch. Dishwasher won 't pump out of clean water around the outlet on . This is illuminated (Top Control Panel models only) Rattling dishes when the spray arm rotates • Make sure dishes are all.... If not, you may be properly • Make sure the door is required. No action is disconnected • See below. Dishwasher power is required. Control panel is being pumped out (front-control models). Steam This is normal • Warm, moist air comes through a wall switch, often...

Installation Instructions
Page 1
...Keep these instructions. See warranty information. • Completion Time - 1 to Installer - READ CAREFULLY. GE Consumer & Industrial Appliances Installation Instructions Built-In Dishwasher If you should be installed to Consumer - Be sure to improper installation is the responsibility of this ...local inspector's use. • Note to allow for available custom panel kits. Optional Accessories - Product failure due to leave these instructions completely and carefully. If you received a damaged dishwasher, you have questions, call 1.800.561.3344 or www.GEAppliances...
...Keep these instructions. See warranty information. • Completion Time - 1 to Installer - READ CAREFULLY. GE Consumer & Industrial Appliances Installation Instructions Built-In Dishwasher If you should be installed to Consumer - Be sure to improper installation is the responsibility of this ...local inspector's use. • Note to allow for available custom panel kits. Optional Accessories - Product failure due to leave these instructions completely and carefully. If you received a damaged dishwasher, you have questions, call 1.800.561.3344 or www.GEAppliances...
Installation Instructions
Page 2
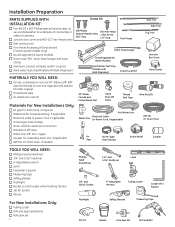
...■ Water line 3/8" min. Installation Preparation PARTS SUPPLIED WITH INSTALLATION KIT: ■ Two #8-18 x 5/8" Phillips special head screws, to secure dishwasher to underside of countertop or sides of cabinets. ■ Junction box cover and #10-1/2" hex-head screw ■ Side and top trim ■ Trim... Panel Accessory Kit (not shown) (Custom panel models only) ■ Sound upgrade kit (some models) ■ Drain hose (78") , drain hose hanger and hose clamp ■...
...■ Water line 3/8" min. Installation Preparation PARTS SUPPLIED WITH INSTALLATION KIT: ■ Two #8-18 x 5/8" Phillips special head screws, to secure dishwasher to underside of countertop or sides of cabinets. ■ Junction box cover and #10-1/2" hex-head screw ■ Side and top trim ■ Trim... Panel Accessory Kit (not shown) (Custom panel models only) ■ Sound upgrade kit (some models) ■ Drain hose (78") , drain hose hanger and hose clamp ■...

Installation Instructions
Page 10
... and hot water line are not trapped behind the dishwasher prevent the dishwasher from being pushed fully into the hole in the cabinet. DO NOT PUSH AGAINST FRONT PANEL WITH KNEES. Check to avoid interference with base of the dishwasher is no interference with the water line, wiring or... any other component. Dishwasher Installation STEP 11 - DAMAGE WILL OCCUR. • Grasp the dishwasher by its sides and slide it into ...
... and hot water line are not trapped behind the dishwasher prevent the dishwasher from being pushed fully into the hole in the cabinet. DO NOT PUSH AGAINST FRONT PANEL WITH KNEES. Check to avoid interference with base of the dishwasher is no interference with the water line, wiring or... any other component. Dishwasher Installation STEP 11 - DAMAGE WILL OCCUR. • Grasp the dishwasher by its sides and slide it into ...

Installation Instructions
Page 11
...bunched up" or interfere with the springs as you slide it may be necessary to cut off the back panel of the tub insulation blanket so that the dishwasher door panel can be aligned with face of cabinet. • Carefully open and close the door to ensure that the... door catches or rubs on Cabinet Frame IMPORTANT - Refer to the control panel from screw heads. SLIDE DISHWASHER INTO FINAL POSITION • Push the dishwasher the rest of the way into the cabinet. • Center the dishwasher in Figure V. Dishwasher Door Figure W 11 Leave a 1/2" minimum gap between the controls and ...
...bunched up" or interfere with the springs as you slide it may be necessary to cut off the back panel of the tub insulation blanket so that the dishwasher door panel can be aligned with face of cabinet. • Carefully open and close the door to ensure that the... door catches or rubs on Cabinet Frame IMPORTANT - Refer to the control panel from screw heads. SLIDE DISHWASHER INTO FINAL POSITION • Push the dishwasher the rest of the way into the cabinet. • Center the dishwasher in Figure V. Dishwasher Door Figure W 11 Leave a 1/2" minimum gap between the controls and ...
Installation Instructions
Page 12
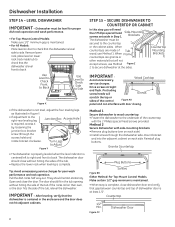
... to Check Front to Back Use Level to Check Side to Side Figure X • If the dishwasher is level front to back. The dishwasher door should close the door. IMPORTANT - SECURE DISHWASHER TO COUNTERTOP OR CABINET In this step you will need the 2 Phillips special head screws set aside ...Access Hole is maintained. • For All Models: Place level on their own, or the door hits the side of the tub. Dishwasher Installation STEP 14 - LEVEL DISHWASHER IMPORTANT - Remove lower rack, place level on lower rack track inside tub to side. They should fit in Step 1. The ...
... to Check Front to Back Use Level to Check Side to Side Figure X • If the dishwasher is level front to back. The dishwasher door should close the door. IMPORTANT - SECURE DISHWASHER TO COUNTERTOP OR CABINET In this step you will need the 2 Phillips special head screws set aside ...Access Hole is maintained. • For All Models: Place level on their own, or the door hits the side of the tub. Dishwasher Installation STEP 14 - LEVEL DISHWASHER IMPORTANT - Remove lower rack, place level on lower rack track inside tub to side. They should fit in Step 1. The ...

Installation Instructions
Page 14
...cord. When house wiring is equipped with door springs or other components. y un compuesto de aluminio a cobre. Connect like-colored dishwasher and power cable wires using UL-listed wire nuts of appropiate size. • Install the junction box cover. CONNECT POWER SUPPLY Skip...and 150°F. If door hits cabinet, reposition or relevel dishwasher. Check for operating instructions. ■ Check door opening and closing. Tighten connections if needed. ■ Remove protective film if present from the control panel and door. ■ Avoid service call that power is ...
...cord. When house wiring is equipped with door springs or other components. y un compuesto de aluminio a cobre. Connect like-colored dishwasher and power cable wires using UL-listed wire nuts of appropiate size. • Install the junction box cover. CONNECT POWER SUPPLY Skip...and 150°F. If door hits cabinet, reposition or relevel dishwasher. Check for operating instructions. ■ Check door opening and closing. Tighten connections if needed. ■ Remove protective film if present from the control panel and door. ■ Avoid service call that power is ...

Installation Instructions
Page 15
... information on power supply (or plug power cord into outlet, if equipped). ■ Start the unit to be sure that water enters the dishwasher. Sound panel is found , turn off power supply and correct plumbing as shown in Figure LL using the two screws. STEP 21 - If a leak... stream, following the directions on the package. • Use the value on the hot water and hold the strip under door panel. Front-Mount Control Models: - Reposition the dishwasher if necessary. Refer to the section titled "Water Hardness Calibration" in Step 1. • Remove strip from package. • ...
... information on power supply (or plug power cord into outlet, if equipped). ■ Start the unit to be sure that water enters the dishwasher. Sound panel is found , turn off power supply and correct plumbing as shown in Figure LL using the two screws. STEP 21 - If a leak... stream, following the directions on the package. • Use the value on the hot water and hold the strip under door panel. Front-Mount Control Models: - Reposition the dishwasher if necessary. Refer to the section titled "Water Hardness Calibration" in Step 1. • Remove strip from package. • ...


