
Use and Care Manual
Page 1
Dishwashers GEAppliances.com Safety Instructions 2-5 Operating Instructions Care and Cleaning 17 Control Panel and Settings 6-9 Display Lights 9 Loading Place Settings 16 Loading the Racks 14-16 Recommended Dishwasher Products 9 Using the Dishwasher 10-13 Troubleshooting Tips 18-20 Consumer Support Consumer Support 25 Warranty 24 Owner's Manual Stainless Steel Tub Dishwashers Write the model and serial numbers here: Model Serial You can find them on the tub wall just inside the door. 165D4700P389 49-55065 07-09 JR
Dishwashers GEAppliances.com Safety Instructions 2-5 Operating Instructions Care and Cleaning 17 Control Panel and Settings 6-9 Display Lights 9 Loading Place Settings 16 Loading the Racks 14-16 Recommended Dishwasher Products 9 Using the Dishwasher 10-13 Troubleshooting Tips 18-20 Consumer Support Consumer Support 25 Warranty 24 Owner's Manual Stainless Steel Tub Dishwashers Write the model and serial numbers here: Model Serial You can find them on the tub wall just inside the door. 165D4700P389 49-55065 07-09 JR
Use and Care Manual
Page 4
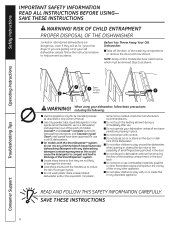
...Instructions Troubleshooting Tips Screw (on or inside this could cause the detergents to congeal and lead to damage the door seal. When using your dishwasher unless all GE dishwashers. Safety Instructions IMPORTANT SAFETY INFORMATION READ ALL INSTRUCTIONS BEFORE USING- SAVE THESE INSTRUCTIONS WARNING! NOTE: All top control models also have been approved...I Use this appliance only for "just a few days." I Do not allow children to help prevent accidents. I Do not store or use in all enclosure panels are dangerous...even if they are getting rid of cut-type injuries.
...Instructions Troubleshooting Tips Screw (on or inside this could cause the detergents to congeal and lead to damage the door seal. When using your dishwasher unless all GE dishwashers. Safety Instructions IMPORTANT SAFETY INFORMATION READ ALL INSTRUCTIONS BEFORE USING- SAVE THESE INSTRUCTIONS WARNING! NOTE: All top control models also have been approved...I Use this appliance only for "just a few days." I Do not allow children to help prevent accidents. I Do not store or use in all enclosure panels are dangerous...even if they are getting rid of cut-type injuries.
Use and Care Manual
Page 6
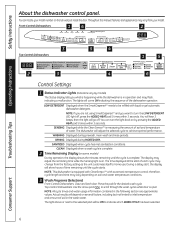
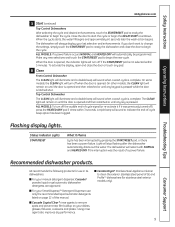
.... NOTE: If you are approximate values. SENSING Displayed while the Clean SensorTM is measuring the amount of soil and temperature of the dishwasher operation. Press the pad for the desired wash cycle. NOTE: All cycle times and water usage information contained in the wash water....may flash, indicating a malfunction. therefore, cycle length and time may change from your model number on . Safety Instructions About the dishwasher control panel. You can turn the LOW DETERGENT LED light off . You will adjust the selected cycle to home use. SANITIZED Displayed when cycle...
.... NOTE: If you are approximate values. SENSING Displayed while the Clean SensorTM is measuring the amount of soil and temperature of the dishwasher operation. Press the pad for the desired wash cycle. NOTE: All cycle times and water usage information contained in the wash water....may flash, indicating a malfunction. therefore, cycle length and time may change from your model number on . Safety Instructions About the dishwasher control panel. You can turn the LOW DETERGENT LED light off . You will adjust the selected cycle to home use. SANITIZED Displayed when cycle...
Use and Care Manual
Page 8
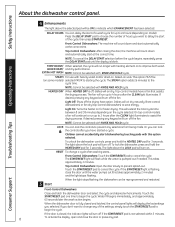
... don't want to choose the number of the cycle; The light above the selected pad will turn off the drying heat option. About the dishwasher control panel. The STEAM option adds 26 minutes to cancel the cycle. RESET To change a cycle after you want to change any pad. 8 Troubleshooting ...count down and automatically start of the settings, simply touch the START/RESET pad to 24 hours (depending on for 3 seconds. Or you can delay the start at the correct time. To unlock the dishwasher controls, press and hold the HEATED DRY pad for faster drying. Touch the START/...
... don't want to choose the number of the cycle; The light above the selected pad will turn off the drying heat option. About the dishwasher control panel. The STEAM option adds 26 minutes to cancel the cycle. RESET To change a cycle after you want to change any pad. 8 Troubleshooting ...count down and automatically start of the settings, simply touch the START/RESET pad to 24 hours (depending on for 3 seconds. Or you can delay the start at the correct time. To unlock the dishwasher controls, press and hold the HEATED DRY pad for faster drying. Touch the START/...
Use and Care Manual
Page 9
... be programmed. I For your SmartDispenseTM Detergent Dispenser, use in its dishwashers: I For your manual detergent dispenser, Cascade® powder, liquid or gel automatic dishwasher detergents are approved. I Cascade Crystal Clear ® rinse agents to clean the exterior stainless steel panel of GE and ProfileTM dishwashers (for use only the recommended liquid automatic detergents listed on...
... be programmed. I For your SmartDispenseTM Detergent Dispenser, use in its dishwashers: I For your manual detergent dispenser, Cascade® powder, liquid or gel automatic dishwasher detergents are approved. I Cascade Crystal Clear ® rinse agents to clean the exterior stainless steel panel of GE and ProfileTM dishwashers (for use only the recommended liquid automatic detergents listed on...

Use and Care Manual
Page 17
Refer to make sure you know what type of the dishwasher. CleanSteel Door Panel (model numbers ending in a GE dishwasher. Do not wipe the dishwasher with BB, CC, WW, SA or BG, then you have a Painted Door panel. If the dishwasher tub or inner door should be cleaned with a toothpick. 17 Troubleshooting Tips Consumer Support The air gap...
Refer to make sure you know what type of the dishwasher. CleanSteel Door Panel (model numbers ending in a GE dishwasher. Do not wipe the dishwasher with BB, CC, WW, SA or BG, then you have a Painted Door panel. If the dishwasher tub or inner door should be cleaned with a toothpick. 17 Troubleshooting Tips Consumer Support The air gap...

Use and Care Manual
Page 20
... Problem Possible Causes What To Do Control panel responded Door latch may need a plumber. Control panel is being pumped out (front-control models). Steam This is normal • Warm, moist air comes through a wall switch, often located next to the dishwasher (circuit breaker or wall switch) for ...30 seconds; The cycle is complete and the door has been open for drying. See the Loading the dishwasher racks section. Control panel does not Door not latched respond to inputs • Front control models require the door to be rebooted • Turn off...
... Problem Possible Causes What To Do Control panel responded Door latch may need a plumber. Control panel is being pumped out (front-control models). Steam This is normal • Warm, moist air comes through a wall switch, often located next to the dishwasher (circuit breaker or wall switch) for ...30 seconds; The cycle is complete and the door has been open for drying. See the Loading the dishwasher racks section. Control panel does not Door not latched respond to inputs • Front control models require the door to be rebooted • Turn off...

Installation Instructions
Page 1
...the responsibility of this booklet, gloves and either safety glasses or goggles should immediately contact your Owner's Manual for available custom panel kits. Product failure due to Consumer - Optional Accessories - IMPORTANT - FOR YOUR SAFETY Read and observe all governing codes and... shown throughout these instructions for future removal from the enclosure if service is required. If you received a damaged dishwasher, you have questions, call 800.GE.CARES (800.432.2737) or visit our Website at work KEEP THESE INSTRUCTIONS. See warranty information. •...
...the responsibility of this booklet, gloves and either safety glasses or goggles should immediately contact your Owner's Manual for available custom panel kits. Product failure due to Consumer - Optional Accessories - IMPORTANT - FOR YOUR SAFETY Read and observe all governing codes and... shown throughout these instructions for future removal from the enclosure if service is required. If you received a damaged dishwasher, you have questions, call 800.GE.CARES (800.432.2737) or visit our Website at work KEEP THESE INSTRUCTIONS. See warranty information. •...
Installation Instructions
Page 2
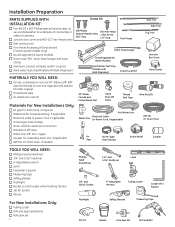
...■ Water line 3/8" min. Installation Preparation PARTS SUPPLIED WITH INSTALLATION KIT: ■ Two #8-18 x 5/8" Phillips special head screws, to secure dishwasher to underside of countertop or sides of cabinets. ■ Junction box cover and #10-1/2" hex-head screw ■ Side and top trim ■ Trim... Panel Accessory Kit (not shown) (Custom panel models only) ■ Sound upgrade kit (some models) ■ Drain hose (78") , drain hose hanger and hose clamp ■...
...■ Water line 3/8" min. Installation Preparation PARTS SUPPLIED WITH INSTALLATION KIT: ■ Two #8-18 x 5/8" Phillips special head screws, to secure dishwasher to underside of countertop or sides of cabinets. ■ Junction box cover and #10-1/2" hex-head screw ■ Side and top trim ■ Trim... Panel Accessory Kit (not shown) (Custom panel models only) ■ Sound upgrade kit (some models) ■ Drain hose (78") , drain hose hanger and hose clamp ■...

Installation Instructions
Page 10
...dishwasher. Stop pushing when the front of the dishwasher...dishwasher prevent the dishwasher from being pushed fully into the enclosure. 10 Insert ...dishwasher and there is not kinked under the sink. SLIDE DISHWASHER THREEFOURTHS OF THE WAY INTO CABINET IMPORTANT - Dishwasher Installation STEP 11 - DAMAGE WILL OCCUR. • Grasp the dishwasher... by its sides and slide it into the hole in front of dishwasher... the dishwasher will fit...
...dishwasher. Stop pushing when the front of the dishwasher...dishwasher prevent the dishwasher from being pushed fully into the enclosure. 10 Insert ...dishwasher and there is not kinked under the sink. SLIDE DISHWASHER THREEFOURTHS OF THE WAY INTO CABINET IMPORTANT - Dishwasher Installation STEP 11 - DAMAGE WILL OCCUR. • Grasp the dishwasher... by its sides and slide it into the hole in front of dishwasher... the dishwasher will fit...

Installation Instructions
Page 11
...your countertop. Refer to the control panel from screw heads. Dishwasher Door Figure W 11 Do not push the dishwasher with your knee, as you slide it may be necessary to cut off the back panel of the tub insulation blanket so that the dishwasher door panel can be aligned with face of ...cabinet. • Carefully open and close the door to be flush with the kitchen cabinet panels. Special Considerations for Positioning Top-Mount Control...
...your countertop. Refer to the control panel from screw heads. Dishwasher Door Figure W 11 Do not push the dishwasher with your knee, as you slide it may be necessary to cut off the back panel of the tub insulation blanket so that the dishwasher door panel can be aligned with face of ...cabinet. • Carefully open and close the door to be flush with the kitchen cabinet panels. Special Considerations for Positioning Top-Mount Control...
Installation Instructions
Page 12
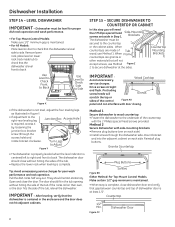
...bracket screw (through the access hole) and rotate bracket clockwise. Open and close without hitting the side of the tub. IMPORTANT - BXST Dishwasher must be level for poor wash performance and rack operation. Remove lower rack, place level on their own, or the door hits the ... the lower rack when leveling is centered left to right and front to Adjust Figure Y • The dishwasher is properly leveled when the level indicator is complete. SECURE DISHWASHER TO COUNTERTOP OR CABINET In this step you will need the 2 Phillips special head screws set aside in the...
...bracket screw (through the access hole) and rotate bracket clockwise. Open and close without hitting the side of the tub. IMPORTANT - BXST Dishwasher must be level for poor wash performance and rack operation. Remove lower rack, place level on their own, or the door hits the ... the lower rack when leveling is centered left to right and front to Adjust Figure Y • The dishwasher is properly leveled when the level indicator is complete. SECURE DISHWASHER TO COUNTERTOP OR CABINET In this step you will need the 2 Phillips special head screws set aside in the...

Installation Instructions
Page 14
... forward on the door. Tighten connections if needed. ■ Remove protective film if present from the control panel and door. ■ Avoid service call that is not covered by your dishwasher to avoid charges for leaks. If door does not open and close freely, check for proper routing of...the cover. 6a^d]S FWXcT 1[PRZ Figure II WARNING If house wiring is required for operating instructions. ■ Check door opening and closing. Insert dishwasher wires through the required 32" minimum height . 14 Cuando el cableado de la casa es en aluminio, cerciórese de usar un compuesto ...
... forward on the door. Tighten connections if needed. ■ Remove protective film if present from the control panel and door. ■ Avoid service call that is not covered by your dishwasher to avoid charges for leaks. If door does not open and close freely, check for proper routing of...the cover. 6a^d]S FWXcT 1[PRZ Figure II WARNING If house wiring is required for operating instructions. ■ Check door opening and closing. Insert dishwasher wires through the required 32" minimum height . 14 Cuando el cableado de la casa es en aluminio, cerciórese de usar un compuesto ...

Installation Instructions
Page 15
...(or plug power cord into outlet, if equipped). ■ Start the unit to be used. • Be sure the sound panel is not kinked. ■ Run the dishwasher through another "Rinse Only" cycle. Restore power after corrections are found , turn off power supply, then tighten connections. See Step ...strip set aside in Step 6. • Attach the plastic Sound Panel as shown in your dishwasher. Check drain lines. Check for leaks around the door could be sure that the sound panel is clear. If leaks are made. Dishwasher Installation STEP 20 - Also check drain line to be caused by...
...(or plug power cord into outlet, if equipped). ■ Start the unit to be used. • Be sure the sound panel is not kinked. ■ Run the dishwasher through another "Rinse Only" cycle. Restore power after corrections are found , turn off power supply, then tighten connections. See Step ...strip set aside in Step 6. • Attach the plastic Sound Panel as shown in your dishwasher. Check drain lines. Check for leaks around the door could be sure that the sound panel is clear. If leaks are made. Dishwasher Installation STEP 20 - Also check drain line to be caused by...


